Prilux EMPOTRAR User manual

1/5
[GRÁFICOS: Unidades en mm/ GRAPHICS: Units in mm/GRAPHIQUES: Unités en mm/GRÁFICOS: Unidades em mm]
Diane Tech Switch
EMPOTRAR
PRECAUCIONES:
• Lea este manual antes de instalar el producto, si tiene dudas consulte con
personal cualicado.
• Si el producto se encuentra dañado, sustitúyalo inmediatamente por uno
nuevo.
• Desconecte la corriente antes de instalar el producto.
• Mantenga el producto fuera del alcance de los niños pequeños.
• No manipule el producto mientras se encuentre en funcionamiento y
déjelo enfriar antes de tocarlo con las manos.
• No instale el producto donde haya fuentes de calor o concentraciones
de humedad.
• Este aparato debe utilizarse con su driver especicado.
• No válido para utilización en baños.
• Solo para uso interior.
• Lámpara de LED no reemplazables.
INSTRUCCIONES DE MONTAJE:
EMPOTRAR:
1. Quite el falso techo donde se quiera colocar la luminaria.
2. Seleccione la opción de temperatura de color antes de conectar la
luminaria a la corriente.
3. Conecte la luminaria al driver mediante el conector rápido.
4. Conecte el cable de alimentación general al driver (ver esquema).
5. Coloque la luminaria en su posición.
6. Conecte la corriente.
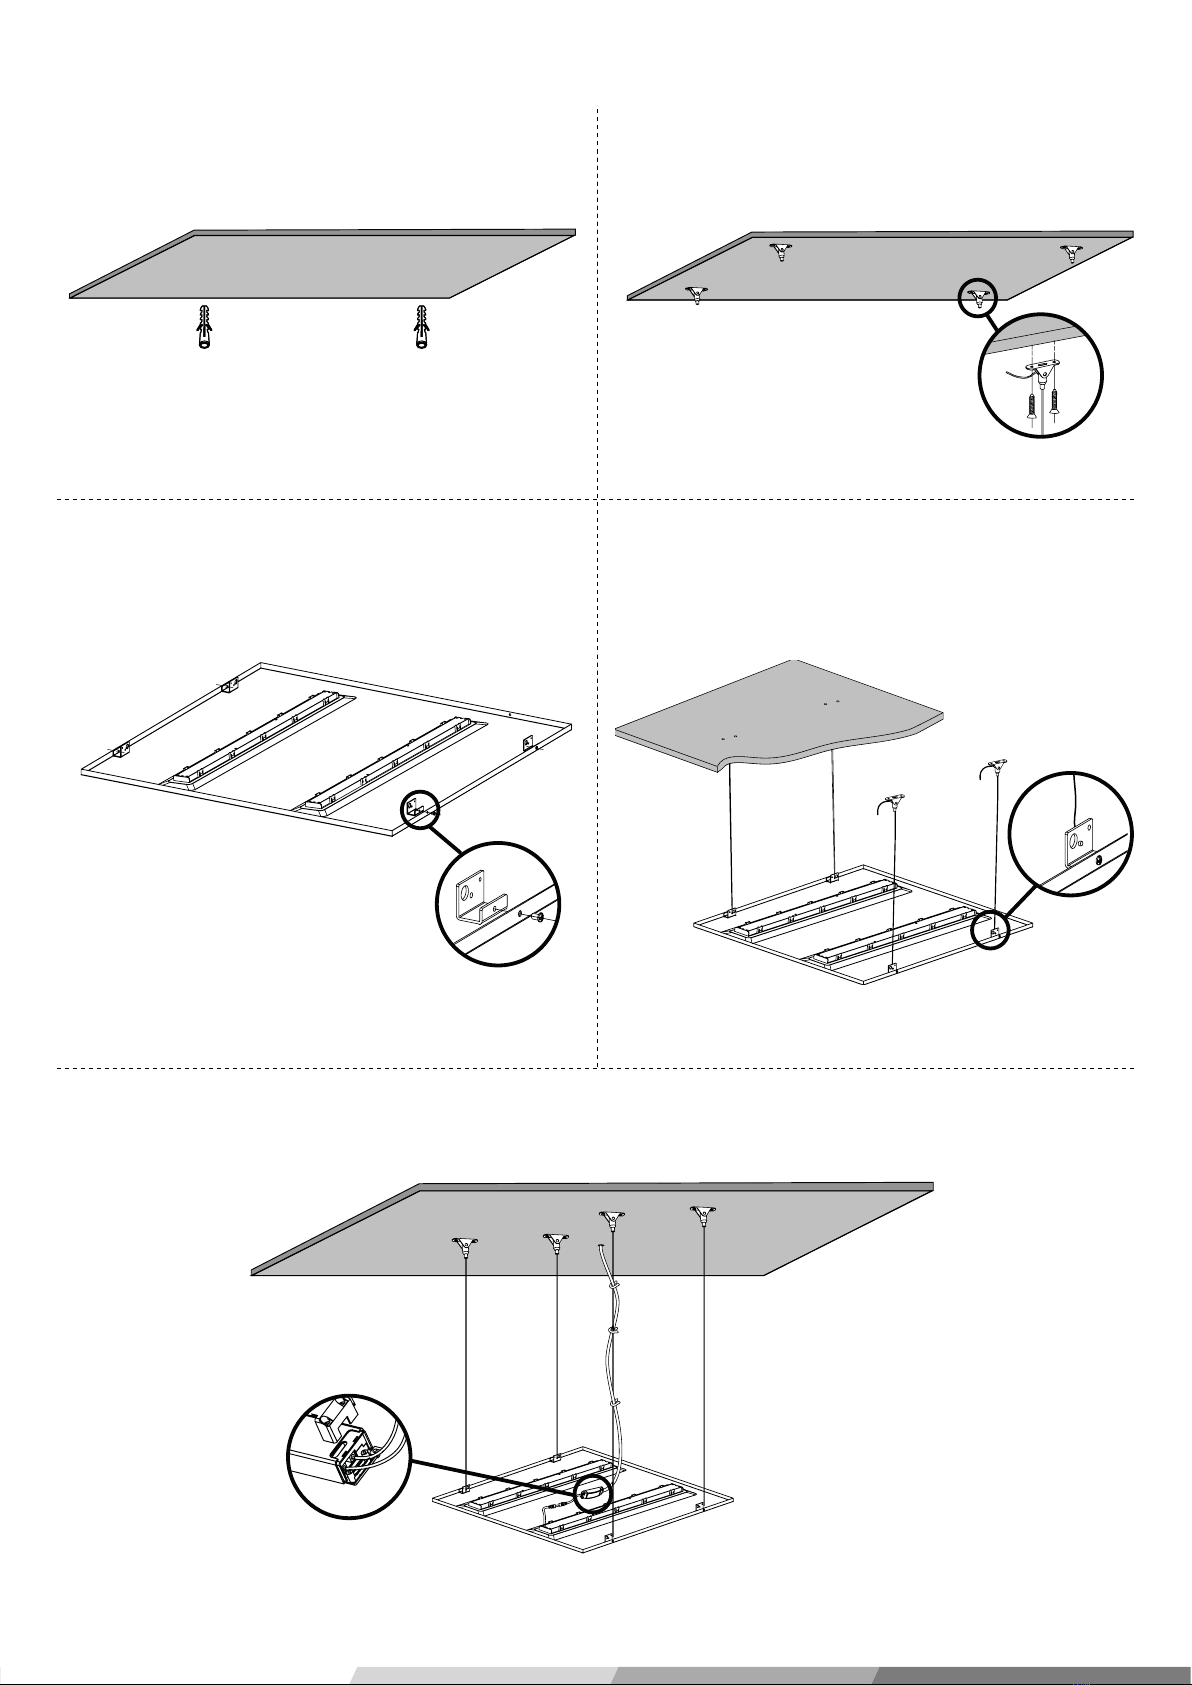
SUSPENDIDO:
1. Realice los agujeros en el techo para poner los tacos. Tenga en cuenta
la distancia donde van a ir colocadas las suspensiones .
2. Enrosque la parte A de la pieza de suspensión a los tacos. Y a continua-
ción enrosque la parte B a la parte A de la suspensión.
3. Enganche las suspensiones a la luminaria.
595
595 14,5
295
1195 14,5
Empotrar 60x60 Empotrar 30x120
AVISO
ANTES DE COMENZAR LA INSTALACIÓN DE ÉSTE PRODUC-
TO, POR FAVOR, LEA ATENTAMENTE LAS INSTRUCCIONES Y
GUÁRDELAS EN UN SITIO SEGURO.
LA INSTALACIÓN DEBE REALIZARLA PERSONAL CUALIFICA-
DO.
LA INADECUADA MANIPULACIÓN DE LOS COMPONENTES O DE
LA PROPIA LUMINARIA PODRÍA DAÑAR EL CORRECTO FUNCIO-
NAMIENTO DE ESTE PRODUCTO, QUEDANDO ANULADA LA GA-
RANTÍA DEL FABRICANTE.
LA GARANTÍA CUBRE ÚNICA Y EXCLUSIVAMENTE EL PRODUCTO
SUMINISTRADO.
LAS AVERÍAS OCASIONADAS POR INSTALACIONES FUERA DE LO
QUE INDICA EL REBT 2002 EXIMEN DE LA VIGENCIA DE LA GA-
RANTÍA EN LOS PRODUCTOS DAÑADOS.
ES DE OBLIGADO CUMPLIMIENTO EN INSTALACIONES INTERIORES
LA APLICACIÓN DEL ARTÍCULO 16, PUNTO 3 DEL REBT 2002.
RESPETAR LAS PRECAUCIONES
DE MANIPULACIÓN DE LOS
COMPONENTES SENSIBLES A
DESCARGAS ELECTROSTÁTICAS
(LED).
CARACTERÍSTICAS ELÉCTRICAS
Tensión 220-240Vac
GRADO PROTECCIÓN
Aislamiento eléctrico
Grado de estanqueidad IP20
CORTE
Empotrar 60x60 575x575mm
Empotrar 30x120 1.175x275mm

2/5
EMPOTRAR
1/
2/
4/ 5/
3/
AC-L
AC-N
AC-L
AC-N

3/5
CONEXIONADO REGULACIÓN 1-10V
ESQUEMA DE CONEXIONADO
CONEXIONADO REGULACIÓN DALI
CONEXIONADO EMERGENCIA
(on demand)
L
+
-
N
1-10V+
1-10V-
L
+
-
N
L
N

4/5
SUSPENDIDO (Kit de suspensión DIANE TECH 1,5m. NO INCLUIDO)
2/
4/
1/
3/
5/
AC-
AC-

www.grupoprilux.com
5/5
CONECTORES SWITCH-DIM
CONECTORES DALI
• Switch-Dim opcional para anulación manual de DALI, verique compatibili-
dad ya que el sistema DALI puede anular periódicamente
• Los terminales no utilizados se han omitido para mayor claridad.
• Los terminales no utilizados se han omitido para mayor claridad.
Esquemas/
• Switch-Dim opcional para anulación manual de DALI, verique compatibili-
dad ya que el sistema DALI puede anular periódicamente
• Los terminales no utilizados se han omitido para mayor claridad.
L
N
L
N
Switch-Dim
LED+
LED
L
N
Switch-Dim
LED
+
LED
*Pulsador
DALI
DALI
LED+
LED
LED
LED
DALI
Switch-Dim
Switch-Dim
DALI
L
N
L
N
DALI
+
DALI
L
N
*Pulsador

1/5
[GRÁFICOS: Unidades en mm/ GRAPHICS: Units in mm/GRAPHIQUES: Unités en mm/GRÁFICOS: Unidades em mm]
Diane Tech Switch
RECESED
WARNING
BEFORE INSTALLING THIS PRODUCT, PLEASE READ THE
INSTRUCTIONS CAREFULLY AND STORE THEM IN A
SAFE PLACE.
THE INSTALLATION SHOULD BE CARRIED OUT BY
TRAINED STAFF.
INCORRECT HANDLING OF THE PARTS OR THE
LIGHT FIXTURE ITSELF MAY IMPAIR THE PROPER
PERFORMANCE OF THIS PRODUCT. IN THIS CASE,
THE MANUFACTURER GUARANTEE SHALL BE DEEMED
VOID.
THE MANUFACTURER GUARANTEE SHALL BE DEEMED
VOID: IF THE INSTALLATION IS NOT PERFORMED IN
ACCORDANCE WITH THE SPANISH LOW VOLTAGE
ELECTROTECHNICAL REGULATION 2002 (REBT 2002).
THEAPPLICATIONOFIBCBT09-4OFREBT(INSTALLATION
OF LINE AND LIGHT FIXTURE SURGE PROTECTORS) IS
ESSENTIAL FOR INDUSTRIAL AND PUBLIC LIGHTING
INSTALLATIONS. THE GUARANTEE DOES NOT COVER
AGAINST DAMAGES CAUSED BY SURGES IN LIGHT
FIXTURES WITHOUT SURGE PROTECTORS INSTALLED.
ATTENTION!!!
OBSERVE PRECAUTIONS FOR
HANDLING ELECTROSTATIC
SENSITIVE DEVICES.
PRECAUTIONS::
• Read this manual before installing the product, if in doubt consult qualied
personnel.
• If the product is damaged, replace it immediately with a new one.
• Turn off the power before installing the product.
• Keep the product out of the reach of small children.
• Do not handle the product while it is in operation and let it cool before
touching it with your hands.
• Do not install the product where there are sources of heat or humidity
concentrations.
• This device must be used with its specied driver.
• Not valid for use in bathrooms.
• For indoor use only.
MOUNTING INSTRUCTIONS:
EMBED:
1. Remove the false ceiling where you want to place the luminaire.
2. Select the color temperature option before connecting the luminaire to
the current.
3. Connect the luminaire to the driver using the quick connector.
4. Connect the general power cable to the driver (see diagram).
5. Place the luminaire in position.
6. Turn on the power.
DISCONTINUED:
1. Drill the holes in the ceiling to put the dowels. Consider the distance whe-
re the suspensions will be placed.
2. Screw part A of the suspension piece to the studs. And then screw part B
to part A of the suspension.
3. Hook the suspensions to the luminaire.
ELECTRICAL CHARACTERISTICS
Voltage 220-240Vac
DEGREE OF PROTECTION
Electrical isolation
Degree of waterlightness IP20
CUT
Recesed 60x60 575x575mm
Recesed 30x120 1.175x2725mm
595
595 14,5
295
1195 14,5
Recesed 60x60 Recesed 30x120

2/5
RECESED
1/
2/
4/ 5/
3/
AC-L
AC-N
AC-L
AC-N

3/5
CONNECTION REGULATION 1-10V
CONNECTION DIAGRAM
DALI REGULATION CONNECTION
EMERGENCY CONNECTION
(on demand)
L
+
-
N
1-10V+
1-10V-
L
+
-
N
L
N
4/5
SUSPENDED (1,5m suspension kit DIANE TECH NOT INCLUDED)
2/
4/
1/
3/
5/
AC-
AC-

www.grupoprilux.com
5/5
SWITCH-DIM CONNECTORS
DALI CONNECTORS
L
N
L
N
Switch-Dim
LED+
LED
L
N
Switch-Dim
LED
+
LED
*Pulsador
• Optional Switch-Dim for manual DALI override, check compatibility as the
DALI system may periodically override
• Unused terminals have been omitted for clarity.
• Unused terminals have been omitted for clarity.
Schemes/
• Optional Switch-Dim for manual DALI override, check compatibility as the
DALI system may periodically override
• Unused terminals have been omitted for clarity.
DALI
DALI
LED+
LED
LED
LED
DALI
Switch-Dim
Switch-Dim
DALI
L
N
L
N
DALI
+
DALI
L
N
*Pulsador
*Button
*Button
Table of contents
Languages:
Other Prilux Switch manuals


Popular Switch manuals by other brands

Radio Shack
Radio Shack 49-537 owner's manual

Mercoid
Mercoid A1F Series Specifications-installation and operating instructions

Extron electronics
Extron electronics SW HDMI Series user guide

MiLAN
MiLAN MIL-SM24004TG Quick installation guide

AETEK
AETEK H70-084-30 Quick installation guide

CCS
CCS LSS-2404 user manual

D-Link
D-Link DUB-H7 - Hub - USB Quick installation guide

BERNSTEIN
BERNSTEIN SHS3 Series Installation and operating instructions

Niveo
Niveo NGSME48T2H user manual

Allied Telesis
Allied Telesis x950-52XTQm installation guide

Honeywell
Honeywell MAXPRO-Net Hardware installation manual

Key Digital
Key Digital KD-S2x1X-2 operating instructions


