PrimaLuceLab SESTO SENSO 2 User manual

VERSION 3.0
Update 19-12-2021
SESTO SENSO 2 is made by PrimaLuceLab SpA (Italy). For any matters relating to the use, service and warranty,
please refer to the addresses given in the relevant documents.!
PrimaLuceLab SpA • Via Roveredo 20/B, 33170, Pordenone • www.primalucelab.com
SESTO SENSO 2 robotic focusing motor
USER MANUAL

PrimaLuceLab SpA SESTO SENSO 2 user manual
English
WARNING
If improperly handled, SESTO SENSO 2 may damage. So please follow the instructions below:
•Do not disassemble
•Do not open, damage or subject to electric shock or excessive impact any part of SESTO SENSO 2. Do not drop.
•Do not short the electronic elements
•Do not expose at temperatures below -20°C and above +60°C
•Do not burn or incinerate any component.
•Do not expose to rain or other atmospheric effect related to water
•Do not bend, modify or force any part of SESTO SENSO 2
Index
Components Identification 2
Contents of the package 2
Technical specifications 3
Install SESTO SENSO 2 on the telescope’s focuser 4
Install SESTO SENSO 2 in EAGLE or Windows 7/8/10/11 computer 6
Control SESTO SENSO 2 with PLAY software 9
Update SESTO SENSO 2 firmware with PLAY software 13
Calibrate SESTO SENSO 2 with PLAY software 14
SESTO SENSO 2 Advanced Settings in PLAY software 15
Controlling SESTO SENSO 2 with Virtual HandPad 16
Control SESTO SENSO 2 with ASCOM drivers and third party softwares 21
Installing 26mm, 33mm or 37mm adapters for SESTO SENSO 2 25
Troubleshooting 26
INFORMATION TO USERS 28
"
page 1
QUALITY CONTROL
Each SESTO SENSO 2 unit, after created in our laboratories, it’s tested by PrimaLuceLab technical experts to check all com-
ponents. We verify mechanics and electronics. In case you check any malfunction, please contact us immediately (+ 39-0434-
1696106 or [email protected]). Do not try to disassemble, repair or modify yourself SESTO SENSO 2, without our
written approval, in order not to loose the Producer Warrantee.
PrimaLuceLab SpA SESTO SENSO 2 user manual
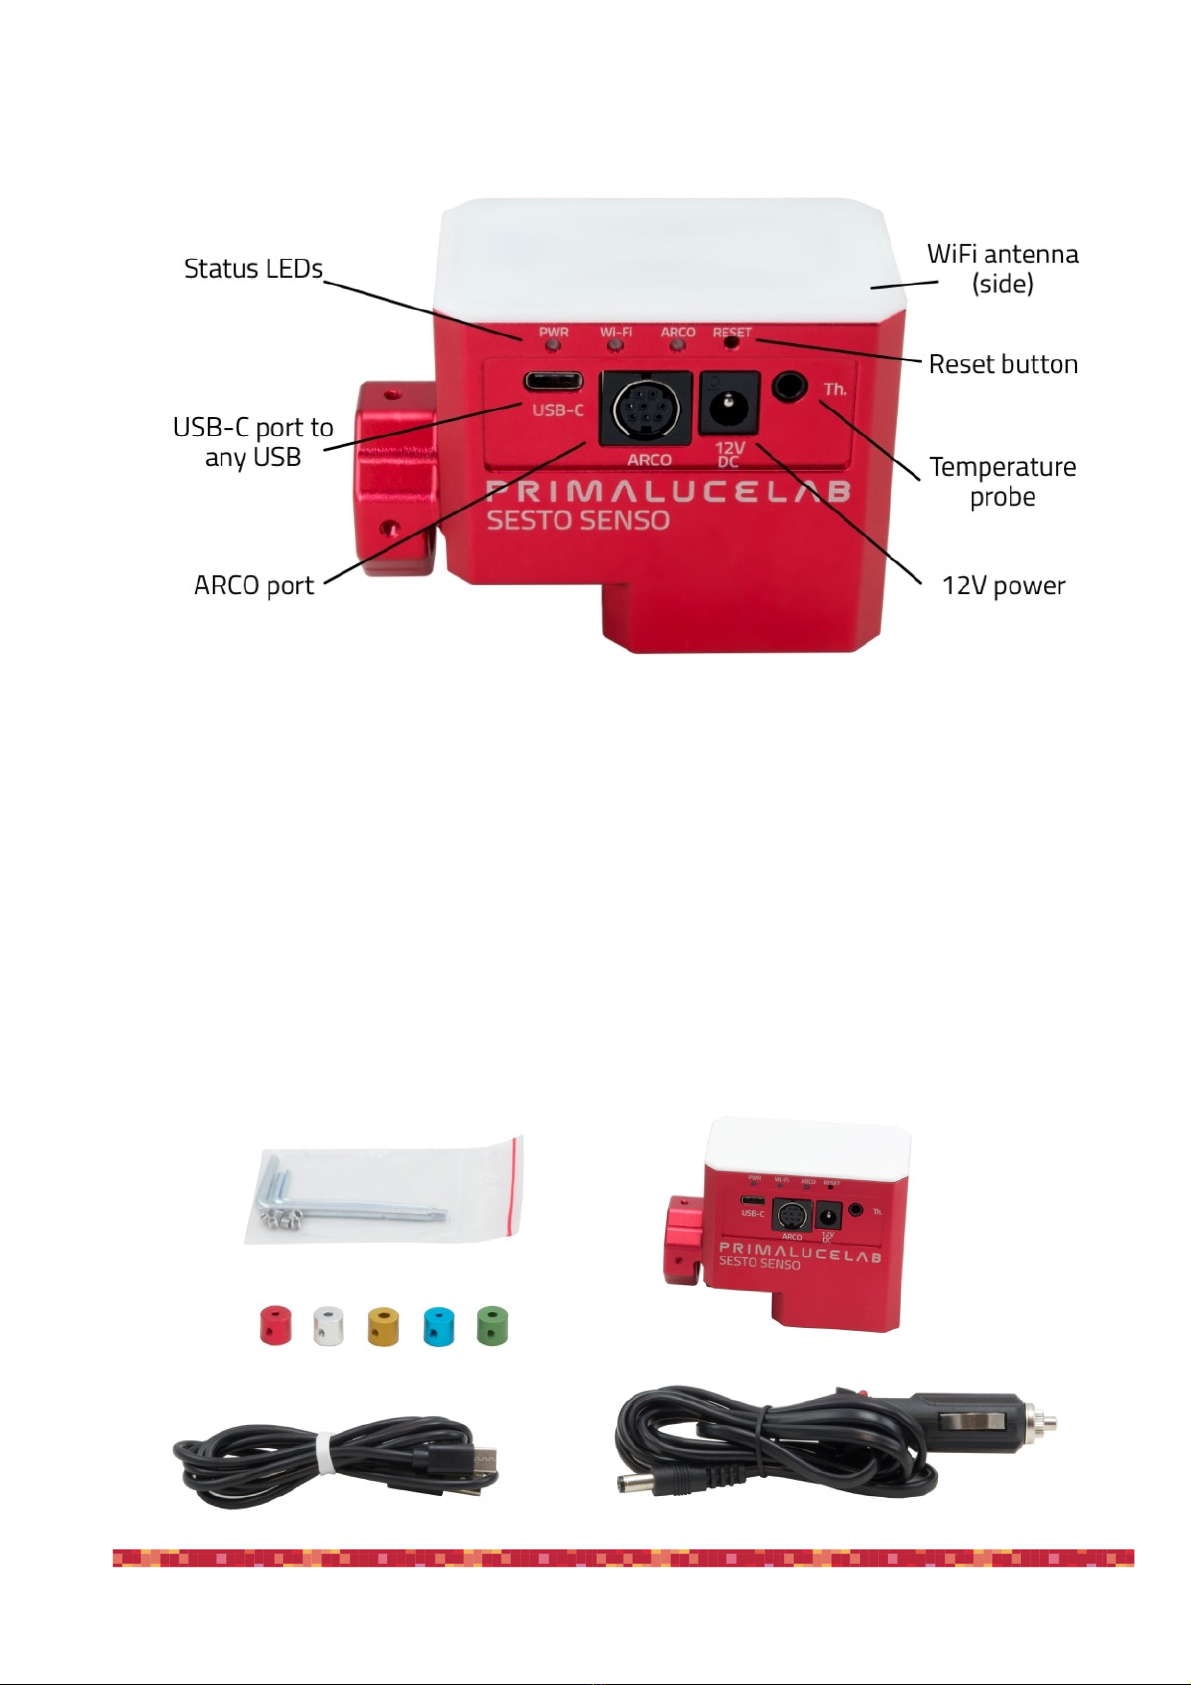
Components Identification
Contents of the package
•SESTO SENSO 2 robotic focusing motor
•5 bushings
•Allen keys with grub screws
•Power cable for cigarette plug
•USB-C to USB cable
•Quick Start guide
"
page 2

PrimaLuceLab SpA SESTO SENSO 2 user manual
Technical specifications
"
page 3
CAUTION
In order to correctly use SESTO SENSO 2, you have to connect it to your telescope’s focuser. The installation
procedure changes based on the telescope’s focuser so please refer to the next paragraphs. But if you want, you
can proceed with the SESTO SENSO 2 first use also without having the focuser not installed on the telescope’s
focuser.
NOTE
In order to proceed with installation you have to download the SESTO SENSO 2 software package from the
DOWNLOAD
section of our www.primalucelab.com website.
Save the package (it’s in zip format) onto the EAGLE or computer you want to use to control the SESTO SENSO
2 and unzip it with the proper unzip software (You can right-click and select “Expand” or you can use software
from https://www.winzip.com).
Power
12V - 5.5/2.5 connector - positive tip polarity
Power consumption @ 12V
800mA max
Working temperature
-20°C / +60°C
Control with:
USB
WiFi
Resolution
0,7 microns per step
Temperature probe
Internal to read motor temperature (in the package)
External for focus temperature compensation (optional)
Provided software
Driver for Windows 64 bit (compatible with Windows 7, 8, 10, 11)
PLAY for control with Windows 10/11 operative system
ASCOM driver for control from external software (tested with ASCOM platform
6.4)
Virtual HandPad for WiFi control
Weight
380 grams

PrimaLuceLab SpA SESTO SENSO 2 user manual
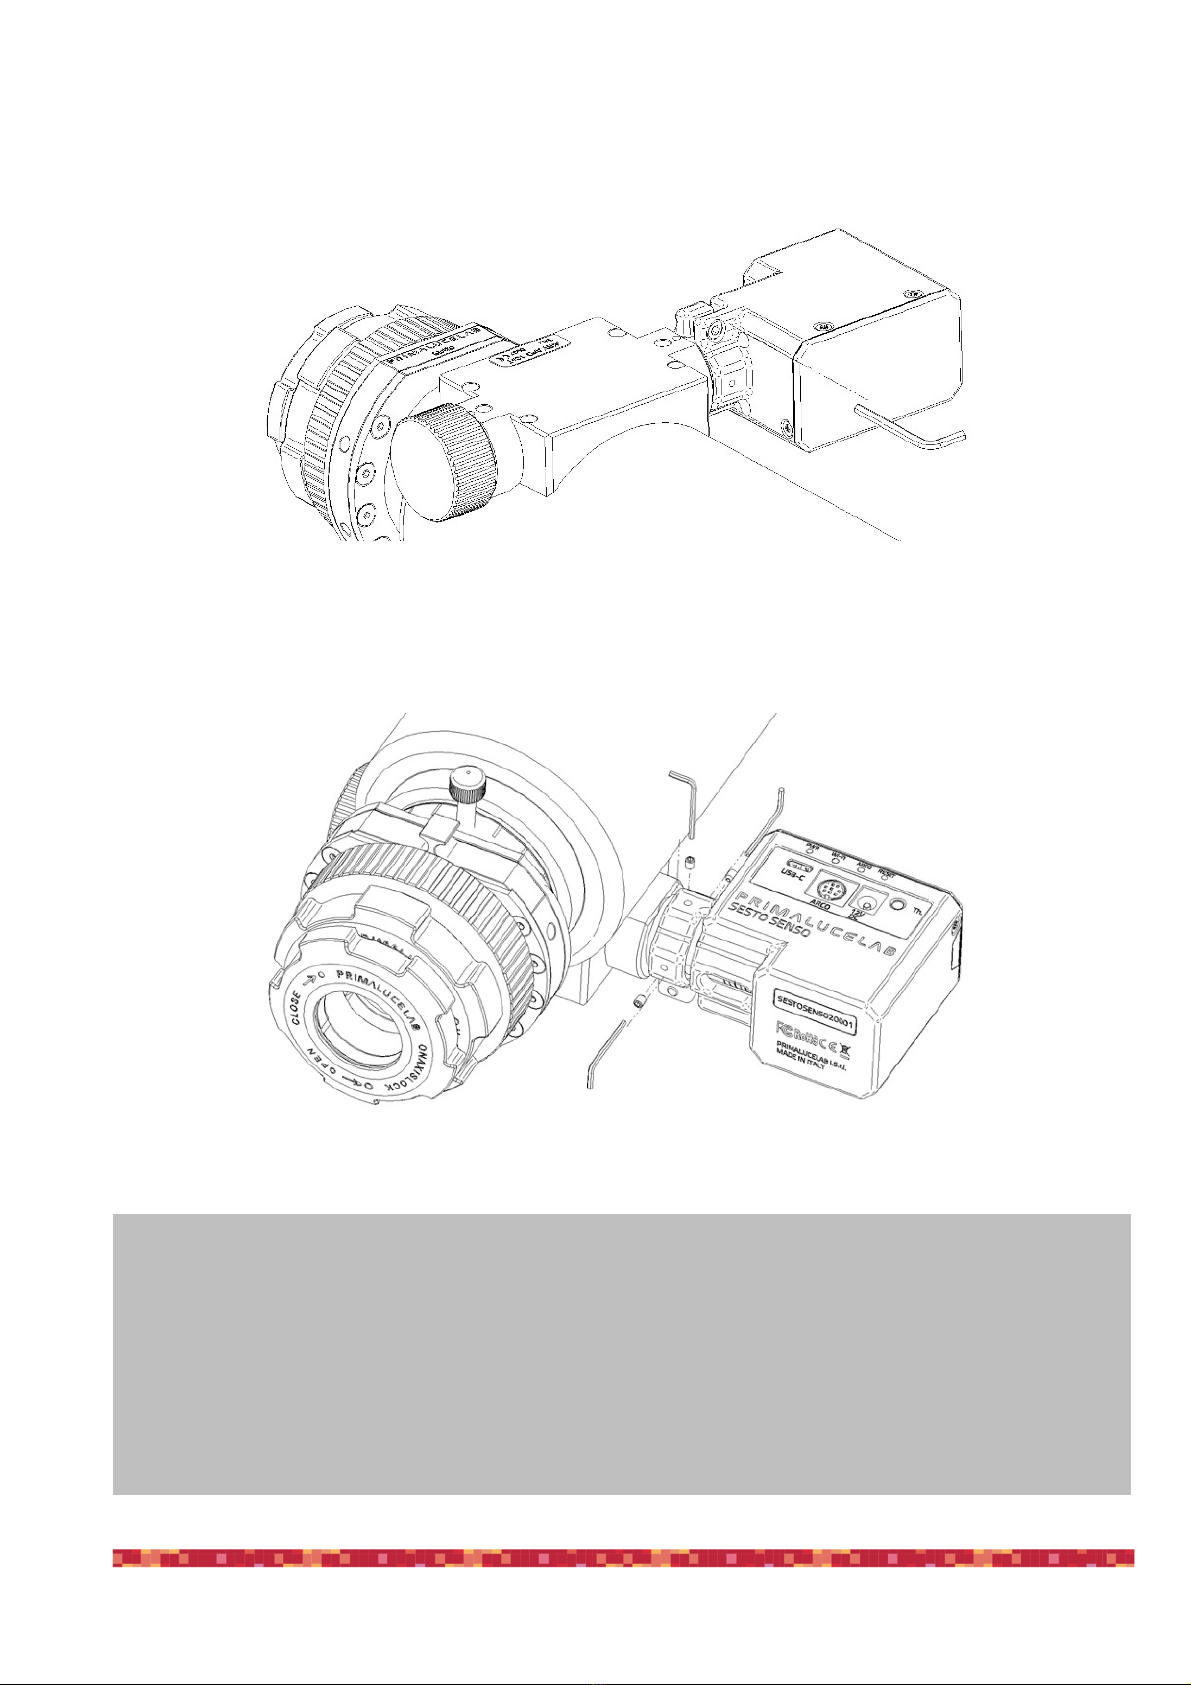
Install SESTO SENSO 2 on the telescope’s focuser
In order to connect SESTO SENSO2 to the focuser of your telescope, remove the manual focus micrometric knob
by unscrewing the screw normally present on the knurled knob. After pulling it out, you also need to disconnect the
coarse focuser knob, by means of an Allen screw on the knob. On some plastic-covered focusers, you need to re-
move the plastic to access the disassembly screw. Connect one of the bushings you find in the SESTO SENSO 2
box (based on the diameter that fits your focuser) to the small focuser shaft of your focuser.
Now you can connect SESTO SENSO 2 to your focuser by paying attention to centering the micrometric pin with
the pre-assembled bushing on SESTO SENSO 2, until it stops. By using the provided Allen screw, lock the 2 grub
screws that fix the pre-assembled bushing on SESTO SENSO 2 to the bushing you just installed on your focuser's
shaft.
"
page 4
NOTE
in order to work, SESTO SENSO 2 requires
your focuser to have the micro metric knob.
NOTE
SESTO SENSO 2 is designed to be connec-
ted to 25mm shaft. If you have another dia-
meter, you may add the optional 26, 33 or
37mm adapters. Please refer to page 25 in
order to know how to install the adapters.
PrimaLuceLab SpA SESTO SENSO 2 user manual
Then, by using the provided Allen screw, please fix the screws that fix the outer ring of SESTO SENSO 2 to your
focuser.
Finally, use the Allen screw to lock the 3 small grub screws fix the outer ring of SESTO SENSO 2 to your focuser.
"
page 5
NOTE: After installing SESTO SENSO 2 on your focuser, check the smoothness of the movement keeping SE-
STO SENSO 2 powered off and then manually moving the focus knob of your focuser. The presence of SESTO
SENSO 2 will make the movement harder (since the motor is connected) but the motion must still be uniform. If
you notice an uneven movement, repeat the installation procedure.
NOTE: SESTO SENSO 2 connects to several focusers that may have different machining and tolerances preci-
sions. Focusing accuracy, especially when using automatic focusing procedures, depends on the focuser me-
chanics and not only strictly on SESTO SENSO 2. If your focuser has an important backlash, you can adjust the
backlash parameter in the software.
PrimaLuceLab SpA SESTO SENSO 2 user manual
Install SESTO SENSO 2 in EAGLE or Windows 7/8/10/11 computer
SESTO SENSO 2 can be installed in the EAGLE or an external computer running Windows 7, 8, 10 or 11 operating
system. In the SESTO SENSO 2 package you can find a 12V power cable with cigarette plug and a PC connection
cable for USB port.
Connect SESTO SENSO 2 power cable to a power sour-
ce (SESTO SENSO 2 power port is Ø5.5 ø2.5mm with
center positive) and then connect the USB-C cable to the
USB port of your EAGLE or standard computer. You will
see the PWR LED on (this means SESTO SENSO 2 is
powered) and, after a few seconds the Wi-Fi LED will also
be become lit - This means that the SESTO SENSO 2 is
online and the WiFi connection is ready to be used.
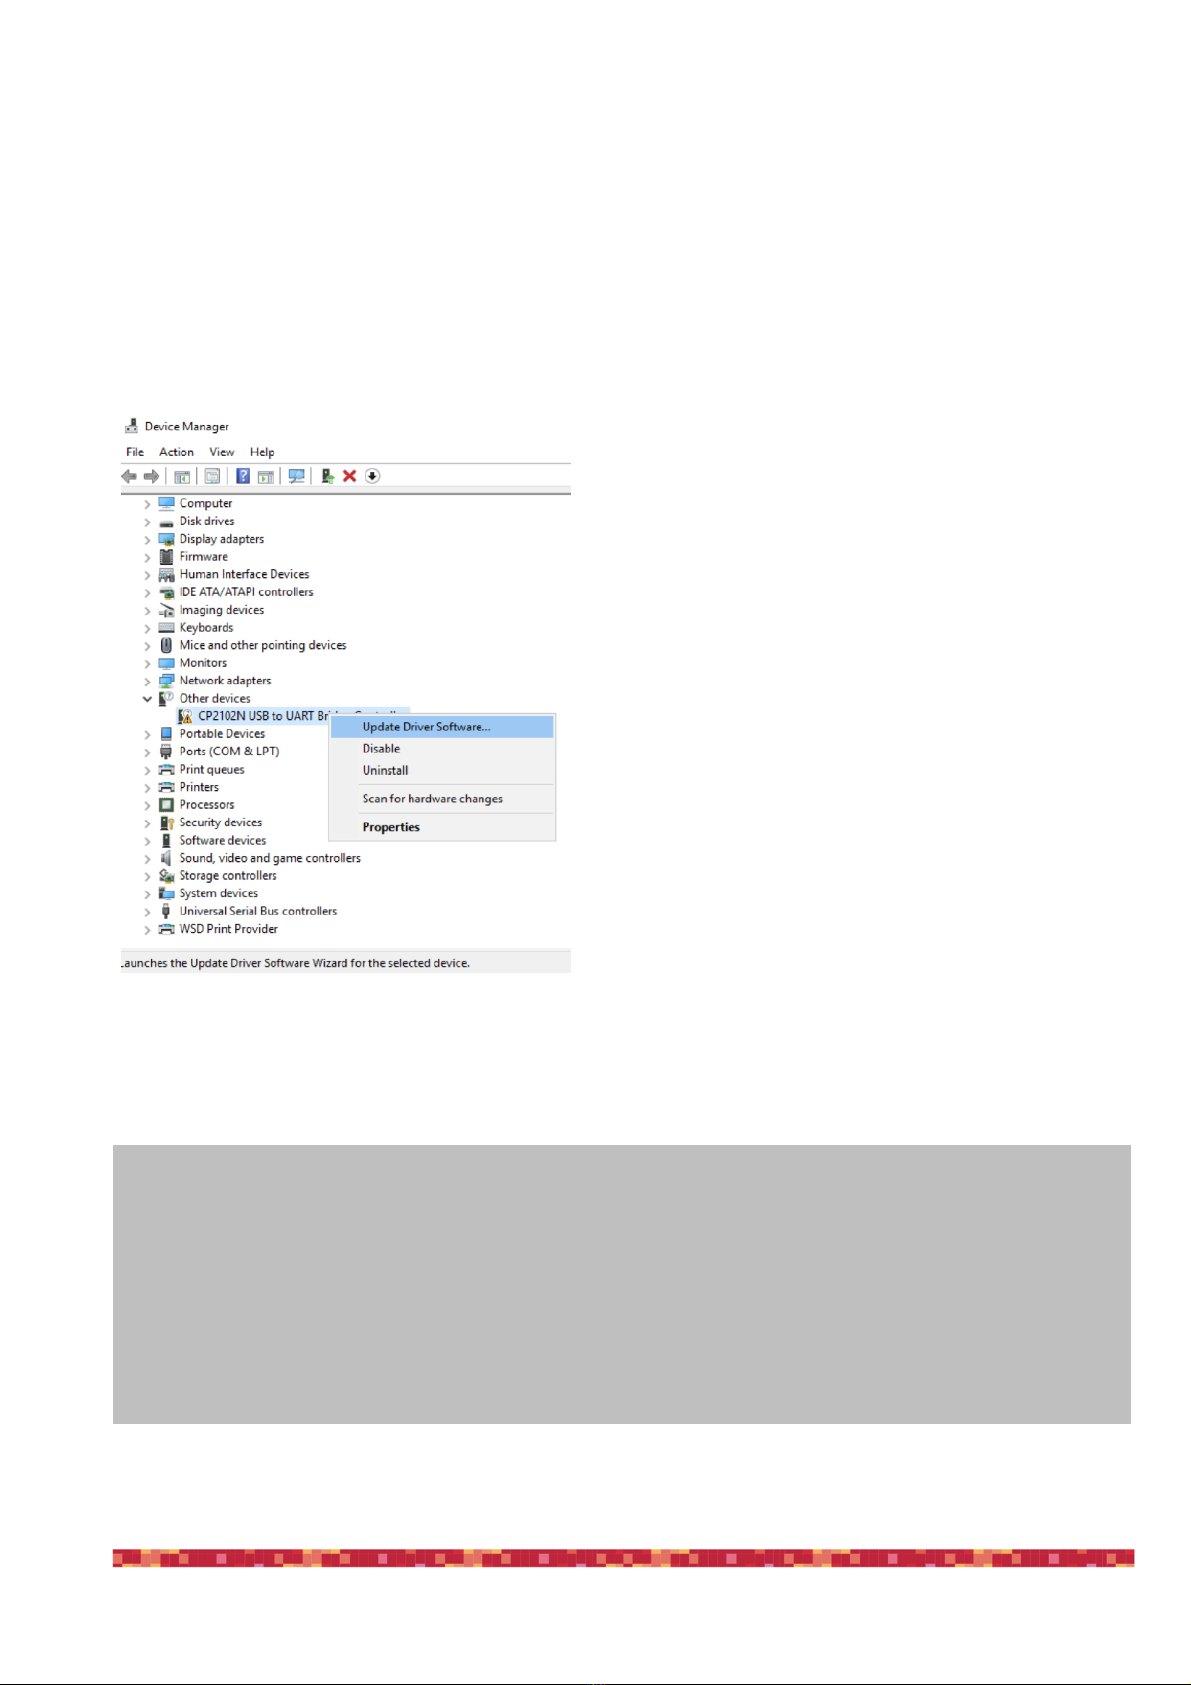
Once connected the SESTO SENSO 2 should be auto-
matically detected and Windows should automatically
install the new driver. To verify this this, please go to Con-
trol Panel and then choose Device Manager. You should
see the SESTO SENSO 2 listed under “Ports (COM &
LPT)” and described as “Silicon Labs CP210x” (in order to
check, you can disconnect and then reconnect the SE-
STO SENSO 2 USB cable and see how Windows lists it).
If you can’t find it, Windows is not able to automatically
install the SESTO SENSO 2 driver. In order to do this,
please follow this procedure:
1) go to "Device Manager”
2) locate "CP2102N USB to UART Bridge Controller" un-
der "Other devices"
!
"
page 6
PLEASE NOTE
In order to correctly work, SESTO SENSO 2 requires an external 12V power supply and by connecting it to the
USB port of a computer is not enough. Always connect an AC power unit or a 12V battery to the SESTO SENSO
2 12V power port before connecting the USB cable to the computer.

PrimaLuceLab SpA SESTO SENSO 2 user manual
3) Right-click on the device and select "Update Driver
Software”
4) select the second option “Browse my computer for
driver software” in order to specify the location of the
downloaded driver.
5) Select the folder where you saved and expanded
the SESTO SENSO 2 software package you downloa-
ded from our website, click “Next” and complete the
installation procedure.
(Please remember to unzip/expand the file you down-
loaded before starting the installation of the SESTO
SENSO 2)
"
page 7
PrimaLuceLab SpA SESTO SENSO 2 user manual
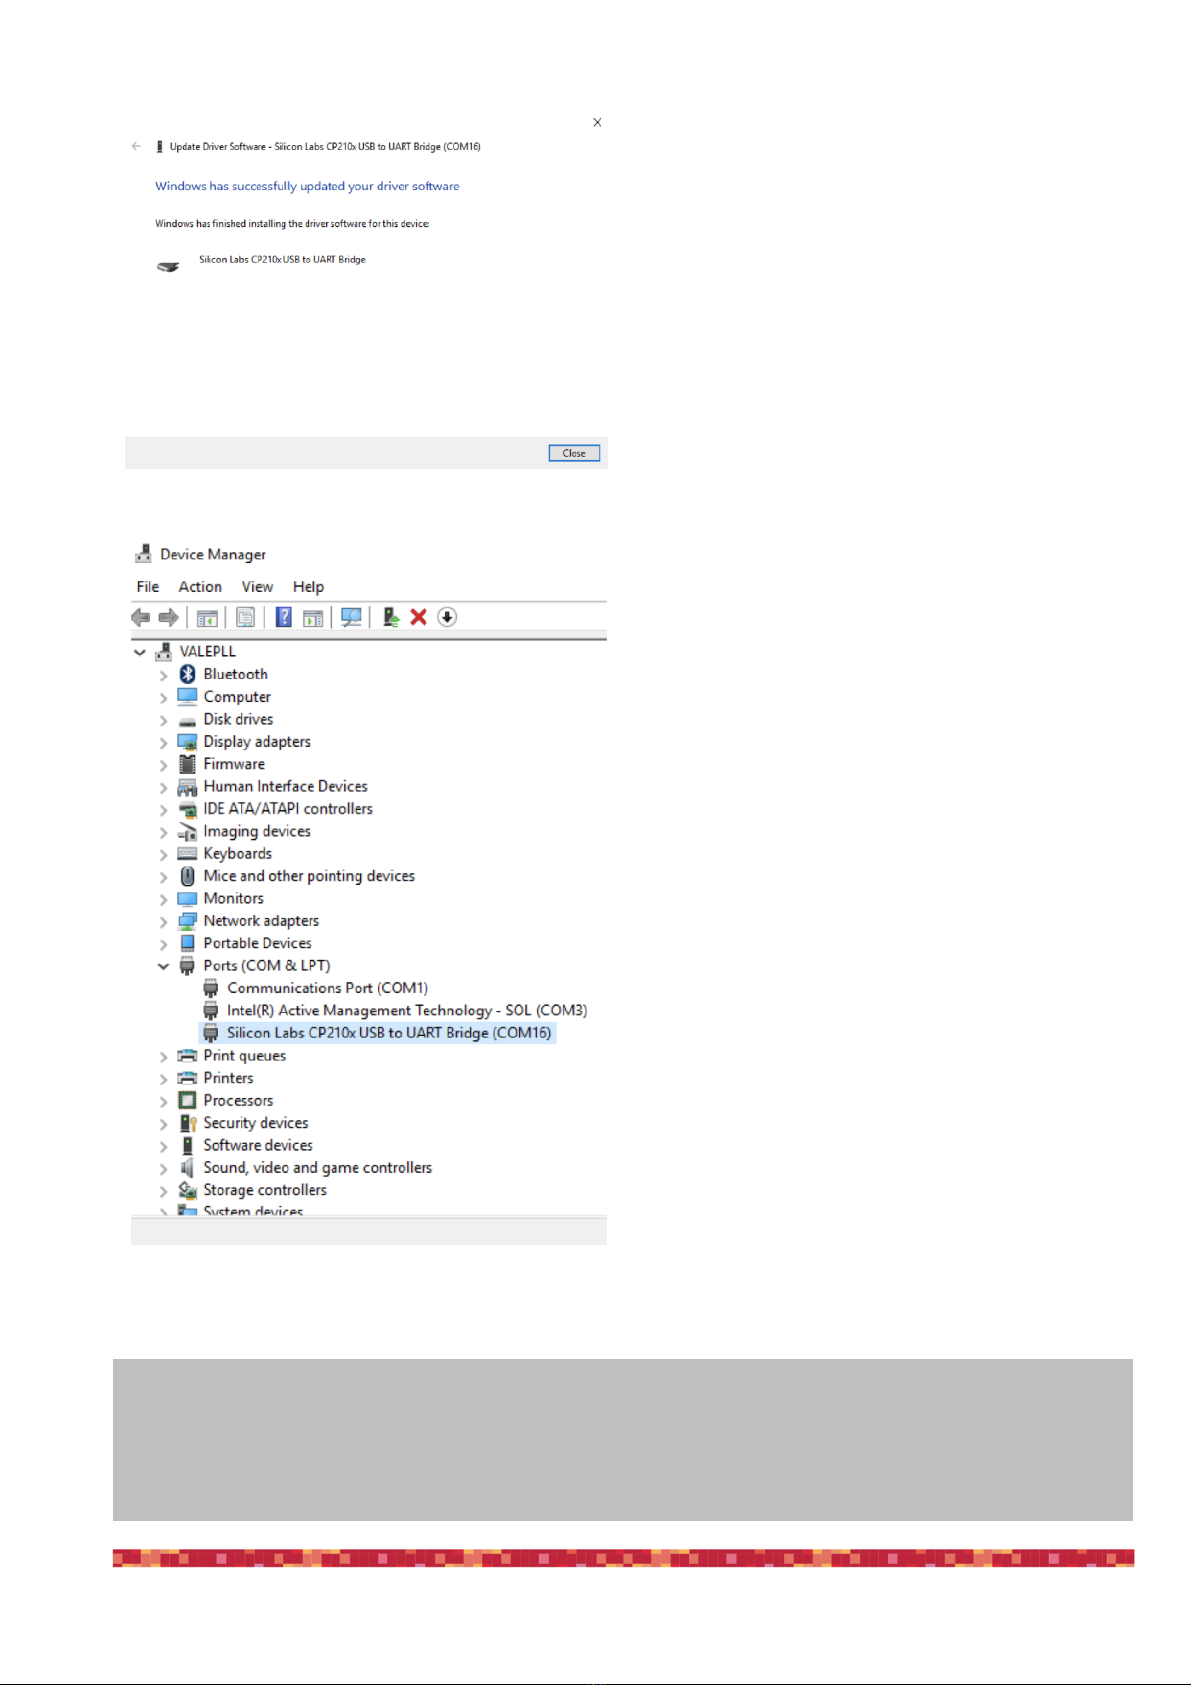
6) at the end of the procedure, a message will appear
indicating successful installation.
Now, under COM and LPT devices, you will see a new
COM port (in this example COM16) which is the one
used by your computer to communicate with SESTO
SENSO 2.
"
page 8
NOTE
If the driver is not correctly installed in your Windows operative system, SESTO SENSO 2 won’t be able to con-
nect to your EAGLE or external computer and it won’t work. So please check that the COM driver is correctly in-
stalled before proceeding to the next step.
PrimaLuceLab SpA SESTO SENSO 2 user manual
Control SESTO SENSO 2 with PLAY software
If you want to control SESTO SENSO 2 with the EAGLE or a Windows 10/11 computer, you can use our PLAY
software you can download from the DOWNLOAD section of our website. In order to use SESTO SENSO 2 with
PLAY, you have to use the SESTO SENSO 2 firmware at least version 3.0. Please refer to the “Update SE-
STO SENSO 2 firmware with PLAY software” paragraph in order to read how to update SESTO SENSO 2
firmware.
PLAY software allows you to control not only SESTO SENSO 2 focusing motors but also other devices that may
compose your telescope. For this reason, PLAY starts with the CONFIGURATOR section where you have to con-
nect your devices first, and then you can proceed to the CAPTURE section that allows you to control the connected
devices.!
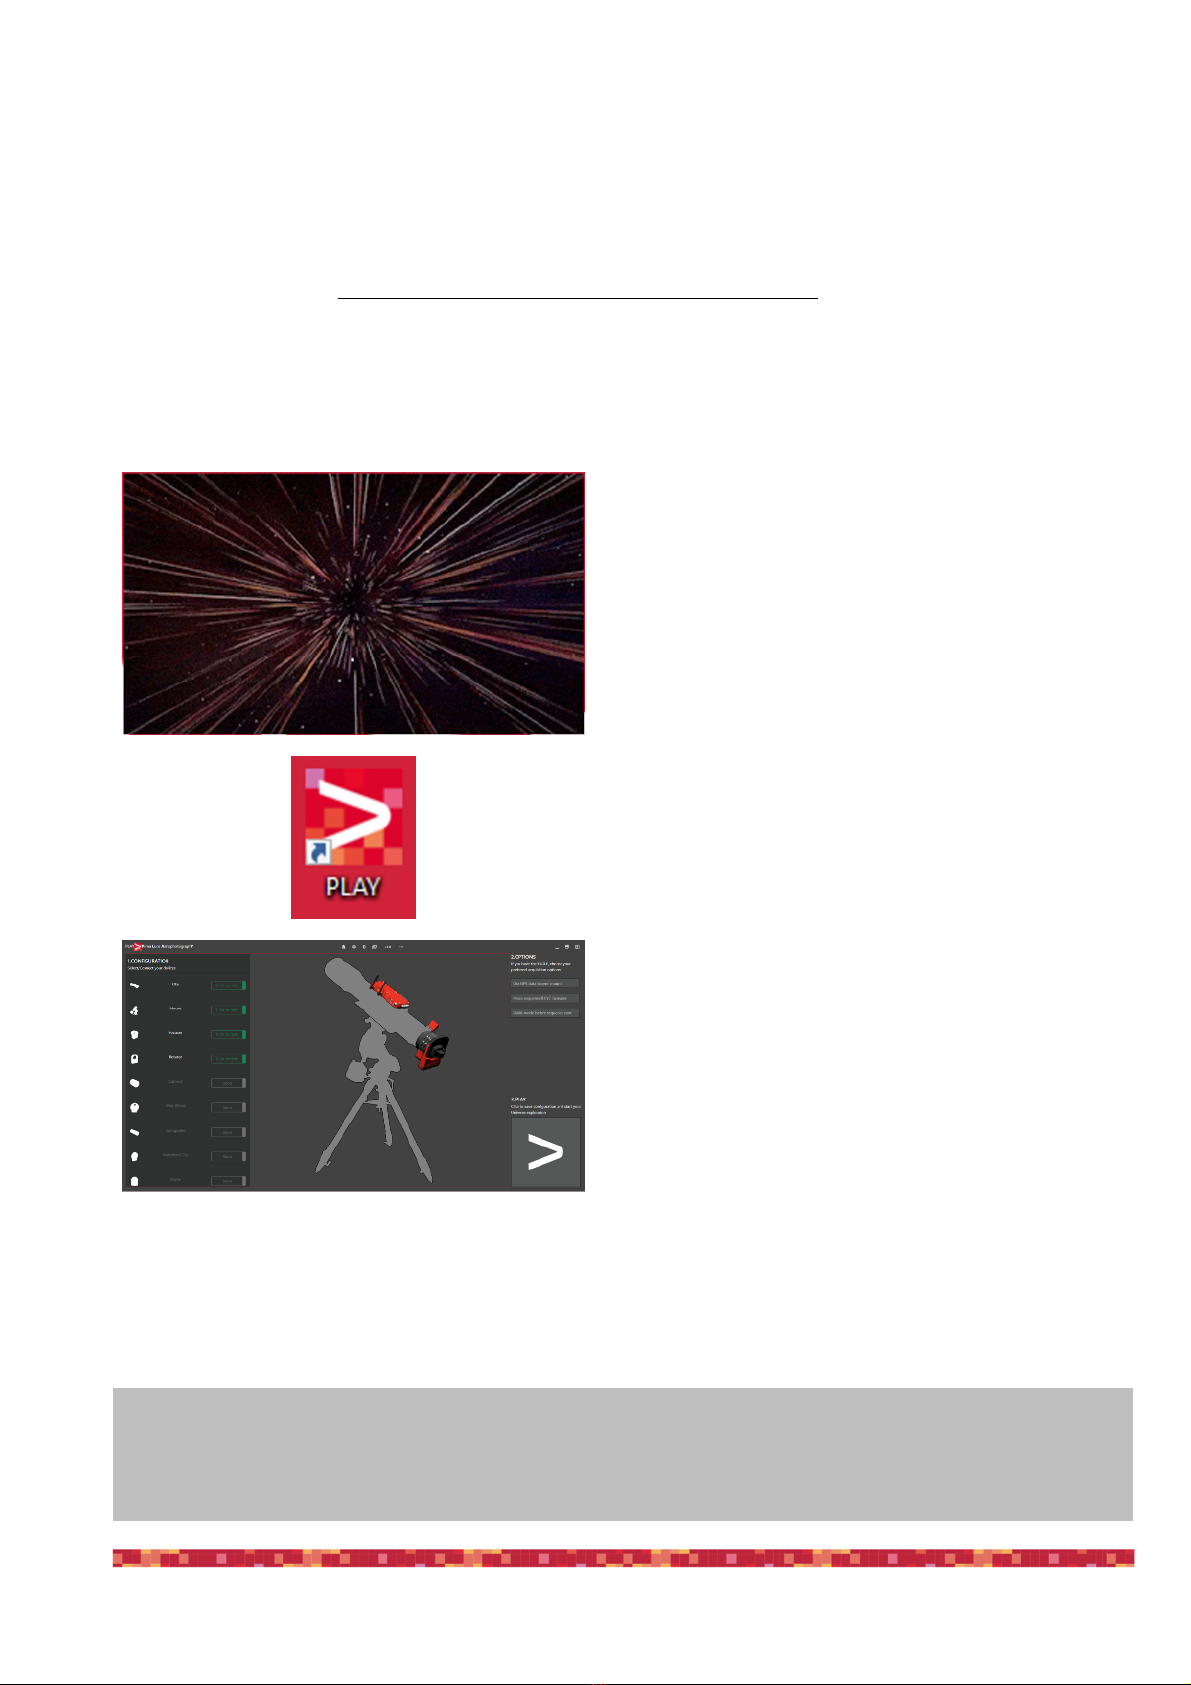
Double click on PLAY-setup.exe file to start installa-
tion, you will see an animation during the installation
procedure.
Installation process automatically creates a shortcut
on the operative system Desktop.
At the end of the installation process, PLAY is auto-
matically launched.
"
page 9
ATTENTION
In the event you need to manually reset SESTO SENSO 2 please proceed this way: with the SESTO SENSO 2
not connected to USB port and without power, press the “RST” reset button (keep it pressed for 10 seconds) and,
at the same time, connect to power. The SESTO SENSO 2 will reboot and it will be reset to factory settings.
PrimaLuceLab SpA SESTO SENSO 2 user manual
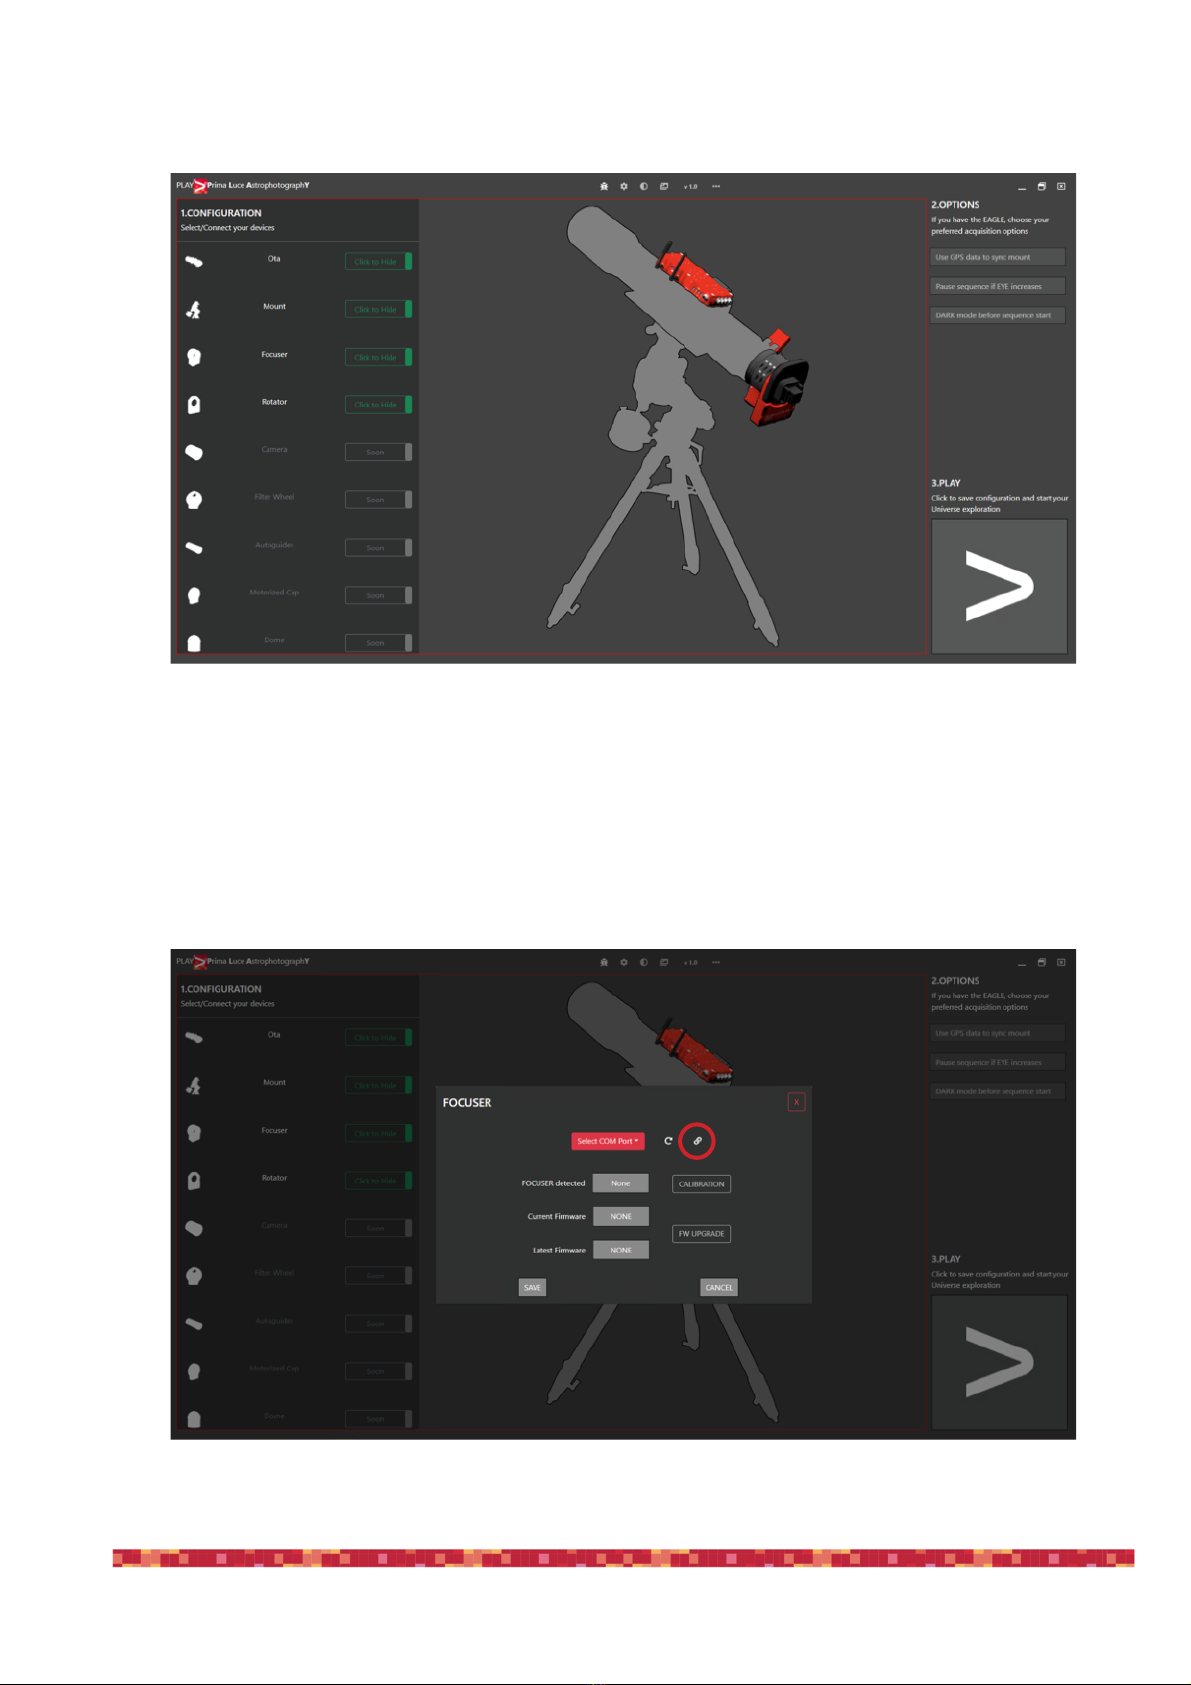
1) Launch PLAY software and you will see the CONFIGURATOR section where you have to connect your devices.
2) Click on the Focuser section (you can click both on the Focuser shape of the central image or on the Focuser
text in the left column). This will open a popup window where you can set the COM port number associated to
your SESTO SENSO 2 focusing motor. If you don’t know what is the COM port associated to your SESTO
SENSO 2, you can enter in Windows Device Manager and check what COM port number Windows creates
when you plug the USB cable of your SESTO SENSO 2 focusing motor. In order to better identify it, you can
also connect and disconnect the USB cable since this will update the Device Manager list. The press the Con-
nect icon in order to start the connection to your focuser.
"
page 10

PrimaLuceLab SpA SESTO SENSO 2 user manual
3) If the connection is correctly set, the button to the right of “FOCUSER detected” will become green. You can
now press the SAVE button to confirm and exit. The “Current Firmware” shows the actual firmware version
you’re using in your SESTO SENSO 2. The “Latest Firmware” shows the latest SESTO SENSO 2 firmware
available. If there is a “Latest Firmware” newer than the “Current Firmware” please click the “FW UPDATE” but-
ton to start the update procedure. Please refer to the “Update SESTO SENSO 2 firmware with PLAY software”
paragraph and follow the instructions and update firmware.
4) Before moving SESTO SENSO 2, you have to start the calibration. Please refer to the next paragraph “Calibra-
te SESTO SENSO 2 with PLAY software” and follow the instructions to calibrate SESTO SENSO 2 focusing
motor. Then press the SAVE button to save your focuser configuration.
5) Now that the connection to your devices is confirmed, please click on the large PLAY button (bottom-right) to
proceed to the CAPTURE section of PLAY software where you will be able to control your devices and start
astrophotography.
"
page 11
PrimaLuceLab SpA SESTO SENSO 2 user manual
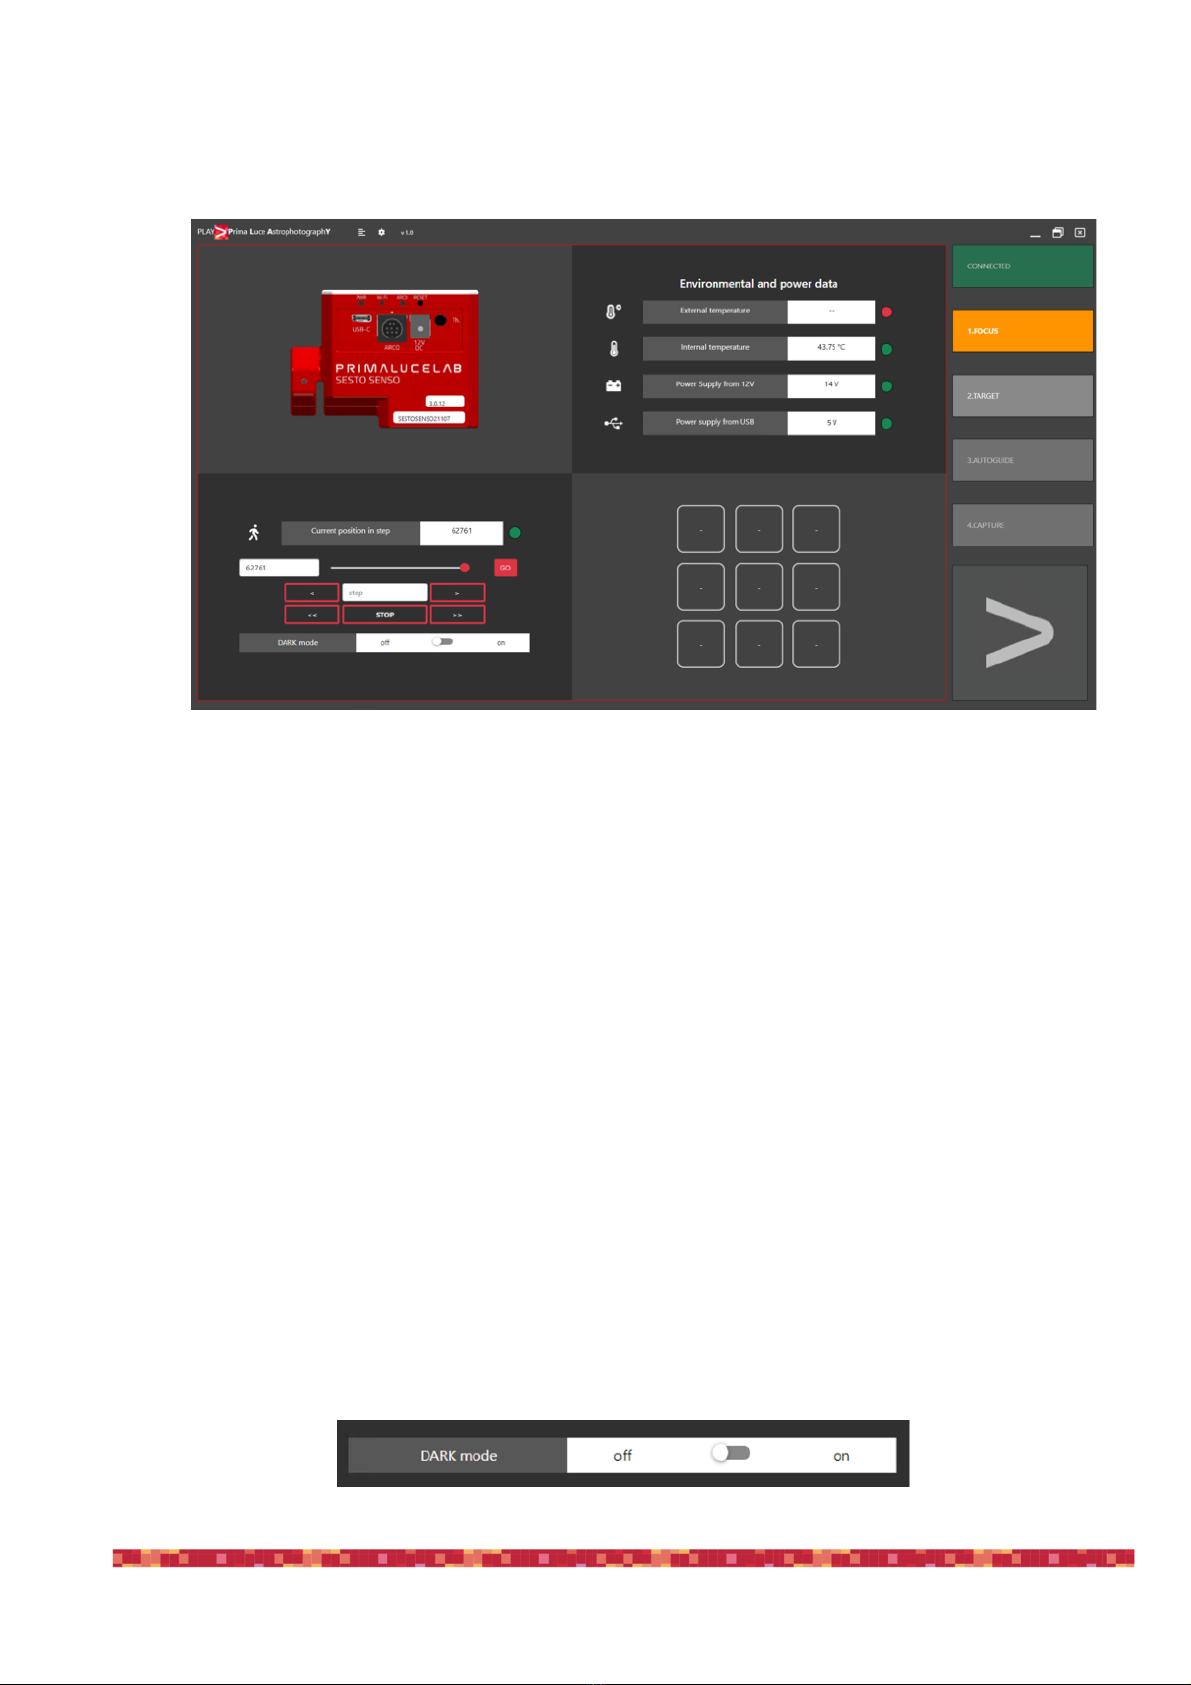
6) At the top-right part of the screen you can see the green CONNECTED notification that shows you that the de-
vices, the you set in the previous steps, are connected. The FOCUS tab is now selected and here you can see
the connection to SESTO SENSO 2 focusing motor."
"
Under the “Environmental and power data” you will see the lights on the right side of the window become
green:"
1) if you connect SESTO SENSO 2 to your computer only with the USB cable, you will see a green light illumina-
ted in the right of the “Internal temperature” row
2) If you have connected an optional temperature sensor, you will also get the green light in to the right of “Exter-
nal temperature” row
3) since SESTO SENSO 2 requires also 12V power (a 12V battery by using the supplied cigarette plug cable, a
12V AC adapter with at least 1A and Ø5.5/2.5mm connector or the EAGLE power cable to power it through the
EAGLE), you will get the green light to the right of the “Power supply from 12V” row."
"
Moving the SESTO SENSO 2 focusing motor is very easy. You can do this in different ways:
1. Move the slider until you reach the desired position and press the GO button
2. Click on the area to the left of the slider, enter the number you prefer and then press the GO button
3. Click on the area with “step” label, insert the number you wish and press the <or >buttons to move the focuser
by the number you entered. Press the << or >> buttons to move the focuser by 10 times the number you ente-
red."
"
You will see the focuser moving. At any moment you need to stop the movement of the focuser, press the STOP
button in the lower part of the window."
"
7) In the bottom-left area of PLAY window, you can find the settings of the focuser. Here you can set:"
- DARK mode: it allows you to activate DARK mode that will turn off focuser’s LED lights (please note that, if
you turn them off, you won’t be able to check the SESTO SENSO 2 status without controlling it via the provided
software).
"
page 12
PrimaLuceLab SpA SESTO SENSO 2 user manual
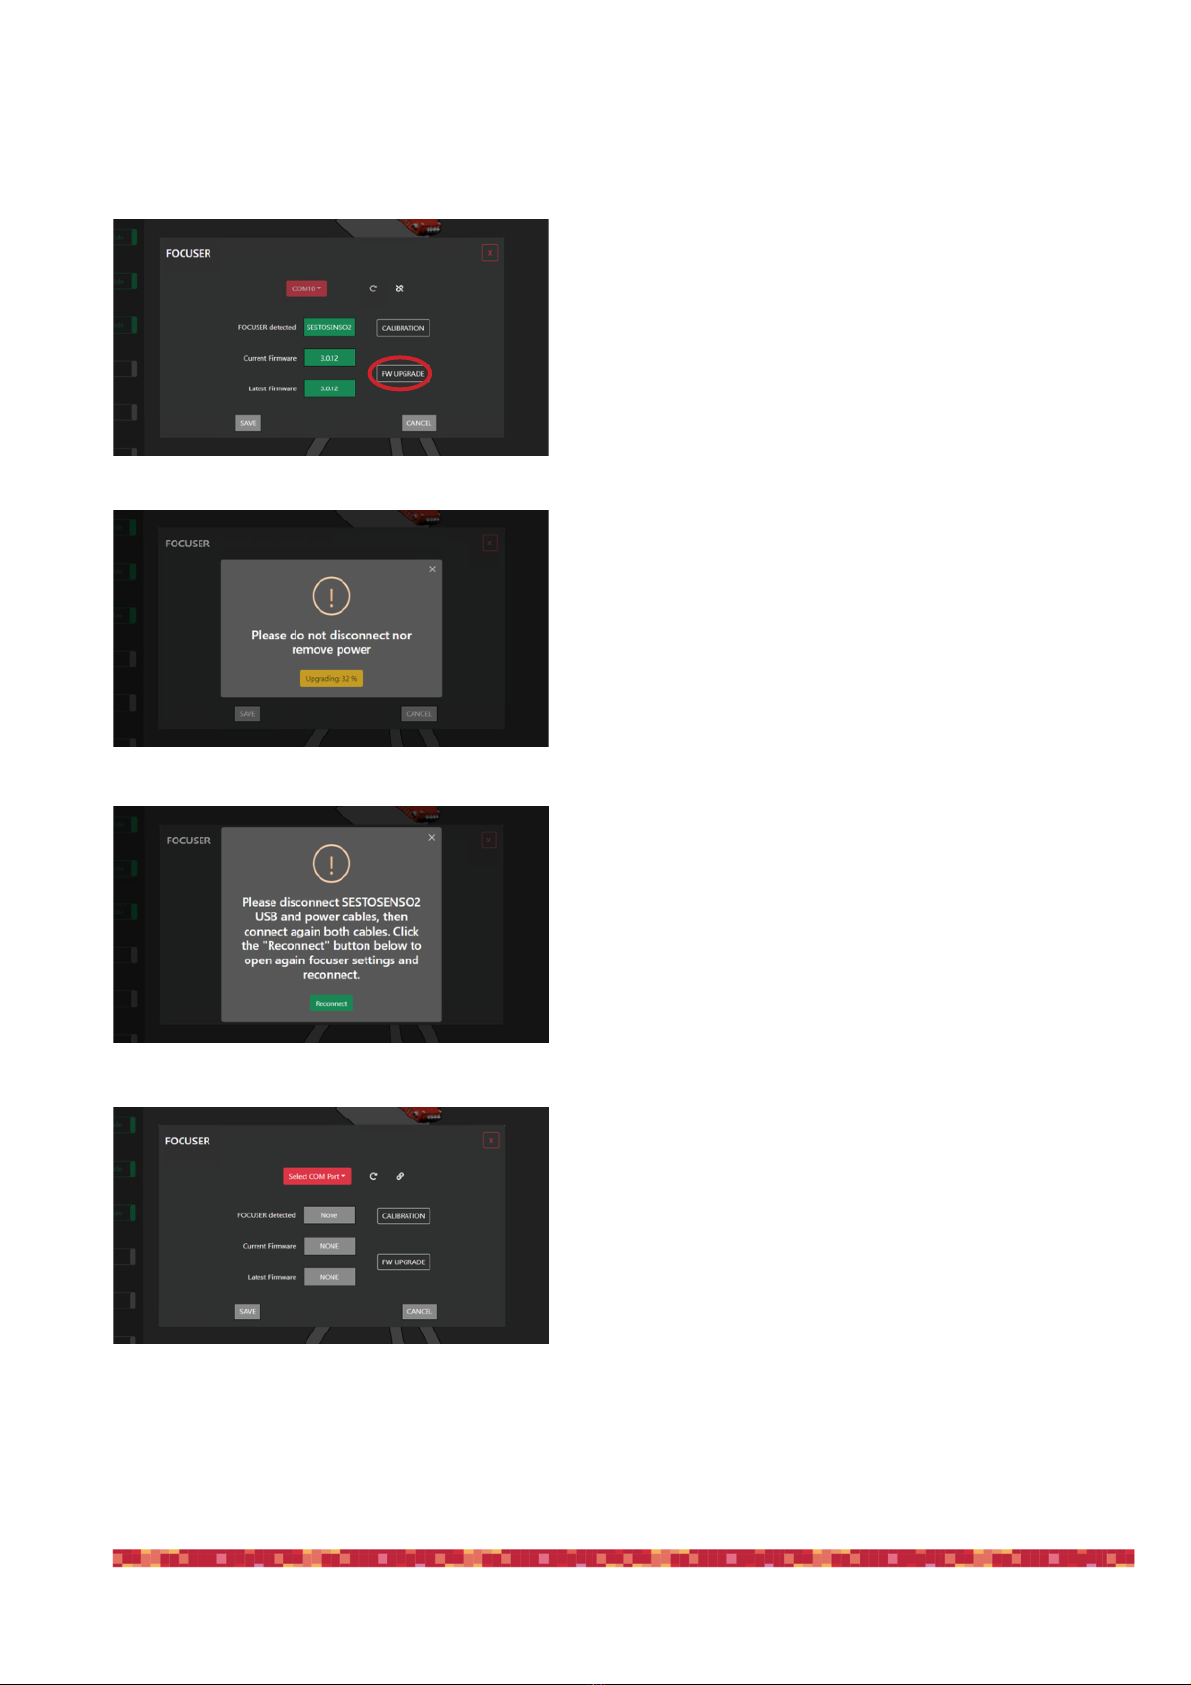
Update SESTO SENSO 2 firmware with PLAY software
In order to update the SESTO SENSO 2 firmware, first of all
please check you’re using the latest version of PLAY (if you
find a new version available to download on our website, plea-
se uninstall the older version of the PLAY and then install the
latest PLAY version). Start PLAY and connect to SESTO SEN-
SO 2 focusing motor. The “Current Firmware” shows the actual
firmware version you’re using in your SESTO SENSO 2. The
“Latest Firmware” shows the latest SESTO SENSO 2 firmware
available. If there is a “Latest Firmware” newer than the “Cur-
rent Firmware” please click the “FW UPDATE” button to start
the update procedure.
The process will start updating SESTO SENSO 2 firmware.
Please do not disconnect USB or power cable until the process
is completed.
At the end of the update procedure, please disconnect SESTO
SENSO 2 USB and power cables, then connect again power
and USB cable to your computer. Click the "Reconnect" but-
ton.
This will open again the FOCUSER settings window. Here
please select the COM port of your SESTO SENSO 2 focusing
motor and click on the connect icon to reconnect.!
"
page 13
PrimaLuceLab SpA SESTO SENSO 2 user manual
Calibrate SESTO SENSO 2 with PLAY software
In order to properly work, SESTO SENSO 2 requires a calibration after you install it to the focuser (or if you ma-
nually move the focuser know on the other focuser’s side than SESTO SENSO 2). In order to do this, after you
connected to SESTO SENSO 2 focusing motor, in the Focuser section of the CONFIGURATOR, please click on the
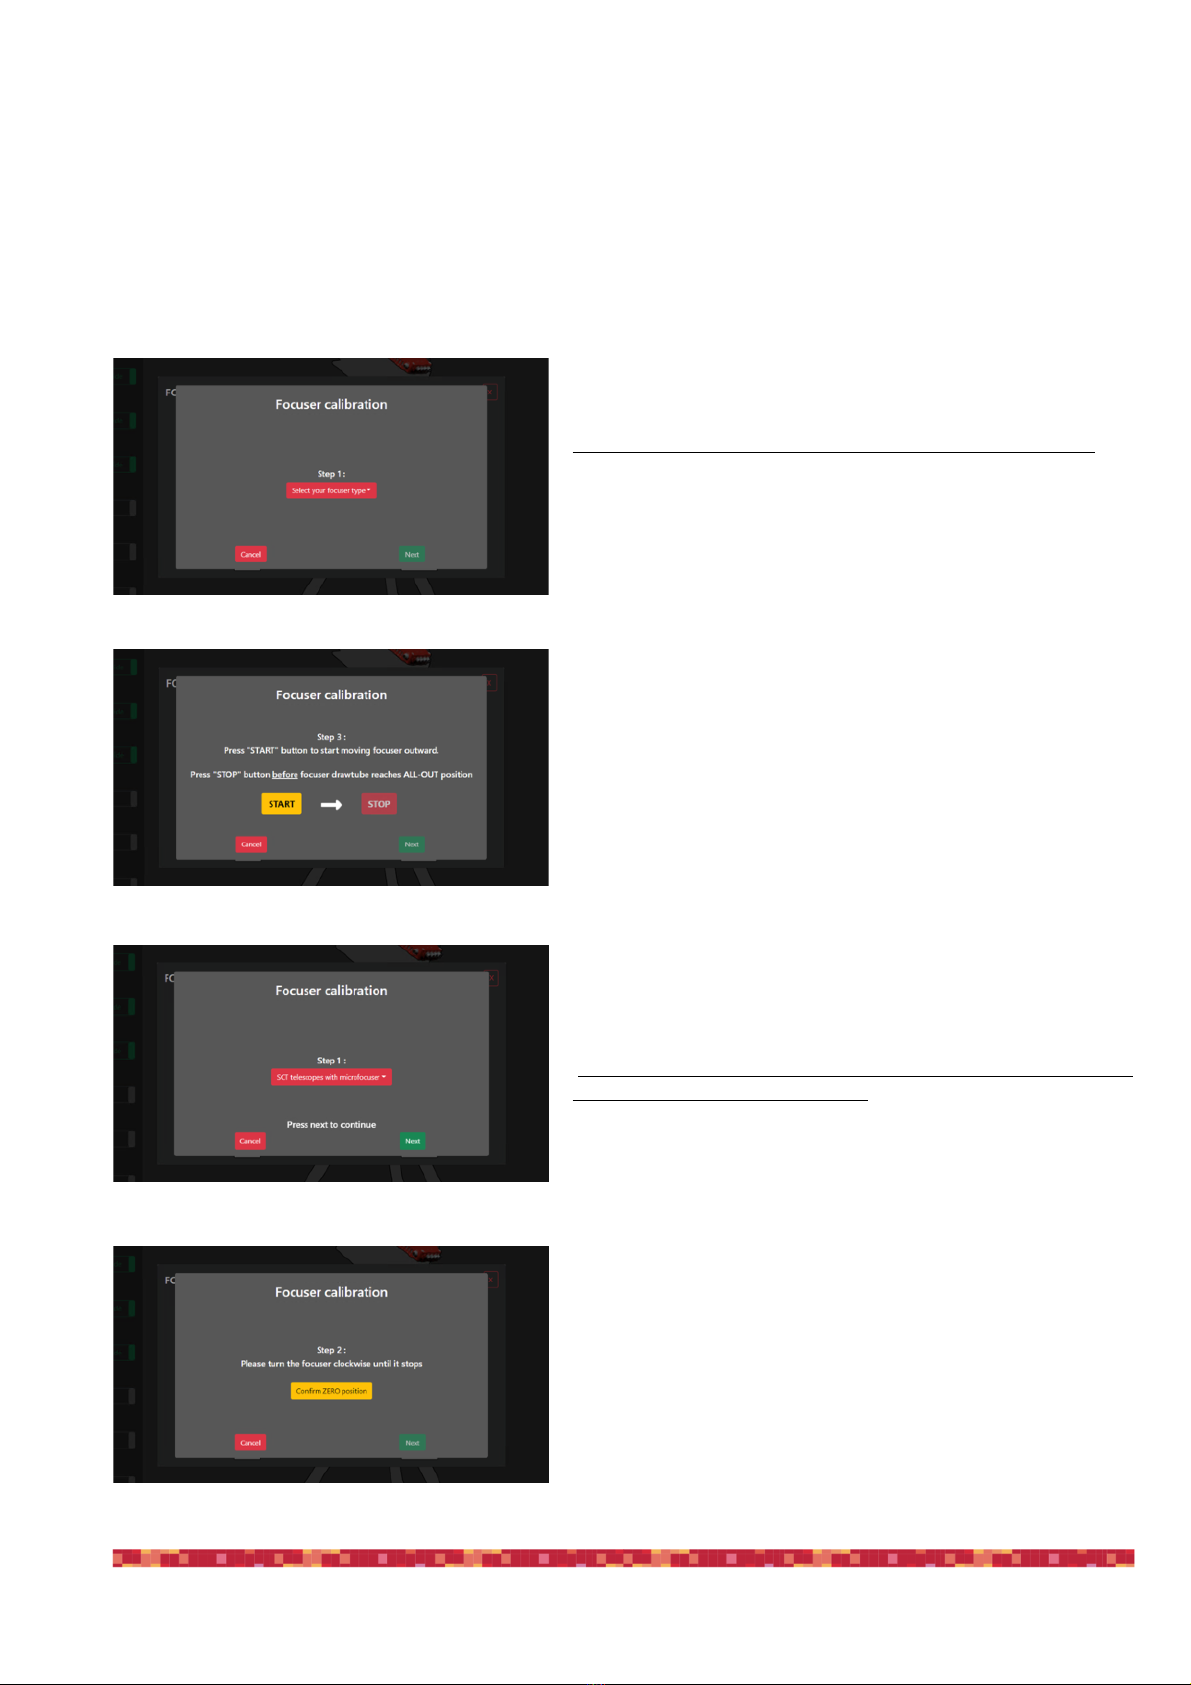
CALIBRATION button and you will see a new window. "
"
If you installed SESTO SENSO 2 on an external focuser (for
example a Crayford or Rack and Pinion focuser):"
- Step 1: please select “Telescope with external focuser” and
press Next button. "
- Step 2: Manually move your focuser to the innermost position
and then press the button “Confirm ZERO position”."
- Step 3: Press "START" button to start moving focuser out-
ward. You will see SESTO SENSO 2 motor that will start mo-
ving. Then you will have to press "STOP" button before focuser
drawtube reaches ALL-OUT position. Attention: please remem-
ber to stop the motor BEFORE it will reach the end of draw
tube travel or you may cause problems to the focuser or to the
SESTO SENSO 2 motor. Press NEXT button to continue."
- Step 4: You will see a notification, that confirms that calibra-
tion is completed, press Close button to complete the process.
"
"
If you want to SESTO SENSO 2 on an SC type telescope with
internal focuser and microfocuser:"
- Step 1: please select “SCT telescopes with Microfocuser”
and press Next button. "
- Step 2: with SESTO SENSO not installed on your telescope,
please manually turn the coarse knob of the focuser clockwise
until it stops. Then press the button “Confirm ZERO position”."
- Step 3: now install SESTO SENSO 2 on the microfocuser of
your telescope. When SESTO SENSO 2 is installed, press In-
stalled button."
- Step 4: You will see a notification, that confirms that calibra-
tion is completed, press Close button to complete the process.
"
page 14

PrimaLuceLab SpA SESTO SENSO 2 user manual
SESTO SENSO 2 Advanced Settings in PLAY software
By clicking the ADVANCED SETTINGS button in the Focuser configurator, you will see the advanced parameters
that may be used, for example, to have a perfect match of SESTO SENSO with your telescope’s focuser, to better
support the weight of the imaging accessories you use (camera, off axis guider, filter wheel, etc.) used in astropho-
tography.
Quick Settings:
In order to simplify SESTO SENSO 2 settings, we created some preset profiles from which you can start to create
the ideal configuration based on the weight load applied to the focuser and the moving speeds you want.
Light and Fast button is recommended for light loads.
Medium button is recommended for medium loads.
Heavy and Slow button is recommended for heavy loads.
The 3 buttons “User 1”, “User 2” and “User 3” allow you to save up to 3 quick settings based on your personalised
values of Speed and Current.
Advanced Settings:
In the first set of commands, the operating currents of the SESTO SENSO 2 motor are reported, the values that
can be set range from 0 to 10.
•Acceleration: set the current in acceleration ramp
•Run: set the current after acceleration ramp during RUN
•Deceleration: set the current in deceleration ramp
In the second set of commands (“Speed settings), the SESTO SENSO 2 motor movement speed parameters are
set.
•Acceleration: set the acceleration during starting ramp (Range from 0 to 10)
•Run: set the speed value after acceleration ramp (Range from 0 to 10)
•Deceleration: set deceleration value after slowdown ramp (Range from 0 to 10)
• Hold: set the hold current, when the motor is stopped
The third option allows you to activate the Hold current.!
"
page 15
NOTE: if the focus micrometer reduction system has slippages between the micrometer pin and focuser shaft,
you can solve this problem by setting the Acceleration, Run, and Deceleration (in Speed Settings) to 1.
PrimaLuceLab SpA SESTO SENSO 2 user manual
Controlling SESTO SENSO 2 with Virtual HandPad
SESTO SENSO 2 can be controlled also without EAGLE or a computer, by connecting from any smartphone or
tablet (also a computer) with WiFi and using the included Virtual HandPad. In order to set the WiFi control, please
follow this guide (that has been created on a smartphone with iOS operative system but it’s similar for Android de-
vices).
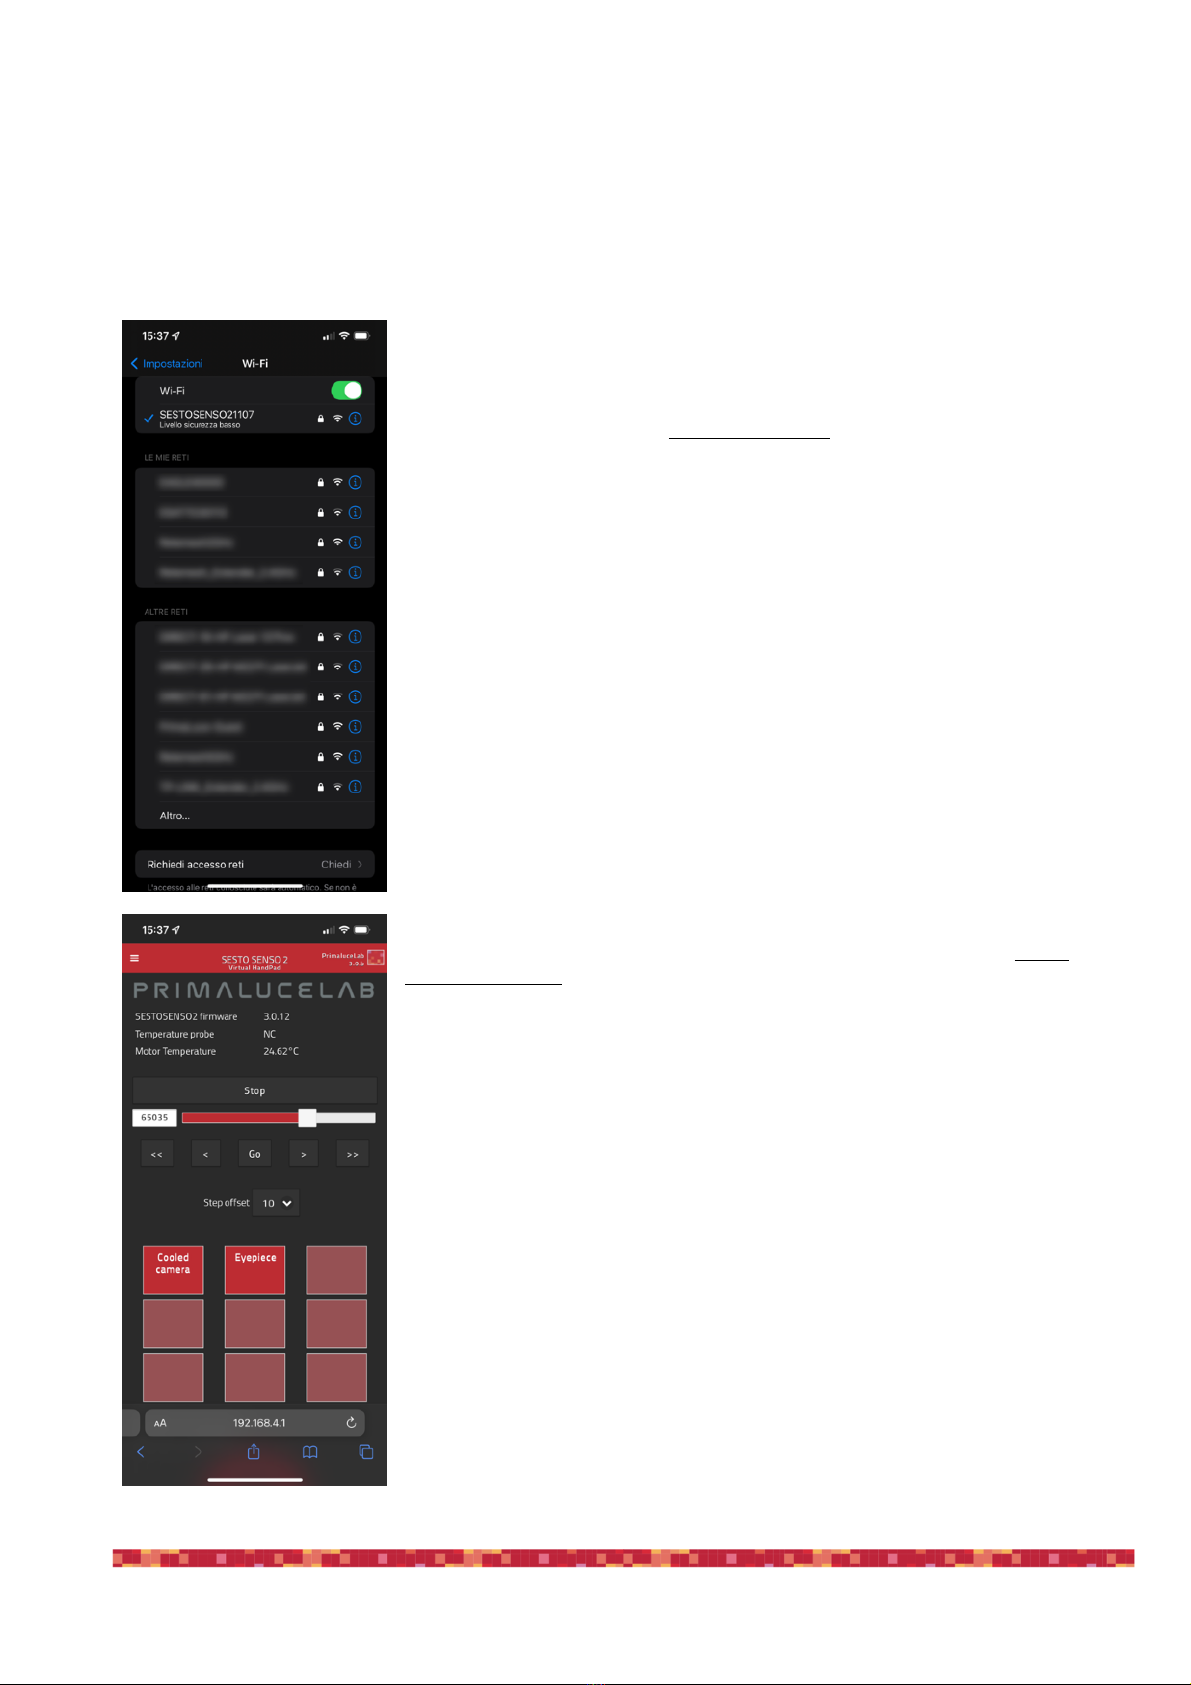
After you power up the SESTO SENSO 2, turn on the WiFi of your device
(that can be a smartphone or a tablet).
Please note that you can’t control SESTO SENSO 2 with WiFi (Virtual
HandPad) and USB (PLAY) at the same time. If you want to control it
with WiFi through the Virtual HandPad, please make sure it’s discon-
nected from PLAY.
You will see the SESTOSENSO2xxxxx network created by your SESTO
SENSO 2, the network name corresponds to your SESTO SENSO 2 serial
number. Select the SESTOSENSO2xxxxx network. Using the keyboard
(virtual or physical) of your device insert "primalucelab" as the default pas-
sword (or the password you choose if you changed with the FOCUSER
Manager software as described in the previous paragraph) and then press
the "Login" button. The next time you want to access SESTO SENSO 2,
you will no longer have to enter your password: your device will automati-
cally connect when you select the network created by SESTO SENSO 2
unless you change the login password. Wait for a few seconds until you
get confirmation that your device is connected to the SESTOSENSO2xxx-
xx network.
Now you can open the browser of the device (for example Chrome or Sa-
fari), in the url area (in the field where you usually write the url like www.-
primalucelab.com), type the address 192.168.4.1 and press the button
RETURN: you will see the SESTO SENSO 2 Virtual HandPad on your
screen.
"
page 16
PrimaLuceLab SpA SESTO SENSO 2 user manual
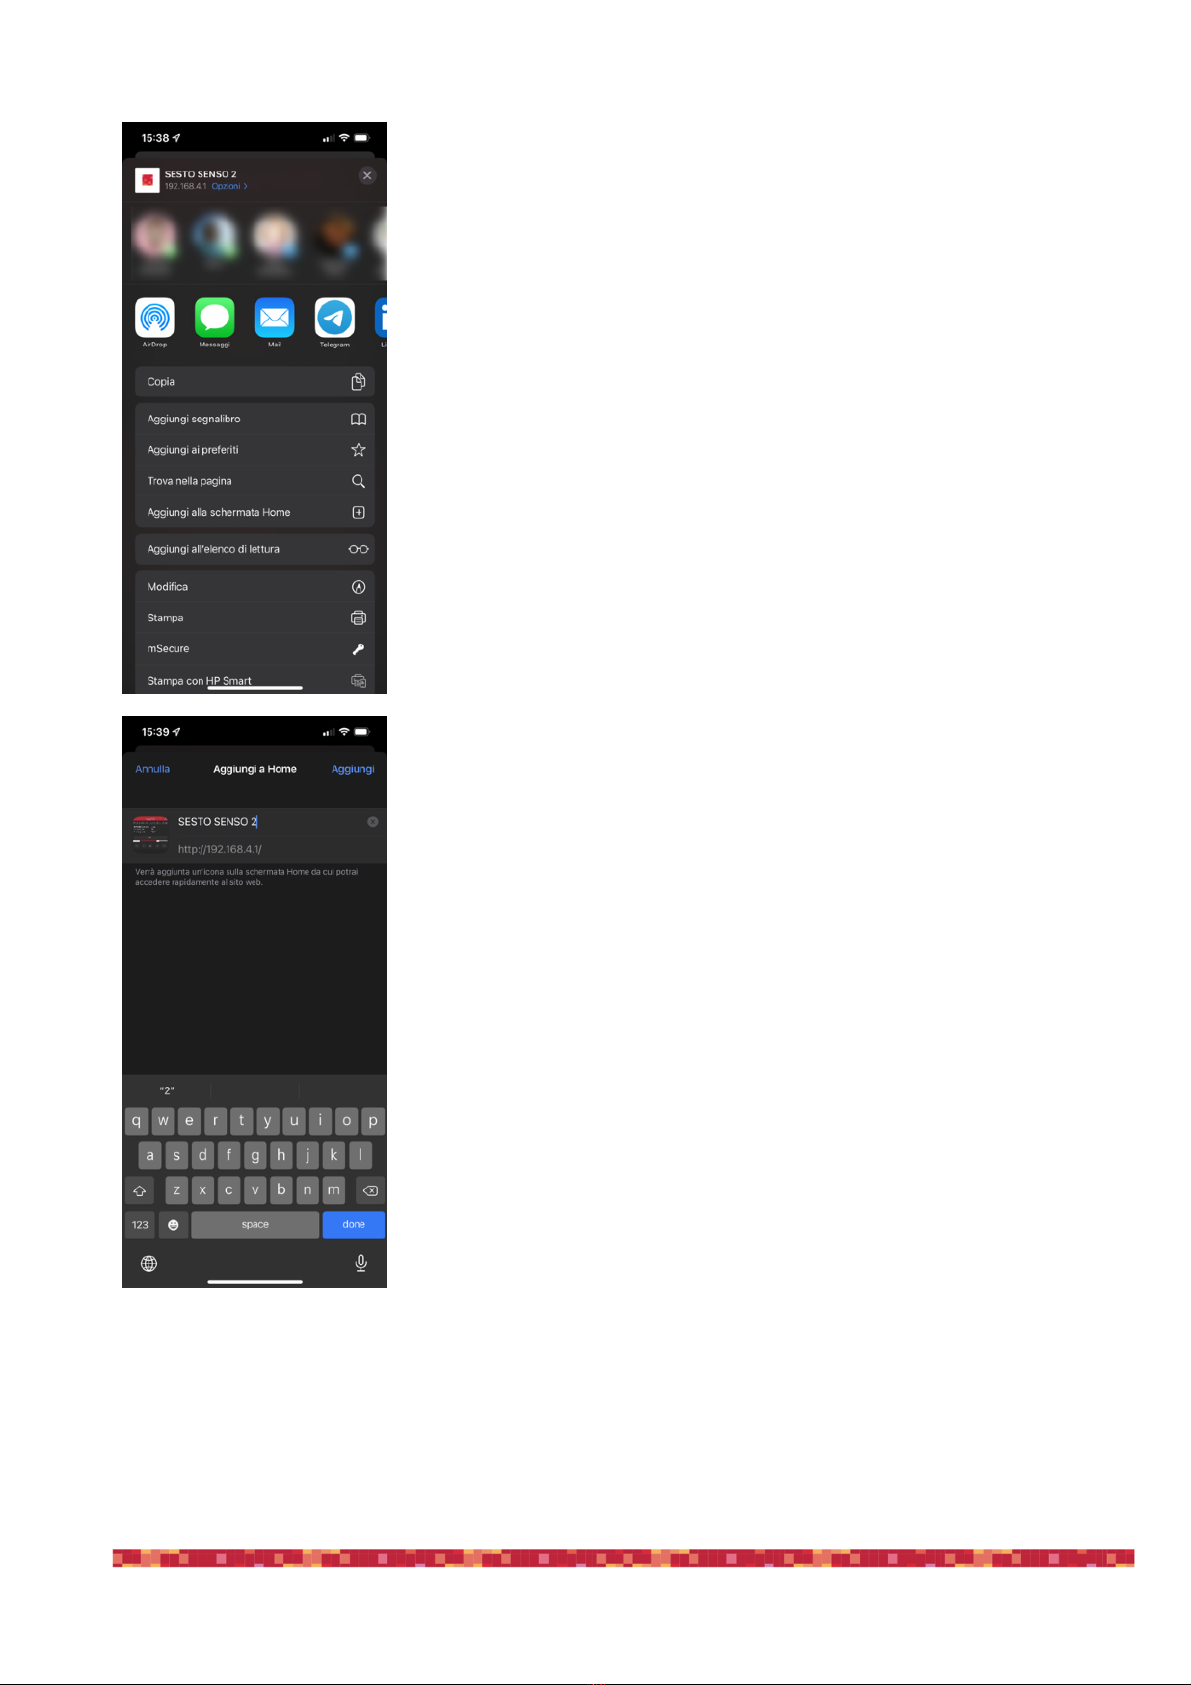
To create a link directly to your device desktop, simply press the "share"
button and then "Add to Home”.
You can personalize the name, or just leave “SESTO SENSO 2”. Press
Add button to confirm.
"
page 17
PrimaLuceLab SpA SESTO SENSO 2 user manual
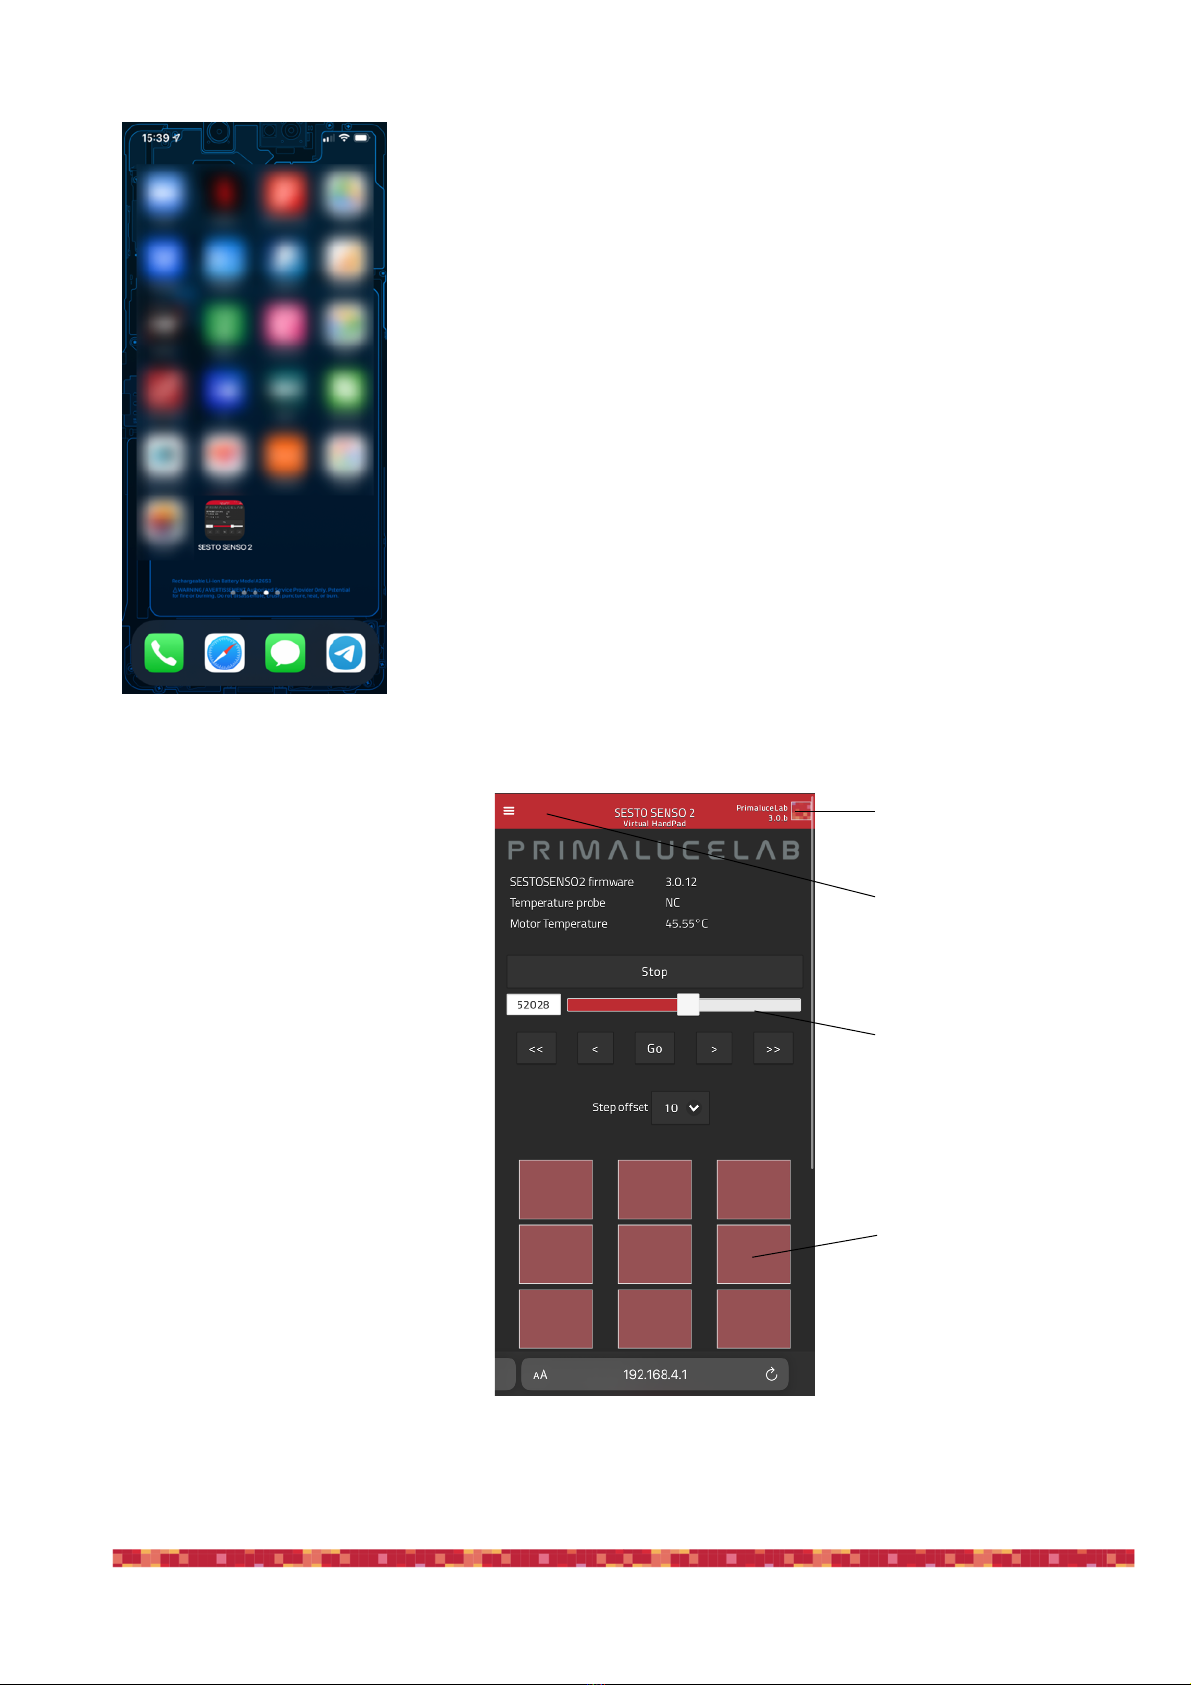
The Virtual HandPad allows you to con-
trol and use SESTO SENSO 2 focusing
motor without the need of an EAGLE or
of a computer.
On the top-right of your screen you can
find the Virtual HandPad version. Then
you can read the SESTO SENSO 2
firmware version, the external tempera-
ture (if you connected the optional tem-
perature sensor) and the internal motor
temperature.
Below you can find the slider and the
button to move the SESTO SENSO 2,
together with the step selector.
In the lower part you can find the 9 pro-
grammable buttons that allow you to
save up to 9 different focus positions,
name them and easily recall focus posi-
tion with just the push of a button.
The SESTO SENSO 2 connection will be created and you will have a di-
rect and immediate connection to SESTO SENSO 2 in your device.
Press the SESTO SENSO 2 button to start the Virtual HandPad.
"
page 18
Virtual HandPad version
Settings
SESTO SENSO 2 "
controls
Presets buttons
PrimaLuceLab SpA SESTO SENSO 2 user manual
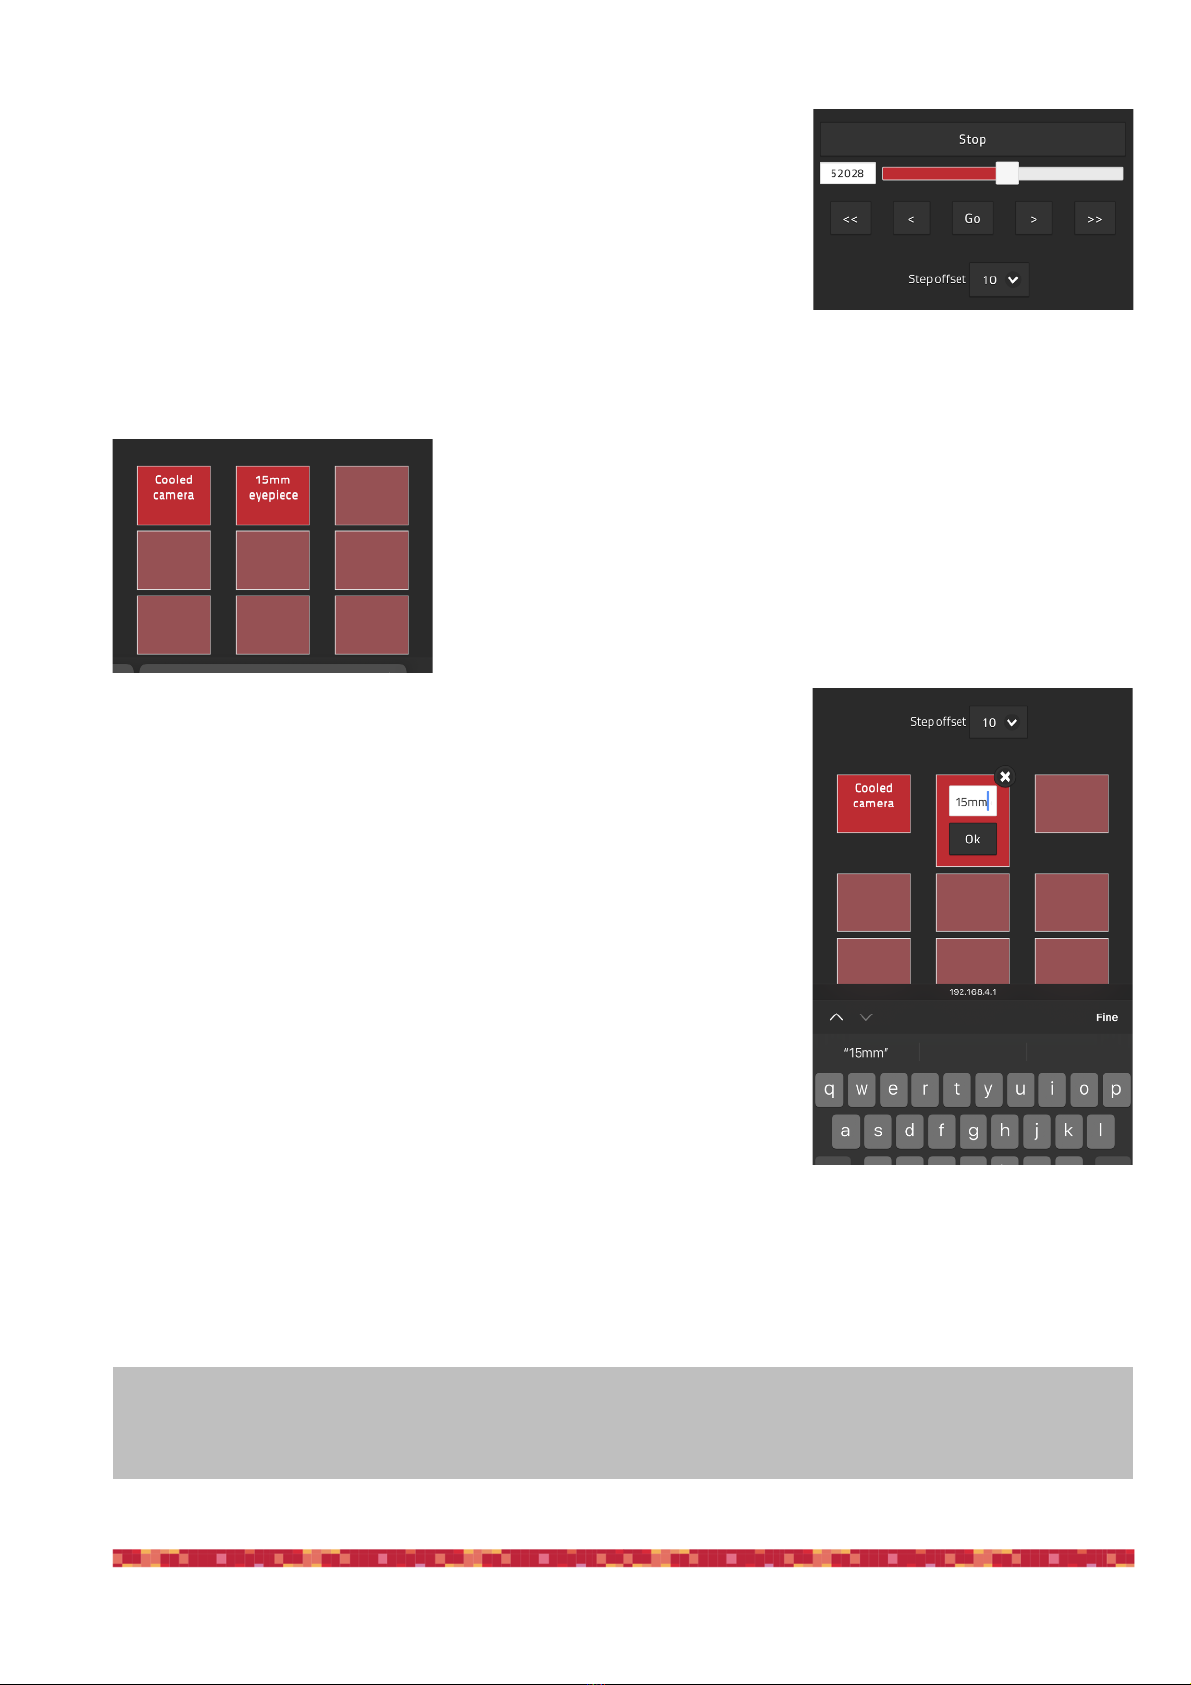
Moving the SESTO SENSO 2 focuser with the Virtual HandPad is very easy.
You can do this in different ways:
1. move the slider until you reach the desired position and tap on the GO
button
2. make a double tap on the left field (where you can read the number in
step of your focuser), write the number you prefer with the virtual key-
board of your device and then press the GO button
3. select a value in the “Step offset” selector (from 100 to 2000 steps) and
tap the <or >buttons to move the focuser by the number you selected.
Tap the << or >> buttons to move the focuser by 10 times the number you selected.
In any moment, if you need to immediately stop the movement, press the
STOP button in the upper part.
In order to save a new position in the Virtual HandPad, first of all you have
to move the SESTO SENSO 2 to a position where your telescope is in per-
fect focus (you will need an optical accessory or a camera in order to do
this) and then follow this procedure:
Tap and keep your finger on one of the empty buttons: the position will be
automatically saved with a “Preset” name.
Tap on the name of the button and you will be able to change it by using the
virtual keyboard of your device. Press ENTER button to confirm the new
name.
"
page 19
NOTE
When you save the focus position in the SESTO SENSO 2 Virtual HandPad, you will find the same positions
when you will control the SESTO SENSO 2 with USB from your EAGLE or external computer.
Other manuals for SESTO SENSO 2
2
Table of contents
Other PrimaLuceLab Engine manuals


