PrimaLuceLab SESTO SENSO 2 User manual

VERSION 1.0
Update 16-12-2019
SESTO SENSO 2 is made by PrimaLuceLab iSRL (Italy). For any matters relating to the use, service and warranty, please
refer to the addresses given in the relevant documents.
PrimaLuceLab iSrl • Via Roveredo 20/B, 33170, Pordenone • www.primalucelab.com
SESTO SENSO 2 robotic focusing motor-
USER MANUAL

PrimaLuceLab iSrl SESTO SENSO 2 user manual
English
WARNING
If improperly handled, SESTO SENSO 2 may damage. So please follow the instructions below:
•Do not disassemble
•Do not open, damage or subject to electric shock or excessive impact any part of SESTO SENSO 2. Do not drop.
•Do not short the electronic elements
•Do not expose at temperatures below -20°C and above +60°C
•Do not burn or incinerate any component.
•Do not expose to rain or other atmospheric effect related to water
•Do not bend, modify or force any part of SESTO SENSO 2
Index
Components Identification 2
Contents of the package 2
Technical specifications 3
Installing SESTO SENSO 2 on the telescope’s focuser 4
Controlling SESTO SENSO 2 with EAGLE or computer with Windows OS 6
Controlling SESTO SENSO 2 with Virtual HandPad 12
SESTO SENSO 2 Advanced Settings 15
Controlling SESTO SENSO 2 with ASCOM drivers and third party softwares 17
INFORMATION TO USERS 21
page 1
QUALITY CONTROL
Each SESTO SENSO 2 unit, after created in our laboratories, it’s tested by PrimaLuceLab technical experts to check all components.
We verify mechanics and electronics. In case you check any malfunction, please contact us immediately (+ 39-0434-1696106 or
[email protected]). Do not try to disassemble, repair or modify yourself SESTO SENSO 2, without our written approval, in
order not to loose the Producer Warrantee.

PrimaLuceLab iSrl SESTO SENSO 2 user manual
Components Identification
Contents of the package
•SESTO SENSO 2 robotic focusing motor
•5 bushings
•Allen keys with grub screws
•Power cable for cigarette plug
•USB-C to USB cable
•Quick Start guide
page 2

PrimaLuceLab iSrl SESTO SENSO 2 user manual
Technical specifications
page 3
CAUTION
In order to correctly use SESTO SENSO 2, you have to connect it to your telescope’s focuser. The installation procedure
changes based on the telescope’s focuser so please refer to the next paragraphs. But if you want, you can proceed with
the SESTO SENSO 2 first use also without having the focuser not installed on the telescope’s focuser.
NOTE
In order to proceed with installation you have to download the SESTO SENSO 2 drivers and softwares package from our
website:
www.primalucelab.com/astronomy/downloads
Save the package (it’s in zip format) in the EAGLE or computer you want to use to control the SESTO SENSO 2 and unzip
it with the proper unzip software (if you haven’t an unzip software, you can use https://www.winzip.com).
Power
12V
Power consumption @ 12V
800mA max
Working temperature
-20°C / +60°C
Control with:
USB
WiFi
Resolution
0,7 microns per step
Temperature probe
Internal to read motor temperature (in the package)
External for focus temperature compensation (optional)
Provided software
Driver for Windows 64 bits (compatible with Windows Vista, 7, 8 and 10)
FOCUSER Manager for control with Windows operative system
ASCOM driver for control from external software (tested with ASCOM platform 6.4)
SESTO SENSO 2 Virtual HandPad for WiFi control
Weight
380 grams

PrimaLuceLab iSrl SESTO SENSO 2 user manual
Installing SESTO SENSO 2 on the telescope’s focuser
In order to connect SESTO SENSO2 to the focuser of your telescope, remove the manual focus micrometric knob by un-
screwing the screw normally present on the knurled knob. After pulling it out, you also need to disconnect the coarse fo-
cuser knob, by means of an allen screw on the knob. On some plastic-covered focusers, you need to remove the plastic to
access the disassembly screw. Connect one of the bushings you find in the SESTO SENSO 2 box (based on the diameter
that fits your focuser) to the small focuser shaft of your focuser.
Now you can connect SESTO SENSO 2 to your focuser by paying attention to centering the micrometric pin with the pre-
assembled bushing on SESTO SENSO 2, until it stops. By using the provided allen screw, lock the 2 grub screws that fix
the pre-assembled bushing on SESTO SENSO 2 to the bushing you just installed on your focuser's shaft.
page 4
NOTE
in order to work, SESTO
SENSO 2 requires your
focuser to have the micro
metric knob.

PrimaLuceLab iSrl SESTO SENSO 2 user manual
Then, by using the provided allen screw, please fix the screws that fix the outer ring of SESTO SENSO 2 to your focuser.
Finally, use the allen screw to lock the 3 small grub screws fix the outer ring of SESTO SENSO 2 to your focuser.
page 5
NOTE: After installing SESTO SENSO 2 on your focuser, check the smoothness of the movement keeping SESTO SENSO
2 powered off and then manually moving the focus knob of your focuser. The presence of SESTO SENSO 2 will make the
movement harder (since the motor is connected) but the motion must still be uniform. If you notice an uneven move-
ment, repeat the installation procedure.
NOTE: SESTO SENSO 2 connects to several focusers that may have different machining and tolerances precisions. Fo-
cusing accuracy, especially when using automatic focusing procedures, depends on the focuser mechanics and not only
strictly on SESTO SENSO 2. If your focuser has an important backlash, you can adjust the backlash parameter in the
software.

PrimaLuceLab iSrl SESTO SENSO 2 user manual
Controlling SESTO SENSO 2 with EAGLE or computer with Windows OS
SESTO SENSO 2 can be controlled with the EAGLE or any external computer that comes with Windows operative system
(at least version 7 64 bits). In the SESTO SENSO 2 package you can find a 12V power cable with cigarette plug and a PC
connection cable for USB port. Connect the USB-C cable to the USB port of your EAGLE or personal computer. You will see
the PWR LED on (this means SESTO SENSO 2 is powe-
red) and, after a few seconds the Wi-Fi LED will be on
too and this means that also the SESTO SENSO 2 WiFi
connection is ready to be used.
When you connect it to USB port of the EAGLE or of an
external computer, SESTO SENSO 2 should be automa-
tically detected and Windows should automatically
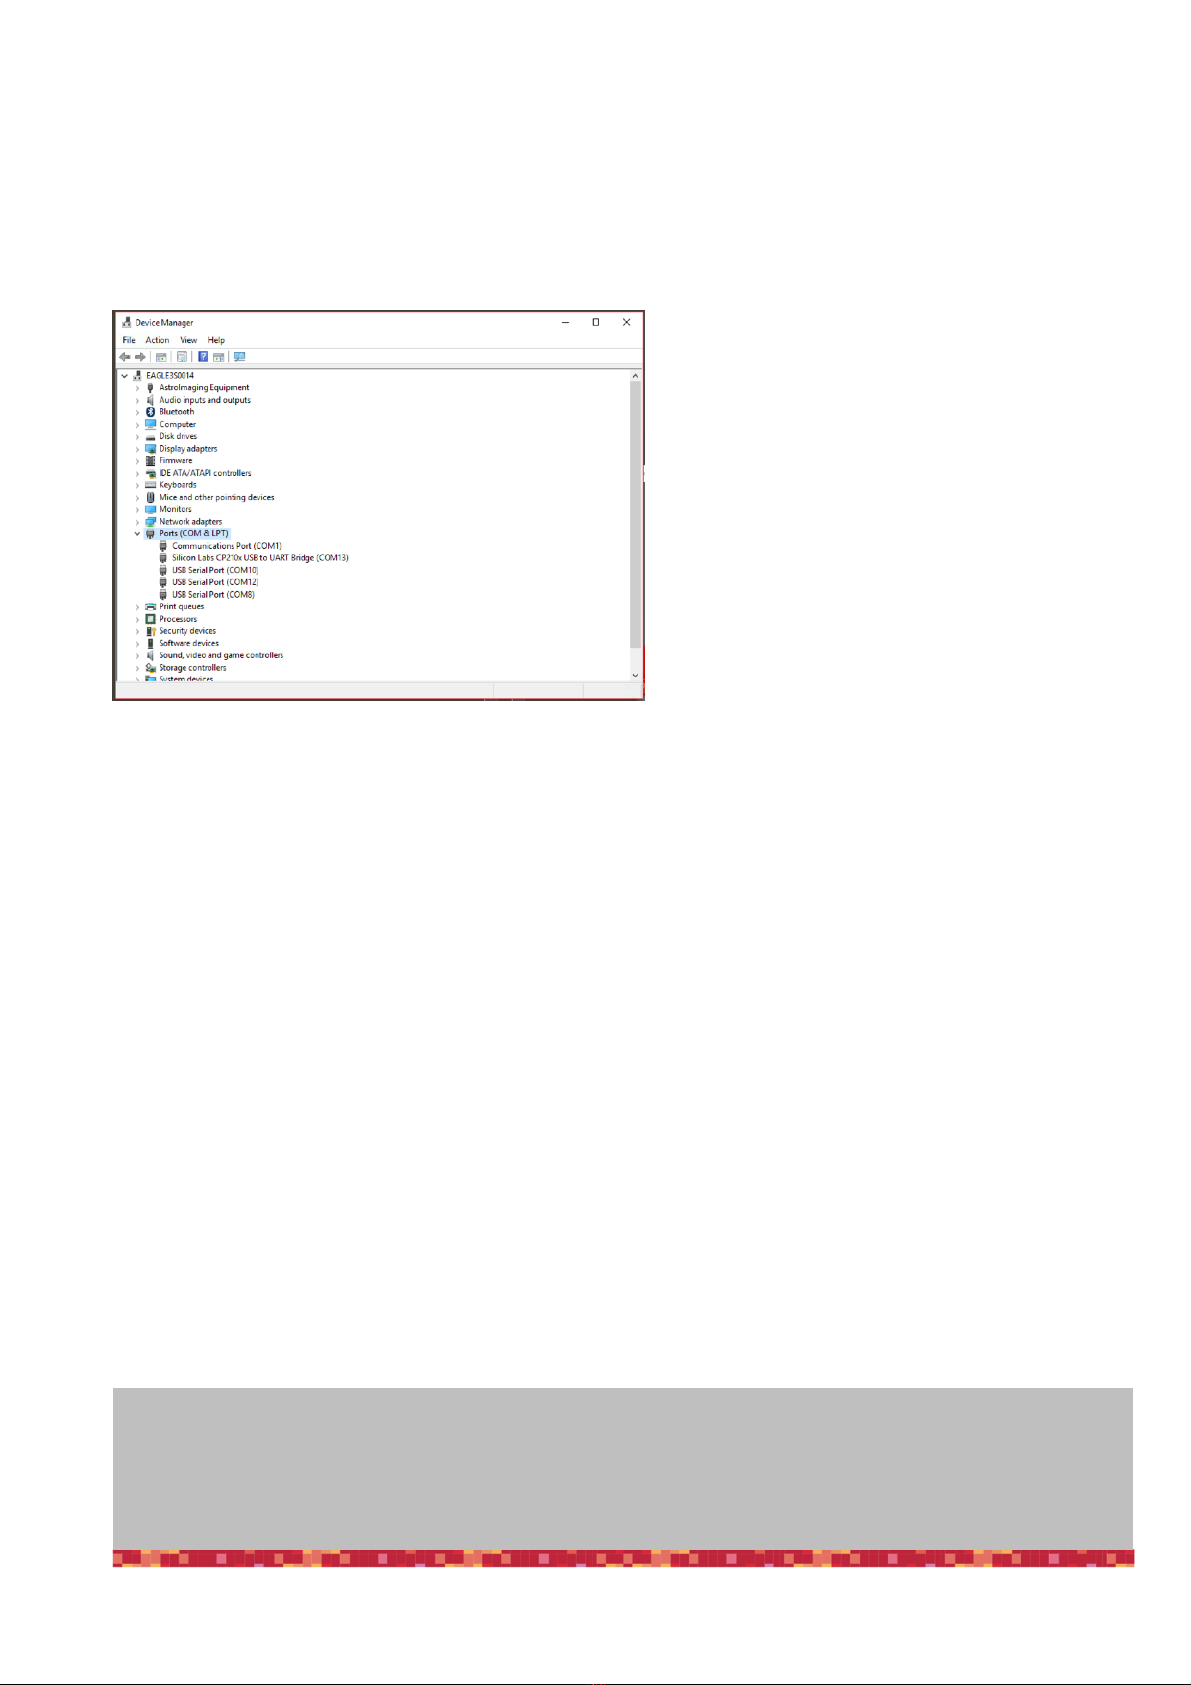
install the new driver. In order to check this, please go
to Control Panel and then choose Device Manager. You
should see the SESTO SENSO 2 listed under “Ports
(COM & LPT)” and described as “Silicon Labs
CP210x” (in order to check, you can disconnect and
then reconnect the SESTO SENSO 2 USB cable and see
how Windows lists it).
If you can’t find it, Windows is not able to automatically install the SESTO SENSO 2 driver. In order to do this, please follow
this procedure:
1) go to "Device Manager”
2) locate "CP2102N USB to UART Bridge Controller" under "Other devices”
3) make a mouse right-click and select "Update Driver Software”
4) select the second option “Browse my computer for driver software” in order to install the driver from a specific folder
5) select the folder where you saved the content of the SESTO SENSO 2 software package you downloaded from our
website
www.primalucelab.com/astronomy/downloads
Please remember to unzip the file you downloaded before starting the installation of the SESTO SENSO 2.
6) at the end of the procedure, a message will appear indicating the correct installation.
Now, under “COM and LPT devices”, you will see a new COM port (in this example COM16) which is the one used by your
computer to communicate with SESTO SENSO 2.
page 6
NOTE
If the driver is not correctly installed in your Windows operative system, SESTO SENSO 2 won’t be able to connect to
your EAGLE or external computer and it won’t work. So please check that the COM driver is correctly installed before
proceeding to the next step.

PrimaLuceLab iSrl SESTO SENSO 2 user manual
SESTO SENSO 2 is supplied with a complete Windows software
“FOCUSER Manager” (included in the file that you download
from the download section of our website) that allows you to
control the SESTO SENSO 2 and manage all its functions. Make
a double click on FOCUSERManagerSetup.exe file to start in-
stallation. Click OK to proceed. In the first window that opens,
please select your language and click the “OK” button to start
the installation.
Then, in the next window, click the “Next” button.
Select the folder where you want to install FOCUSER Manager
software (if you want to change the default one, you can click
on the Browse button and choose for a different folder). Then
click on the “Install” button to start installation.
At the end of installation process, please click on “Close” button to finish. Now you will find the FOCUSER Manager soft-
ware among the softwares installed in your EAGLE or Windows computer. If you leaved the default folder, it will be loca-
ted in “C:\Program Files (x86)\FOCUSER manager” folder.
page 7

PrimaLuceLab iSrl SESTO SENSO 2 user manual
Having connected SESTO SENSO 2 to a USB port of your EAGLE or Windows computer and powered with an external po-
wer source (a 12V battery by using the supplied cigarette plug cable, a 12V AC adapter with at least 1A and Ø5.5/2.5mm
connector or the EAGLE power cable to power it through the EAGLE), pleas select “FOCUSER Manager” software to start it
and you will see this interface:
On the left, select the COM port number your compu-
ter assigned to the SESTO SENSO 2 and click on the
“Open/Close” button. You will see the lights on the
right become green. If you connected also the optional
temperature sensor, you will get the green light also in
correspondence to the “External temperature” row.
page 8
What happens if I can’t connect by pressing the “Open/Close” button?
At this stage, if you can’t connect to SESTO SENSO 2 by pressing the “Open/Close” button, please check the COM port
number that your EAGLE or personal computer assigned to the SESTO SENSO 2. In order to do that, please go to Control
Panel -> Device Manager and search for the SESTO SENSO 2 COM port number. This is the number you have to select in
the FOCUSER Manager software, before starting the connection.
NOTE on internal temperature values
Here you can read the internal motor temperature, it’s normal
to see values from 10 to 50 °C.

PrimaLuceLab iSrl SESTO SENSO 2 user manual
Before moving SESTO SENSO 2, you have to start the
calibration. Please click on the CALIBRATION button and
you will see a new window. Move by hand the focuser
position to the innermost position of your focuser then:
1. press the “Init Calibration” button to start calibration
2. then press the “Set ZERO position” button in order to
set the 0 value of your calibration.
3. click the “Move out (!CAUTION!)” button: this will start
moving your focuser to the outer position. This will
move the focuser.
4. When your focuser is close to the outermost position,
click the “ Stop Motor and Set max limit” button. At-
tention: please remember to stop the motor BEFORE
it will reach the end of draw tube travel or you may
cause problems to the focuser or to the SESTO SEN-
SO 2 motor.
page 9

PrimaLuceLab iSrl SESTO SENSO 2 user manual
Calibration data is automatically stored in the SESTO SENSO 2 electronics so you don’t need to do it again or you don’t
need to make it again if you change the computer to control it.
Moving the SESTO SENSO 2 focuser is very easy. You can do this in different ways:
1. move the slider until you reach the desired position and press the GO button
2. make a double click on the POSITION area, write the number you prefer and then press the GO button
3. make a double click on the number below STEP label, insert the number you prefer and press the < or > buttons to
move the focuser by the number you selected. Press the << or >> buttons to move the focuser by 10 times the
number you selected.
You will see the focuser moving and you will see the focuser draw tube also moving in the software, this is designed to let
you easily understand that it’s really moving also in case of remote operations (that is, when you can’t directly look at the
focuser). In any moment, if you need to stop the movement, press the STOP button in the lower part of the window.
As you will read in the next paragraph, SESTO SENSO 2 robotic microfocuser includes also a WiFi connection (to let you
control it without the need of a personal computer) with WiFi and the included SESTO SENSO 2 Virtual HandPad. You can
use the Virtual HandPad also by controlling the SESTO SENSO 2 with USB and with the FOCUSER Manager software. This
way you can save up to 9 positions, for example to let you recall the focus position of a camera or a visual accessory. In
order to save a new position in the Virtual HandPad, first of all you have to move the SESTO SENSO 2 to a position where
your telescope is in perfect focus (you will need an optical accessory or a camera in order to do this) and then follow this
procedure:
1. Click on one of the empty buttons and select the
“Record current position” option. A new window
will appear asking you to type the name of the
button.
2. By clicking OK the new position will be saved and
the SESTO SENSO 2 Virtual HandPad will show the
new button in red color, with the name you choose.
3. In order to change the name of the button, you can
make a right click of the mouse on the button and
choose “Rename”.
4. If you want to delete a pre saved position, you can
make a right click of the mouse on the button and
choose “Delete”. If you want to change the value of
a saved button, you have to delete it first and then
save the value as a new button.
page 10
NOTE 2
If you can’t see any movement, maybe you set a too
small value to be seen. Please remember that, for
the SESTO SENSO 2 microfocuser, 1 step is only 0.7
NOTE 1
If you moved the focuser manually, you can simply re-calibrate
SESTO SENSO 2 by manually moving the focuser to the inner-
most position and pressing the “Set ZERO position” button.

PrimaLuceLab iSrl SESTO SENSO 2 user manual
To the right of the FOCUSER Manager window you can find the settings of the
focuser. Here you can set the LED lights intensity, the temperature to be visuali-
zed in °C (Celsius) or °F (Fahrenheit) and change the WiFi password to access and
control SESTO SENSO 2 from a smartphone or tablet.
SESTO SENSO 2 allows you to change the LED lights intensity and you can even
turn them off completely (please note, if you turn them off you won’t be able to
check the SESTO SENSO 2 status without controlling it via the provided
software). In order to change the LED lights intensity, please make a left mouse
click on the arrow to the right of the “LED lights” option and set the value you
prefer. LED status will be automatically stored in the SESTO SENSO 2 electronics.
The third option in the SESTO SENSO 2 settings window
allows you to change the unit of measurement of tempe-
rature from °C (Celsius) to °F (Fahrenheit). The last option
in the SESTO SENSO 2 settings allows you to change the
password to connect to SESTO SENSO 2 with WiFi. The
default password is “primalucelab” and, in order to chan-
ge it, please make a mouse left click on the “primalucelab”
word, and you will be able to change it. Press ENTER but-
ton of your keyboard to confirm and you will see a new window asking you to confirm. Press Yes button to confirm.
page 11

PrimaLuceLab iSrl SESTO SENSO 2 user manual
Controlling SESTO SENSO 2 with Virtual HandPad
SESTO SENSO 2 can be controlled also without EAGLE or a computer, by connecting from any smartphone or tablet (also a
computer) with WiFi and using the included SESTO SENSO 2 Virtual HandPad. In order to set the WiFi control, please fol-
low this guide (that has been created on a smartphone with iOS operative system but it’s similar for Android devices)
After you power up the SESTO SENSO 2, turn on the WiFi of your device (that can be a smartphone or a tablet).
You will see the SESTOSENSO2xxxxx
network created by your SESTO SENSO
2, the network name corresponds to
your SESTO SENSO 2 serial number.
Select the SESTOSENSO2xxxxx net-
work. Using the keyboard (virtual or
physical) of your device insert "primalu-
celab" as the default password (or the password you choose if you changed with the FOCUSER Manager software as de-
scribed in the previous paragraph) and then press the "Login" button. The next time you want to access SESTO SENSO 2,
you will no longer have to enter your password: your device will automatically connect when you select the network crea-
ted by SESTO SENSO 2 unless you change the login password. Wait for a few seconds until you get confirmation that your
device is connected to the SESTOSENSO2xxxxx network.
Now you can open the browser of the device (for example Chrome or
Safari), in the url area (in the field where you usually write the url like
www.primalucelab.com), type the address 192.168.4.1 and press the
button RETURN: you will see the SESTO SENSO 2 Virtual HandPad on
your screen.
To create a link directly to your device desktop, simply press the "share"
button and then "Add to Home”. You can personalize the name, or just
leave "SESTO SENSO 2". Press Add button to confirm. The SESTO SENSO
2 connection will be created and you will have a direct and immediate
connection to SESTO SENSO 2 in your device. Press the SESTO SENSO 2
button to start the SESTO SENSO 2 Virtual HandPad.
page 12
NOTE
When you save the focus position in the SESTO SENSO 2 Virtual HandPad,
you will find the same positions when you will control the SESTO SENSO 2
with WiFi from your smartphone or tablet.

PrimaLuceLab iSrl SESTO SENSO 2 user manual
The SESTO SENSO 2 Virtual HandPad allows
you to control and use SESTO SENSO 2 micro
focuser without the need of an EAGLE or of a
computer.
On the top-right of your screen you can find
the SESTO SENSO 2 Virtual HandPad ver-
sion. Then you can read the SESTO SENSO 2
firmware version, the external temperature
(if you connected the optional temperature
sensor) and the internal motor temperature.
Below you can find the slider and the button
to move the SESTO SENSO 2, together with
the step selector.
In the lower part you can find the 9 pro-
grammable buttons that allow you to save
up to 9 different focus positions, name them
and easily recall focus position with just the
push of a button.
Moving the SESTO SENSO 2 focuser with the SESTO SENSO 2 Virtual HandPad is very easy. You can do this in different
ways:
1. move the slider until you reach the desired position and tap on the GO button
2. make a double tap on the left field (where you can read the number in step of your focuser), write the number you pre-
fer with the virtual keyboard of your device and then press the GO button
3. select a value in the “Step offset” selector (from 100 to 2000 steps) and tap the < or > buttons to move the focuser by
the number you selected. Tap the << or >> buttons to move the focuser by 10 times the number you selected.
In any moment, if you need to immediately stop the movement, press the STOP
button in the upper part.
In order to save a new position in the SESTO SENSO 2 Virtual HandPad, first of
all you have to move the SESTO SENSO 2 to a position where your telescope is in
perfect focus (you will need an optical accessory or a camera in order to do this)
and then follow this procedure:
page 13
Virtual HandPad version
Settings
SESTO SENSO 2 controls
Presets buttons

PrimaLuceLab iSrl SESTO SENSO 2 user manual
Tap and keep your finger on one of the empty buttons: the position will be auto-
matically saved with a “Preset” name.
Tap on the name of the button and you will be able to change it by using the vir-
tual keyboard of your device. Press ENTER button to confirm the new name.
By pressing the top-left button in the SESTO SENSO 2 Virtual HandPad main
screen, the option menu will appear. Here you will be able to set:
1) LED dimming: you can change the SESTO SENSO 2 LED lights intensity to the
value you prefer. LED status will be automatically stored in the SESTO SENSO 2
electronics.
2) Calibration: if you want to redo the calibration, by pressing this button you will
re calibrate SESTO SENSO 2 again.
3)Advanced settings: here you can set the advanced settings of your SESTO
SENSO 2 unit, please refer to the previous paragraphs to understand the use of
the advanced settings.
page 14
NOTE
When you save the focus position in the SESTO SENSO 2 Virtual HandPad, you will find the same positions when you
will control the SESTO SENSO 2 with USB from your EAGLE or external computer.
ATTENTION
In any case, if you want to reset the SESTO SENSO 2 manually, when the SESTO SENSO 2 is powered on please press
the button RST (Reset) for 10 seconds. SESTO SENSO 2 will reboot and it will be reset to factory settings.

PrimaLuceLab iSrl SESTO SENSO 2 user manual
SESTO SENSO 2 Advanced Settings
By clicking the upper right button on SESTO SENSO software, it will show the advanced parameters that may be used, for
example, to have a perfect match of SESTO SENSO with your telescope’s focuser, to better support the weight of the ima-
ging accessories you use (camera, off axis guider, filter wheel, etc.) used in astrophotography.
Quick Settings:
In order to simplify SESTO SENSO 2 settings, we created some preset profiles from which you can start to create the ideal
configuration based on the weight load applied to the focuser and the moving speeds you want.
Light and Fast button is recommended for light loads.
Medium button is recommended for medium loads.
Heavy and Slow button is recommended for heavy loads.
The 3 buttons “User 1”, “User 2” and “User 3” allow you to save up to 3 quick settings based on your personalized values
of Speed and Current.
page 15

PrimaLuceLab iSrl SESTO SENSO 2 user manual
Advanced Settings:
In the first set of commands, the operating currents of the SESTO SENSO 2 motor are reported, the values that can be set
range from 0 to 10.
• Acceleration: set the current in acceleration ramp
• Run: set the current after acceleration ramp during RUN
• Deceleration: set the current in deceleration ramp
In the second set of commands (“Speed settings), the SESTO SENSO 2 motor movement speed parameters are set.
• Acceleration: set the acceleration during starting ramp (Range from 0 to 10)
• Run: set the speed value after acceleration ramp (Range from 0 to 10)
• Deceleration: set deceleration value after slowdown ramp (Range from 0 to 10)
• Hold: set the hold current, when the motor is stopped
The third option allows you to activate the Hold current.
page 16
NOTE: if the focus micrometer reduction system has slippages between the micrometer pin and focuser shaft, you can
solve this problem by setting the Acceleration, Run, and Deceleration (in Speed Settings) to 1.

PrimaLuceLab iSrl SESTO SENSO 2 user manual
Controlling SESTO SENSO 2 with ASCOM drivers and third party softwares
In order to control your telescope focus with SESTO SENSO 2 you can also use third party softwares instead of the FOCU-
SER Manager described in the previous paragraphs. In order to do this, you can use SESTO SENSO 2 ASCOM drivers. In
order to install SESTO SENSO 2 ASCOM driver in the EAGLE or Windows computer you use to control SESTO SENSO 2,
please follow these steps:
Now you can use and control SESTO SENSO 2 by using third party softwares for Windows and that supports ASCOM plat-
form. In this guide we’ll show two examples with 3 softwares commonly used in astrophotography:
Make a double click on the SESTOSENSO2AscomDriverSetup.exe that is part
of the SESTO SENSO 2 software package you downloaded from our website
https://www.primalucelab.com/astronomy/downloads
A new window will appear, select “I accept the agreement” and press Next
button to proceed.
In the next window, press the Install button to proceed with installation.
When the installation is completed, press the Finish button
page 17
NOTE
ASCOM is an open platform that allows an integration between astronomy softwares and devices. In order to use ESAT-
TO with ASCOM drivers, first all you have to download the ASCOM platform (from https://ascom-standards.org website,
SESTO SENSO 2 has been tested with ASCOM platform 6.4) and install it in the Windows computer you use to control
SESTO SENSO 2.

PrimaLuceLab iSrl SESTO SENSO 2 user manual
1) Sequence Generator Pro: http://mainsequencesoftware.com
Start Sequence Genera- tor Pro and, in the Equipment profiler, select “ASCOM Focuser Driver for SESTO SENSO 2”
then click on the first icon to the right. This will open a new window asking for the COM port number. Select the COM
port related to SESTO SENSO 2 and press the OK button.
This will start the connection to the SESTO SENSO 2 and you will see position, temperature (if you connect the optional
temperature probe) and movement buttons in the “Focus Control” tab (to the right of the above image).
page 18

PrimaLuceLab iSrl SESTO SENSO 2 user manual
2) N.I.N.A.: https://nighttime-imaging.eu
Select the “Equipment” tab, select “ASCOM Focuser Driver for SESTO SENSO 2” then click and click on the
button to the right of the “Focuser” area. This will open a new window asking for the COM port number. Select the
COM port related to SESTO SENSO 2 and press the OK button. This will start the connection to the SESTO SENSO 2 and
you will see position and temperature (if you connect the optional temperature probe).
page 19
Other manuals for SESTO SENSO 2
2
Table of contents
Other PrimaLuceLab Engine manuals