Prime Design Baselight 420X User manual

PAGE 1
BASELIGHT 420X
USER MANUAL

PAGE 2
Thank you for choosing Baselight! We hope that this product will help boost your
producvity. Don't hesitate to contact your preferred supplier or Prime Design
Sweden if you have any quesons!
Prime Design Sweden AB
Sales: sales@prime-design.se
Support: support@primde-design.se
www.baselight.se
Read this carefully before
operaon for your safety!
Welcome!

PAGE 3
Table of contents
Operaon overview 4
Component diagram 5
Leg operaon 6
Mast operaon 7
Armature conguraon 8
Using the ballast accessory 9
Maintenance & Technical data 10
Read this carefully before operaon to avoid
personal injury or void warranty.
Baselight 420X is a mobile lighng equipment intended for temporary illuminaon where high
lumen output in combinaon with low weight and minimal power consumpon is required.
Baselight is designed to protect the operator as much as possible and all important safety func-
ons are in red color. It is however a requirement that the operator understand the limitaons
of this equipment by reading this manual.
• Never cover the armature when switched on.
• Deploy the legs and secure their locking before the armature and mast is raised.
• Never switch on power before armature is outside the chassi.
• Make sure that Baselight is properly secured to the ground.
• Make sure that Baselight stands level on ground before the mast is raised.
• Make sure that Baselight is secured to the ground on slippery surfaces (snow, mud etc).
• Never try to adjust the leg angle when the mast is raised.
• Never use high pressure water to clean/rinse Baselight. Use garden hose pressure only.
• Always use electrical connecons with protecve earth and ground fault switch.
• Never try to open electrical juncon boxes. Dangerous voltage inside!
• Never hold out the red locking handles when raising the mast.
• Never use chemical substances to clean Baselight.
• Never put any extra weight/equipment on mast or armature.
• Make sure each secon locks (click sound) when raising mast.
• Never drop the mast onto lock bellow. Slide downwards gently.
• The light source in this product is based on light eming diodes (LED). Avoid looking into the light
source as this may aect your eyesight.
PAGE 4
Engage locking lever in up
posion on all three legs (Se
chapter ”Leg operaon”)
Extend all three legs
to the ground.
Adjust leg angels if necessary so that
Baselight stands straight and level
(See chapter ”Leg operaon”)
Press red lever inside
chassi to eject armature
out of chassi.
Chose armature congura-
on. (See chapter
”Armature conguraon”)
Raise mast to desired
height. (See chapter
”Mast operaon”)
OPERATION OVERVIEW
12
456
7
Raise box unl it stands
up. Self locking
3
PAGE 5
1Armature
2Armature plaorm
3Armature juncon box
4Mast lock x6
5Spiral cable
6Mast
7Chassi
8Mains juncon box
9Dimmer
10 Power switch
11 Power extension outlet
12 Power cord
13 Power supply x 2
14 Wheels
15 Wheels assembly
16 Leg lock
17 Support leg
18 Main leg
19 Surface shoe
20 Handle x2
COMPONENT DIAGRAM
1
2
3
4
5
6
7
8910
11 12 13
14 15
16
17
18
19
20
PAGE 6
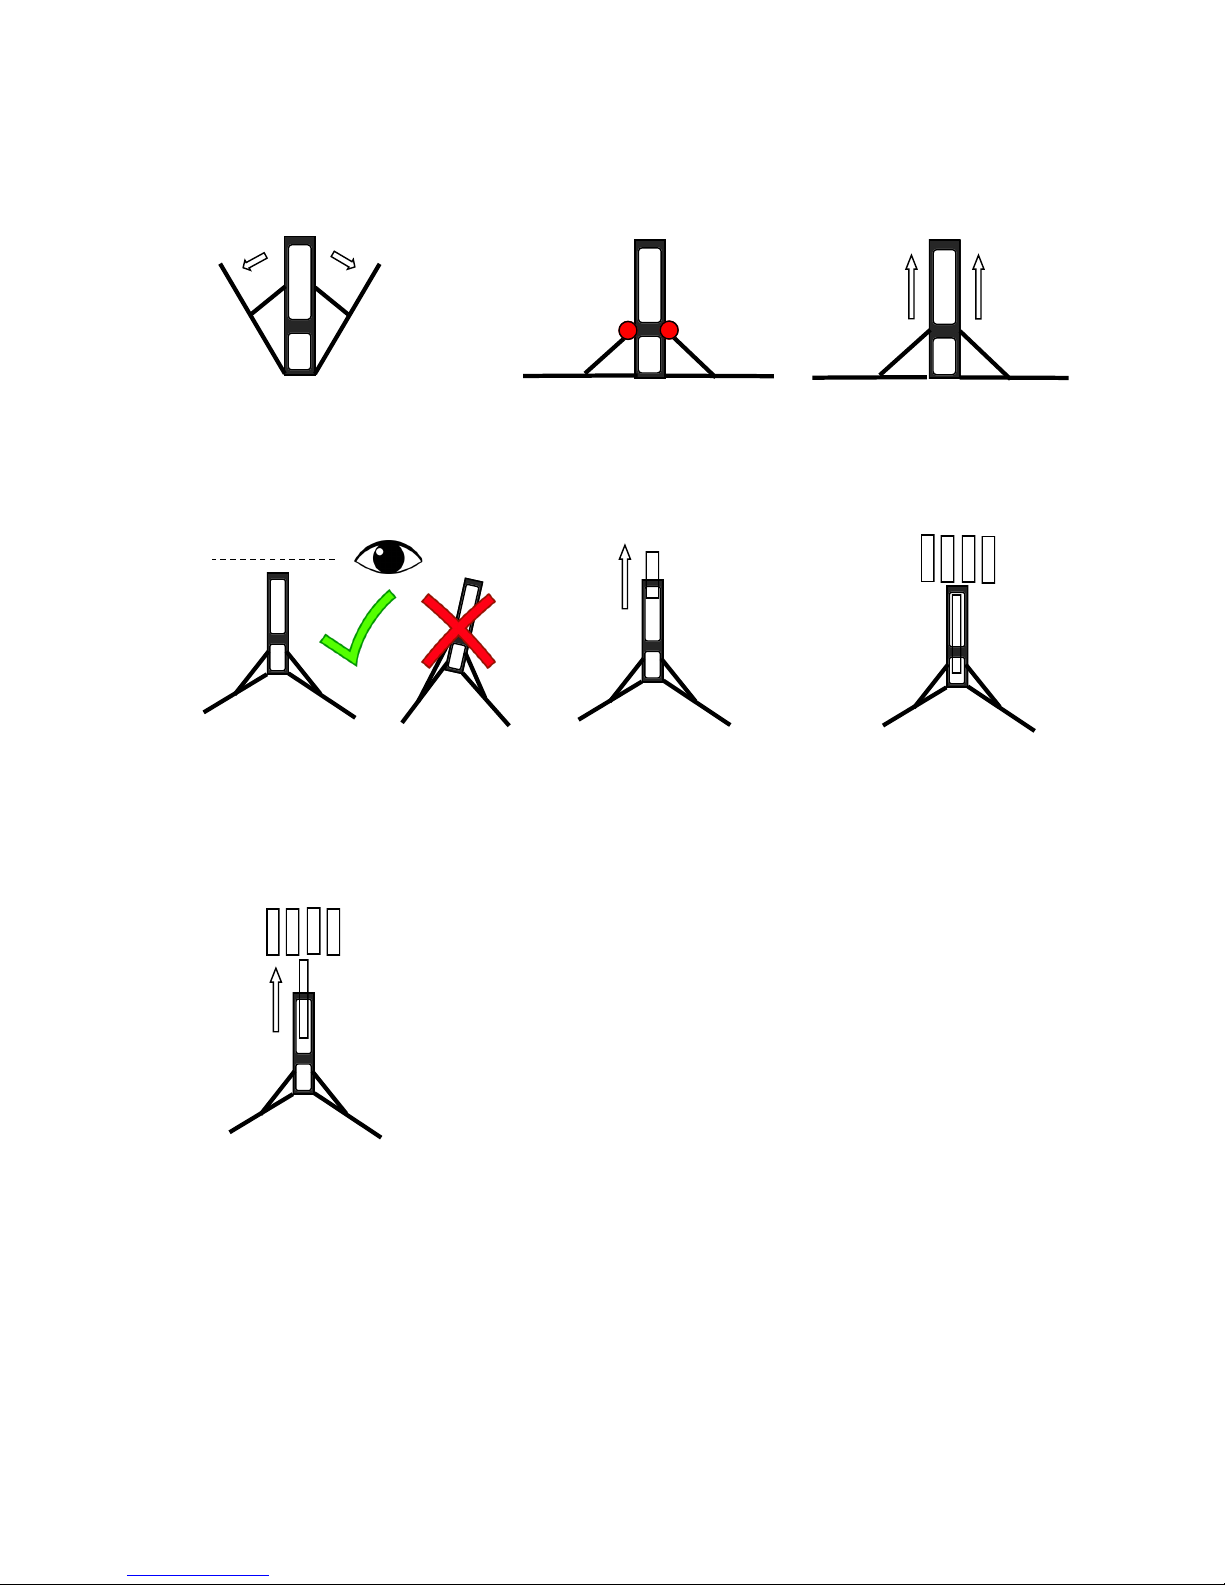
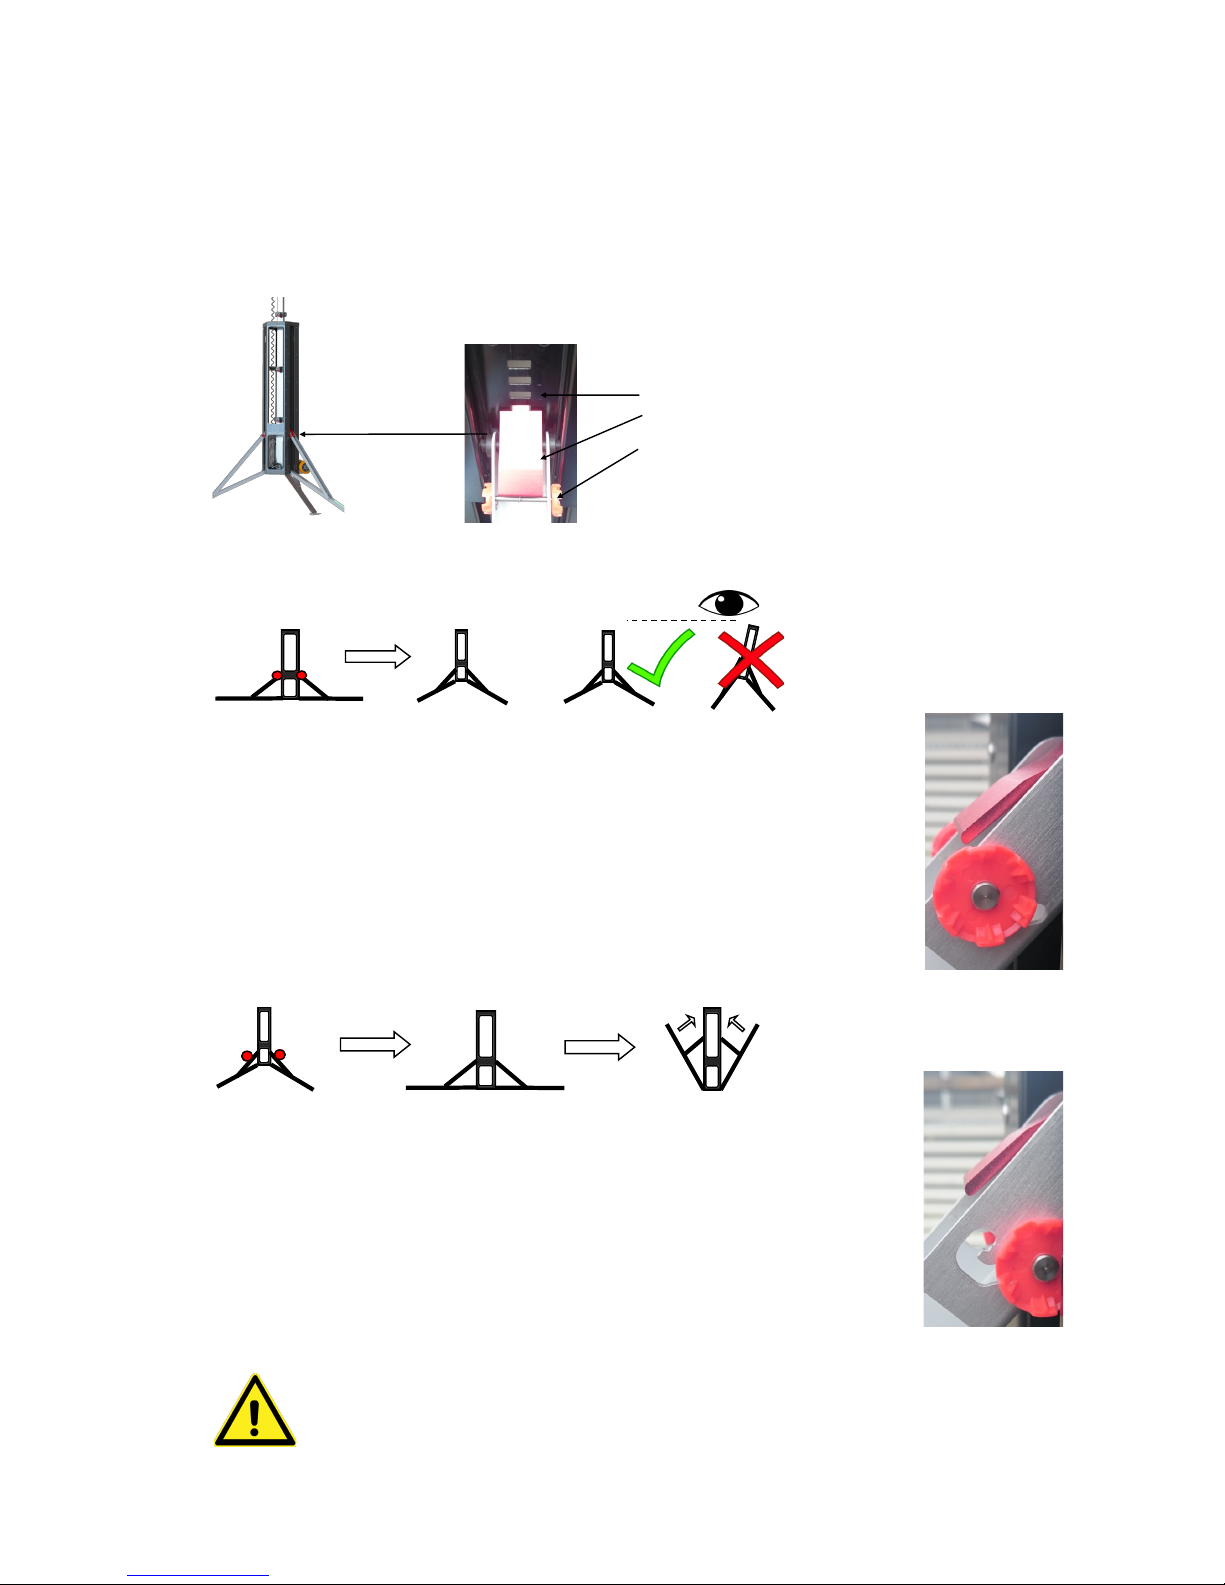
LEG OPERATION
1Locking slot
2Locking clamp
3Locking lever
CAUTION! Never try to adjust leg angels aer the mast is extended.
Always lower the mast before making adjustments.
The leg adjustment mechanism contains three parts:
Baselight have three support legs that can be individually adjusted to compensate for uneven
terrain. The goal for the operator is to ensure that Baselight chassi always stand straight (level)
BEFORE rising the mast.
How to unsecure legs before lowering chassi
Always make sure that Baselight armature is stoved inside the chassi before pro-
ceeding with this step!
Release the locking lever by bringing it to the down posion on all three legs.
The self locking mechanism is now deacvated and the Baselight chassi can now
be raised from the ground a few cenmetres and the locking clamps will now
leave the locking slots. It is now possible to lower the chassi to the ground. Pic-
ture shows locking lever in unlocked posion (lever down).
How to secure legs before rising chassi
When the locking lever is in its top posion the self locking mechanism is
engaged. Baselight will now self lock when chassi is raised. The operator
must determine if Baselight chassi is standing straight (level) aer being
raised from ground and adjust if necessary. Failure to check horizontal
level can lead to more fricon when raising mast. Picture shows locking
lever in locked posion (lever up)
Locked
Unlocked
PAGE 7
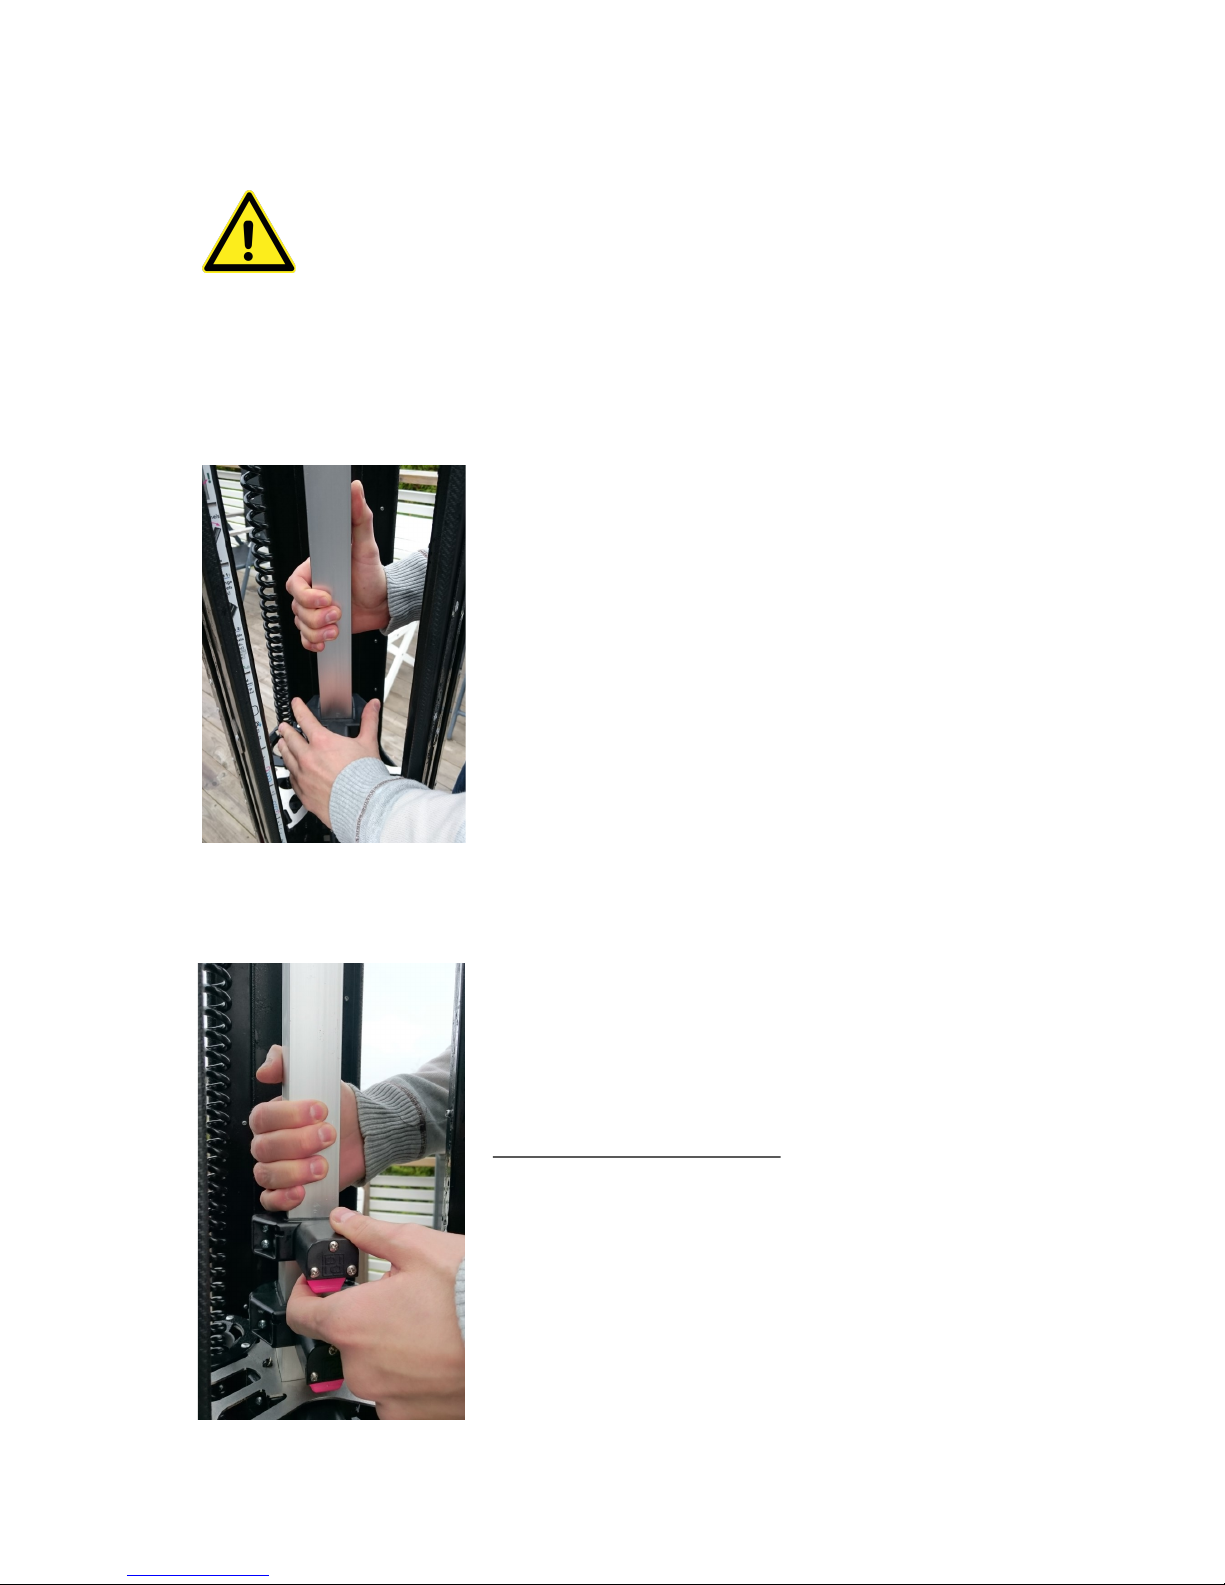
MAST OPERATION
TO EXTEND THE MAST
1. Make sure that the support legs have been extended and locked
and that the chassi is raised from ground and in a level posion. See
chapter ”Leg operaon”.
2. When raising a mast secon place one hand on the telescopic
pole and the other hand on the lock bellow to hold it in place while
liing the secon above. Start with the top secon and repeat for
each secon below.
3. Raise each secon up unl the lock engages with a click sound.
Make sure it is locked by moving the secon up and down before
releasing grip. Failure to do so could cause the secon to fall down
and damage the lock bellow.
Now it is me to chose a conguraon of light. See chapter ”Light
conguraon”
CATION! Baselight contains a self locking telescopic mast. To avoid personal
injury or damage to Baselight these procedures must be followed!
Before extending the mast the armature must be ejected from the casing and the preferred light
conguraon selected (360 or 180, for example). Ejecon of armature is done by pressing the red
lever placed under armature on the chassi wall.
TO LOWER THE MAST
1. Always start by lowering the boom secon rst and then the
one above (and so on).
2. Place one hand around the lock and use the index nger to pull
on the red grip while the other hand grips around the mast secon
and li it upwards a cenmetre. This will disengage the safety
mechanism and make downwards movement of the secon possi-
ble.
3. Keep the grip around the mast secon (right hand in picture)
and let it slide downwards slowly. Apply breaking if necessary. The
secon should never be allowed to drop onto the next secon
which could damage to the locking mechanism.
4. Before the last secon is lowered the operator must congure
the armature for stoving before pushing armature back into chassi.
PAGE 8
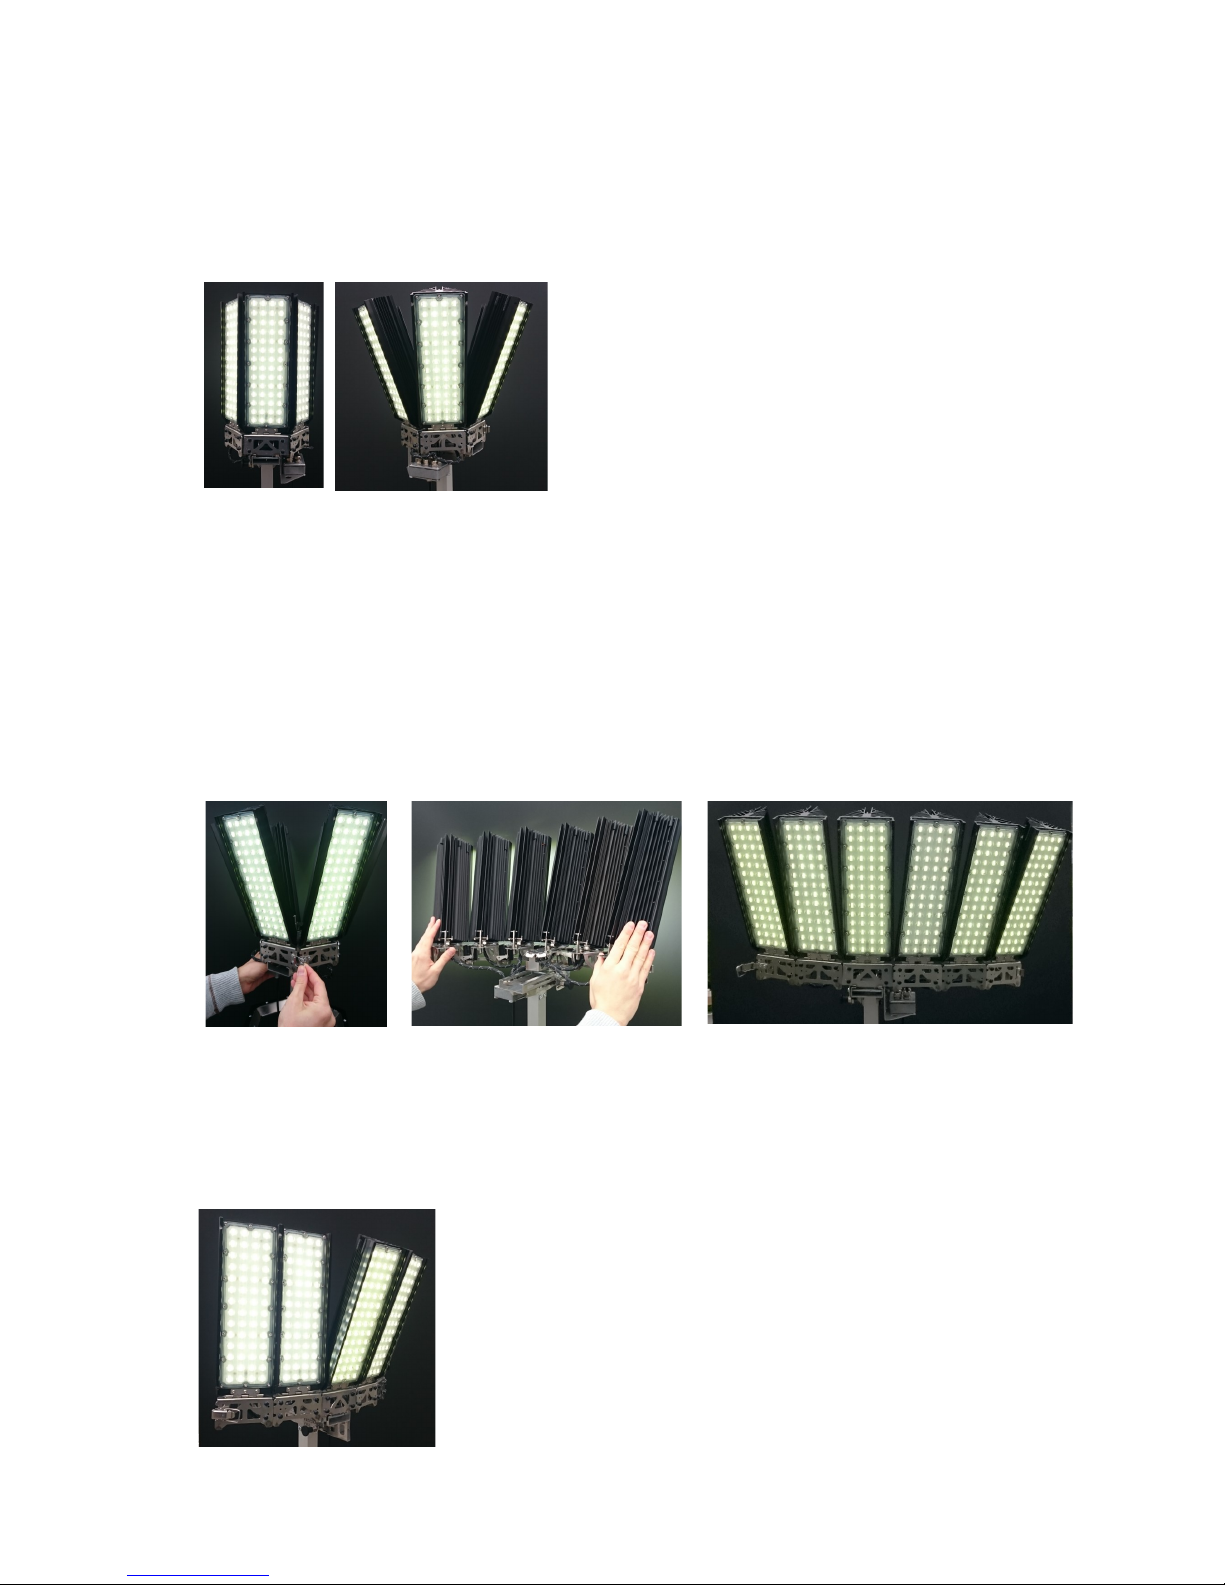
ARMATURE CONFIGURATION
360 Degree conguraons
This type of conguraon provides light in all direcon (360 degree).
When used in a lted mode make sure that the fricon lock engages. The operator folds out the
panels unl they reach a stopping posion with a disnct click sound (Fricon lock engaged). This
posion ensures that wind cannot alter the angle.
180 Degree conguraons
This type of conguraon provides concentrated light in one direcon (180 degree). Open the
snap lock on the armature base and adjust the armature by pushing it out gently to a desired
conguraon.
Mixed conguraon
As the name implies this is a mix of lted and straight armatures or armatures being in any congura-
on between open or closed. Note that a straight standing armature will project light at a further dis-
tance while a lted one will direct light onto the ground more eecvely.
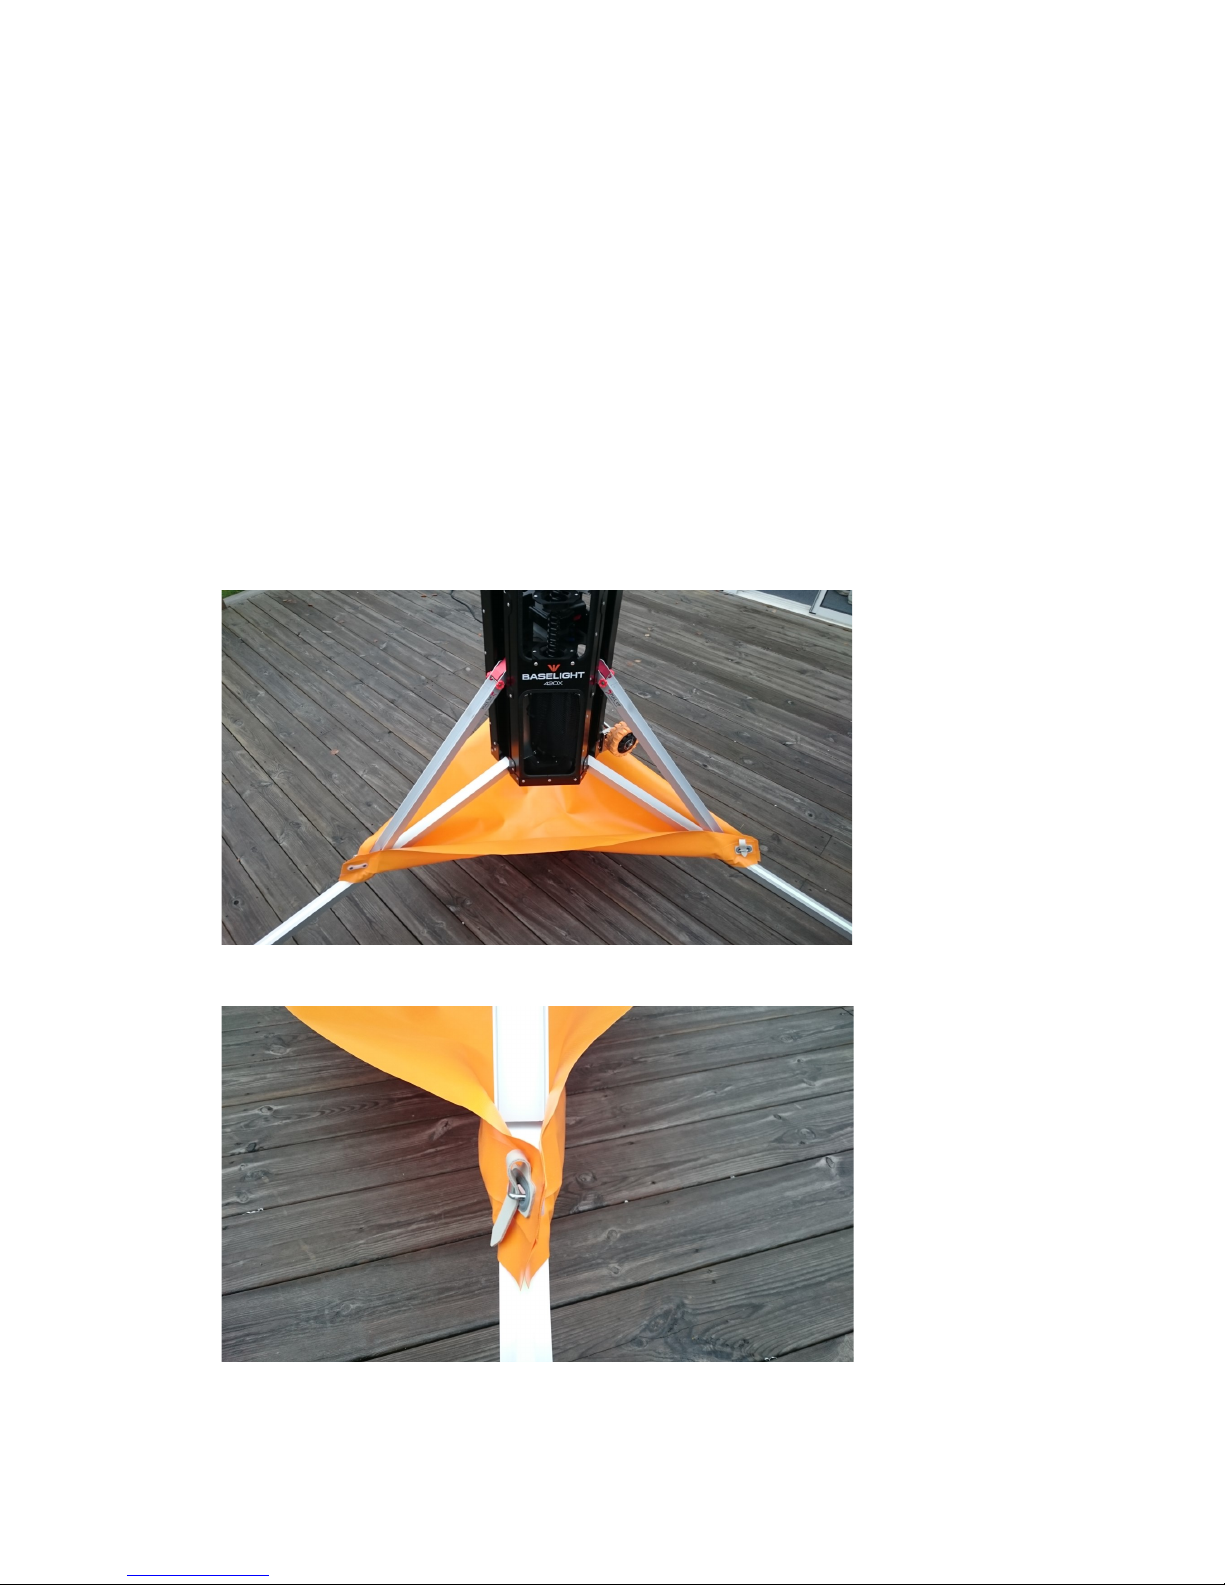
PAGE 9
The ballast accessory is used to stabilize Baselight in heavy wind. This eliminates the need of
support lines in winds over 20 m/s. With this accessory properly applied the wind resistance
is >30 m/s.
Aach the ballast sheet as show in the picture. It can then be lled with gravel, sand or wa-
ter. Fill it 2/3 or about 20KG as a maximum. The operator must determine a suitable amount
depending on the expected wind velocity by observing the movement of the mast and the
unit as a whole.
Test the correct amount by trying to move Baselight sideways aer lling up. Swaying of
mast and armature is normal but the legs should not leave the surface.
BALLAST ACCESSORY

PAGE 10
MAINTENANCE
Baselight is designed for minimal maintenance and use in remote locaons. It is a key feature of
the product to require lile or no maintenance. The recommended maintenance is as follows:
Before every usage the operator must:
Check electrical wires for damage.
This relates to:
-Main power cable & plug
-Extension cable & plug
-Armature cables
-Spiral cable
Any damaged found on these items re-
quire immediate service. Do not proceed
with operaons unl fault is removed.
Every year:
Lubricaon of the telescopic mast.
Each year the inside of the mast secons should be
lubricated with silicon spray. This is a simple proce-
dure that involves the following steps:
1. Li each mast secon (one at a me) while
holding out the red lock unl part of the mast
locking hole is visible above the lock itself.
2. Spray silicon inside for about 3 seconds.
3. Release red lock and slide mast secon down.
4. Repeat procedure for every mast secon.
TECHNICAL DATA
Wind resistance without ballast......................................Up to 20 m/s
Wind resistance with ballast………………………………………...Up to 30 m/s
Luminous ux.................................................................50.000 Lumen
Light source lifeme.........................................................50.000 Hours
Working temperature................................................-30 to + 45 Deg C
Operang voltage.................................................90 to 305 VAC/50Hz
Power connector............................................................CEE or Schuko
Colour temperature...................................6000 Kelvin (Bright Daylight)
Power consumpon...................................15 to 420 Wa (Dimmable)
IP Rang.........................................................................................IP67
Weight..................................................................................35Kg(77lb)
Fully extended height............................................ 4.7 Meters (16 feet)
Transport dimensions.............................................. 1200mm x 280mm
Cercaon…………………………………………………………………………………...CE

PAGE 11
Table of contents


