Primrose CAN0033 User manual

Sliding roof canopy
Instruction manual
SIZE:L392xW305xH207/H262cm
IMPORTANT
You must read these instructions carefully before you start to assemble this Sliding roof canopy .Please ensure
that you find all parts.
in the carton box in the correct type and quantity as mentioned in the list illustrated in every page accordingly.
Please carry out the steps in the order set out in these instructions.
Do not tighten the steps in the Sliding roof canopy until completing on the assembly.
Keep these instructions in a safe place for future reference.
CAN0033
!
SAFETY ADVICE
We strongly recommend the use of work gloves during assembly.
Do not attempt to assemble the Sliding roof canopy in windy or wet conditions,
Do not touch overhead power cables with the aluminum profiles.
Always wear shoes and safety goggles when working with extruded aluminum.
Dispose of all plastic bags safety-keep them out of reach of small children.
The Sliding roof canopy must be positioned and fixed on a flat level surface.
Do not lean against or push the Sliding roof canopy during construction.
Keep children away from the assemble area.
Do not position your Sliding roof canopy in an area exposed to excessive wind.
Do not attempt to assemble this Sliding roof canopy if you are tired ,have taken drugs or
alcohol or
if you are prone to dizzy spells.
If using a step ladder or power tools ensure that you follow the manufactures safety advice.
Hot items such as recently used grills, blowtorches etc.must not be stores in the Sliding roof
canopy .
Ensure there are no hidden pipes or cables in the ground before inserting the pegs.
GENERAL ADVICE
This is a multi-part assembly, Allow at least 200 minutes for assembly.
Selecting a site-choose a sunny level position away from overhanging trees.
If you are fixing your Sliding roof canopy directly to a solid concrete foundation use
the
pre drilled holes in the metal base supplied.
The component parts should be checked and laid out close at hand.
Keep all small parts(screws etc)in a bowl so they do not get lost.
Note that the door is hinged on the right hand side and therefore opens tothe right.
Keep roof clear of snow and leaves.
CARE & MAINTENANCE
When your Sliding roof canopy needs cleaning, use a mild detergent solution and
risen
with cols clean water.
Do NOT use acetone, abrasive cleaners or other special detergents to clean the
clear panels.
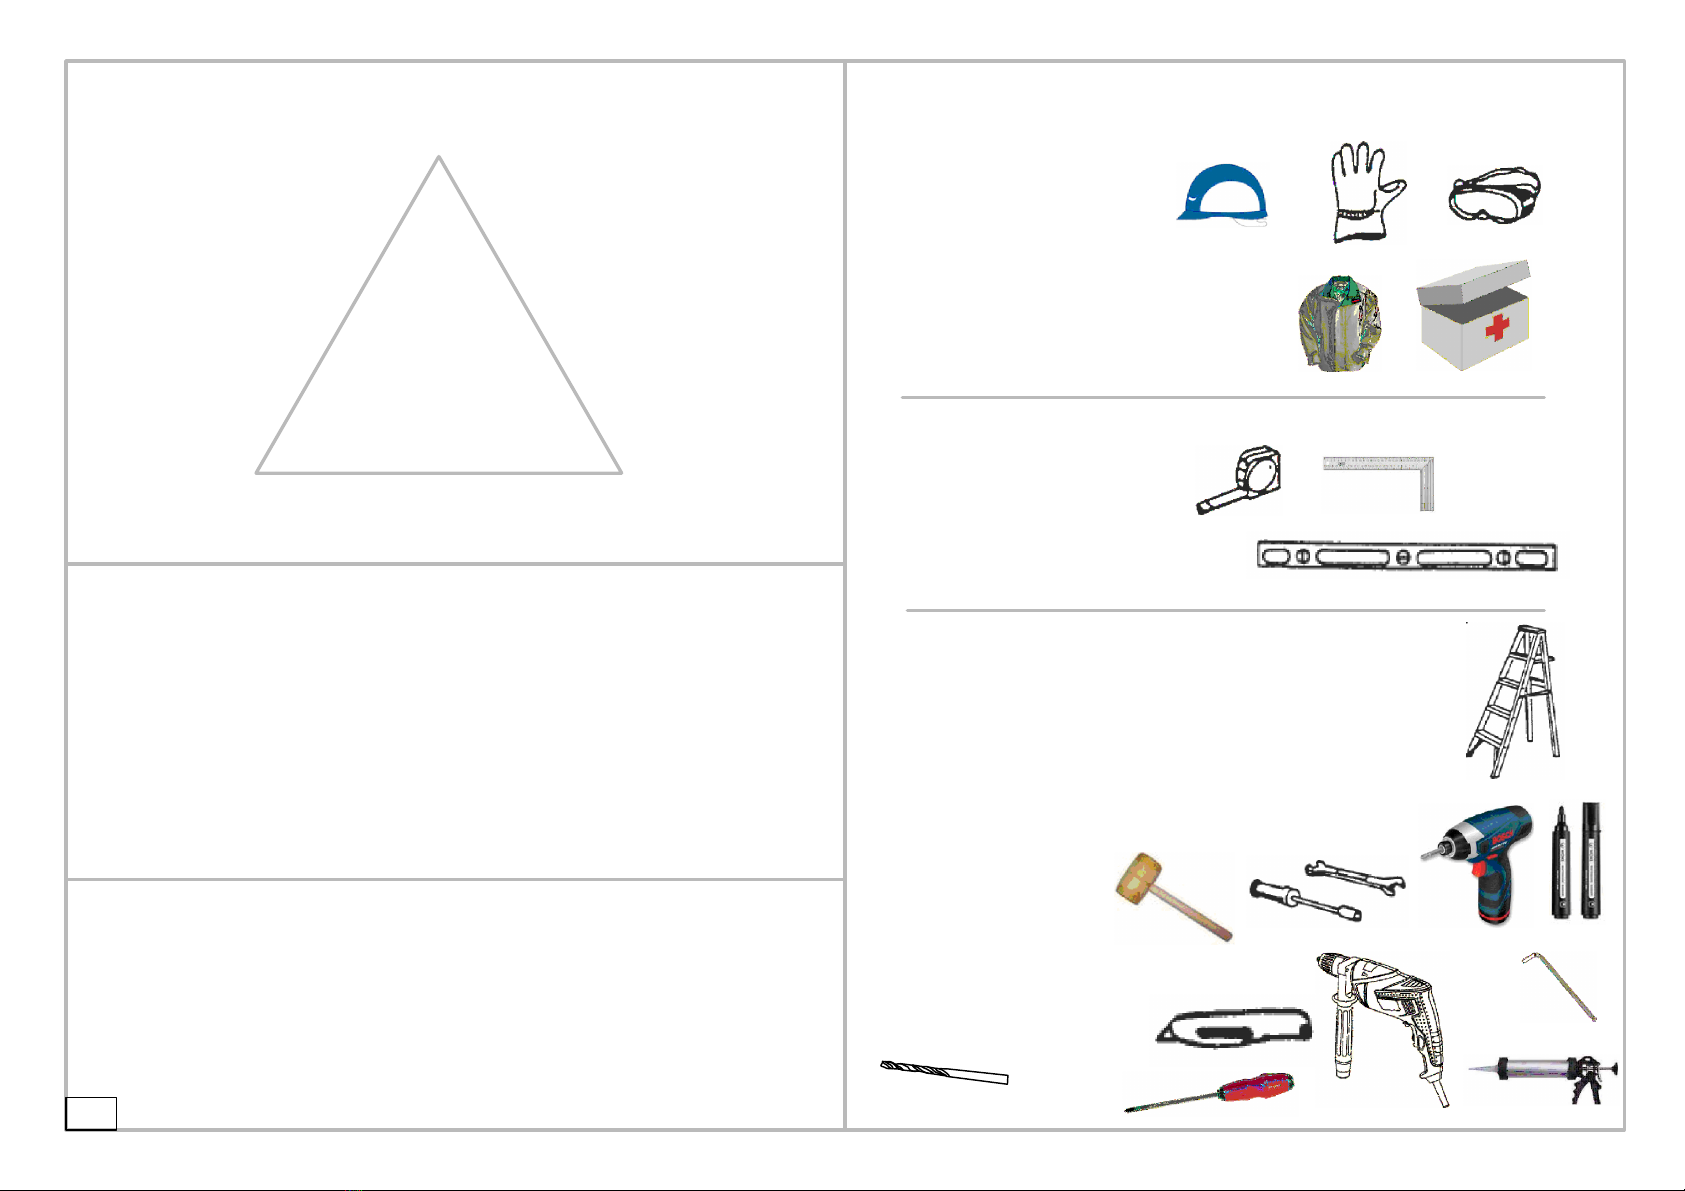
TOOLS & EQUIPMENT REQUIRED
Protective Equipment:
1.Helmet
2.Glove
3.Long Sleeve Cotton Overalls
4.Emergency Medicine Cabinet
5.Eye Shield
Measure (metric):
1.The Tape (5 m)
2.Angle Square
3.Level Meter
-2-
Installation Tool:
1.Triangle Stairs≈2m Height
2.Spanner 10mm (Ratchet Wrench is better)
3.Spanner 14mm (Install the expansion screw)
4.Hexagon wrench 5mm
5.Electric screwdriver+5mm Hexagon wrench
(suggest)
6.Wooden Mallet
7.Marking Pen
8.Percussion bit(8mm and 10mm)
9.Knife
10.Phillips screwdriver
Ø3

!
OTHER CAUTIONS
1. 3 people required, one is for measuring & taking marks
to ensure the installation dimension ,the second person is
responsible for the installation and the last one do as
assistant and assure the safety.
2. Firstly, make sure the wall is strong enough for
installation. A brick concrete structures is the best choice.
3. High-power electric tools are required, ensure the
normal work of them and highly pay attention to electric
safety.
4. Be careful when using the kind of blunt tools, like
hammer.
5. Wearing long sleeve cotton overalls,gloves and helmet
during installation and wear safety glasses when using
power tools .
6.No up watching when working height, or the drop
screws may hurt your eyes and suffocation causing
accidentally when fall into your mouth.
7. No climbing, No standing on the tent to avoid falling
down.
8. If injuries immediately, using the first-aid kit to stop
bleeding, bind up, In case of emergency, taken
immediately to a nearby medical institutions.
PRODUCT SIZE
Make sure a good installation location
-3-
392cm
305cm
208cm 223cm
262cm

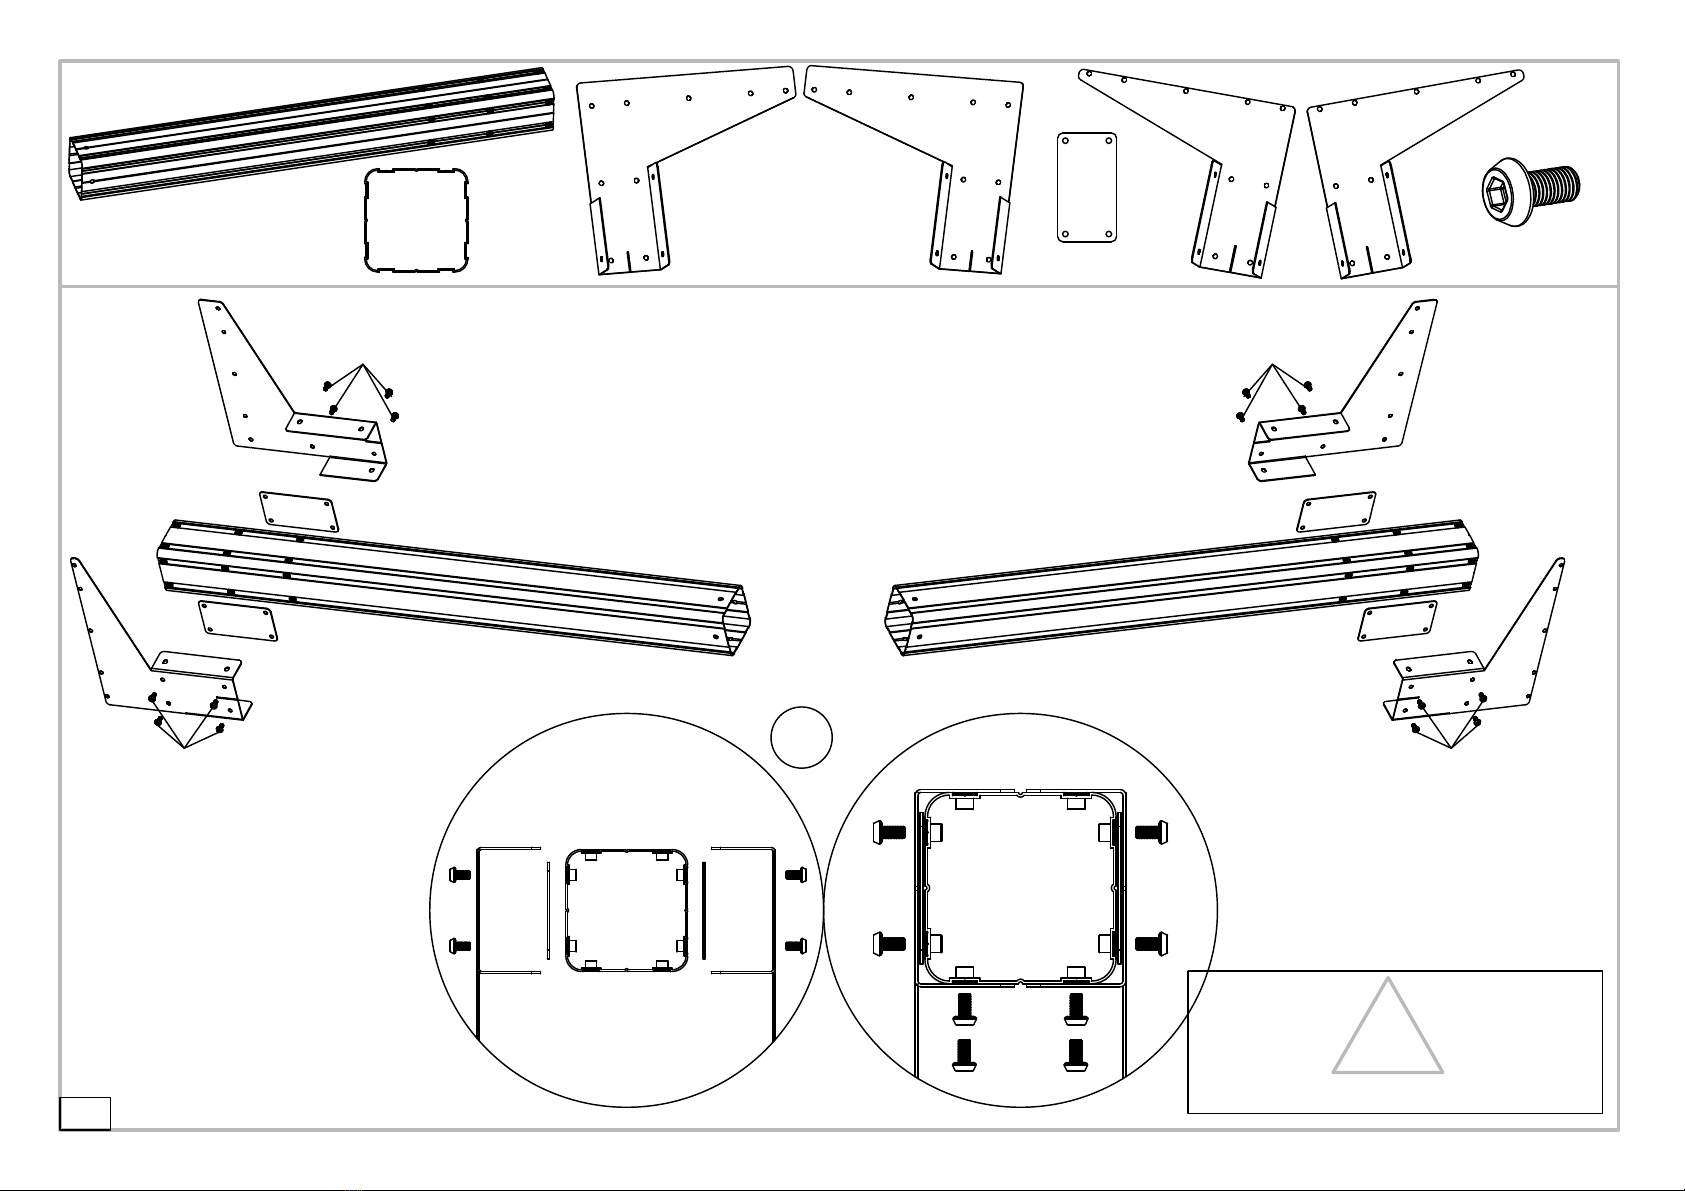
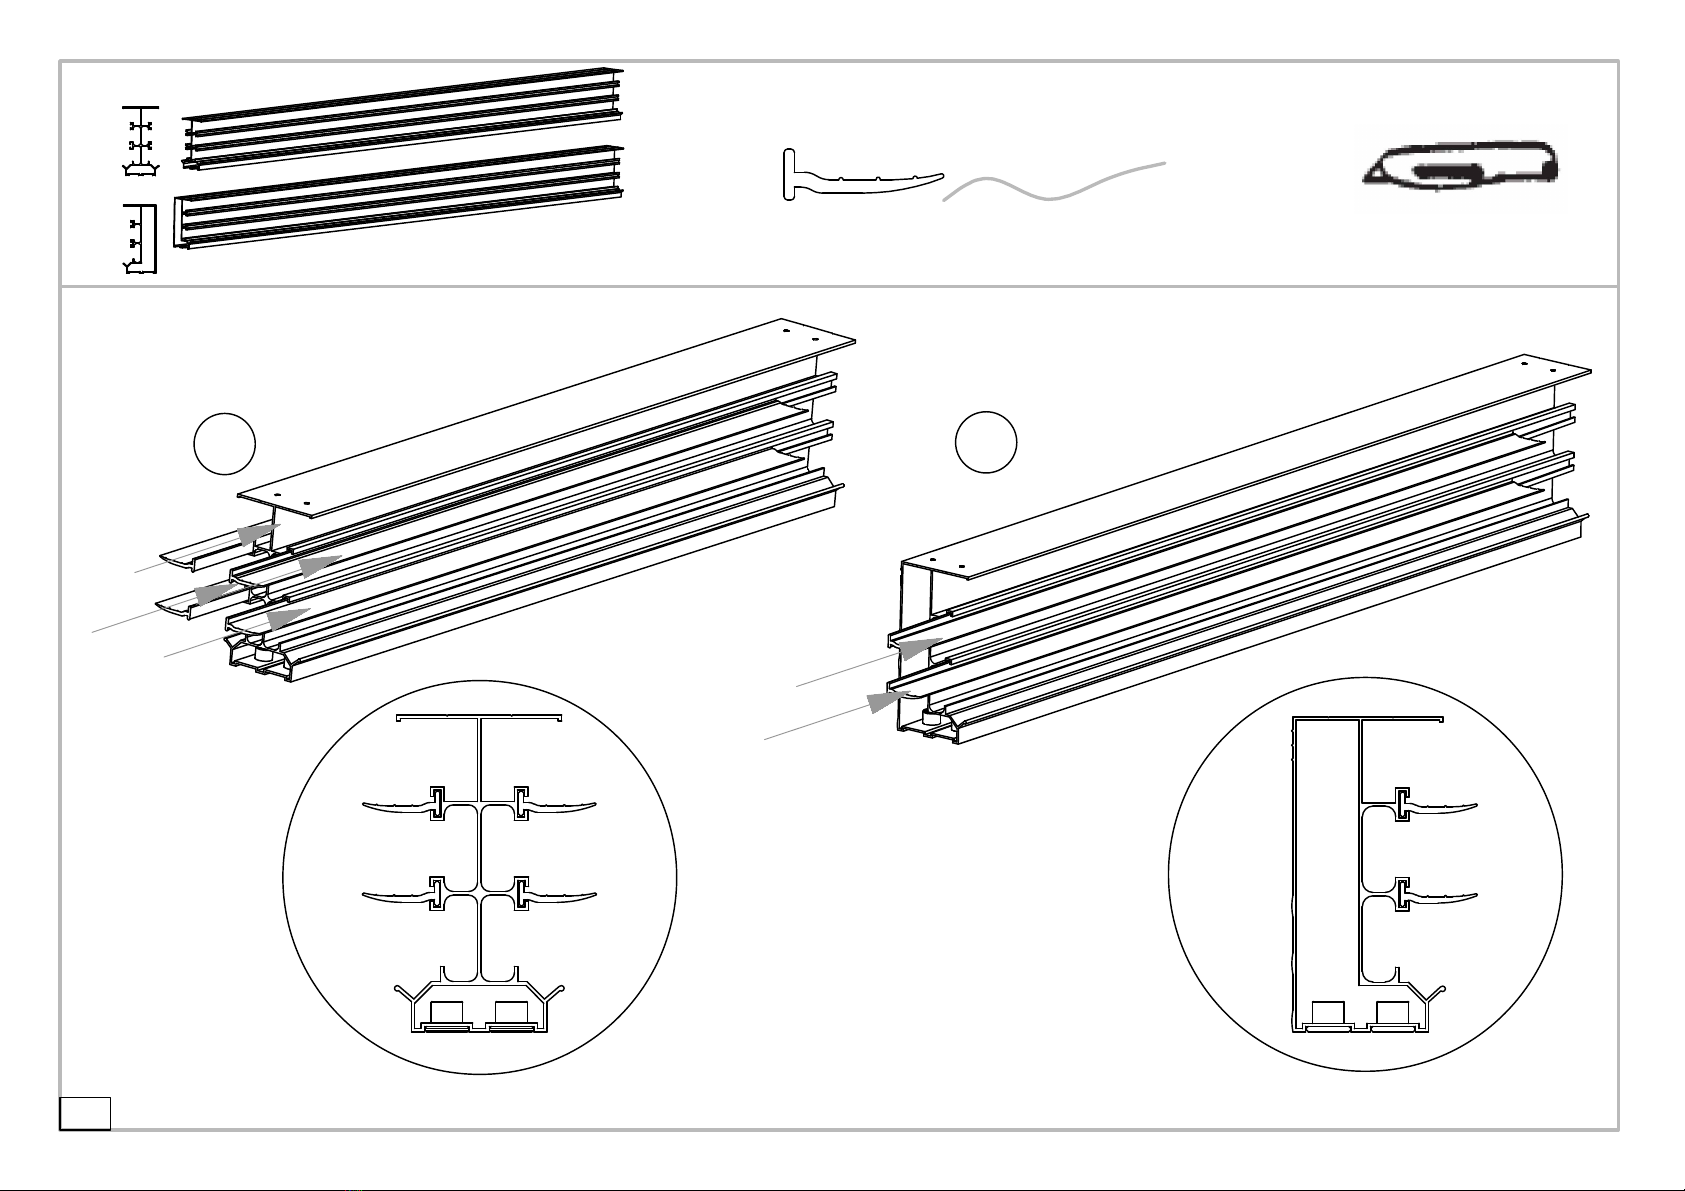
PARTS LIST
-4-
SKELETON
NO. Qty.
1 1 2870mm
2870mm
6 2
9 1
5 1
7 1
NO. Qty.
CONNECT
2870mm
B1 4
3914mm
3914mm
2100mm
3914mm
2531mm
2 2
3 2
NO. Qty.
B2L
B2R
B3L
B3R
1
1
2
2
SCREW
1
1
B5L
B5R
B2
B3
2
2
B5 8
B6 4
S4 4
88
S1 2
S2 2
S3 2
B7 1
NO. Qty. NO. Qty.
F2
146
F2-1 30
F3 74
F4 1
F6 16
Fixed screw should be purchased
according to different ground.

Towards the white film side to the sun as it is UV-protected.
SUMMARY STATEMENT FOR POLYCARBONATE PANEL
UV
x6
-5-
Install schematic diagram of Alu.frames
Window A Window A
Window B
Window B
Window C
Window C
WINDOW A x2
WINDOW B x2
WINDOW C x2
WINDOW
1
WINDOW C
WINDOW C
WINDOW A
WINDOW A
WINDOW B WINDOW B
6
6
9
5
7
2
2
3
3
B1
B1
B1
B1
B2L
B2R
B3R
B3L
B3L
B3R B5L
B5R
B2
B2
B3
B3
B6
B6 B6
B6
S4 S4
S4
S4
S1
S1
S3
S3

!
-6-
2 x2
B2L B2R B3L x1
B3R x1
F2 x24
Do not tighten the screws.
!
B5 x4
22
Drain outlet facing forward.
B2L
B3L
B5
B5 B5
B5
B2R
B3R
F2
F2
F2 F2
F2 x4
x2
Ⅰ

-7-
S1 x2
x2
Silicon
Silicon
x2
B2 x2 F2 x12
Do not tighten the screws.
!
B2 B2
B2 B2
Ⅰ
Ⅱ
Silicon
Ⅰ
S1 S1
S1
F2
F2
22
2
S1 S1
-8-
3 x2
B5L B5R
B3L B3R
F2 x24
B5 x4
B5
B5
B5L
3
F2
F2
B5
B5
B5R
3
F2
F2
B3R
B3L
x2
Ⅰ
F2 x4
Do not tighten the screws.
!

-9-
F2 x12
B3 x2
B3 B3
F2 F2
B3 B3
Do not tighten the screws.
!
8 x8
6 x2
1
8
8
88
8
8
6
1
x2
Ⅱ
Ⅰ
-10-
Knife

Ø3
WINDOW C x2
F3 x12
B6 x4
!
Use Ø 3 drill holes in the middle of the Window C
WINDOW C
B6 B6
F3 F3
F3
Ø3
>2cm
2cm
x2 x2 x2
x3
WINDOW C
WINDOW C
-11-
Ⅱ
Ⅰ
Window C
Window C
B6
B6
Ⅲ
0.5cm

F2 x6
-12-
7
1
6
6
7
7
7
7
6
6
1
F2
F2
F2

Make sure the frame on the ground,
then install the windows.
x2
x2
Window A
Window B
Window C x2
6
-13-
Window A
61 6
Window A
Window B
Window C
Window B
Window C
Ⅱ
Ⅰ
Ⅲ
Window A
Window B
Window C
Upward view
Window C
Window B
B6
!
6
6
1
7
Window A
Window B
Window C

-14-
Ø3
F3 x10
1
7
6
6
x2
7
Window A
Ⅰ
Ⅲ
Ⅱx4
Ø3
0.5cm
Ø3
0.5cm
Ø3
0.5cm
Ø3
0.5cm
1
66
77
7
77
7
6
1
6
F3 F3
F3

F2 x6 S3 x2
-15-
9
F2 9
6
S3
Ⅰx2 6
6
1
9
66
1
F2 F2 F2
9
Ⅱ
S3
S3

-16-
S4 x4 F4
F3 x2
S4
6
C
B
F3
1
S4
B
C
F4
1
F4
BB
CC
AA
S4 S4
S4
6
C
B
F3
1
6
6
Window B
Window C
Window B
Window C
S4
S4
S4
Window A
Window A

-17-
F3
5
S3
5F3 x6
5
Ⅰ
5
9
5
F3
F3
F3
9
1
6
6

-18-
F3 x20 F2 x26 F2-1 x18
Do not tighten the screws.
!
2
2
6
6
9
B2L B2R
B3L B3R
B2L
B2R
B3 B3
B3
B2L
B2R
B3R
B3L B3R
6
5
5
55
F3 F3
F2
F2
F2-1
F2
F2
F2-1
F2
F2
F2-1
F2
F2
F2-1
Ⅰ
Ⅱ
Ⅲ
B3
B3
Back
B3

-19-
F3 x20 F2 x20 F2-1 x12
3
3
6
6
B3
B3
7
B5L B5R
B3L
B3R
B3 B3
7
7
6
6
ⅠⅡ
B5L B5R
B3L B3R
B3
B3
B3R B3LB5L
B5R
7777
F2
F2
F2-1
F2
F2
F2-1
F2 F2
Ⅲ
F3 F3
B3 B3

-20-
F3 x4
S2 x2 B7
S2 S2
Ø3
3
3
33
10cm
10cm
F3 F3
S2 S2
Ⅰ
B7
S2
3
Table of contents
Other Primrose Tent manuals

Popular Tent manuals by other brands


Wenzel
Wenzel 33047 Assembly instructions

DREMCOR
DREMCOR Titan Series Instructions and owner's manual

Sierra Designs
Sierra Designs Clip Flashlight 2 Pitching instructions

Vango
Vango PALERMO Pitching instructions

Coleman
Coleman SUNDOME 9262C905 instructions

Dometic
Dometic Santorini FTK 4X8 Installation and operating manual

Skandika
Skandika Nordland 4 Setup & maintenance

Clam Customer
Clam Customer Quick-Set Escape 9281 Service information

Alice's Garden
Alice's Garden DIVIO manual

PHI VILLA
PHI VILLA E02GA0203-003-01 manual
Arrow
Arrow 697.68221 Owner's manual & assembly instructions

Vango
Vango SCAFELL 200 Pitching instructions