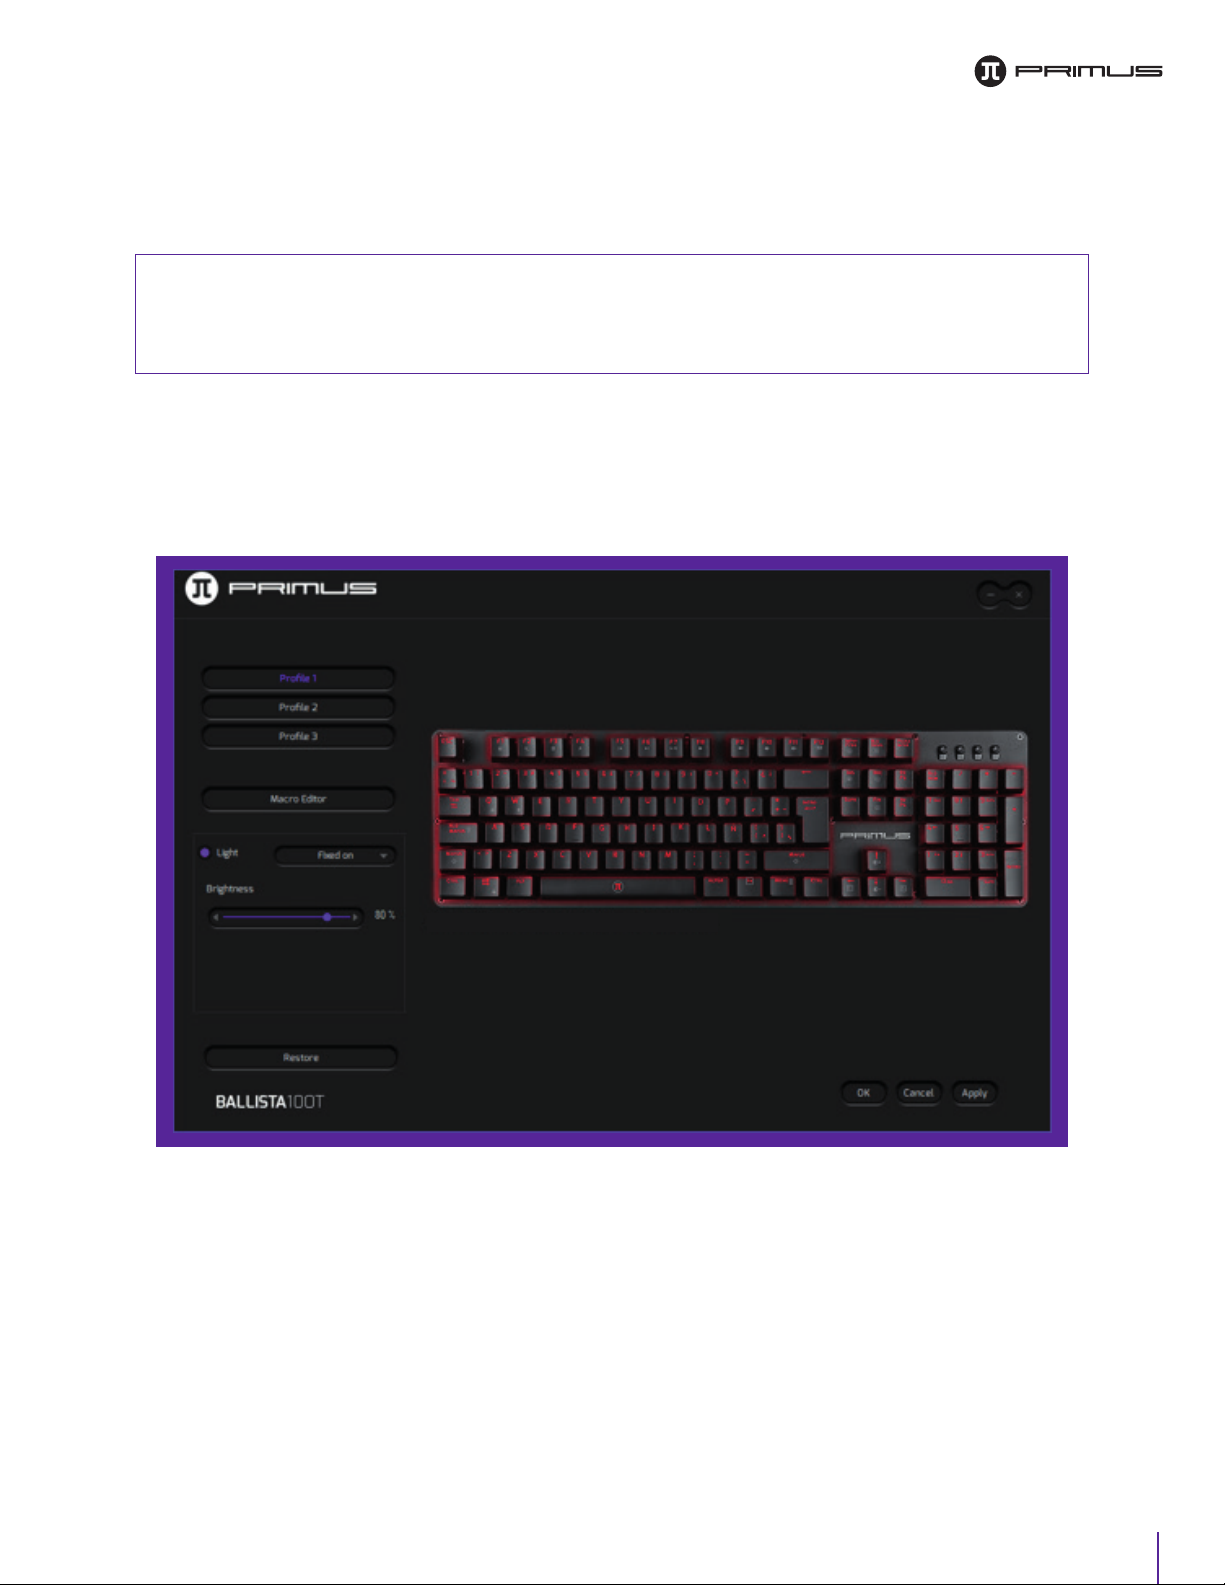
Primus BALLISTA100T User manual

SETUP
BALLISTA100T

• Windows XP/ Windows Vista /Windows 7 /Windows 8 /Windows 10
• Available USB port (V1.1/2.0/3.0)
• 5MB of free disk space
1
1
I. WINDOWS
REQUIREMENT

II. SETUP
2

1. Download the Ballista software from our website at primusgaming.com/software.
2. Connect the gaming keyboard to an available USB port.
3. Double click the BALLISTA100T_Setup file.
4. You will be prompted to select the setup language. The available languages are English or
Spanish. Click the down arrow to choose the preferred language. Once done, click on OK.
5. The welcome screen will appear. Click on Next to initiate the setup process.
3

6. Select the destination where you want the software to be installed. We recommend keeping
the default path, however you can choose a different location if desired. Please note the
software will require 4.2MB of free disk space. Click Next to continue.
7. Select Start Menu folder location where you want the software to be displayed. The default
location is Primus\BALLISTA100T. You may change this path if desired. Click Next when done.
4

8.You are now ready to install your brand new Primus BALLISTA100T gaming keyboard. Click on
Install.
9. Click on Finish to complete the setup.
5

III. MAIN
SOFTWARE
INTERFACE
6

7
The Main software screen will be displayed. In this menu you can configure the lights, setup a
macro, assign personalized keys, and set different profiles.

8
1. Programming profiles
You can assign up to 3 different profiles. To do so, click on Profile 1, make all the software changes
you would like to assign to this profile slot and then click Apply to save the settings. Do the same
for Profile 2 and 3. With all 3 profiles configured, you are now able to cycle between the different
profiles.

9
2. Programming keys
The software allows for all keys to be customized in order to execute specific functions.
Keys can be programmed as follows:
• Single key or combination keys: you can input a single key command or a combination of key
commands to any key.
• Multimedia function or internet functions: there are 18 preset functions for you to choose
from and assign to any key.
• Macro keys: you can assign a Macro function to any key. Keyboard supports a maximum of
20 macros.
Assigning specific functions to a key:
A. Set a single key or combination keys: For illustration purposes, we will use the Qkey.
1. Start by clicking on Q.

2. Once the following screen is displayed, click on Key assignment.
3. You can press any key on the keyboard to assign a different value to Q. We will change it
to Ctrl-Z. Press Zand click on the Ctrl button. Once done, click OK to save the setting.
10

11
4. Now every time you press Qon your keyboard, it will automatically press Ctrl-Z, which is
the Undo function in Windows.
5. If you want to reset the function key, click on Qagain. Then press the restore button on
the upper right corner followed by OK to accept the change.

12
B. Assign a multimedia key: For illustration purposes, we will use the Qkey.
1. Click on Q. You will get a popup as seen below. Click on Media.
2. Select any of the 18 preset functions. Once done, click OK. Now any time you click on Q,
the selected preset will occur. In this demonstration we selected Calculator.

13
C. Macro editor: 20 macros, and each macro can contain a maximum of 8 characters.
1. Click on Macro editor. A new window will open. Right click under Macro List and select New
macro.
2. Enter a name for the Macro. For this example we will use Te s t . Once done, click on OK.

14
3. Ensure the Macro you just made is highlighted. Press on Start record. Now you can enter in
any combination of characters you want. Automatic recording time delay is on by default. So,
it will automatically record how much time you take between key presses. This feature can
be turned off.
4. Click on Stop record when you are done. Then click Save.

D. Macro options
• Macro loop settings:
A. Cycle until the key is released: This will repeat the macro until you release the macro
button.
B. Specified cycle times: Here you can enter how many times you want the macro to loop
over and over again.
• Modify/Delete key list: Here you can modify, delete a key or the time delay between key
presses.
1. Right click on the key or time you wish to modify or delete. Press Z, once done click OK to
save.
15

16
2. You can also use the Insert event option to edit your Macro. Just pick a spot in the key list
you wish to insert the event. The available options are: Key down, Key up, or Delay.

17
E. Import/Export Macro:
1. Export: Click on the Macro you wish to export. Right click and select Export. Name the
Macro, choose a folder on your computer and click Save.
2. Import: Right click on the empty space on the Macro list. Click on Import macro, go to
folder containing your saved Macros. Select the macro and then click Open.

18
F. Assign macro key:
1. To assign a Macro, click on the key you wish to assign the desired sequence. In this
example, we will assign the Test macro to the letter Q.
2. Click on Q followed by Macro. Choose the macro from the list and then click on OK.
3. A red border around the key will indicate that it has a custom function assigned. Click
Apply to save the settings.

19
3. Lighting effects:
1. This menu allows you to configure the lighting effects and colors on the keyboard. Click on the
Light option.
2. There are 10 different lighting effects available. Some of them allow you to pick the brightness
or speed. Game mode allows you to just light up keys that are most used for certain games.
Table of contents
Other Primus Keyboard manuals