PrintIn3D DigiTech PrintInCuring User manual

S-19-01-1128-UP401 V1.0
LED LIGHT CURING BOX
Model Name: PrintInCuring
( 405 nm, 9:50 Min )
PrintIn3D DigiTech
7F-1, No.146, Wenxing Rd., Guishan Dist., Taoyuan City 33377, Taiwan
Tel: +886-3-397-8506
User Manual

S-19-01-1128-UP401 V1.0
2
Table of Contents
1. Introduction…………………………………………………..……………………….3
1.1 Introduction
1.2 Product Characteristic
1.3 Signs and Symbols
2. Safety First……………………………………………………………………………..4
2.1 Indications
2.2 Health and Safety Instructions
2.3 Working Environment
3. Product Description………………………………………………………….4, 5, 6
3.1 Product Specification
3.2 Unpacking and checking the contents
3.3 Assembly and initial start-up
3.4 Optional Accessories
4. Operation…………………………………………………………………………………6, 7
4.1 Switching on/off
4.2 Curing
4.3 Buzzer
4.4 Safety switch
4.5 Memory Function
5. System Maintenance and Cleaning………………………………………………..7
5.1 Maintenance
5.2 Cleaning
5.3 Changing LED
5.4 Calibration
6. Warranty…………………………………………………………………………………. 8
6.1 Malfunction
6.2 Repair
6.3 Warranty exception
EQUIPMENT NOT SUITABLE FOR USE IN THE PRESENCE
OF FLAMMABLE ANESTHETIC MIXTURE WITH AIR OR WITH
NITROUS OXIDE.

S-19-01-1128-UP401 V1.0
3
1. Introduction
1.1 Preface
Dear valued customer, thank you for selecting Phrozen Cure. It is a high quality technical product
for lab professionals. The Curing Box is used for post curing of photosensitive cured resins.
Equipped with state-of-the-art electronic components, the PrintInCuring can be used for post
processing photosensitive resins for dental, jewellery and microfluidic applications.
Inappropriate use may damage the equipment and be harmful to the human body. Please read
the relevant safety instruction in this manual. This helps you use this equipment properly and
easily.
1.2 Characteristic/feature
1. This unit consists of dental Violet L.E.D. which have much longer lifetime than halogen lamps.
2. Digital display control panel provides simple and user-friendly operation.
3. Widened curing chamber room makes the in-and-out of the curing object easier.
4. Inner surface of the chamber is surrounded by glossy stainless steel which reflects the LED
light and makes performance uniform.
5. Buzzer upon curing process complete.
6. Safety interruption of curing process if door is opened.
1.3 Signs and symbols
The signs and symbols in the user manual and on the curing unit facilitate the finding of important
points and have the following meanings:
: Caution, attention.
: Refer to user manual.
:Alternating current.
: On (supply)
: Off (supply)
: Turn on/off the light by pressing this button.
:Use this button to preset the curing time. The increment is 10sec, and the longest curing
time setting is 9 min 50 sec each cycle.

S-19-01-1128-UP401 V1.0
4
: This product corresponds with CE standards.
2. Safety First
2.1 Indications
The LED lab curing unit must only be used to cure light-activated composite and resin. Uses other
than the one foresaid purpose are contraindicated. The manufacturer does not assume any
liability for damage resulting from misuse.
2.2 Health and Safety Instructions
1. Direct view into the light without a filter or goggles may lead to eye harm.
2. Do not place the unit in the immediate vicinity of heaters or other sources of heat.
3. Place the apparatus away from combustible objects.
4. Make sure that no foreign objects may enter the air vent.
5. The unit must be used indoors.
2.3 Working Environment
In order to ensure optimum performance, please keep this unit in a clean environment. Dust might attach on
the LED, causing malfunction of the LED or other damage.
3. Product Description
3.1 Product Specification-Technical Data:
Power Supply Voltage:
100-240 VAC 50/60 Hz
Wattage: MAX 65 W
Dimension:
Height:
150 mm
Width:
200 mm
Depth:
216 mm
Weight:
3.3KG
Operating Environment:
AMBIENT TEMPERATURE:
+10℃~+40℃
RELATIVE HUMIDITY:
30% ~75%
AMBIENT PRESSURE:
700hPa ~1060hPa
S-19-01-1128-UP401 V1.0
5
Transportation And Storage Conditions:
AMBIENT TEMPERATURE:
-10℃~+70℃
RELATIVE HUMIDITY:
10%~90%
AMBIENT PRESSURE:
500hPa~1060hPa
Wavelength:
405 +/- 15 nm
3.2 Unpacking and checking the content
1 Main curing box equipment
1 Power cord
1 Protective Goggle
1 User Manual
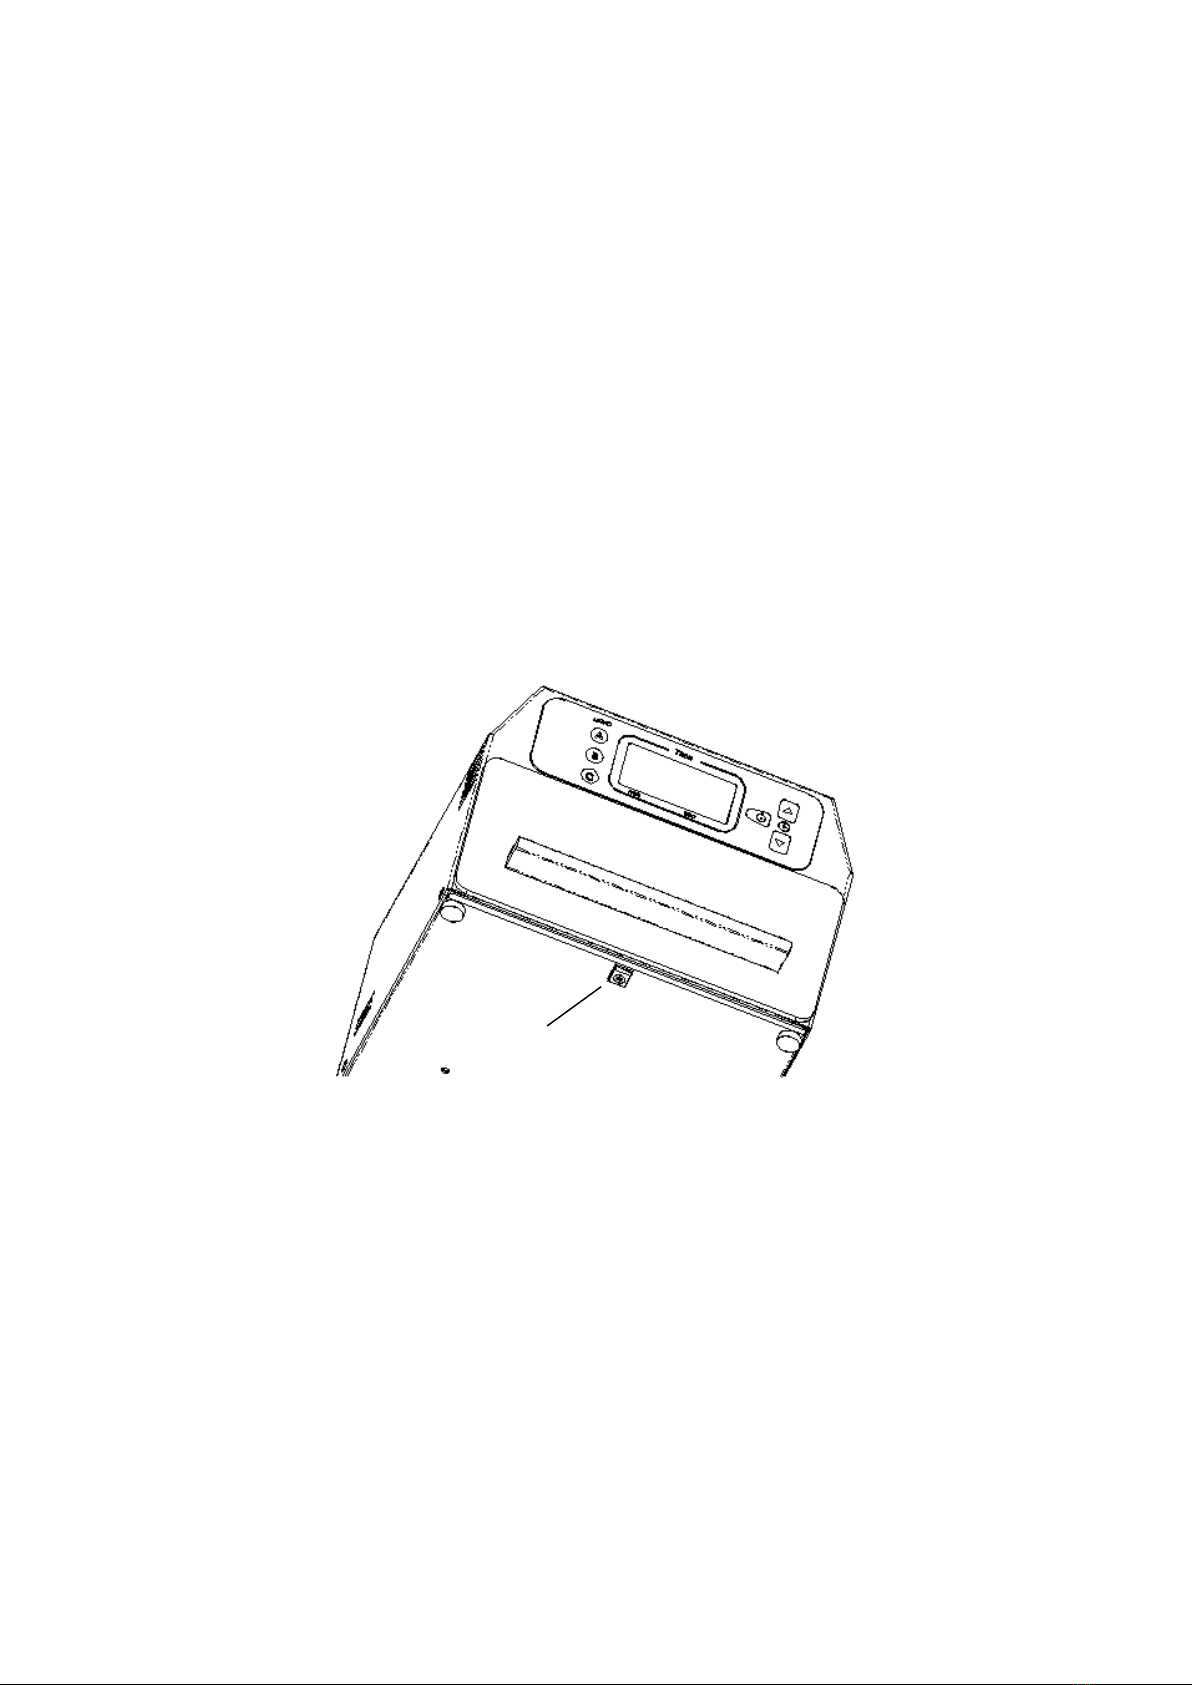
3.3 Assembly and initial start-up
Note: Prior to first use, please remove the screw on the bottom. Make the tray movable and ready
for use.
1. Make sure that the voltage indicated on the rating plate complies with local standard.
2. Selecting location: Place the unit on a flat surface. Make sure it is not exposed to the
immediate vicinity of heaters or other source of heat. Protect the unit from direct sunlight.
Make sure the air may properly circulate between the wall and the unit.
3. Connect the power cord with the power socket.
Remove the screw

S-19-01-1128-UP401 V1.0
6
3.4 Optional Accessories
Optional accessories of Extra eye protection goggles can be purchased from authorized PrintIn3D
DigiTech dealers where you purchase this unit.
4. Operation
Preparation: Turn on the power switch on the back. Put the light-cured object in the effective
place/center of the tray. Make sure the tray is well closed.
4.1 Switching on/off
Control panel consists of digital display timer, “on/off” button, “△”up, and “▽”down time
adjusting button. Select your preferred curing time by pressing “up” and “down” button. Activate
on/off button to start/stop curing process.
4.2 Curing
The maximum curing time per cycle can be set at 9 min 50 seconds. When curing process starts,
the digital timer counts down - indicating the remaining time of the process. In an emergency,
stop the process by re-pressing On/Off button.
4.3 Buzzer
Audible 5-short beeping sounds upon curing process completed.
Power socket
Power switch
S-19-01-1128-UP401 V1.0
7
4.4 Safety switch
The system will be automatically suspended to protect operator when opening the door during
curing. In case the tray is not well closed to trigger the safety switch, the device cannot be
operated.
If you do not wear a goggle, do not press the safety switch when the system is suspended
by opening door. Every time when need to look into the chamber, please wear a goggle for safety
purpose.
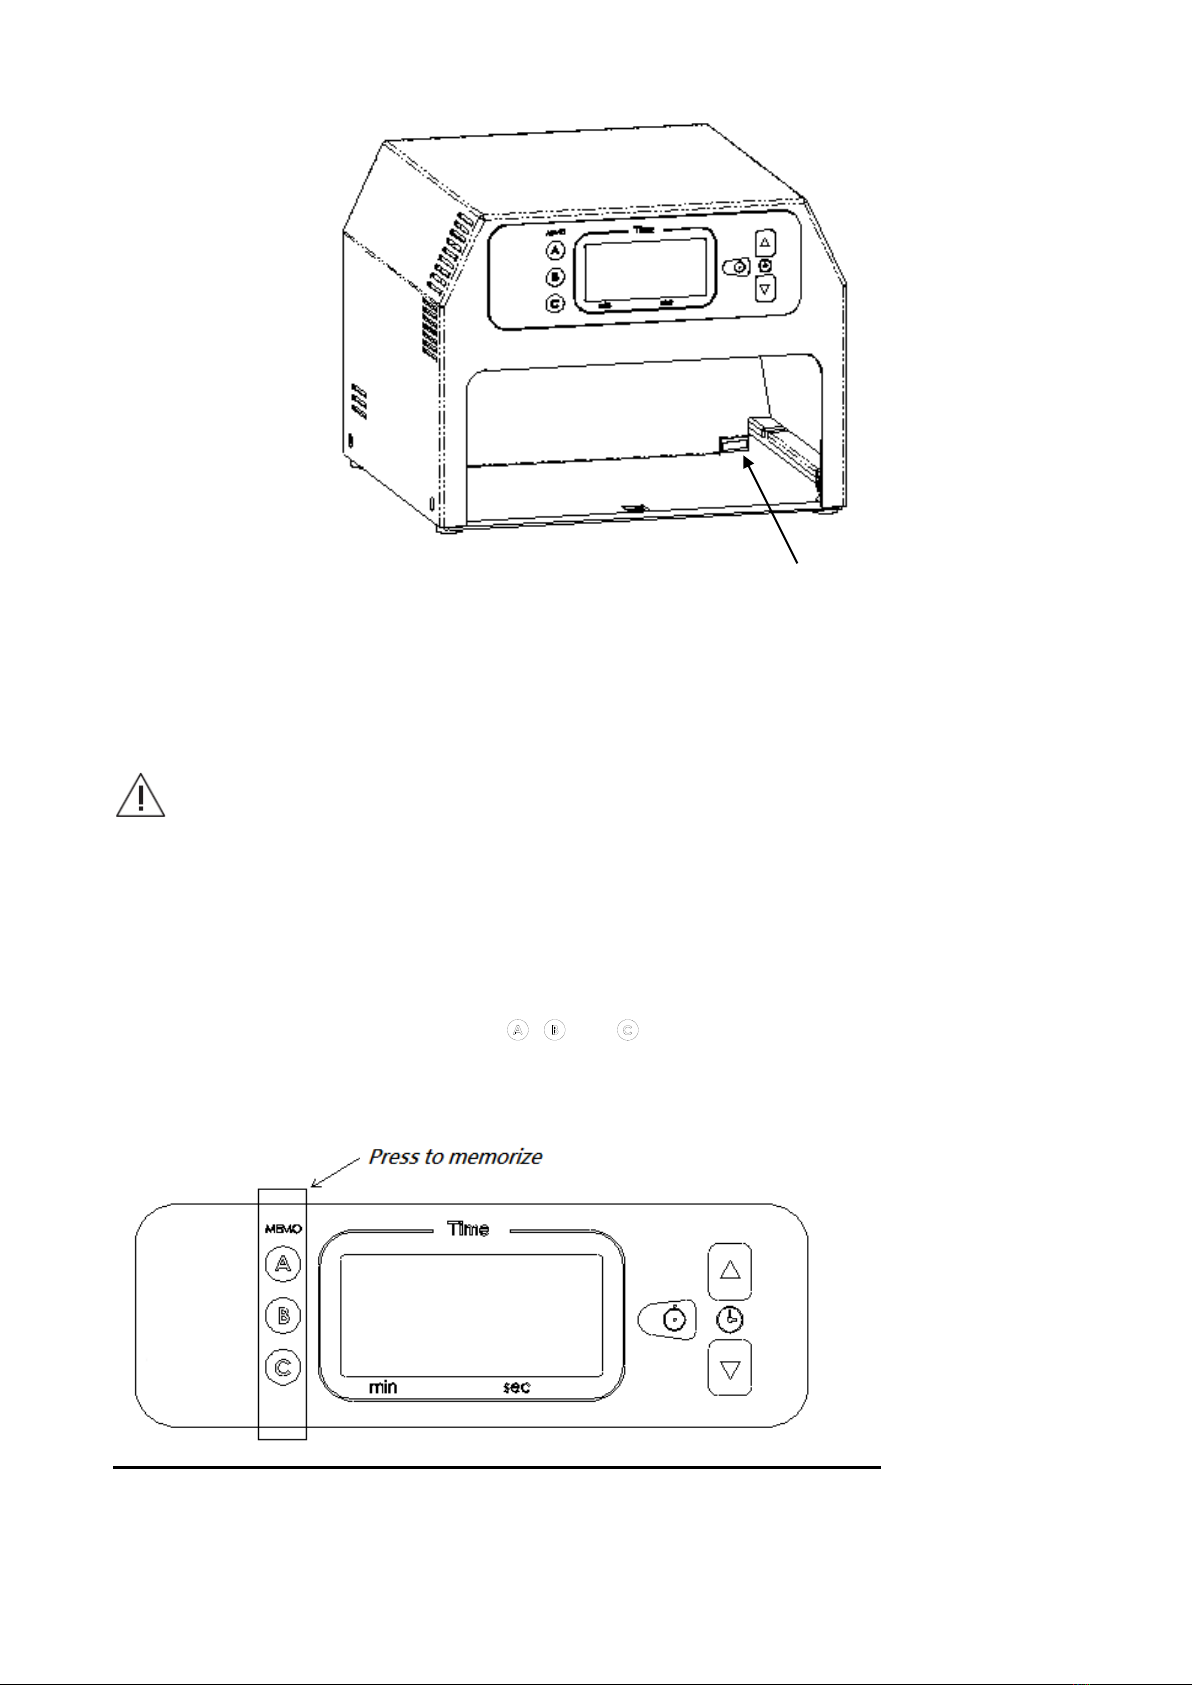
4.5 Memory Function
The system features memory function to memorize the curing time. 3 settings are available on the left side
of control panel showing as three buttons, , and . Press down each button for 5sec, wait till the
beeping sound and flashing numbers showing the current curing time is well memorized. Press button to
recall preferred setting before use.
Safety switch

S-19-01-1128-UP401 V1.0
8
5. System Maintenance and Cleaning
5.1 Maintenance
Disconnect power cord before cleaning, since there is still a risk of electrical shock. The inner
surface of the chamber is surrounded by glossy stainless steel to reflect the LED light. To maintain
the light curing efficiency, please make sure the stainless steel is cleaned before curing.
5.2 Cleaning
Please use neutral detergent for cleaning outer surface and chamber. Do not touch LED,
as hand sweat considerably shortens the life cycle of the LED. The time for these
maintenance/cleaning procedures depends on the frequency of use and the working habits of the
users. It is recommended to clean chamber and stainless steel reflector throughout every 2
weeks at least.
5.3 Changing LED
Total 12 LEDs are used in this unit. To replace the LED, please refer to the Service Manual. All LED
parts can be purchased from authorized PrintIn3D DigiTech distributors.
5.4 Calibration
In order to ensure optimum performance, it is recommended to calibrate LED intensity every year.
Please send the unit to authorized PrintIn3D DigiTech distributor for calibration.
6. Warranty
6.1 Malfunction
PrintIn3D DigiTech hereby warrants that for a period of one year from the delivery date, this
device shall be free from defects in material and workmanship. In case the machine is found
malfunctioned under normal use, PrintIn3D DigiTech will offer service of free maintenance and
parts for replacement.
6.2 Repair
Repairs must be only carried out by an authorized PrintIn3D DigiTech engineer/dealer. If repairs
during warranty period are not carried out by an authorized engineer/dealer, warranty will expire
immediately.
6.3 Warranty Exception
The warranty stated herein is the sole warranty applicable to PrintIn3D DigiTech products.

S-19-01-1128-UP401 V1.0
9
PrintIn3D DigiTech expressly disclaims the liability for warranty even within warranty period, if
(1) Damages caused by natural disaster.
(2) Operator's fault or wrong operation.
(3) Application use other than curing light-cured material purpose.
(4) A malfunction or damage caused by repair, adjustment, modification which is not carried out
by authorized PrintIn3D DigiTech engineers/dealers.
(5) A malfunction caused by abnormal power source or voltage.
(6) It is a consumption part.
(7) Bad working environment causing malfunction, like dust attach on the LED.
( This manual subjects to change without notice. )
Table of contents
Popular Lighting Equipment manuals by other brands

ML Accessories
ML Accessories EMPDL Installation & maintenance manual

American DJ
American DJ Hyper Beam User instruction

LIVARNO
LIVARNO 354373 2010 Operation and safety notes

LumiGrow
LumiGrow Pro 325 quick start guide

Magneti Marelli
Magneti Marelli 007935030070 owner's manual

ALW
ALW MoonRing OnePointFive MR1.5 installation instructions


AQUARAY
AQUARAY AquaBeam 500 Single Instructions for installation and use

MaxLite
MaxLite External U-Bend T8 operating instructions

Blizzard Lighting
Blizzard Lighting ROCKER PANEL RGBAW manual

ADJ
ADJ ACCU-STAND CSL100 user guide

Ingo Maurer
Ingo Maurer Satel.light instructions

CoeLux
CoeLux 45 HC P Series Instructions and warnings for assembly and installation