Pro Controll Revolution Trolling Motor User manual

User Guide
This manual contains important safety information.
Read it before installing and using your trolling motor.
Keep it for future reference.
Unless otherwise noted, the information in this User Guide applies to both the L and S Models.

REVOLUTION Trolling Motors by Pro Controll
2
Safety First!
» Always wear a life vest, and insist that all passengers also wear one.
» Never let children operate the motor unsupervised.
» Never use the motor if people or pets are swimming nearby.
» Keep loose hair and clothing away from the motor.
» Watch for oating or submerged hazards.
» Do not use the motor in water less than 2 feet (0.6 m) deep.
» Never use the motor in waves over 3 feet (0.9 m) high.
» Never immerse the control unit. If it falls into the water, disconnect the battery before
attempting to retrieve it. Dry it thoroughly before attempting to use it.
» The motor was not intended for use at temperatures below -4°F (-20°C) or above 113°F
(45°C).
» Never exceed recommended battery voltage.
» Do not modify your motor.
» Never mount or dismount the motor with the battery connected.
» Never service the propeller with the battery connected.

USER GUIDE
3
Table of Contents
Safety First! . . . . . . . . . . . . . . . . . . . . . . . . . . . . . . . . . . . . . . . . . . . . . . . . . . . . . . 2
Welcome . . . . . . . . . . . . . . . . . . . . . . . . . . . . . . . . . . . . . . . . . . . . . . . . . . . . . . . . 4
Registration and Serial Number . . . . . . . . . . . . . . . . . . . . . . . . . . . . . . . . . . . . . . . . . 5
Choosing and Connecting a Battery . . . . . . . . . . . . . . . . . . . . . . . . . . . . . . . . . . . . . . 6
Connecting an Additional Battery or Circuit Breaker . . . . . . . . . . . . . . . . . . . . . . . . . . . . 8
Mounting Your Motor. . . . . . . . . . . . . . . . . . . . . . . . . . . . . . . . . . . . . . . . . . . . . . . 10
Controls and Safe Use. . . . . . . . . . . . . . . . . . . . . . . . . . . . . . . . . . . . . . . . . . . . . . . 12
Daily Checks and Routine Maintenance . . . . . . . . . . . . . . . . . . . . . . . . . . . . . . . . . . . 14
Replacing the Propeller . . . . . . . . . . . . . . . . . . . . . . . . . . . . . . . . . . . . . . . . . . . . . 15
Troubleshooting . . . . . . . . . . . . . . . . . . . . . . . . . . . . . . . . . . . . . . . . . . . . . . . . . . 16
Accessories and Parts Diagram . . . . . . . . . . . . . . . . . . . . . . . . . . . . . . . . . . . . . . . . . 18
Replacement Parts List . . . . . . . . . . . . . . . . . . . . . . . . . . . . . . . . . . . . . . . . . . . . . . 19
How to Contact Customer Service . . . . . . . . . . . . . . . . . . . . . . . . . . . . . . . . . . . . . . 20
RM Industries, Inc. (Pro Controll) Limited Warranty . . . . . . . . . . . . . . . . . . . . . . . . . . . . 21
Declaration of Conformity for Recreational Craft. . . . . . . . . . . . . . . . . . . . . . . . . . . . . . 22
Pro Controll Products and Accessories . . . . . . . . . . . . . . . . . . . . . . . . . . . . . . . . . . . . 23

REVOLUTION Trolling Motors by Pro Controll
4
Welcome
Thanks for choosing a Revolution Trolling Motor by Pro Controll for your freshwater shing
adventures.
Fishing preferences are incredibly personal. There are many variables that go into a successful
day of shing: clarity of – and structures under – the water; weather; how many people are in
your boat. Your trolling motor should be exible enough to allow you to sh your way: alone
or with family and friends; standing in the front of the boat or sitting in the back; close to
structures and underwater weeds; on windy days or on calm waters.
Our patented Pro Controll bracket means that Revolution Trolling Motors are the only hand-
controlled trolling motors on the market that can be mounted on the bow – or transom – of
your jon boat or utility boat.
At Pro Controll, we give you the freedom to sh how you want.
Before operating your new motor
Read this manual completely before you mount your new motor. The next few pages contain
information you need to use your motor safely and keep it in good condition. Failure to follow
these instructions could result in injury to yourself or others and/or damage to the motor.
Look for this symbol
Please pay special attention to warnings throughout this manual, which are marked with the
symbol shown below:
Look for this symbol for warnings throughout the User Guide.

USER GUIDE
5
Registration and Serial Number
Registration
Remember to keep your receipt and immediately register your Revolution Trolling Motor. You
can complete registration online at www.procontroll.com.
Serial number
Your serial number helps determine the
specic model and year of manufacture. When
contacting Customer Service or registering your
product, you will need to know your product
serial number. The serial number on your
Revolution Trolling Motor is located on the top
of the bracket. We recommend you record this
information for future reference.
Motor information
Model:
Serial Number:
Purchase Date:
Where purchased (If online, specify retailer):
IMPORTANT: Do not return your Revolution Trolling Motor to your retailer. Your retailer is not
authorized to repair or replace this unit. For help, call Customer Service at 913-721-9800 or
review our return policy instructions, which are posted at: www.procontroll.com.
Your Serial Number

REVOLUTION Trolling Motors by Pro Controll
6
Choosing and Connecting a Battery
For best results, use a deep-cycle/marine battery rated at 50 amp-hours or higher. Pro Controll’s
Revolution motors are engineered for lead-acid batteries. Lithium or other batteries are not
recommended.
Please refer to the chart on Page 7 for voltage requirements. 32-, 40-, and 50- pound thrust
motors (14.5 kg, 18 kg, and 22.5 kg thrust) require a 12-volt battery.
86-pound thrust (39 kg thrust) motors require one 24-volt battery, or two 12-volt batteries
connected in series. For additional information about using two 12-volt batteries as a 24-
volt power source, please refer to Page 8.
Choosing a longer cable
To extend the battery cables provided, we recommend using the Trolling Motor Battery Harness
by Pro Controll with 8-gauge (3.26 mm) wire.
Circuit protection
We recommend the use of a manual-reset circuit breaker within 1’ (0.3 m) of the battery. Visit
www.procontroll.com for purchase options of the Circuit Breaker by Pro Controll.
For additional information on connecting more than one battery and on the benets of a circuit
breaker, please refer to“Connecting an Additional Battery or Circuit Breaker” on Page 8.
Charging any lead-acid battery releases hydrogen and oxygen into the surrounding
atmosphere. Ensure adequate ventilation to prevent the buildup of potentially explosive
gases.
Lead-acid batteries contain sulfuric acid (H₂SO₄) that causes serious chemical burns. Never
allow any liquid that leaks or spills from a battery to touch your skin or clothes. In the event
of accidental contact, ood exposed skin or eyes with water. Contact a poison control center
for additional rst-aid advice or seek medical attention.

USER GUIDE
7
How much power do I need?
Boat Wt. (lbs) Max Boat Length Recommended Minimum
Thrust
Battery Required
1,500 or less 14’ 32 lbs / 14.4 kg One 12-volt battery
2,000 17’-18’ 40 lbs / 18 kg One 12-volt battery
2,500 20’-21’ 50 lbs / 22.5 kg One 12-volt battery
4,000 25’ 86 lbs / 39 kg Two 24-volt batteries
Connecting a battery
Always connect the battery after you mount the motor and launch your boat.
Ensure that the speed control handle is in the neutral position prior to connecting the
battery.
» Connect the black wire from the trolling motor to the negative (-) terminal on the battery.
» Connect the red wire from the trolling motor to the positive (+) terminal on the battery.
» Make sure the cables are rmly tightened for a good electrical connection.
To connect more than one battery, see“Connecting an Additional Battery or Circuit
Breaker” on page 8.

REVOLUTION Trolling Motors by Pro Controll
8
Connecting an Additional Battery or Circuit Breaker
Connecting two 12-volt batteries in parallel for extended trolling time
If you’re shing with a 32-, 40-, or 50-pound thrust (14.5 kg, 18 kg, and 22.5 kg thrust) Revolution
Trolling Motor, you can wire a second battery in parallel for up to twice the trolling range.
Never mix batteries of dierent type, size, or condition.
1. Use 8-gauge (3.26mm) wire with ring or spade
connectors to connect the two negative (-)
terminals.
2. Use 8-gauge (3.26mm) wire with ring or spade
connectors to connect the two positive (+)
terminals.
3. Connect the black wire from the motor to the
closest battery’s negative (-) terminal.
4. Connect the red wire from the motor to the
closest battery’s positive (+) terminal.
Connecting two 12-volt batteries in series to create a 24-volt power source
86-pound (39 kg) thrust motors are designed for use with 24-volt batteries. You can create a 24-
volt power source by connecting two 12-volt batteries in series.
For use with 86-pound (39 kg) thrust motors only!
Connecting batteries in series will damage 32-, 40-, or 50-pound thrust (14.5 kg, 18 kg, and
22.5 kg thrust) motors.
DC12V
DC12V
Red cable (+)
from motor
Black
cable (-)
from motor

USER GUIDE
9
Never mix batteries of dierent type, size, or condition.
1. Use 8-gauge (3.26mm) wire with ring or spade connectors to connect the negative (-) terminal
from battery #1 to the positive (+) terminal of battery #2.
2. Connect the black wire from the motor to the negative (-) terminal of battery #2.
3. Connect the red wire from the motor to the positive (+) terminal of battery #1.
Installing a circuit breaker
At Pro Controll, we recommend the use of an appropriate DC circuit breaker between your battery
and your Revolution motor. A circuit breaker is also a legal requirement in some jurisdictions. Visit
www.procontroll.com for more information on our Circuit Breaker by Pro Controll.
An internal combustion motor will stall if the propeller becomes jammed by weeds, shing line,
rocks or logs, or just hitting the bottom. However, DC electric motors can’t stall. If the propeller
is jammed, the motor will draw more power. It may even draw enough power to damage the
motor, controls, or power cables. A circuit breaker prevents this type of damage by cutting
power to the motor if the draw exceeds a certain amperage.
Motors with thrust ratings of 32 and 40 pounds should be protected by a 50-amp circuit breaker.
Motors with thrust ratings of 50 and 86 pounds should be protected by a 60-amp circuit breaker.
1. Mount the circuit breaker on your boat at a point less
than 1’(0.30m) from the battery.
2. Connect the positive lead from your Revolution
Trolling Motor to the“AUX”terminal on the circuit
breaker. (See diagram at right.)
3. Connect the positive lead from the battery to the
“BAT”terminal on the circuit breaker.
4. Connect the negative lead as normal.
Battery side
(BAT )
Trolling motor
side (AUX)
DC12V DC12V
Red cable (+)
from motor
Black cable (-)
from motor
REVOLUTION Trolling Motors by Pro Controll
10
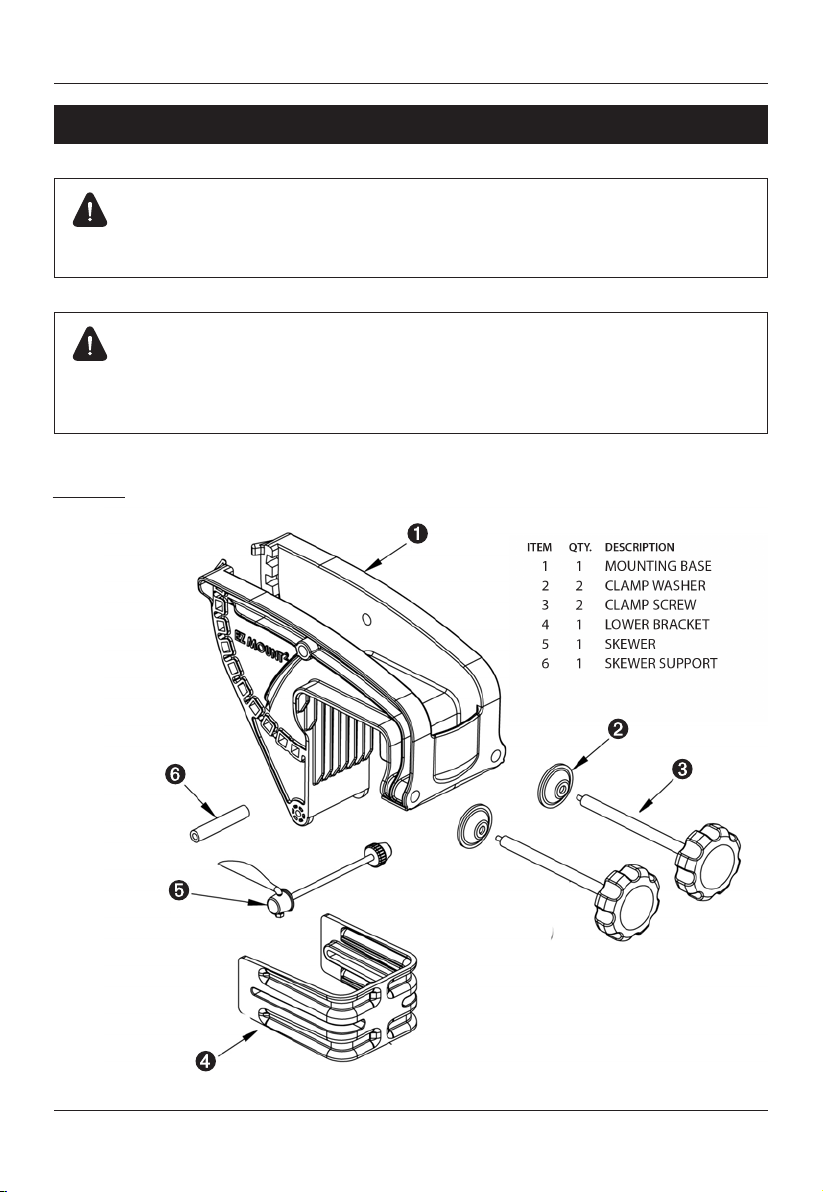
Mounting Your Motor
Always mount your trolling motor to your boat before putting the boat in the water.
Never connect the battery until you’ve nished all mounting steps and your boat is in the
water.
Figure A

USER GUIDE
11
1. Loosen Bracket (#4) by releasing the Skewer Lever (#5) so Bracket will move freely.
2. With the Skewer Lever released, loosen the nut at the opposite end of the Skewer by hand.
3. Loosen Clamp Screws (#3) so that the Mounting Bracket (#1) will slide over Top Rail or
Gunwale, keeping the Clamp Screws (#3) on the inside of the boat.
4. Position Mounting Bracket (#1) so it is resting on Top Rail or Gunwale of boat.
5. Hold Mounting Bracket (#1) against the outside of the boat with mounting base in a vertical
(plumb) position, slide Bracket (#4) against outside of hull at an angle that conforms to the
hull angle and gives the most surface contact with the hull. (The berglass shaft should enter
the water straight up and down.)
6. Tighten nut on Skewer (#5) rmly by hand, then clamp down the Skewer Lever (#5) .
7. With Bracket (#4) secured, tighten Clamp Screws (#3) against inside of boat. Do not over
tighten.
8. After securing, if motor is not plumb, adjust with Tilt Lever on trolling motor bracket.
Figure B
Clamp Screws #3 Mounting Bracket #1
Bracket #4
Skewer Lever #5
3” Opening
Top Rail/Gunwale
Fiberglass
Shaft
REVOLUTION Trolling Motors by Pro Controll
12
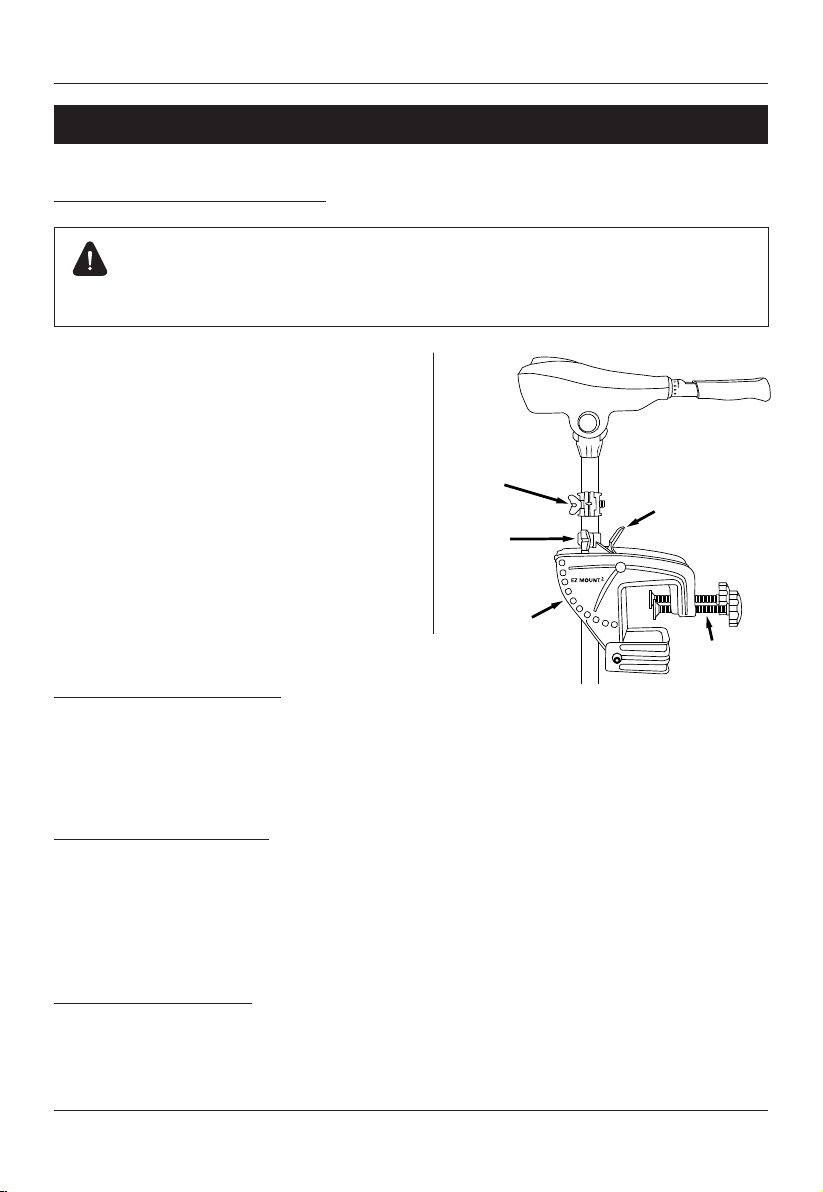
Controls and Safe Use
Raising and lowering the motor
Disconnect the battery before raising or lowering the motor.
Use the Quick Release Tilt Lever to raise the
trolling motor up out of the water and to stow
it. The Tension Collar will need to be loosened
in order to raise the motor for depth control or
stowing. Once out of the water for stowing, use
the Quick Release Tilt Lever to fold the motor
into the boat area. Put the trolling motor in
the water when it is time to sh. Press the lever
with your thumb while holding the head of the
trolling motor with the other hand to control
the tilting, raising and lowering of the motor.
Tilt the motor as needed and release the lever
to lock it in the desired position.
Adjusting the motor angle
Use the Quick Release Tilt Lever to ne-tune the angle of the shaft when shing. Press the Quick
Release Tilt Lever to adjust the tilt angle of the motor. Releasing the lever will lock the motor
unit in the desired position.
Depth Adjustment Collar
To adjust motor depth, loosen the tension collar screw on the Depth Adjustment Collar and
slide the shaft up or down so that the motor is approximately 12” below the surface, then
re-tighten the tension screw. Loosen the screw on the Depth Adjustment Collar and position
against the Steering Tension Collar, then retighten screw to set the motor depth.
Steering Tension Collar
Tighten or loosen the knob on the Steering Tension Collar to adjust the amount of friction in
the steering mechanism.
Depth
Adjustment
Collar
Steering
Tension
Collar
EZ Mount 2
Mounting
Bracket
Quick Release
Tilt Lever
Transom Clamp
Screw

USER GUIDE
13
Tiller operation
Speed: set the handle on the tiller to select one of the ve forward or three reverse speeds.
Align the arrow marker with“0” to stop the motor. Tiller Angle: on S-Series motors only, lift up
or push down on the Tiller to adjust angle of the head.
Always allow the motor to come to a stop before switching from forward to reverse. Failure
to do so may damage the motor.
Battery meter
There are 10 LED lights on the indicator display. If all 10 are illuminated, your battery is at or
near full power. Keep an eye on the battery level as you sh. We recommend you recharge the
battery when the indicator reads 50% charge, but never let the battery fall lower than 20% to
ensure a long life. Lead-acid batteries, such as deep cycle batteries, run the risk of sulfation if
left uncharged for too long. A sulfated battery has a buildup of lead sulfate crystals and is the
number one cause of early battery failure in lead-acid batteries.
Your trolling motor was not designed for use with a lithium battery. The battery meter is not
a reliable indicator of lithium battery status.
Taking the motor o the boat
To avoid damaging your motor in transportation, we recommend removing it before you tow
your boat
Disconnect the battery before removing your trolling motor.
Remove the motor by loosening the Transom Clamp Screws. Lift motor and mount o. On some
boats, you may also need to loosen the Skewer (#5) so the Bracket (#4) will clear the Gunwale
(see Figure A on Page 10).

REVOLUTION Trolling Motors by Pro Controll
14
Daily Checks and Routine Maintenance
Always disconnect the battery before you handle the propeller or motor unit.
1. Check behind the propeller after each use for weeds, shing line or other debris that may get
wrapped behind the propeller.
2. Lubricate all the pivot points with a non-aerosol lubricant. Never use aerosol lubricants to
grease or oil any part of the unit, because aerosols contain propellants that can damage your
motor or control unit.
3. Inspect the main battery cables and look for loose or corroded connections.
4. Tighten any loose fasteners.
5. If appropriate, reconnect the battery and tighten the battery leads.

USER GUIDE
15
Replacing the Propeller
Always disconnect the battery before handling the propeller or motor unit.
1. Hold the propeller blade to prevent it from turning.
2. Loosen the Propeller Nut using the wrench that was supplied with the motor.
3. Remove the Propeller Nut and Propeller Washer.
4. Pull the propeller o. If it will not come free, hold one blade and gently tap the other blades
from behind.
5. Examine the propeller for damage, including damage to the surfaces that mate with the
motor unit. If damaged, the propeller should be replaced.
6. Examine the Drive Pin. If it is bent or damaged, the pin should be replaced.
7. Reinstall the Drive Pin.
8. Reinstall the propeller.
9. Reinstall the Propeller Washer and hand-tighten the Propeller Nut.
10. Tighten the Propeller Nut an additional quarter turn with the wrench.
Do not hammer the Propeller Pin out. Doing so may bend the Motor Drive Shaft.

REVOLUTION Trolling Motors by Pro Controll
16
Troubleshooting
Loss of power
Disconnect the battery before servicing the propeller.
» Propeller may be fouled. Remove propeller, clean it, and replace if needed.
» Battery connections may be corroded.
» Low battery voltage. Recharge battery.
» Battery may be faulty. Recharge and check.
» Insucient cable size from battery to motor. 8-gauge (3.264mm) wire is recommended.
» Bad or faulty connection in boat wiring or electric motor wiring.
» Permanent magnet in motor may be cracked or chipped. Motor will whine or grind. Take
your motor to an authorized trolling motor service center for repair or contact Pro Controll
Customer Service for advice.
Excessive noise or vibration
Disconnect the battery before servicing the propeller.
» Propeller may be fouled or have damage, creating an imbalance. Remove propeller, clean
and examine it, and replace it if needed.
» Propeller may be loose. Check to see if the propeller nut is tight.

USER GUIDE
17
» Turn the propeller by hand. It should turn easily with a slight magnetic drag. If it does not
turn easily, the bearing or bushes may be worn out. Take your motor to an authorized
trolling motor service center for repair or contact Pro Controll Customer Service for advice.
» Remove propeller, reconnect battery and run the motor at medium speed. If the armature
appears to wobble as the motor spins, take your motor to an authorized trolling motor
service center for repair or contact Pro Controll Customer Service for advice.
Motor fails to run
» Check for loose or corroded connections on battery cables.
» Check the circuit breaker. Reset if necessary.
» Check battery voltage. Recharge or replace battery as required.
» If you are condent that your motor is getting power and is still not working, take your
motor to an authorized trolling motor service center for repair or contact Pro Controll
Customer Service for advice.
Motor loses one or more speeds
» Loose connection in top housing.
» FWD/REV-5 speed Switch damaged.
» Speed Coils in lower unit may be burned out.
» Take your motor to an authorized trolling motor service center for repair or contact Pro
Controll Customer Service for advice.

REVOLUTION Trolling Motors by Pro Controll
18
Accessories and Parts Diagram

USER GUIDE
19
For pricing and to purchase replacement parts, visit www.procontroll.com.
Replacement Parts List
Part # Part Name Qty Part # Part Name Qty
1 Decal w/Battery Meter 1 29 Center Housing Assembly Magnet 1
2 Control Box Cover 1 30 O-Ring 1
3 Control Box 1 31 Bearing-Flange 1
4 SS Screw - 4mm-2.0 X 20mm 6 32 Plain End Housing Assembly 1
5 Telescoping Handle 1 33 Seal 1
6 Handle Pivot 1 34 O-Ring 4
7 Handle Pivot Screw 1 35 Through Bolt 2
8 FWD/REV-5 Speed Switch 1 36 Seal Shield 1
9 LED Battery Meter 1 37 Propeller 1
10 Battery Meter Screws 2 38 Drive Pin 1
11 Depth Adjustment Collar 1 39 Washer 1
12 Clamp Knob 1 40 Lock Nut 1
13 Cap Screw - 5mm-0.80 X 50mm 1 41 Hinge Bracket 1
14 48”Composite Shaft 1 42 Hinge Bracket Bushing 1
15 Brush End Housing Assembly 1 43 Snap-in Tension Block 1
16 Speed Coil 1 44 Tension Knob 1
17 Brush Plate w/Holder 1 45 Tilt Lever 1
18 Compression Springs 2 46 Tilt Lever Pin 1
19 Brush Assembly 2 47 T-Bar Spring 1
20 Brush Plate Screw 2 48 Plastic T-Bar 1
21 Steel Washer 2 49 Mounting Bracket 1
22 Steel Washer 2 50 Hinge Pin 1
23 Ball Bearing 1 51 Clamp Screw 2
24 Armature Assembly 1 52 Clamp Screw Washer 2
25 Retaining Ring 1 53 Skewer 1
26 Steel Washer 1 54 Lower Bracket 1
27 Steel Washer 1 55 Skewer Nut 1
28 Nylon Washer 1 56 Internal 10GA Wire Harness with
Spade Terminals 1

REVOLUTION Trolling Motors by Pro Controll
20
How to Contact Customer Service
If you have questions or concerns, please contact us by phone at
(913) 721-9800.
Or email customerservice@ProControll.com
Hours: 8:30 a.m.-4:30 p.m. (Central Time Zone)
Table of contents
Popular Engine manuals by other brands

O.S. engine
O.S. engine MAX-18CV-RMX Owner's instruction manual

Velká Bíteš
Velká Bíteš Turbojet Engine TJ20A Operation and maintenance manual

O.S. engine
O.S. engine FS-60 instruction manual

MTU
MTU 12V2000M91 operating instructions

ZIEHL-ABEGG
ZIEHL-ABEGG SM250.45B Original operating instructions

Perkins
Perkins 904J-E36TA Operation and maintenance manual


