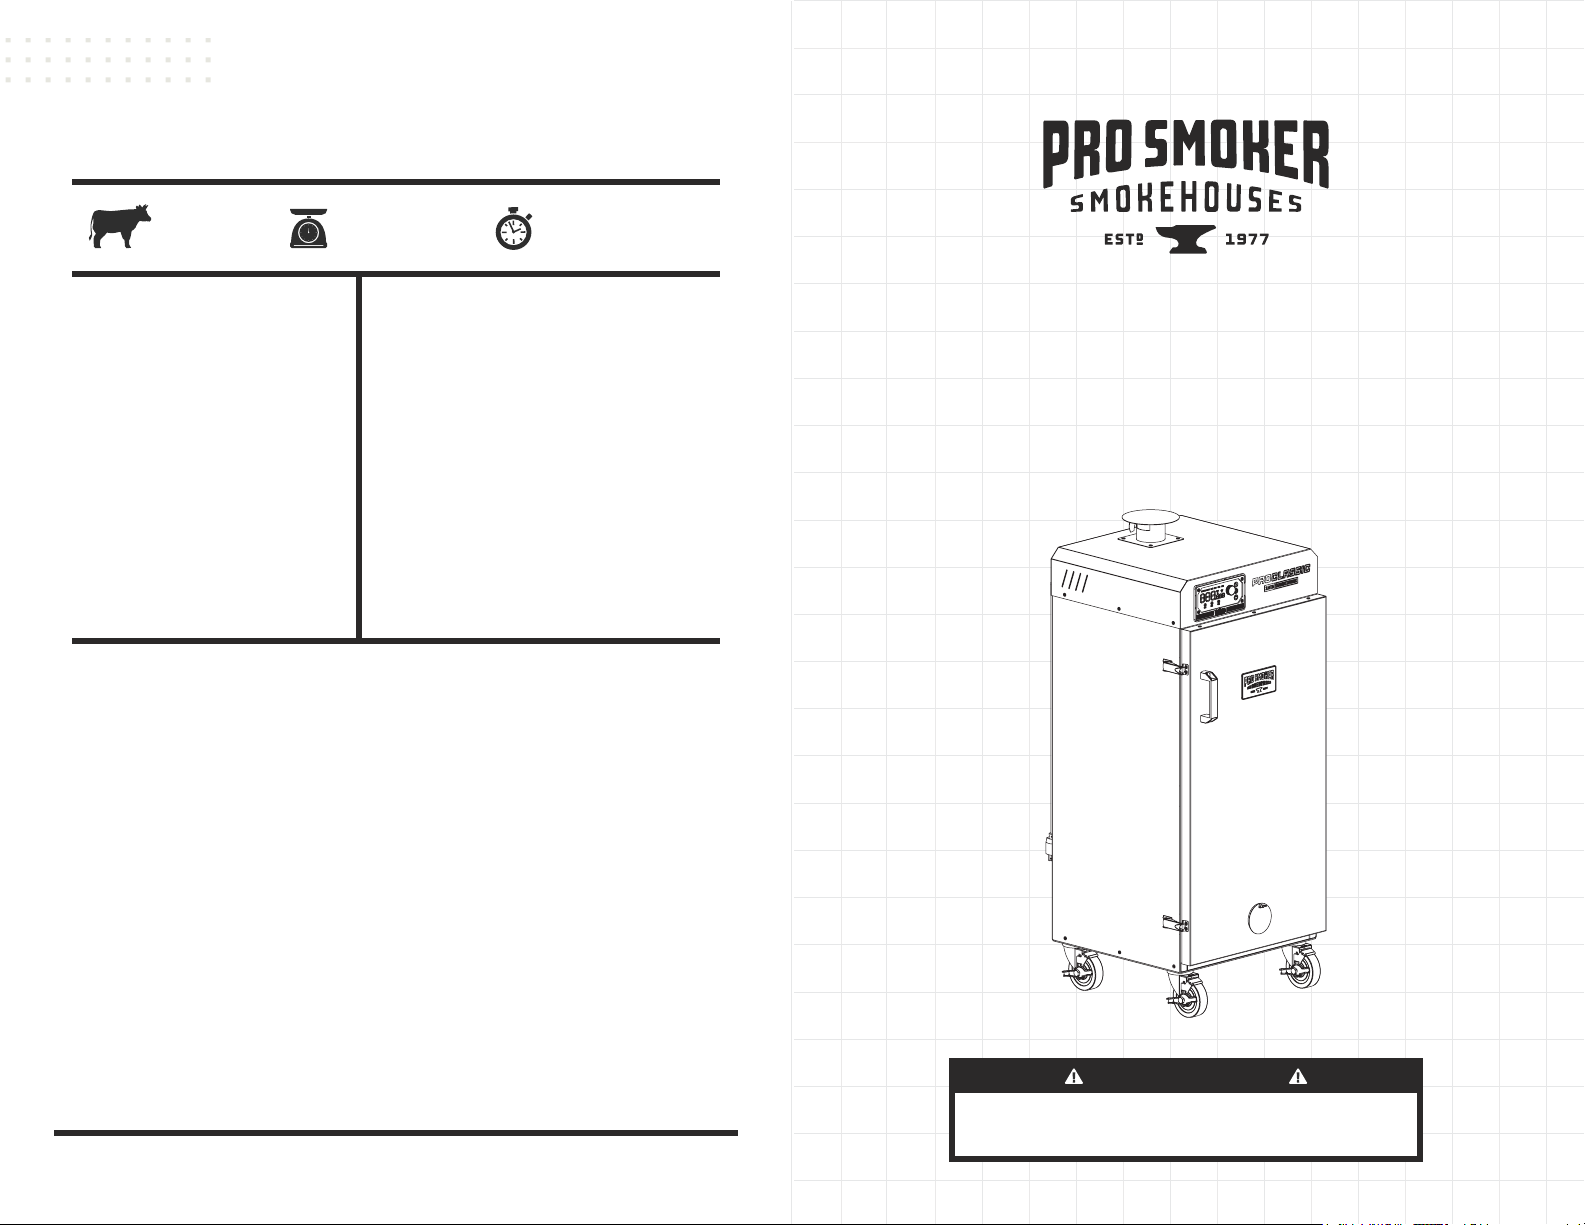
PRO SMOKER PRO-PKC User manual

WARNING
Read Instruction Manual Before Attempting To
Assemble Or Operate This Product.
PRO CLASSIC SMOKEHOUSE
OWNER’S MANUAL
Model#: PRO-PKC

2Pro Smoker®: Owner’s Manual - Pro Classic Smokehouse 3
© 2023 Pro Smoker pro-smoker.com - Phone: 1-800-874-1949
FROM OUR FAMILY TO YOURS.
- The Hanni Family
Your Smoker Overview ……………………..................…… Page 4
Getting Started: Assembly & Set-Up …………........... Pages 5-6
Basic Smoker Operation …............…………................... Page 7
Smoker Controller Operation ………………..…......… Pages 8-9
Cleaning & Maintenance ...………………......….…......... Page 10
Troubleshooting ................................................. Pages 11-12
Recipes ...........................……………………………....... Page 13
Polish Kielbasa ............................................... Page 14
Hot Dogs ..…………................................………. Page 15
Ring Bologna ………………….……..…............… Page 16
Summer Sausage ..…….................................... Page 17
Snack Sticks ..…...........................................… Page 18
Ham ................................................................ Page 19
Bacon ............................................................. Page 20
Pulled Pork .................................................... Page 21
BBQ Ribs ....................................................... Page 22
Smoked Turkey ............................................... Page 23
Smoked Salmon .............................................. Page 24
Brisket ............................................................ Page 25
Beef Jerky ........................................................ Page 26
Warranty ………………………………………………..… Pages 53-55
Congratulations on your new Pro Smoker. With the purchase of your new smokehouse,
you’ve joined a four-generation strong family obsessed with the art of smoking. Over 45
years ago, our founder Harold Hanni nearly burnt his house down with his homemade
smoker. After years of perfecting his smokehouse design, Pro Smoker became the leading
provider of commercial smokehouses to butcher shops and meat processors across the
country. The Pro Classic is the culmination of years of professional smoking expertise, made
for your backyard. Take some time to read the user manual and explore the Hanni family’s
own recipes that we’re passing down from our family, to yours. It’s time to Smoke Like a Pro.
Keep Smokin’
TABLE OF CONTENTS
• DO NOT operate this Smokehouse without reading this user manual completely.
• DO NOT open the door when heavy smoke appears. Wait until smoke is not visible
to open the smoker.
• DO NOT place Smokehouse on any type of combustible material or uneven surface.
• Use properly grounded outlets, 3-wire plugs and 3-wire grounded receptacles.
• DO NOT touch hot accessories. Use hot pads or a pair of gloves.
• Use your smoker only for what it is intended.
• DO NOT move your smoker when it is in use.
• DO NOT use attachments or accessories not recommended by manufacturer.
• Other than cleaning your smoker, servicing of any kind should be performed by
authorized service technicians only.
• Always unplug your smoker when not in use or during examination.
• Be sure to replace shelves and accessories after cleaning to discourage children
from entering your smoker.
• DO NOT open main door when sawdust is smoking.
• Always empty sawdust ash in a re-proof container.
• DO NOT use any other substance for smoking – use mixed hardwood, hickory, apple
mesquite or cherry sawdust.
• Line the entire drip pan with aluminum foil and change after each use for easy clean
up and to prevent grease build up.
If you have any problems or questions on set up and
start up, call the manufacturer at 1-800-874-1949
(Hours of Operation: 8:00 am-4:30 pm CST) and ask
for Smoker Service Support or go to our website:
www.pro-smoker.com/support for assistance.
WARNING
When you are operating your Smokehouse you must follow these simple steps; failure
to do so may result in a re hazard, spontaneous combustion or other types of harm.
Problems or Questions?
DANGER - RISK OF FIRE
DO NOT USE WOOD PELLETS. Only use ne sawdust or
small wood chips in this Smoker. Using wood pellets will
cause your smoker to catch re or spontaneously combust
potentially resulting in personal or property damages.

4Pro Smoker®: Owner’s Manual - Pro Classic Smokehouse 5
© 2023 Pro Smoker pro-smoker.com - Phone: 1-800-874-1949
YOUR SMOKER
OVERVIEW GETTING STARTED
ASSEMBLY & SET-UP
Part # Description Qty Part # Description Qty
1 Chimney Cap (03-0075) 1 8 Door 1
2 Cabinet 1 9 Sawdust Pan (04-0154) 1
3 Controller (04-0246) 1 10 Drip Tray (PS-1018) 1
4 Controller Trim 1 11 Burner Drip Pan (04-0139) 1
5 Wire Shelves (04-0181) 6 12 Burner Fixed Plate (04-0140) 1
6 Meat Probe (04-0303) 1 13 Burner (04-0142-C) 1
7 Shelves Rack (04-0289-C) 2 14 Casters (04-0603) 4
When you rst receive your Pro Smoker, check for
any damage that may have occurred during the
transportation of your smokehouse.
Assembly Instructions
1. Place the smoker on its back
on a soft cloth. Tighten the
casters in a clockwise direction.
Stand the smoker upright
with casters installed.
2. Open the door and install the wire
shelves rack assembly. Align the
large end of the keyhole slot of the
rack with the xed column on the
side panel of the body interior, set
it on the xed post of the rack, and
then drop the rack down to the
top of the slot.
3. Next, place the six wire shelves on
the rack assembly.
1
2
3

6Pro Smoker®: Owner’s Manual - Pro Classic Smokehouse 7
© 2023 Pro Smoker pro-smoker.com - Phone: 1-800-874-1949
Damper Position
Preparing Sawdust In Pan
Fill pan 3/4 full with sawdust and dampen thoroughly
with water. Form mixture into a funnel shape.
Sawdust should only be added in Smoke mode.
Dampers are located on the bottom half of your smokehouse door and the top chimney.
The position of your dampers is important for controlling air circulation in your smokehouse,
affecting temperature, smoke production and more. Please follow these guidelines when
determining how your dampers should be positioned. Always close dampers when not in use.
Note: When adjusting dampers, the upper chimney damper and lower door damper should
always be set to the same position.
Assembly Continued
4. Install the product drip tray: The drip
pan (included) is formed with 2 tabs
on one side; the tabs must always
be positioned towards the back of
smoker to ensure proper airow.
Tip: Line the drip tray with aluminum
foil before installing for easy clean-up.
5. Place the sawdust pan on burner.
6. Place the chimney cap on top on
smoker damper chimney.
Assembly is complete.
General Set-Up
• Choose a well-ventilated area
for smoker use.
• Place smoker on a sturdy,
level surface.
• Plug in cord. Note: If an extension
cord is needed, use only 14-3 wire
cord up to 25 feet, and 12-3 wire
cord from 25-50 feet, and use only
a grounded outlet.
Optional: This Smokehouse can
be vented and used indoors with
appropriate ventilation. Please
contact info@pro-smoker.com to
learn more about how to extend
your exhaust for indoor use.
GETTING STARTED
ASSEMBLY & SET-UP YOUR SMOKER
BASIC OPERATION
Now that your Pro Smoker is set up, below are some
general guidelines for operating your smokehouse.
4
5 6
For Smoking
Dampers 2/3 Closed
For Drying
Dampers Wide Open
For Cooking
Dampers Closed
“Seasoning” Your Smoker
For First Time Use
• Apply non-stick cooking oil or mineral oil
to door gasket. Note: We recommend cooking
spray for easy application.
• Set controller to Smoke and set to 100°F.
• Fill sawdust pan about 3/4 full with sawdust.
Dampen the sawdust with water and funnel
the sawdust to the outside of the pan.
Increase the temperature to 150°F.
• Open dampers 1/2 open during the break-in
period.
• After 3 hours, turn the temperature control off.
• Once smoker has cooled completely, the
smokehouse is now ready for use.
Preparing Wood Chips In Pan
Fill the pan ¾ full (about 5 cups) with wood chips.
Cover the pan with heavy duty aluminum foil and seal the edges. Poke holes in the foil to
allow airow.
For a lighter and longer smoke, soak the woodchips. Fill the pan ¾ full with wood chips (about
5 cups) and then cover with water. Allow to soak for 30 minutes and then strain off the excess
water. Cover the pan with heavy duty aluminum foil and seal the edges. Poke holes in the foil
to allow airow.
DANGER - RISK OF FIRE
DO NOT USE WOOD PELLETS. Only use ne sawdust or
small wood chips in this Smoker. Using wood pellets will
cause your smoker to catch re or spontaneously combust
potentially resulting in personal or property damages.

8Pro Smoker®: Owner’s Manual - Pro Classic Smokehouse 9
© 2023 Pro Smoker pro-smoker.com - Phone: 1-800-874-1949
A. Power button
Press power button to turn on controller, all display lights will engage, and the smoker will be in
standby status awaiting next steps. Press power button to turn off.
B. Menu button
B1 - Press the menu button to navigate to the “Smoke” Setting. Once the “Smoke” icon
ashes, press the knob to conrm. The Smoke icon will stop ashing and stay lit, you
can now set the smoke temp and begin smoking.
B2 - Press the menu button to navigate to the “Cook” Setting. Once the “Cook” icon ashes,
press the knob to conrm. The “Cook” icon will stop ashing and stay lit, you can now set
the cook temp and begin cooking.
B3 - Press the menu button to navigate to the “Time” Setting. Once the “Time” icon ashes,
press the knob to conrm. The “Time” icon will stop ashing and stay lit, you can now set
the timer. First set the hour by turning the knob, press to conrm. Next set minute by
turning the knob, press to conrm.
B4-B6 - Press the menu button to navigate to the “MP1” (probe 1). Once the “MP1” icon
ashes, press the knob to conrm. The “MP1” icon will stop ashing and stay lit, you can
now rotate knob to adjust the meat temperature of the probe. Press knob to conrm.
If needed, press menu button again for MP2 and MP3 repeating the same steps.
(Note: A meat probe needs to be inserted into jacks, otherwise they will be
skipped when clicking the menu icon)
B7 - Press the menu button to navigate to the “Cycle” Setting. Once the “Cycle” icon ashes,
press the knob to conrm. The “Cycle” icon will stop ashing and stay lit, your display will
now alternate between smoker temp and the timer.
C. Query button
Press the query button to view the set time and meat probe temperature.
D. WIFI
When the WiFi symbol is blinking, the smoker is not connected via Bluetooth or WiFi. Down-
load the app and follow to prompts to connect your smoker and link your device. The WiFi
symbol will be solid when connected successfully.
*Bluetooth must be enabled on WIFI device in order to connect to smoker.
Temp Range: 80°-180°F | Burner Wattage: 725W
This is the recommended setting when using a sawdust pan for smoke production.
A lower wattage output from the burner reduces the chance for burning sawdust and
produces a more controlled stable smoke cycle.
*When smoking at lower temperatures, we recommend building a smolder on the sawdust at 130°F then
reducing the temperature of your smoker as needed to the preferred target range.
Temp Range: 80°-300°F | Burner Wattage: 1450W
This is the recommended setting for cooking product above 180°F. It can also be used to hold
lower temps without a sawdust pan and may come in handy when smoking in colder climates
as the higher wattage burner setting will produce more radiant heat within the smoker.
*We do not recommend this setting with the use of our sawdust pan
SMOKE COOK TIME MP1 MP2 MP3
SMOKER OPERATION
CONTROLLER
You can easily monitor the temperature and ensure that
your meat is cooked to perfection every time.
Meat Probe Jacks
Actual
Temperature
Readout
Primary
Control Knob
*Hold for 3 seconds to
toggle °F / °C
Setpoint
Temperature
Readout
Power
Button (A)
Menu
Button (B)
Query
Button
(C)
WIFI (D)
Download The Pro Smoker App
Access your Smoker Controls via Smartphone, monitor your
smoke temperatures, discover recipes and more!
Smoke
Cook

10 Pro Smoker®: Owner’s Manual - Pro Classic Smokehouse 11
© 2023 Pro Smoker pro-smoker.com - Phone: 1-800-874-1949
TROUBLESHOOTING
SMOKER MAINTENANCE
CLEANING & CARE
The smoker is designed to be low-maintenance and easy to clean, so you can spend less
time cleaning and more time enjoying your smoked meats. To ensure your Pro Smoker runs
properly, please follow the following cleaning tips:
Problem Possible Cause Solution(s)
Smoke/heat burner
does not come on
Controller is on but
burner does not heat
Controller will not turn
burner off
Door leaks smoke
at door edges
The Smoker keeps
Tripping the GFCI
Smoker is not plugged in
No power from outlet
Fuse is blown
Wire connections are bad
Burner is shorted out
Shorted Wire
Burner is shorted out
Control is malfunctioning
Door gasket is bad
Insufcient Outlet Power
Extension Cord Is Too Long
Element or Wiring Shorted
Corrosion In Controller
Ensure Smoker Is
Plugged In
Check outlet for power
If blown, replace - if fuse
blows again, check for
shorted burner or wires
Repair wiring connection
Replace Burner
Repair wiring connection
Replace Burner
Replace Controller
Replace door gasket
Use A Grounded 20AMP Outlet
Shorter Heavy-Duty Extension Cord
Replace Element or Wiring
Replace Corroded Components
WARNING
Always unplug your smoker before making any repairs.
Repairs should be made by trained personnel only.
If you have any problems or questions on set up and
start up, call the manufacturer at 1-800-874-1949
(Hours of Operation: 8:00 am-4:30 pm) and ask for
Smoker Service Support or go to our website:
www.pro-smoker.com/support for assistance.
Note: Before calling for service, be sure you have
power to your smokehouse.
Problems or Questions?
General Care
• Before using the shelves, spray them with any non-stick spray.
• Line the entire drip pan with aluminum foil and change after each use for easy clean
up and to prevent grease build up.
• Keep your door gasket oiled with mineral oil or cooking spray to prevent gasket from
sticking.
Cleaning
• After each use allow the smoker to cool completely before cleaning.
• Do not clean interior walls completely – only remove loose debris. The smoke lm on
the walls will improve the product avor and will not affect the performance of the smoker
• Remove the shelves/sticks and the drip pan and clean with hot, soapy water
• Use soap-lled steel wool pads to remove baked on grease and stains
• Rinse, dry and store shelves and pan inside the smoker
DO NOT use excessive amounts of water in the interior of the smoker. If water is used,
dry out the interior thoroughly before operating.

12 Pro Smoker®: Owner’s Manual - Pro Classic Smokehouse
TROUBLESHOOTING
Problem Possible Cause Solution(s)
Error Indicator - Er1
RTD open circuit or
short circuit fault
Error Indicator - ErH
Temperature fault
Error Indicator - ErC
Cook heating
wire fault
Error Indicator - ErS
Smoke heating
wire fault
RTD cable is not plugged
in correctly
RTD Failure
Controller is faulty
Temperature is too high
RTD failure
Controller is faulty
Cook cable is not
plugged in correctly
Cook heating wire fault
Controller faulty
Smoke cable is not
plugged in correctly
Smoke heating wire fault
Controller faulty
Ensure that RTD cable is
plugged In correctly
Replace RTD
Replace the controller
Turn off and allow to cool
Replace RTD
Replace the controller
Ensure the Cook cable is
plugged in correctly
Replace Cook heating wire
Replace the controller
Ensure the Smoke cable is
plugged in correctly
Replace Smoke heating wire
Replace the controller
WARNING
Always unplug your smoker before making any repairs.
Repairs should be made by trained personnel only.
CONTINUED
SMOKEHOUSE RECIPE
COOKBOOK
Now that you’ve learned how to operate your smokehouse, lets get smoking!
For those who are new to smoking or looking for some inspiration, we put together
a collection of the Hanni family’s favorite recipes to get you started. As you gain
experience with your smokehouse, feel free to experiment with perfecting
some recipes of your own. We can’t wait to see what you cook up.
GIVE US A SHOUT
Make something in your smokehouse that’s too good to not share?
Be sure to tag us @PROSMOKERWI on your next social media post.
The Official
STOCK UP ON SUPPLIES
If you need seasoning, casings or supplies for
your next creation? We’ve got you covered.
Scan this QR code or go to psseasoning.com
to nd everything you’ll need.
MORE RECIPES & TUTORIALS
From venison sausage to smoked cheese,
discover our complete collection of recipes
& tutorials by scanning this QR code or by
going to pro-smoker.com/recipes.

14 Pro Smoker®: Owner’s Manual - Pro Classic Smokehouse 15
© 2023 Pro Smoker pro-smoker.com - Phone: 1-800-874-1949
SMOKEHOUSE RECIPE
HOT DOGS
Ingredients
● 15 lbs. - Beef Trims
● 10 lbs. - Pork Trims
● 3-4 Cups - Distilled Water
● Wiener Seasoning & Cure
(For 25 Lbs Meat)
● 24-26mm natural sheep casings
Pro’s Choice: PS Seasoning
● No. 155 Blue Ribbon
Wiener Seasoning
Smoking Procedure
1. Preheat smoker to 130°F on Smoke mode with dampers wide open.
2. Hang hot dogs on smoke sticks (avoid overcrowding for optimal airow).
3. Insert meat probe to monitor temperature.
4. Dry hot dogs at 130°F for 2 hours.
5. Fill pan 3/4 full with sawdust and dampen thoroughly with water. Form mixture into a funnel
shape and place on the heating element.
6. Increase temperature to 180°F. Set dampers to 2/3 closed.
7. Run until internal temperature of hot dogs reaches 155°F. (4-6hrs)
8. Remove hot dogs from smoker and place in an ice bath until internal temperature drops to 100°F.
9. Hang hot dogs at room temperature for 2 hours to bloom.
10. Store in refrigerator up to 2 weeks or freezer up to 6 months.
Total Time:
18-22 Hours
Batch Size:
25 lbs.
Type:
Sausage
Preparation
1. Rinse casings and soak in warm water
for 30 minutes.
2. Grind beef and pork together once through
a 3/8” plate.
3. Re-grind once through a 3/16” plate.
Optional: For a ner more traditional hot dog,
re-grind through a 1/8” plate.
4. Add seasoning to meat and mix for 2 minutes
until fully incorporated.
5. Mix cure with water, then add to meat block.
6. Continue mixing for an additional 5-7 minutes
until meat block becomes very tacky.
7. Load meat block into stuffer and stuff into casings.
8. Link hot dogs into 7” sections.
9. Rest hot dogs in fridge overnight to allow avor
and cure development.
10. Line smoker drip tray with new aluminum foil.
SMOKEHOUSE RECIPE
POLISH KIELBASA
Ingredients
● 15 Lbs – Beef Trims
● 10 Lbs – Pork trims
● 3-4 Cups – Distilled Water
● Polish Kielbasa Seasoning
& Cure (for 25 lbs meat)
● 38-42mm Natural Hog Casings
Pro’s Choice: PS Seasoning
● Smoked Polish Kit
Includes Seasoning, Casings
& Cure
Smoking Procedure
1. Preheat smoker to 110°F on Smoke mode with dampers wide open.
2. Hang sausages on smoke sticks (avoid overcrowding for optimal airow).
3. Insert meat probe into one sausage to monitor temperature.
4. Dry sausage at 110°F for 2 hours.
5. Increase temperature to 120°F, run 1 hour.
6. Fill pan 3/4 full with sawdust and dampen thoroughly with water. Form mixture into a funnel
shape and place on the heating element.
7. Increase temperature to 130°F. Set dampers to 2/3 closed. Run 1 hour.
8. Increase temperature to 140°F, run 1 hour.
9. Carefully remove sawdust pan and increase temperature to 150°F, run 1 hour.
10. Increase temperature to 160°F, run 1 hour.
11. Increase temperature to 180°F and run until the internal temperature of sausage reaches 155°F.
(2-4hrs)
12. Remove sausage from smoker and place in an ice bath until internal temperature drops to 100°F.
13. Hang sausage at room temperature for 2 hours to bloom.
14. Store in refrigerator up to 2 weeks or freezer up to 6 months.
Total Time:
23-25 Hours
Batch Size:
25 lbs.
Type:
Sausage
Preparation
1. Prepare casings by rinsing, then soak in warm
water for 30 minutes.
2. Grind beef and pork together once through a
3/8” plate.
3. Re-grind once through a 3/16” plate.
4. Add seasoning to meat and mix for 2 minutes
until fully incorporated.
5. Mix cure with water, then add to meat block.
6. Continue mixing for an additional 5-7 minutes
until meat block becomes very tacky.
7. Load meat block into stuffer and stuff into casings.
8. Link sausages into 7” sections.
9. Rest sausage in the fridge overnight to allow
avor and cure development.
10. Line smoker drip tray with new aluminum foil.

16 Pro Smoker®: Owner’s Manual - Pro Classic Smokehouse 17
© 2023 Pro Smoker pro-smoker.com - Phone: 1-800-874-1949
SMOKEHOUSE RECIPE
SUMMER SAUSAGE
Ingredients
● 15 Lbs – Beef Trims or Venison
● 10 Lbs - Pork Trims
● 3-4 Cup - Distilled Water
● Summer Sausage Seasoning
and Cure (for 25 lbs of Meat)
● 2½” X 12” Mahogany Casings
Pro’s Choice: PS Seasoning
● Garlic Summer Sausage Kit
Includes Seasoning, Casings
& Cure
Smoking Procedure
1. Preheat smoker to 110°F on Smoke mode with dampers wide open.
2. Hang sausage on smoke sticks (avoid overcrowding for optimal airow).
If you don’t have smoke sticks, sausage can be laid directly on racks.
3. Insert meat probe into one sausage to monitor temperature.
4. Dry sausage at 110°F for 2 hours.
5. Increase temperature to 120°F, run 1 hour.
6. Fill pan 3/4 full with sawdust and dampen thoroughly with water. Form mixture into a funnel
shape and place on the heating element.
7. Increase temperature to 130°F. Set dampers to 2/3 closed, run 1 hour.
8. Increase temperature to 140°F, run 1 hour.
9. Carefully remove sawdust pan and increase temperature to 150°F, run 1 hour.
10. Increase temperature to 160°F, run 1 hour.
11. Increase temperature to 180°F and run until internal temperature of summer sausage
reaches 155°F. (2-4hrs)
12. Remove sausage from smoker and place in an ice bath until internal temperature drops to 100°F.
13. Hang sausage at room temperature for 2 hours to bloom.
14. Store in refrigerator up to 2 weeks or freezer up to 6 months.
Total Time:
23-25 hours
Batch Size:
25 lbs.
Type:
Sausage
Preparation
1. Prepare casings by rinsing, then soak in
warm water for 30 minutes.
2. Grind beef (or venison) and pork together
once through a 3/8” plate.
3. Re-grind once through a 3/16” plate.
4. Add seasoning to meat and mix for 2 minutes
until fully incorporated.
5. Mix cure with water, then add to meat block.
6. Continue mixing for an additional 5-7 minutes
until meat block becomes very tacky.
7. Load meat block into stuffer and stuff into casings.
Tie off the ends.
8. Rest sausage in the fridge overnight to allow
avor and cure development.
9. Line smoker drip tray with new aluminum foil.
SMOKEHOUSE RECIPE
RING BOLOGNA
Ingredients
● 13 lbs. - Lean Beef Trims
● 12 lbs. - Lean Pork Trims
● 3-4 Cups - Distilled Water
● Bologna Seasoning & Cure
(for 25 Lbs meat)
● Casings - 40mm or 43mm
Tied Rounds
Pro’s Choice: PS Seasoning
● No. 211 Blue Ribbon
Bologna Seasoning
● No. 665 Bologna Seasoning
(no MSG)
Smoking Procedure
1. Preheat smoker to 130°F on Smoke mode with dampers wide open.
2. Hang ring bologna on smoke sticks (avoid overcrowding for optimal airow).
3. Insert meat probe into one link to monitor temperature.
4. Dry the ring bologna at 130°F for 2 hours.
5. Fill pan 3/4 full with sawdust and dampen thoroughly with water. Form mixture into a funnel shape
and place on the heating element.
6. Increase temperature to 170°F. Set dampers to 2/3 closed.
7. Run until the internal temperature of the ring bologna reaches 155°F. (6-8hrs).
8. Remove ring bologna from smoker and place in an ice bath until internal temperature drops to 100°F.
9. Hang the ring bologna at room temperature for 2 hours to bloom.
10. Store in refrigerator up to 2 weeks or freezer up to 6 months.
Total Time:
21-23 Hours
Batch Size:
25 lbs.
Type:
Sausage
Preparation
1. Prepare casings by rinsing, then soak in
warm water for 30 minutes.
2. Grind beef and pork together once through
a 3/8” plate.
3. Re-grind once through a 3/16” plate.
4. Add seasoning to meat and mix for 2 minutes
until fully incorporated.
5. Mix cure with water, then add to meat block.
6. Continue mixing for an additional 5-7 minutes
until meat block becomes very tacky
7. Load meat block into stuffer and stuff into casings.
Tie off the ends.
8. Rest sausage in the fridge overnight to allow
avor and cure development.
9. Line smoker drip tray with new aluminum foil.

18 Pro Smoker®: Owner’s Manual - Pro Classic Smokehouse 19
© 2023 Pro Smoker pro-smoker.com - Phone: 1-800-874-1949
SMOKEHOUSE RECIPE
WHOLE HAM
Ingredients
● 16-18 LB – Whole Ham (uncured)
● Cure - Pre-measured for weight
of ham
● Seasoning, if desired
Pro’s Choice: PS Seasoning
● Speed Cure
● Maple Meat Cure and Brine Mix
● Apple Pie Rub
Smoking Procedure
1. Preheat smoker to 180°F on Smoke mode with dampers 2/3 closed.
2. Place ham in a stockinette and then tie it to a smoke stick. Hang the ham on the top
rung in the smoker.
If you do not have a stockinette or smoke stick, you can place the ham on a rack in your
smoker. We recommend a stockinette for best results.
3. Place a meat probe in the ham to monitor temperature.
4. Run until internal temperature reaches 90°F. (3-4 hours).
5. Fill pan 3/4 full with sawdust and dampen thoroughly with water and then form into a
funnel shape. Place the pan on the heating element.
6. Smoke for 3 hours.
7. Carefully remove sawdust pan and change the setting to Cook. Increase the temperature
of the smoker to 225°F. Fully close dampers.
8. Cook until the internal temperature of the ham reaches 150°F. (4-5 Hours)
Pro tip: If using sauce, baste generously last 30 minutes of cooking.
9. Remove from the smoker and rest 1 hour before slicing or cooling completely.
Total Time:
9-10 Days
Batch Size:
16-18 lbs.
Type:
Pork
Preparation
1. Pat ham dry with paper towel.
2. Follow curing instructions that come with your
cure – usage will vary based on cure and weight
of the meat.
3. After curing, remove ham from brine and rinse
well with cold water.
4. Pat dry with paper towel and place in fridge
overnight to dry out.
5. Remove ham from the fridge and season topically.
Rest at room temperature while the smoker
preheats.
6. Line smoker drip tray with new aluminum foil.
Ingredients
● 15 Lbs – Beef Trims or Venison
● 10 Lbs – Pork trims
● 3-4 Cups – Distilled Water
● Snack Stick Seasoning & Cure
for 25 lbs meat
● 21mm Collagen Casings or
Natural Sheep Casings
Pro’s Choice: PS Seasoning
● Original Snack Stick Kit
Includes Seasoning, Casings
& Cure
● Hot Snack Stick Kit
Includes Seasoning, Casings
& Cure
Smoking Procedure
1. Preheat smoker to 110°F on Smoke mode with dampers wide open.
2. Hang snack sticks on smoke sticks (avoid overcrowding for optimal airow).
If you don’t have smoke sticks, snack sticks can be laid directly on racks.
3. Insert meat probe to monitor temperature.
4. Dry snack sticks at 110°F for 2 hours.
5. Increase temperature to 120°F, run 1 hour.
6. Fill pan 3/4 full with sawdust and dampen thoroughly with water.
Form mixture into a funnel shape and place on the heating element.
7. Increase temperature to 130°F. Set dampers to 2/3 closed, run 1 hour.
8. Increase temperature to 140°F, run 1 hour.
9. Carefully remove sawdust pan and increase temperature to 150°F, run 1 hour.
10. Increase temperature to 160°F, run 1 hour.
11. Increase temperature to 180°F and run until internal temperature of snack sticks
reaches 155°F. (1-3 hrs)
12. Remove snack sticks from smoker and place in an ice bath until internal temperature
drops to 100°F.
13. Hang snack sticks at room temperature for 2 hours to bloom.
14. Store in refrigerator up to 2 weeks or freezer up to 6 months.
Total Time:
22-24 Hours
Batch Size:
25 lbs.
Type:
Sausage
Preparation
1. If using sheep casings, prepare by rinsing, then
soaking in warm water for 30 minutes.
2. Grind beef (or venison) and pork together once
through a 3/8” plate.
3. Re-grind once through a 3/16” plate.
4. Add seasoning to meat and mix for 2 minutes
until fully incorporated.
5. Mix cure with water, then add to meat block.
6. Continue mixing for an additional 5-7 minutes until
meat block becomes very tacky.
7. Load meat block into stuffer and stuff into casings.
8. Rest snack sticks in fridge overnight to allow avor
and cure development.
9. Line smoker drip tray with new aluminum foil.
SMOKEHOUSE RECIPE
SNACK STICKS

20 Pro Smoker®: Owner’s Manual - Pro Classic Smokehouse 21
© 2023 Pro Smoker pro-smoker.com - Phone: 1-800-874-1949
SMOKEHOUSE RECIPE
BACON
Ingredients
● 20 Lbs – Pork belly
(5 lb portions)
● Bacon Cure - For 20 lbs meat
● Topical Rub, if desired
Pro’s Choice: PS Seasoning
● Maple Meat Cure (wet)
● PS Bacon Dry Rub Cure (dry)
● Big Kahuna Rub
● Hot Honey Bee Sting Rub
Smoking Procedure
1. Preheat smoker to 180°F on Smoke mode with dampers wide open.
2. Place the pork bellies on rack, fat side up, and then place them in the smoker.
3. Insert a meat probe to monitor temperature.
4. Run until internal temperature reaches 90°F (about 1 hour).
5. Fill pan 3/4 full with sawdust and dampen thoroughly with water. Form mixture into a funnel
shape and place on the heating element.
6. Set dampers to 2/3 closed, smoke for 2 hours.
7. Carefully remove the sawdust pan from the smoker.
8. Change to Cook mode and increase the temperature to 225°F, close dampers.
9. Run until internal temperature reaches 150°F (2-4 hours).
10. Remove bacon from smoker and rest at room temperature for 30 minutes before placing
in the fridge to cool completely.
Total Time:
1-2 Weeks
Batch Size:
20 lbs.
Type:
Pork
Preparation
1. Pat the pork belly dry with paper towel.
2. Follow curing directions that come with your
bacon cure – wet cure and dry cure will have
different process and both will deliver fantastic
results.
3. Once cured, rinse the pork bellies with cold
water and pat dry with paper towel.
4. Place the pork bellies on rack lined trays and
into the fridge overnight to dry out.
5. Remove pork bellies from the fridge and rest
at room temperature while the smoker preheats.
If using a topical rub, apply at this stage.
6. Line smoker drip tray with new aluminum foil.
SMOKEHOUSE RECIPE
PULLED PORK
Ingredients
● 2 – Pork Shoulder or butts
(8-10 lb average)
● ½ Cup – Mustard
● 2½ Cup - BBQ Rub
Pro’s Choice: PS Seasoning
● Brew City Mustard
● Notorious PIG Rub
Smoking Procedure
1. Preheat smoker to 180°F on Smoke mode with dampers 2/3 closed.
2. Place pork butts on separate racks in the smoker, fat cap up.
3. Insert meat probe to monitor temperature.
4. Run until internal temperature reaches 90°F (2-4 hours).
5. Fill pan 3/4 full with sawdust and dampen thoroughly with water. Form mixture into a funnel
shape and place on the heating element.
6. Smoke until internal temperature reaches 165°F (3-5 hours).
7. Remove pork from smoker and wrap well with butcher paper.
8. Return wrapped pork to smoker and insert meat probe.
9. Carefully remove sawdust pan from the smoker.
10. Change to Cook mode and increase temperature to 250°F, close dampers.
11. Run until internal temperature reaches 200°F (8-10hrs).
12. Remove pork from smoker and place in an empty cooler to rest for at least 1 hour, but up to 3.
Shred and enjoy.
Total Time:
14-20 Hours
Batch Size:
16-20 lbs.
Type:
Pork
Preparation
1. Pat pork dry with a paper towel and trim
as needed.
2. Score the fat cap in a crosshatch pattern.
3. Slather the pork with mustard and season
generously on all sides.
4. Allow pork to rest at room temperature for
45 minutes while smoker pre-heats.
5. Line smoker drip tray with new aluminum foil.

22 Pro Smoker®: Owner’s Manual - Pro Classic Smokehouse 23
© 2023 Pro Smoker pro-smoker.com - Phone: 1-800-874-1949
SMOKEHOUSE RECIPE
BBQ RIBS
Ingredients
● 4 Racks – Pork Back Ribs
● 1/3 Cup – Mustard
● 1 Cup – Seasoning
● 1/4 Cup - Apple Cider Vinegar
● 1 Cup – BBQ Sauce
Pro’s Choice: PS Seasoning
● Brew City Mustard
● Blue Ribbon Rib Rub
● Cherry Bomb BBQ Sauce
Smoking Procedure
1. Preheat smoker to 180°F on Smoke mode with dampers 2/3 closed.
2. Place ribs on racks, bone side down, and then place in smoker.
3. Fill pan 3/4 full with sawdust and dampen thoroughly with water. Form mixture into a funnel
shape and place on the heating element.
4. Smoke for 2 Hours.
5. Open smoker to spritz ribs with apple cider vinegar and carefully remove the sawdust pan
from the smoker.
6. Change to Cook mode and increase the temperature to 250°F, close dampers.
7. Run for 3-5 hours until desired tenderness. (pro tip: spritz ribs with apple cider vinegar every
hour to maintain moisture)
Optional: Once the ribs are done, lightly baste with sauce and then return to the smoker for an
additional 20 minutes.
8. Remove the ribs from the smoker and rest for 10 minutes before serving.
Total Time:
5-7 Hours
Batch Size:
6-8 lbs.
Type:
Pork
Preparation
1. Pat ribs dry with paper towel and
remove membrane.
2. Slather ribs with mustard and season generously
on all sides.
3. Allow ribs to rest at room temperature while
smoker preheats.
4. Line smoker drip tray with new aluminum foil.
SMOKEHOUSE RECIPE
SMOKED TURKEY
Ingredients
● Whole Turkey (16-20 lbs)
● Turkey Brine Kit
● 1 TB - Olive Oil
● 3/4 Cup - Seasoning
Pro’s Choice: PS Seasoning
● Tipsy Tom Turkey Kit
(Includes Brine Mix, Rub & Bag)
Smoking Procedure
1. Preheat smoker to 180°F on Smoke mode with dampers 2/3 closed.
2. Place turkey on a rack, breast side up. Place an aluminum pan on rack below the turkey to
catch drippings (Pro tip: use drippings for gravy).
3. Insert a meat probe to monitor temperature.
4. Run until internal temperature reaches 90°F (about 1 hour).
5. Fill pan 3/4 full with sawdust and dampen thoroughly with water. Form mixture into a funnel
shape and place on the heating element.
6. Set dampers to 2/3 closed, smoke for 2 hours.
7. Carefully remove the sawdust pan.
8. Change setting to Cook and increase temperature to 275°F, close dampers.
9. Cook until turkey reaches an internal temperature of 170°F. (about 3-4 hours)
Pro Tip: To crisp up the skin, nish your turkey in a pre-heated oven at 400°F for 15-20min
10. Remove from smoker and rest for 30-45 minutes before carving.
Total Time:
18-22 Hours
Batch Size:
16-20 lbs.
Type:
Turkey
Preparation
1. Prepare turkey according to directions on
brine kit.
2. Remove turkey from brine and rinse thoroughly
with cold water. Then pat dry with paper towel.
3. Drizzle turkey with olive oil and rub into the skin.
4. Season generously. Truss/dress the turkey.
5. Allow turkey to rest at room temperature for
1 hour before placing in the smoker.
6. Line smoker drip tray with new aluminum foil.

24 Pro Smoker®: Owner’s Manual - Pro Classic Smokehouse 25
© 2023 Pro Smoker pro-smoker.com - Phone: 1-800-874-1949
SMOKEHOUSE RECIPE
SMOKED SALMON
Ingredients
● 6 Lbs. - Salmon Filets
(About 2 sides, scaled & de-boned)
● 4 TB - Mustard
● 1 Cup - Seasoning
Pro’s Choice: PS Seasoning
● Buzzed Hot Honey Mustard
● Hot Honey Bee Sting Rub
Or
● Big Dill Mustard
● Spicy Pickle Seasoning
Smoking Procedure
1. Preheat smoker to 180°F on Smoke mode with dampers 2/3 closed.
2. Place the salmon on racks, skin side down, and place in the smoker.
3. Insert a meat probe to monitor temperature.
4. Run for 1 hour.
5. Fill pan 3/4 full with sawdust and dampen thoroughly with water. Form mixture into a funnel
shape and place on the heating element.
6. Smoke until internal temperature reaches 145°F (2-3 hours).
7. Pull and rest for 10 minutes before serving or cooling completely.
Total Time:
3-4 Hours
Batch Size:
6 lbs.
Type:
Fish
Preparation
1. Pat the salmon dry with paper towel.
2. Slather each let with 2 TB of mustard.
3. Season salmon generously with your choice
of seasoning.
4. Allow salmon to rest at room temperature
while smoker preheats.
5. Line smoker drip tray with new aluminum foil.
SMOKEHOUSE RECIPE
SMOKED BRISKET
Ingredients
● 2 Beef Briskets (10-15 lbs Average)
● 1/2 Cup – Mustard
● 2½ Cup - Seasoning
Pro’s Choice: PS Seasoning
● Brew City Mustard
● The General SPG Rub
Smoking Procedure
1. Preheat smoker to 180°F on Smoke mode and set dampers to 2/3 closed.
2. Place briskets on separate racks in the smoker, fat cap up.
3. Insert meat probe to monitor temperature.
4. Run for 2-4 hours until the internal temperature reaches 90°F.
5. Fill pan 3/4 full with sawdust and dampen thoroughly with water and then form into a funnel
shape. Place the pan on the heating element.
6. Smoke for 3-5 hours until the internal temperature reaches 165°F.
7. Remove the briskets from the smoker and wrap well with butcher paper and then return to
the smoker. Replace the meat probe and remove sawdust pan.
8. Change to Cook mode and increase temperature to 225°F, close dampers.
9. Cook until the internal temperature of the brisket reaches 190-195°F.
10. Remove brisket from smoker and place in an empty cooler to rest for at least 1 hour, but up to 3.
Total Time:
14-22 Hours
Batch Size:
20-30 lbs.
Type:
Beef
Preparation
1. Pat the brisket dry with a paper towel.
2. Trim the brisket as needed and bring the fat
cap down to 1/4”.
3. Slather the briskets with mustard and then
season all sides generously with seasoning.
4. Allow to rest at room temperature while the
smoker preheats (45 minutes).
5. Line smoker drip tray with new aluminum foil.
26 Pro Smoker®: Owner’s Manual - Pro Classic Smokehouse
SMOKEHOUSE RECIPE
BEEF JERKY
Ingredients
● 5 Lbs - Lean Beef
● Jerky Seasoning & Cure
● 1 Cup - Water
Pro’s Choice: PS Seasoning
● Cracked Pepper & Garlic Jerky Kit
● Buttery Prime Rib Jerky Kit
● Maple Jalapeno Jerky Kit
Smoking Procedure
1. Preheat smoker to 140°F in Smoke mode with dampers wide open.
2. Place racks of jerky in smoker. Run 2 hours.
3. Fill pan 3/4 full with sawdust and dampen thoroughly with water. Form mixture into a funnel
shape and place on the heating element.
4. Increase temperature to 170°F. Set the dampers to 2/3 closed.
5. Smoke for 3 hours.
6. Carefully remove the sawdust pan from the smoker.
(Pro Tip: Rotating racks at this stage will promote even drying).
7. Set the dampers wide open and run until desired texture (3-5 hrs).
8. Turn smoker off and let it rest in the smoker for 4-5 hours before packaging and storing.
Total Time:
24-27 Hours
Batch Size:
5 lbs.
Type:
Beef
Preparation
1. Combine jerky seasoning and cure with 1 cup
of water and stir until well combined.
2. Slice beef against the grain, into ¼” to 3/8” slices
(using a meat slicer will give you the best results)
3. Combine the sliced meat and jerky marinade
together in a bowl and mix until meat is well
coated.
4. Place meat in a zip lock bag and refrigerate
for 12 hours.
5. Remove jerky from fridge and lay onto racks in
a single layer (avoid overcrowding for optimal
airow). Let it rest at room temperature while the
smoker preheats.
6. Line smoker drip tray with new aluminum foil.
AVERTISSEMENT
Lire le manuel d’instructions avant d’essayer de
Assemblez ou utilisez ce produit.
FUMOIR CLASSIQUE PRO
LE MANUEL DU
PROPRIÉTAIRE
Modèle#: PRO-PKC

28 Pro Smoker®: Owner’s Manual - Pro Classic Smokehouse 29
© 2023 Pro Smoker pro-smoker.com - Phone: 1-800-874-1949
DE NOTRE FAMILLE À LA VÔTRE.
Félicitations pour votre nouveau Pro Smoker. Avec l’achat de votre nouveau fumoir, vous rejoignez une famille forte de
quatre générations obsédée par l’art de fumer. Il y a plus de 45 ans, notre fondateur Harold Hanni a failli incendier sa mai-
son avec son fumoir artisanal. Après des années passées à perfectionner la conception de son fumoir, Pro Smoker est
devenu le principal fournisseur de fumoirs commerciaux pour les boucheries et les transformateurs de viande à travers le
pays. Le Pro Classic est le point culminant d’années d’expertise professionnelle en matière de fumage, conçu pour votre
jardin. Prenez le temps de lire le manuel d’utilisation et d’explorer les recettes de la famille Hanni que nous transmettons
de notre famille à la vôtre. Il est temps de fumer comme un pro.
Continuez à fumer,
• N’UTILISEZ PAS ce fumoir sans avoir lu entièrement ce manuel d’utilisation.
• NE PAS UTILISER DE GRANULES. N’utilisez que de la sciure ne ou de petits
copeaux de bois dans Smoke. Humidiez la sciure de bois et amenez la sciure de bois
à l’extérieur de la casserole, puis ouvrez amortisseurs 2/3 pour fumeur.
• N’OUVREZ PAS la porte lorsqu’une épaisse fumée apparaît. Attendez que la fumée ne
soit plus visible pour ouvrir le fumoir.
• NE placez PAS le fumoir sur tout type de matériau combustible ou sur une surface inégale.
• Utilisez des prises correctement mises à la terre, des ches à 3 ls et des prises à 3 ls avec
mise à la terre.
• NE PAS toucher les accessoires chauds. Utilisez des coussins chauffants ou une paire
de gants.
• N’utilisez votre fumoir que pour ce à quoi il est destiné.
• NE déplacez PAS votre fumoir lorsqu’il est en cours d’utilisation.
• N’UTILISEZ PAS d’accessoires ou d’accessoires non recommandés par le fabricant.
• Outre le nettoyage de votre fumoir, tout entretien de quelque nature que ce soit doit
être effectué par techniciens de service agréés uniquement.
• Débranchez toujours votre fumoir lorsqu’il n’est pas utilisé ou pendant l’examen.
• Assurez-vous de replacer les étagères et les accessoires après le nettoyage pour décourag-
er les enfants
d’entrer dans votre fumoir.
• NE PAS ouvrir la porte principale lorsque la sciure fume.
• Toujours vider les cendres de sciure de bois dans un récipient résistant au feu.
• N’UTILISEZ AUCUNE utiliser toute autre substance pour fumer - utiliser un mélange de bois
dur, de hickory, de pommier sciure de mesquite ou de cerisier.
• Tapisser toute la lèchefrite de papier d’aluminium et la changer après chaque utilisation pour
un nettoyage facile et pour éviter l’accumulation de graisse.
AVERTISSEMENT
When you are operating your Smokehouse you must follow these simple steps; failure
to do so may result in a re hazard, spontaneous combustion or other types of harm.
Aperçu de votre fumeur …………………….......….......... Page 30
Mise en route : Assemblage et configuration …... Pages 31-32
Fonctionnement de base du fumoir …............….......... Page 33
Fonctionnement du contrôleur de fumoir ……...… Pages 34-35
Nettoyage et entretien ………………….....….................. Page 36
Dépannage ............................................................ Page 37-38
Recettes ................................……………………………... Page 39
Kielbasa polonais .................................................. Page 40
Les hot-dogs ..…………................................………. Page 41
Bague Bologne …....………………..............….......… Page 42
Saucisse d’été ..……............................................... Page 43
Snack Sticks ..….................................................… Page 44
Jambon .................................................................. Page 45
Bacon .................................................................... Page 46
Porc effiloché ........................................................ page 47
Côtes levées au barbecue ..................................... Page 48
Volailles fumées ................................................ Page 49
Poisson fumé ................................................... ... page 50
Poitrine ..................................................... ........... page 51
Viande de boeuf ............................................ ....... Page 52
Garantie ………………………………………………..… Pages 53-55
TABLE DES MATIÈRES
Si vous avez des problèmes ou des questions sur
l’installation et le démarrage, appelez le fabricant au
1-800-874-1949 (Heures d’ouverture: 8:00 am-4:30 pm)
et demandez le service d’assistance pour fumeurs ou
visitez notre site Web :
www.pro-smoker.com/support pour obtenir de l’aide.
Problèmes ou questions?
DANGER - RISQUE D’INCENDIE
NE PAS UTILISER DE GRANULÉS DE BOIS. Utilisez uniquement
de la sciure ne ou de petits copeaux de bois dans ce fumoir.
L’utilisation de granulés de bois entraînera l’incendie ou la
combustion spontanée de votre fumoir, ce qui pourrait entraîner
des dommages personnels ou matériels.
- La Famille Hanni

30 Pro Smoker®: Owner’s Manual - Pro Classic Smokehouse 31
© 2023 Pro Smoker pro-smoker.com - Phone: 1-800-874-1949
VOTRE FUMEUR
APERÇU
Partie# Description Quantité Partie# Description Quantité
1 Chapeau de cheminée (03-0075) 1 8 Porte 1
2 Armoire 1 9 Poêle à sciure (04-0154) 1
3 Manette (04-0246) 1 10 Bac de récupération (PS-1018) 1
4 Garniture du contrôleur 1 11 Lèchefrite du brûleur (04-0139) 1
5 Étagères grillagées (04-0181) 6 12 Plaque de brûleur (04-0140) 1
6 Sonde à viande (04-0303) 1 13 Brûleur (04-0142-C) 1
7 Ensemble d’étagè (04-0289-C) 2 14 Roulettes (04-0603) 4
resen l métallique
COMMENCER
ASSEMBLAGE ET CONFIGURATION
Lorsque vous recevez votre Pro Smoker pour la
première fois, vériez tout dommage qui aurait pu
survenir pendant le transport de votre fumoir.
Instructions de montage
1. Placez le fumoir sur le dos
sur un chiffon doux. Serrez le
roulettes dans le sens des
aiguilles d’une montre.
Redressez le fumeur
avec roulettes installées.
2. Ouvrez la porte et installez le l
assemblage de rack d’étagères.
Alignez le grande extrémité de la
fente en trou de serrure du rack
avec la colonne xe sur le panneau
latéral de l’intérieur de la carrosserie,
ensemble sur le montant xe du
rack, et puis déposez le rack vers
le bas haut de la fente.
3. Ensuite, placez les six grilles
métalliques sur l’ensemble de
crémaillère.
1
2
3

32 Pro Smoker®: Owner’s Manual - Pro Classic Smokehouse 33
© 2023 Pro Smoker pro-smoker.com - Phone: 1-800-874-1949
Assemblage suite
4. Installez le bac d’égouttement du
produit: Le le moule (inclus) est formé
de 2 languettes d’un côté; les onglets
doivent toujours être positionné vers
l’arrière de fumoir pour assurer une
circulation d’air adéquate.
Astuce: Tapisser le bac d’égouttage
avec de l’aluminium feuille avant
l’installation pour un nettoyage facile.
5. Placez le bac à sciure sur le brûleur.
6. Placez le chapeau de cheminée sur
le dessus cheminée du registre des
fumeurs.
L’assemblage est terminé.
Configuration générale
• Choisissez un endroit bien aéré
pour usage fumeur.
• Placez le fumoir sur un support solide,
surface plane.
• Branchez le cordon. Remarque: Si
une extension un cordon est nécessaire,
utilisez uniquement un l 14-3 cordon
jusqu’à 25 pieds et 12-3 ls cordon de
25 à 50 pieds et utilisez uniquement
une prise mise à la terre.
Facultatif : ce fumoir peut être ventilé
et utilisé à l’intérieur avec ventilation
appropriée. S’il te plaît contactez info@
pro-smoker.com pour en savoir plus sur la
façon d’étendre votre échappement pour
une utilisation en intérieur.
COMMENCER
ASSEMBLAGE ET CONFIGURATION
4
5 6
“Assaisonnez” votre fumoir
Pour la première utilisation
• Appliquez de l’huile de cuisson antiadhésive
ou de l’huile minérale au joint de porte.
Remarque : Nous vous recommandons de
cuisiner vaporiser pour une application facile.
• Réglez le contrôleur sur Fumée et sur 37°C.
• Remplir le bac à sciure de bois aux 3/4 environ
avec de la sciure de bois Humidier la sciure
de bois et canaliser la sciure de bois pour
l’extérieur de la casserole. Augmentez la
température à 65°C.
• Registres ouverts à 1/2 pendant le rodage
période.
• Après 3 heures, éteignez le contrôle de la
température.
• Une fois que le fumoir a complètement refroidi,
le le fumoir est maintenant prêt à être utilisé.
Position du registre
Préparation de la sciure de bois
dans la casserole
Remplir le moule aux 3/4 avec de la sciure de bois
et humidier abondamment avec de l’eau. Former
le mélange en forme d’entonnoir.
La sciure de bois ne doit être ajoutée qu’en mode Fumée.
Les amortisseurs sont situés sur la moitié inférieure de la porte de votre fumoir et sur la
cheminée supérieure. La position de vos registres est importante pour contrôler la circulation
de l’air dans votre fumoir, affectant la température, la production de fumée et plus encore.
Veuillez suivre ces directives pour déterminer comment vos amortisseurs doivent être posi-
tionnés. Fermez toujours les registres lorsqu’ils ne sont pas utilisés.
Remarque: lors du
réglage registres, la cheminée
supérieure amortisseur et
bas de porte l’amortisseur
doit toujours être réglé
sur la même position.
VOTRE FUMEUR
OPÉRATION DE BASE
Maintenant que votre Pro Smoker est conguré,
vous trouverez ci-dessous quelques directives
générales le fonctionnement de votre fumoir.
Pour fumer
Amortisseurs 2/3
Fermés
Pour le séchage
Amortisseurs grands
Ouverts
Pour cuisiner
Amortisseurs
Fermés
Préparation des copeaux de bois
dans la casserole
Remplissez le moule aux ¾ (environ 5 tasses) de copeaux de bois. Couvrez le moule avec du
papier d’aluminium épais et scellez les bords. Percez des trous dans la feuille pour permettre
la circulation de l’air.
Pour une fumée plus légère et plus longue, faites tremper les copeaux de bois. Remplissez la
casserole aux ¾ de copeaux de bois (environ 5 tasses) puis couvrez d’eau. Laisser tremper
30 minutes puis ltrer l’excès d’eau. Couvrez le moule avec du papier d’aluminium épais et
scellez les bords. Percez des trous dans la feuille pour permettre la circulation de l’air.
DANGER - RISQUE D’INCENDIE
NE PAS UTILISER DE GRANULÉS DE BOIS. Utilisez uniquement
de la sciure ne ou de petits copeaux de bois dans ce fumoir.
L’utilisation de granulés de bois entraînera l’incendie ou la
combustion spontanée de votre fumoir, ce qui pourrait entraîner
des dommages personnels ou matériels.

34 Pro Smoker®: Owner’s Manual - Pro Classic Smokehouse 35
© 2023 Pro Smoker pro-smoker.com - Phone: 1-800-874-1949
SMOKE COOK TIME MP1 MP2 MP3
FONCTIONNEMENT FUMEUR
MANETTE
Vous pouvez facilement surveiller la température et
vous assurer que votre viande est cuite à la perfection à
chaque fois.
Crics de sonde à
viande
Réel
Température
Lire à haute voix
Primaire
Bouton de
controle
*Maintenez pendant 3
secondes pour
basculer °F / °C
Consigne
Température
Lire à haute voix
Pouvoir
Bouton (A)
Menu
Bouton (B)
Mettre en
doute
Bouton (C)
WIFI (D)
Téléchargez l’application Pro Smoker
Accédez à vos commandes de fumoir via Smartphone, sur-
veillez vos températures de fumée, découvrez des recettes et
plus encore !
A. Bouton d’alimentation
Appuyez sur le bouton d’alimentation pour allumer le contrôleur, tous les voyants d’afchage s’allumeront et le fumoir
sera en état de veille en attendant les prochaines étapes. Appuyez sur le bouton d’alimentation pour éteindre.
B. Bouton de menu
B1 - Appuyez sur le bouton de menu pour accéder au paramètre “Fumée”. Une fois l’icône “Fumée” clignote,
appuyer sur la molette pour valider. L’icône Fumée cessera de clignoter et restera allumée, vous pouvez
maintenant régler la température de la fumée et commencer à fumer.
B2 - Appuyez sur le bouton de menu pour accéder au paramètre « Cuisiner ». Une fois que l’icône “Cook”
clignote, appuyez sur le bouton pour conrmer. L’icône “Cook” s’arrêtera de clignoter et restera allumée, vous
pouvez maintenant régler la température de cuisson et commencer la cuisson.
B3 - Appuyez sur le bouton de menu pour naviguer jusqu’au paramètre “Heure”. Une fois que l’icône “Heure”
clignote, appuyez sur le bouton pour conrmer. L’icône “Heure” cessera de clignoter et restera allumée, vous
pouvez maintenant régler la minuterie. Réglez d’abord l’heure en tournant le bouton, appuyez sur pour
conrmer. Prochaine minute dénie par en tournant le bouton, appuyez sur pour conrmer.
B4-B6 - Appuyez sur le bouton de menu pour naviguer jusqu’au « MP1 » (sonde 1). Une fois l’icône “MP1”
clignote, appuyer sur la molette pour valider. L’icône “MP1” cessera de clignoter et restera allumée, vous
pouvez tournez maintenant le bouton pour régler la température de la viande de la sonde. Appuyez sur le
bouton pour conrmer. Si nécessaire, appuyez à nouveau sur le bouton de menu pour MP2 et MP3 en
répétant les mêmes étapes.
(Remarque : une sonde à viande doit être insérée dans les prises, sinon elles seront
ignoré lorsque vous cliquez sur l’icône de menu)
B7 - Appuyez sur le bouton de menu pour accéder au paramètre “Cycle”. Une fois que l’icône “Cycle” clignote,
appuyez sur le bouton pour conrmer. L’icône “Cycle” s’arrêtera de clignoter et restera allumée, votre écran
maintenant alterner entre la température du fumoir et la minuterie.
C. Bouton de requête
Appuyez sur le bouton de requête pour afcher l’heure réglée et la température de la sonde à viande.
D. WIFI
Lorsque le symbole Wi-Fi clignote, le fumoir n’est pas connecté via Bluetooth ou Wi-Fi. Téléchargez l’applica-
tion et suivez les invites pour connecter votre fumoir et lier votre appareil. Le symbole WiFi sera solide une fois
connecté avec succès.
*Le Bluetooth doit être activé sur l’appareil WIFI an de se connecter au fumeur.
Plage de température: 26°-82°C | Puissance du brûleur: 725W
Il s’agit du réglage recommandé lors de l’utilisation d’un bac à sciure pour la production de fumée.
Une puissance de sortie inférieure du brûleur réduit le risque de brûler de la sciure et produit un cycle de
fumée stable plus contrôlé.
*Lorsque vous fumez à des températures plus basses, nous vous recommandons de construire un feu
couvant sur la sciure de bois à 130 °F, puis de réduire la température de votre fumoir selon les besoins
à la plage cible préférée.
Plage de température: 26°-148°C | Puissance du brûleur: 1450W
Il s’agit du réglage recommandé pour la cuisson d’un produit au-dessus de 180 °F. Il peut également être
utilisé pour maintenir des températures plus basses sans poêle à sciure et peut être utile lorsque vous
fumez dans des climats plus froids, car le réglage du brûleur à puissance plus élevée produira plus de
chaleur rayonnante dans le fumoir.
*Nous ne recommandons pas ce réglage avec l’utilisation de notre poêle à sciure
Smoke
Cook

36 Pro Smoker®: Owner’s Manual - Pro Classic Smokehouse 37
© 2023 Pro Smoker pro-smoker.com - Phone: 1-800-874-1949
ENTRETIEN DU FUMEUR
NETTOYAGE ET ENTRETIEN
Le fumoir est conçu pour nécessiter peu d’entretien et est facile à nettoyer, de sorte que
vous pouvez passer moins de temps à nettoyer et plus de temps à proter de vos viandes
fumées. Pour vous assurer que votre Pro Smoker fonctionne correctement, veuillez suivre
les conseils de nettoyage suivants :
Si vous avez des problèmes ou des questions sur l’installation
et le démarrage, appelez le fabricant au 1-800-874-1949
(Heures d’ouverture: 8:00 am-4:30 pm CST) et demandez le
service d’assistance pour fumeurs ou visitez notre site
Web: www.pro-smoker.com/support pour obtenir de l’aide.
Remarque : Avant d’appeler le service, assurez-vous d’avoir
l’électricité à votre fumoir.
Problèmes ou questions ?
Soins généraux
• Avant d’utiliser les clayettes, vaporisez-les avec un spray antiadhésif.
• Tapisser toute la lèchefrite de papier d’aluminium et la changer après chaque utilisation
pour un nettoyage facile. et pour éviter l’accumulation de graisse.
• Gardez le joint de votre porte huilé avec de l’huile minérale ou un aérosol de
cuisson pour empêcher le joint de collage.
Nettoyage
• Après chaque utilisation, laissez le fumoir refroidir complètement avant de le nettoyer.
• Ne nettoyez pas complètement les murs intérieurs – enlevez seulement les débris lâches.
Le lm de fumée sur les murs amélioreront la saveur du produit et n’affecteront pas les
performances du fumeur
• Retirez les clayettes/bâtons et la lèchefrite et nettoyez-les avec de l’eau chaude
savonneuse
• Utilisez des tampons en laine d’acier savonneuse pour enlever la graisse et les
taches cuites
• Rincez, séchez et rangez les étagères et la casserole à l’intérieur du fumoir
NE PAS utiliser des quantités excessives d’eau à l’intérieur du fumoir. Si de l’eau est utilisée,
séchez soigneusement l’intérieur avant de l’utiliser.
DÉPANNAGE
Problème Cause possible Solution(s)
Le brûleur de fumée/
chaleur ne s’allume
pas
Le contrôleur est
allumé mais le brûleur
ne chauffe pas
Le contrôleur n’étein-
dra pas le brûleur
La porte dégage de la
fumée aux bords des
portes
Le Fumeur garde
Déclencher le GFCI
Le fumoir n’est pas
branché
Pas d’alimentation de la
prise
Le fusible est grillé
Les connexions laires
sont mauvaises
Le brûleur est en court-
circuit
Fil court-circuité
Le brûleur est en court-
circuit
Le contrôle fonctionne mal
Le joint de porte est
mauvais
Puissance de sortie
insufsante
La rallonge est trop longue
Élément ou câblage en court-circuit
Corrosion dans le contrôleur
Assurez-vous que le fumeur
est Branché
Vérier la prise de courant
S’il est grillé, remplacez-le -
si le fusible saute à nouveau,
vériez si le brûleur ou les ls
sont en court-circuit
Réparer la connexion du
câblage
Remplacer le brûleur
Réparer la connexion du
câblage
Remplacer le brûleur
Remplacer le contrôleur
Remplacer le joint de porte
Utilisez une prise de terre
de 20 A
Rallonge plus courte et résistante
Remplacer l’élément ou le câblage
Remplacer les composants corrodés
AVERTISSEMENT
Débranchez toujours votre fumoir avant d’effectuer toute réparation.
Les réparations doivent être effectuées uniquement par du personnel qualié.

38 Pro Smoker®: Owner’s Manual - Pro Classic Smokehouse
DÉPANNAGE
Problème Cause possible Solution(s)
Indicateur d’erreur
Er1
Circuit ouvert RTD ou
défaut de court-circuit
Indicateur d’erreur
ErH
Temperature fault
Indicateur d’erreur
ErC
Cuire le chauffage
Défaut De Fil
Indicateur d’erreur
ErS
Chauffage à la fumée
Défaut De Fil
Le câble RTD n’est pas
branché dans correctement
Défaillance RTD
Le contrôleur est défectueux
La température est trop élevée
Défaillance RTD
Le contrôleur est défectueux
Cook cable is not
plugged in correctly
Cuire le défaut du l chauffant
Contrôleur défectueux
Le câble de fumée n’est
pas branché correctement
Défaut l chauffant
fumée
Contrôleur défectueux
Assurez-vous que le câble
RTD est branché correctement
Remplacer RTD
Remplacer le contrôleur
Éteignez et laissez refroidir
Remplacer RTD
Remplacer le contrôleur
Le câble de cuisson n’est
pas branché correctement
Remplacer le l chauffant Cook
Remplacer le contrôleur
Assurez-vous que le câble
Smoke est correctement
branché
Remplacer le l chauffant
de fumée
Remplacer le contrôleur
AVERTISSEMENT
Débranchez toujours votre fumoir avant d’effectuer toute réparation.
Les réparations doivent être effectuées uniquement par du personnel qualié.
A CONTINUÉ
RECETTE DU FUMOIR
LIVRE DE RECETTES
Maintenant que vous avez appris à faire fonctionner votre fumoir, commençons à fum-
er! Pour ceux qui débutent dans le tabagisme ou qui recherchent de l’inspiration, nous
avons rassemblé une collection des recettes préférées de la famille Hanni pour vous
aider à démarrer. Au fur et à mesure que vous gagnez expérience avec votre fumoir,
n’hésitez pas à expérimenter avec perfectionner vos propres recettes. Nous avons
hâte de voir ce que vous préparez.
FAITES-NOUS UN CRI
Faire quelque chose dans votre fumoir qui est trop bon pour ne pas le partager ?
Assurez-vous de nous identier @PROSMOKERWI sur votre prochaine publication
sur les réseaux sociaux.
L’Officiel
FAITES DES STOCKS DE FOURNITURES
Vous avez besoin d’assaisonnements, de boyaux ou de four-
nitures pour votre prochaine création ? Nous avons ce qu’il
vous faut. Scannez ce code QR ou rendez-vous sur
psseasoning.com pour trouver tout ce dont vous aurez besoin.
PLUS DE RECETTES ET TUTORIELS
De la saucisse de chevreuil au fromage fumé, découvrez
notre collection complète de recettes & tutoriels en scannant
ce QR code ou en allez sur pro-smoker.com/recipes.
Table of contents
Languages:
Other PRO SMOKER Smoker manuals


Popular Smoker manuals by other brands


Mayer Barbecue
Mayer Barbecue RAUCHA MPS-300 PRO user guide

Yoder Smokers
Yoder Smokers YS 640 installation instructions

Outdoor Leisure
Outdoor Leisure Smoke Hollow Smoke-Tronix D4015SSC Assembly, care & use manual

Iron Chef
Iron Chef ICK01000 instruction manual

Dansons Group
Dansons Group Pit Boss 7 Series Assembly and operation

New braunfel
New braunfel 9201508 Product guide