Pro8mm Rhonda CAM User manual

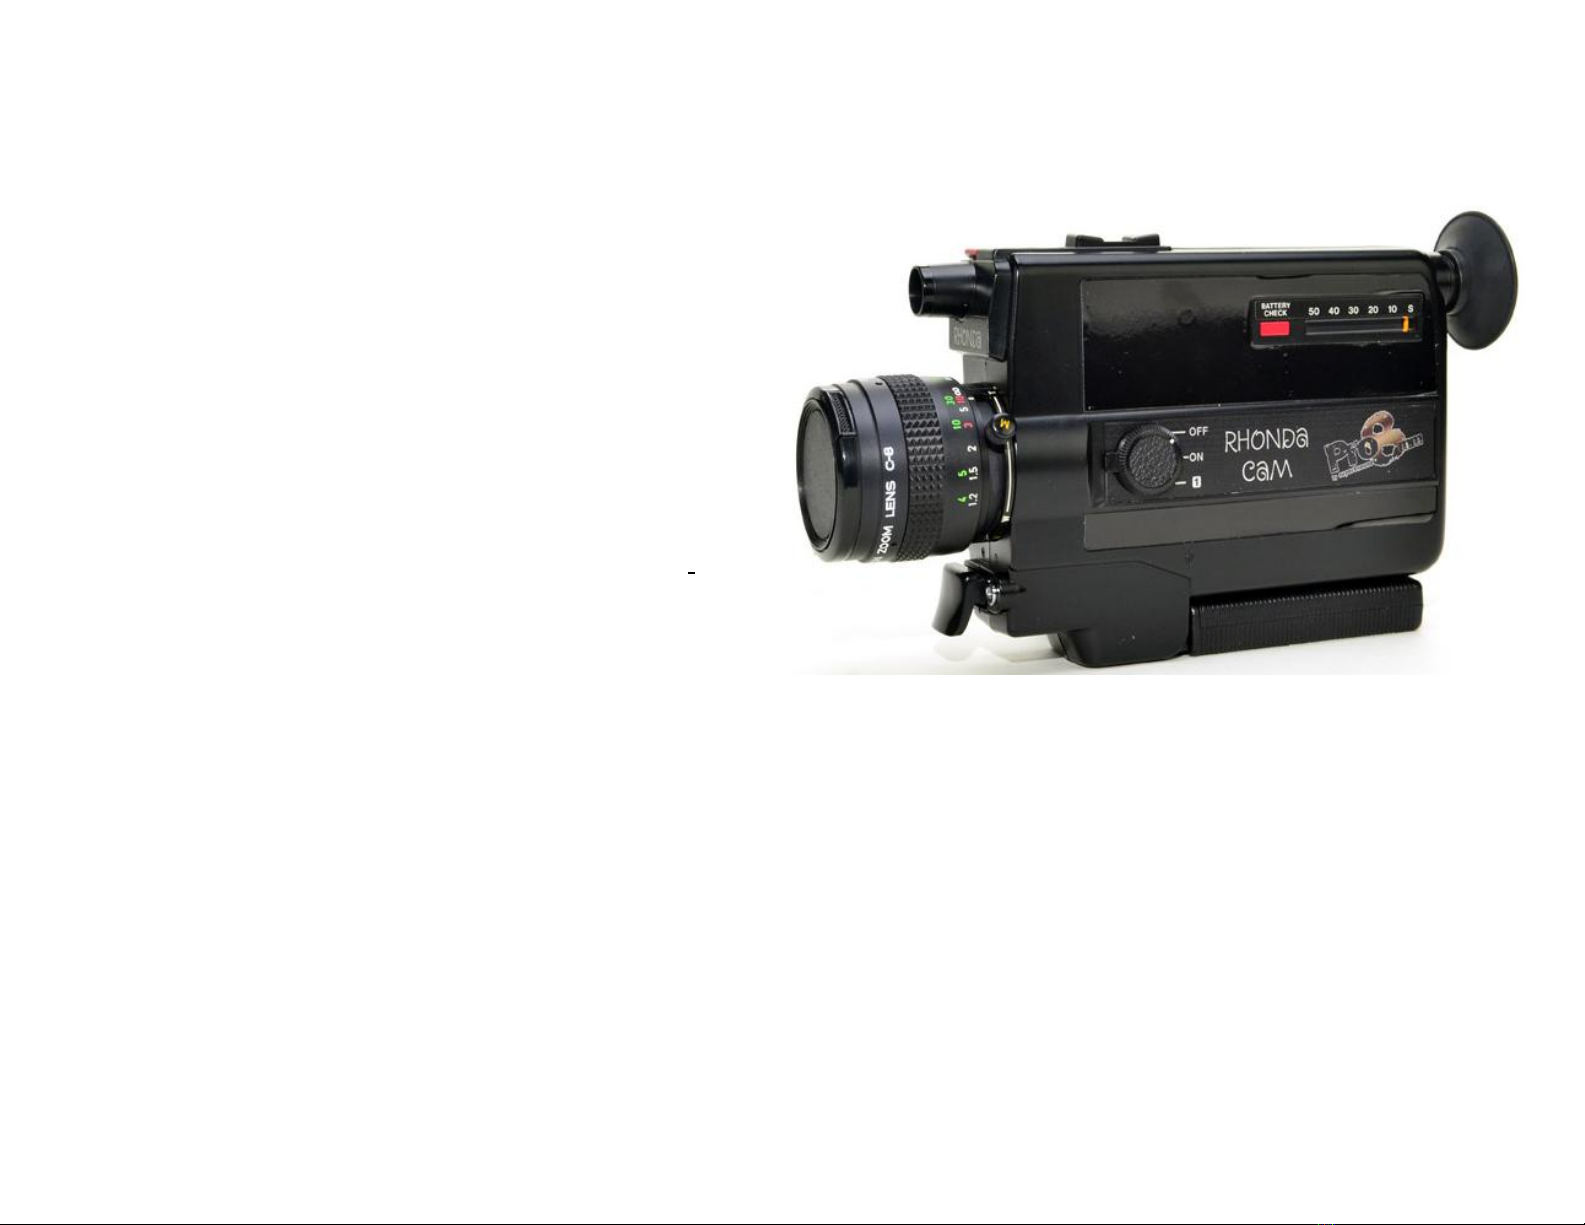
Rhonda CAM Features:
Adapted from a Canon 310 XL
18fps filming speed and singe-frame
shooting capabilities
Power/Manual Zoom
Runs on 2 AA batteries
Petite size (7” x 4 ½ ” x 1 ¾ ”)
Light weight body, weighing only ½ a
pound
Auto exposure with a range of ASA
The world’s fastest lens speed of f/1.0 3x
zoom, with macro
Built in Canon 8.5- 25.5mm zoom lens
F1.0 auto controlled aperture, making it
the lowest light film camera on the market
Additional Rhonda CAM Deluxe Features:
Adapted from a Canon 514 XL
9fps filming speed and 18fps filming speed
F stop scale in the viewfinder with the ability to lock a given exposure
Split screen focusing
Locking ring in the diopter
Built in Canon 9-45mm zoom lens
F1.4-32 auto aperture

User Guide: The Rhonda CAM
Order of Operation:
1. Load the Batteries
2. Check the Battery Charge
3. Insert Film
4. Adjust the Eye Piece
5. Check your Filter Settings
6. Focus the Shot
7. Check Exposure Indicator
8. Shoot Something Fun
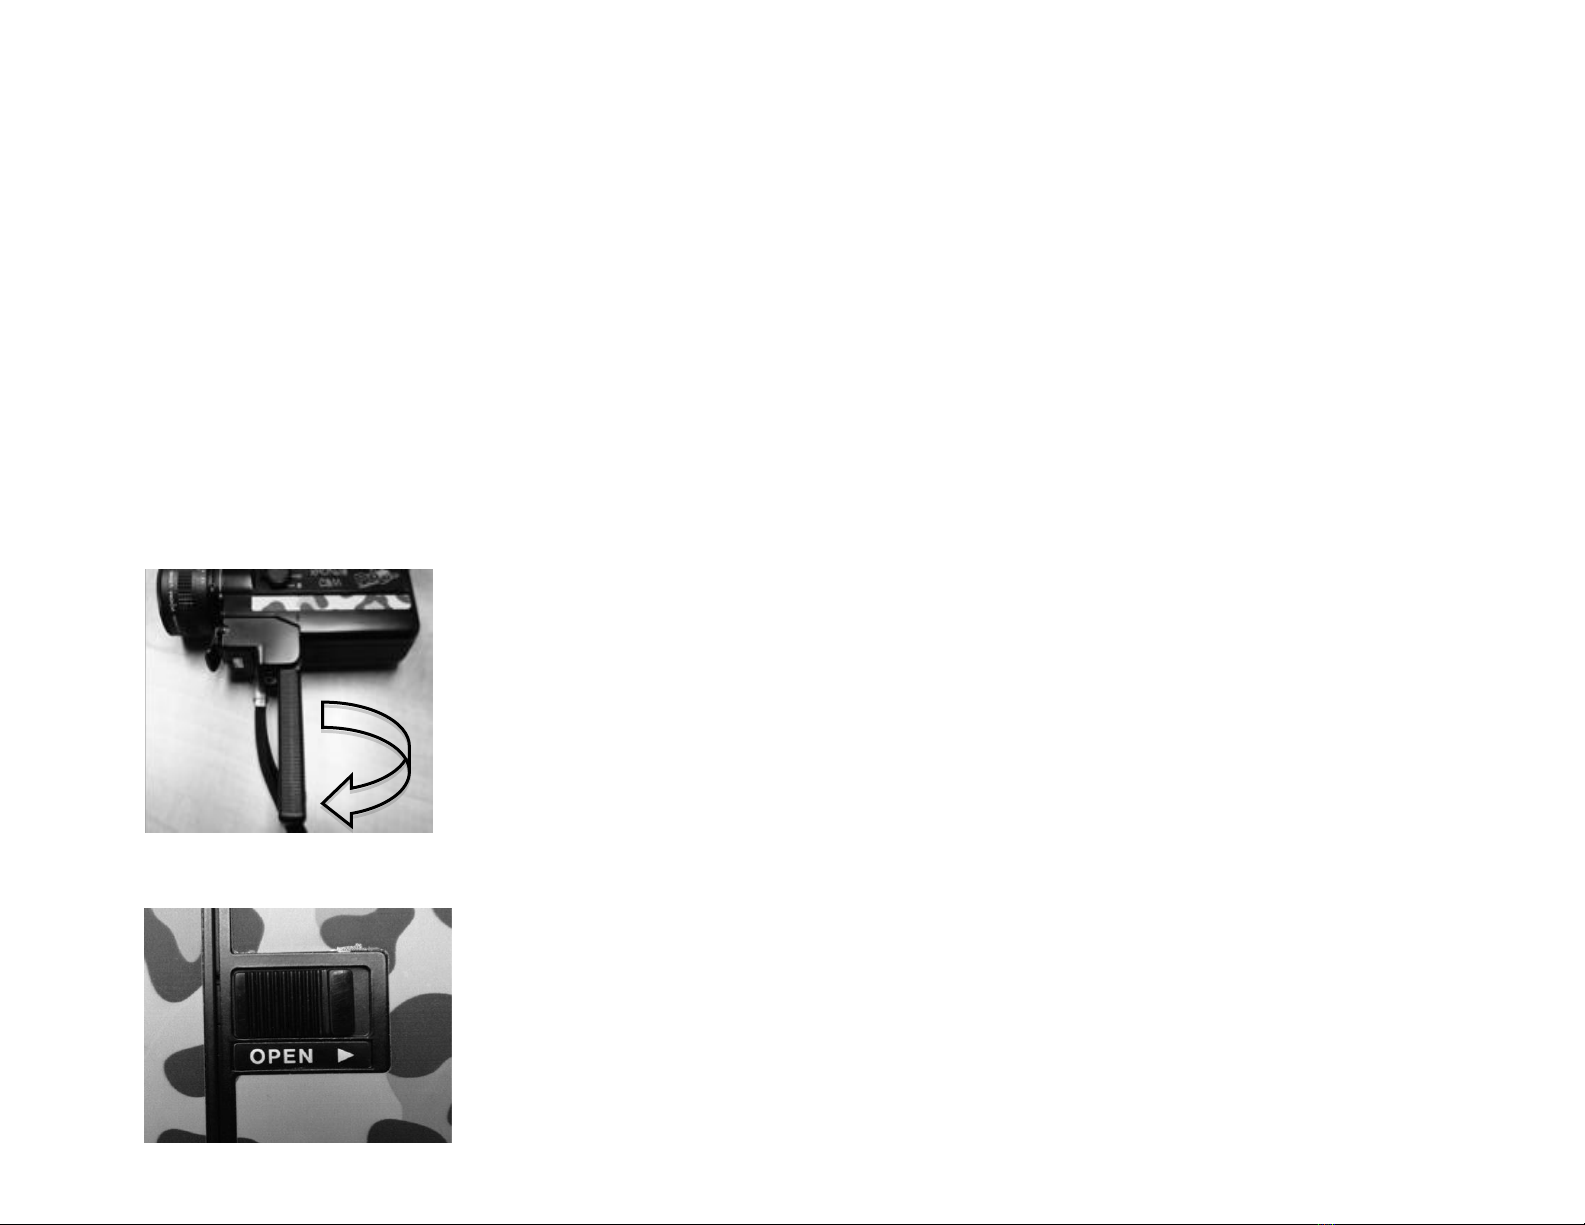
Unfold the Grip
Pull out the grip in the direction indicated by the arrow. To fold it back, push it
in the opposite direction.
Opening and Closing the Film Compartment
To open the film compartment slide the safety lock release in the direction
of the arrow. To close, simply push the cover in and it will snap in place.
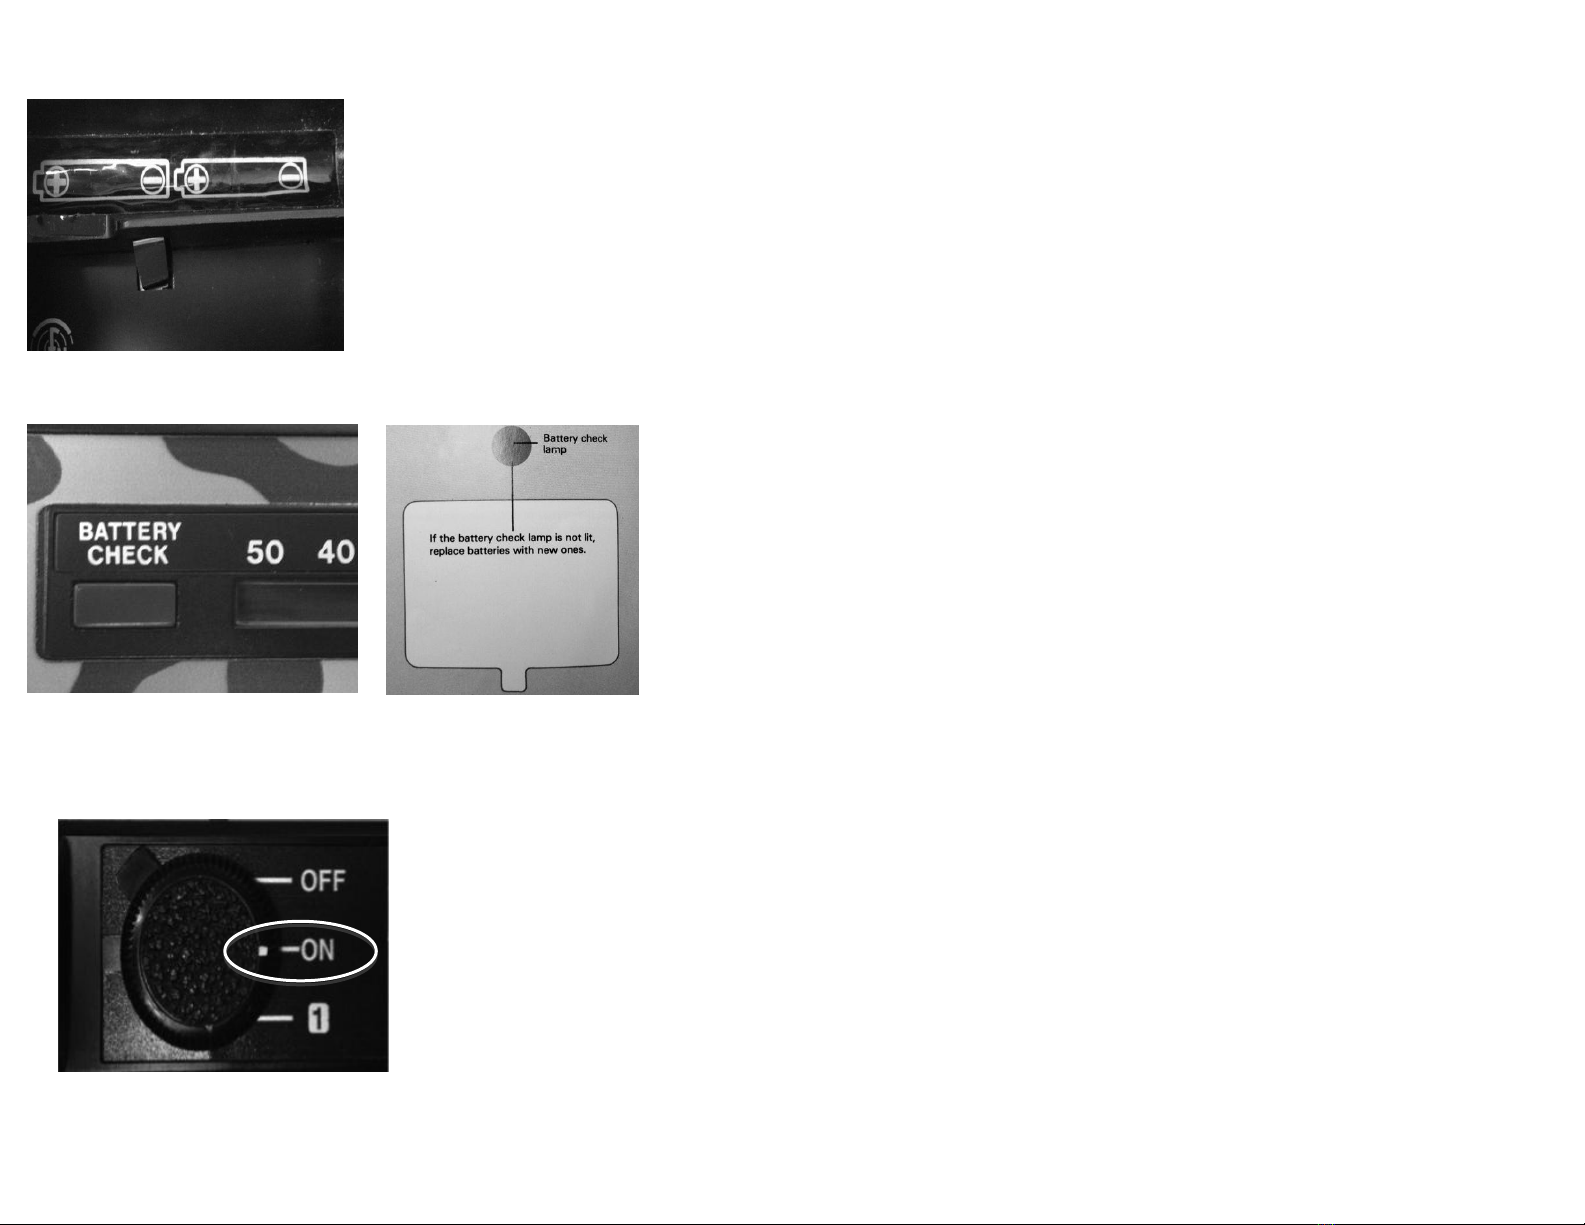
Loading the Batteries
The batteries power the exposure meter, zooming system and film drive. Insert 2
new AA size batteries into the battery compartment. Be sure that the + and -
ends of each battery are in the proper direction.
*If the camera will not be used for a prolonged period, remove the batteries and
store them in a dry place. Batteries may leak and damage the camera if left
inserted in the camera for a long period of time.
Checking the Batteries
Turn the main switch to “ON. ”Look through the viewfinder
and push the battery check button. If the lamp in the upper
portion of the viewfinder is lit red, voltage is sufficient for
filming. When the lamp is not lit, replace batteries. *While
the camera has been restored, the battery circuit may not
always work. For best results, always start with fresh
batteries.
Turning the Camera ON & OFF
By turning the dial of the main switch to “ON,” all electric circuits are
connected. A red mark is visible to the left of the dial when the power is
“ON.”AT “OFF” all the circuits are disconnected. As a safety measure, neither
the shutter nor the zooming switch can be operated. At “1”, you can shoot
single frame for animation.*When the camera is not in use for a long period of
time, turn the dial to “OFF” in order to conserve the battery energy.

Dioptric Adjustment
While looking through the viewfinder, turn the eyecup to adjust the eyepiece to
your vision. Turn the focusing distance ring to infinity (sideways 8). Look
through the viewfinder. Turn the dioptric adjustment ring until the subject in far
distance appears clearest and sharpest. The eyepiece adjustment range is from -4
to +2 diopters. DELUXE only: Turn the locking ring in the viewfinder to lock
down the eyepiece.
Loading the Film
Insert the film cartridge with the identification label up, and filmstrip to the
right. Put the cartridge in first, and then push down in place. Then close the film
compartment door.
Color Temperature Filter Settings
There is a built in filter for adjusting color temperature. When shooting in daylight
with tungsten-balanced film, the filter should be applied. (Sun symbol)
When shooting indoors with artificial light, the filter should be off. (Light-bulb
symbol) When shooting daylight film, the filter is automatically cancelled no matter
what position the switch is. (Either symbol is ok) It is difficult to obtain the proper
color balance unless this is done.
Setting the Distance
The Rhonda CAM can focus as close at 4 feet, but focusing should be done by the
eye. After determining the distance between the camera and the subject, turn the
distance ring until the proper distance is aligned with the index in order to focus
Locking ring deluxe only

correctly. The distance ring may be set at or in between the numbers. The lower row of white numbers
represents distance in meters, and the upper row of green represents distance in feet.
Focusing
RHONDA CAM:
When filming outside, the depth of field is increased. You can use the “3” or “10”
red zone gradations. For closer subjects use “3”, for father away set the distance
ring at “10.”
RHONDA CAM DELUXE EXPOSURE INDICATOR:
The Rhonda Cam Deluxe has a visual F stop range indicator in the viewfinder. As
long as you are operating between the scale (1.4 to 32), you should have good
exposure. If the indictor exceeds the scale and goes into the red, you may get
under or over exposed film.
When perfect focusing is required, use the “film plane indicator” to measure the
distance between the subject and camera exactly.
Split Image Focusing (Deluxe Version)
Zoom into the subject, and turn the focus until the two halves of the circle
align with the image. Note: first, make sure you set up your dipoter before

attempting focus.
Confirming the Exposure
RHONDA CAM EXPOSURE INDICATOR:
When the subject is too dark, a red mark in the lower right part of the viewfinder
warns of under exposure. Under these conditions, use additional light. There is
no indicator for ‘over-exposed.’
EE Lock (Deluxe Version)
Although the Rhonda Cam Deluxe does not have full manual exposure, you
can hold a fixed exposure position using the EE lock. This can be a good way
to maintain a constant exposure or correct for backlight. If you zoom into
your subject using your camera as a spot meter, then hold the EE lock to
maintain that exposure. You can then zoom back for a backlit shot or to pan
into different exposures.
Exposure Control Plate
Filming in bright sunlight with an ASA 200 or higher can sometimes over-
expose your image. To avoid this, you can use a 2-stop neutral density filter
(see accessories) to keep your exposure in a better operating range. In the
Rhonda Deluxe, the camera will automatically adjust for the filter. With the
Rhonda CAM, you must lift the red, 2-stop exposure adjustment switch when
using an ND.6 filter. The ND.6 is only for the Rhonda CAM. The Deluxe can use
any filter.

Checking the Film Transport
The film transport indicator can be seen in the lower part of the viewfinder. The
indicator moves up and down when the film is being properly transported through
the camera. If the indicator does not move, remove the film cartridge and advance
the film slightly with your finger; then insert the cartridge once more. When the
film reaches the end, the film transport indicator will stop moving up and down.
Power Zoom
While pulling the trigger, press the zooming switch. The subject will become
larger when “T” is pressed, and smaller when “W” is pressed. When the image
stops moving, the zooming lever will not rotate anymore.
Manual Zoom
Since power zooming produces the zooming effect at a fixed speed, you can use the manual zoom for
zooming at different speeds. Slide the manual zooming lever up or down as desired.
Footage Counter
When the film ends, the film transport indicator in the viewfinder stops. After
you have shot 50 ft., open the film compartment and remove the film
cartridge. The film footage counter will be set at “50” when the roll is done. If
you remove the film before you shoot the whole roll, the footage counter will
re-set to zero.

Shooting at 9fps (Deluxe Version only)
The Rhonda Deluxe has the option of shooting at 18fps or 9fps. At 9fps, your film
will last almost 7 minutes. Typically film is transferred to digital or projected at
18fps, so the results of shooting at 9fps is fast motion. In digital, this can be
slowed down to give the correct speed.
Single Frame Shooting
Single frame shooting is possible for taking photos or doing animation.
Turn the main switch to “1”. Each time the shutter release is pulled, only one
single frame is exposed. In single frame shooting, the use of a tripod or cable
release will assure a stable image. The Rhonda CAM can take approximately 3,600
still photos on a single roll of film!

Basic Camera Accessories
Snap Cap
Protect your lens when the camera is not in use with a snap-cap lens cap. Included
with your Rhonda CAM.
Camera Gate Cleaning Brush
A standard soft-bristled toothbrush may be used to swipe the gate after each roll to
remove excess emulsion build-up and keep the frame clear.
Neoprene Carrying Case
Store your Rhonda Cam in the Neoprene carrying case, to protect it when the camera
is not in use. Your carrying case will also hold your camera gate brush, extra AA
batteries, and a few rolls of film.
ND .6 (Neutral Density) Filter
ND.6 filter is a handy tool to have when shooting in bright sunlight with an ASA 200 or
higher film stock. The Neutral Density Filter will reduce the amount of light passing
through the camera lens, to help prevent over exposure.

Super 8 Film, Processing and Scanning to Digital
Film Stocks- Super 8 Film Kit
The Super 8 Film Kit is made from the same 35mm
motion picture film used to create theatrical
features, music videos, commercials, TV shows and
more. This type of film produces amazing results
over a wide range of exposure and conditions. Film
is the only proven archival format and has been
proven to last for over 100 years.
What is included in the Super 8 Film Kit?
It includes a cartridge of super 8 film, a pre-paid
mailing envelope to send your roll to the lab, chemical processing of your film, digital film scanning, and
encoding to a universal computer file format. Your digital file will be emailed to you for downloading
and your original film mailed to you on an archival safe reel for preservation.
Exposed Film
Even when all the film in the cartridge has been shot, the camera will
continue running but produce a different sound. To make sure all the
film has been shot, check with the footage counter to see if 50 feet of
film has run through the camera. If so, open the camera door and
remove the film. You should be able to see either a large notch in the
film or the word "EXPOSED" embossed into it, indicating that the

cartridge has been completely used.
8 Basic Super 8 Film Shooting Tips
1. Light
Photography is painting with light so make sure there is enough light to take pictures with. If you’re
new to Super 8, start your experience outdoors with plenty of natural light to work with.
2. Transport
Make sure the film is transporting through the camera. When you pull the trigger the camera may
sound like it’s running, even when the film is not. The Rhonda CAM offers a film transport check that
tells you the film is running and when it is finished. This is the most important indicator that film is
running through the camera.
3. Detecting A Jammed Cartridge
The most common cause of a jammed cartridge is when excess film has not been taken up inside the
cartridge. The camera may still continue to run but will sound like it is struggling. If you suspect that a
cartridge has jammed, remove the cartridge and turn the cartridge’s circular knob clockwise until it is
snug. To check if the film is advancing, mark one of the exposed frames of film with a marker and put it
back in the camera. Roll the camera for a couple seconds and remove the cartridge to see if the film has
advanced and is working as normal.
4. Cleaning The Lens
The best way to clean the lens is to use a scratch-free lens cloth to wipe it down. Alternatives such as
using a clean 100% cotton t-shirt may also be used. If using a liquid cleaner, spray it onto a lens tissue
before wiping the lens. Do not spray directly onto the lens as the liquid may seep down the sides and
into the optics. Liquid cleaners may be abrasive and remove lens coatings, so it should be used only

when needed.
5. Brush your Camera Gate
Use a child’s toothbrush to gently clean the camera gate to avoid hair in your images. A couple of swipes
before each roll is all it takes to save some clean memories.
6. Movie Film
Super 8 is movie film, so some of the best images are going to be of things that move. Look for action
and movement when filming.
7.The 5 Second Rule
A good shot lasts about 5 seconds long. This means you have approximately 40 good shots on your roll
of film. When you pull the trigger, count to 5 so you know you’re not over or under shooting each shot.
8. Tell a Story
The best movies go beyond the images to tell a story. Start with an opening shot, capture action, try
close-up and wide shots, and don’t forget a good ending!
Proper Storage
It is highly recommended to remove the AA batteries whenever the camera will not be in use for a
period of 2 or more days. This prevents unnecessary power drainage and leakage in the compartments,
which can damage the camera. Store the camera in a cool, dry place. Do not leave the camera or film in
extremely high temperatures; this can damage the camera and film.
Service And Repairs
This should only be performed by a trained technician who understands all the parts
of the camera. For more information contact Pro8mm.

Pro8mm –2805 W. Magnolia Blvd. Burbank, CA 91505 Phone: (818) 848-5522 –info@pro8mm.com
This manual suits for next models
1


