procontrol Church Clock User manual

2. oldal, összesen: 21
PROCONTROL ELECTRONICS LTD
www.procontrol.hu
PRELIMINARY
1. Function:
The special clocks of the CC (Church Clock) series are
used in churches, in church halls.
With the clocks you can show the number and the
verses of the hymns and you can see the accurate time
as well.
Furthermore, you can give the intonation (note or
accord) and show the actual temperature of the hall.
2. Structure:
The clocks of the CC series are round shaped and there
are three sizes available:
•CC50 500 x 76 mm with decorative frame
Picture to the right up: CC50 with gold metal decorative frame
2.1 Design:
All clocks are built into a shock resistant steel case with interior dust-free casing (IP 52 protection). Every
type is produced with safety glass front, with RAL9010 white matte polyester 24 hours clock plate, matte
black RAL9005 hour and minute hand and RAL3020 red second hour hand.
Since the clocks are designed for a high-standard, exclusive places, they can be ordered with several
decorative frames. You can choose between six designs:
Clocks are produced with four different decorative frames:
•GM: Gold-Metal intense-lighted frame
•CM: Chrome-Metal intense-lighted frame
•BHW: Black walnut / Hard maple wood with real wood intarsia (the darker American walnut / lighter
Canadian maple)
•HBW: Hard maple / Black walnut wood with real wood intarsia (Canadian maple/ American walnut)

4. oldal, összesen: 21
PROCONTROL ELECTRONICS LTD
www.procontrol.hu
PRELIMINARY
BHW (Black walnut / Hard maple wood)
HBW (Hard maple / Black walnut)
Basic kit:
•Electronic clockwork with clock hand (hour, minute, second)
•24 pieces of LED built-in behind the clock front to display hymn verses
•GPS satellite synchronization for global use
Optional settings:
•KC quartz watch
•Radio Time-setting via remote control
•DCF DCF radio synchronization only in Europe (800-900 km radius from Frankfurt)
•Nr Number: displays the number of the hymn, three numbers from 1 to 999
•Tone Tone: gives the intonation
•Temp Temperature display in Celsius or in Fahrenheit degrees.
•Master Master: slave clock guidance (Slave controller)
•Slave Slave: slave clock (works only with a Master clock)
Accessories:
RR
·Wireless RF remote control for the display of the hymn numbers, hymn
verses and intonation
PSU
·100V-240V 50-60Hz / 5V DC 4A power supply for the clock (basic kit)
CHG
·100V-240V 50-60 Hz battery charger for the remote control (basic kit)
ANT-GPS-I
·GPS interior antenna (for GPS option)
ANT-GPS-O
·GPS exterior antenna (for GPS option)
ANT-DCF-O
·DCF exterior antenna (for DCF option)

5. oldal, összesen: 21
PROCONTROL ELECTRONICS LTD
www.procontrol.hu
PRELIMINARY
3. Services and characteristics:
The system in built from two products:
•CCxx series clock
•RR series remote control.
3.1 A CCxx series clock:
Generally nothing is visible on the clock, we can
see an average, simple clock, but behind the clock front there are 24 intense-lighted, hidden LED lights.
With these lights the verses of the actual hymn are shown.
If somebody asks the third, the sixth and the fourteenth verse of the hymn, than the third and the sixth
big number and the fourteenth smaller number lights.
It is possible to see the number of the hymn on the surface of the clock front as well, with the display,
which is hidden behind the clock front, it has three characters. This function is optional, if you don’t want
to use it you can turn it off totally, than becomes invisible. If on the clock front you see the number of
20, it indicates the twentieth hymn. From the three characters you can see only the actual numbers, for
example if somebody asks the hymn number 18, you can see just two characters (18) and not (018).
Another option is to give the intonation of the
hymn; the conductor has a remote control in his
hand with an electronic pitch-pipe. The
electronic pitch-pipe is able to give the
intonation by the remote controland by the clock
too. So, the intonation can be given by two
methods by the conductor.
•In manual mode: the conductor chooses
the right note on the remote control and
on the virtual piano.
•In automatic mode: the first note of the
actual hymn (the starting sound) sounds
automatically (it has a condition: in the
memory of the remote control all
starting notes have to be saved of every
hymn).

6. oldal, összesen: 21
PROCONTROL ELECTRONICS LTD
www.procontrol.hu
PRELIMINARY
RR series remote control
The radio remote control - looks like a cell phone - is made to control the clock or clocks (in bigger
churches). The remote control is equipped with a keyboard, with a colourful, graphic screen. The usage
is easier with simple pictograms.
How to use the RR series remote control
Battery charging
The status of the battery is visible on the right part of the screen with the appropriate symbol. For the
charge the original Nokia AC-3E charger is suitable. The device is chargeable from a USB port with a
micro USB cable. When the battery is flat the charge time is approximately 4-4,5 hours. The charge in
progress is shownwith thebattery symbol. When the device is turned-off the charging is still functioning,
but in this case on the screen nothing is visible. It is useful to turn on the device to be sure that the
charging is in progress or not.
Power on / Power off
Turn on: press this button of the device
Turn off: press this button of the device for a longer time
From the last press the device changes to ’sleeping mode’ until a certain time. You have to press the
’turn on’ button to use it again. The device does not consume too much energy when it is turned off or
in sleeping mode, but if we don’t use it for a longer time or we would like to deliver, it is advisable to
take out the battery.
Choosing a hymn book (option)
This function can be used optionally if we are able to fill the memory of the remote
control with the titles and content of the used books: Number of the hymn, Title words
of the song, starting note or chord of a hymn.
By pressing the “up” and “down” buttons the “Title of the SONGBOOK” icon can be
found: Choose books from the list eg. “Zion Harp” or “Tune your hearts”. Select it by using the middle
(OK) button. The selection is showed by X sign what can be found in the frame in front of the book. We
are able to jump “HYMN NUMBER” menu by pressing the mentioned button again.
Displaying the hymn number
Using “up” and “down” buttons the “HYMN NUMBER” icon can be found.
We can select the number of the hymn from the list (if you have saved the book
database) or we have opportunity to type directly the number using the keyboard after
2 seconds. Select it by pressing the (OK) button located in the middle and it appears on

7. oldal, összesen: 21
PROCONTROL ELECTRONICS LTD
www.procontrol.hu
PRELIMINARY
the clock. Giving directly the number of the hymn works even if the memory is empty. Using the (OK)
button (located in the middle) we can jump to the “HYMN VERSE” menu
Displaying the verses of the hymn
“HYMN NUMER” icon can be shown by pressing the “up” and “down” buttons:
Using the “number buttons” the requested hymn verses can be written sequentially.
The order isn’t important. The written verses are shown in the same time on the clock
front by pressing the button. After pressing the * button numbers from 10 to 19 and
by pressing the # values from 20 to 24 can be given.
Stored intonation
If the database contains starting-note assigned to the given hymn then by using the middle (Start-up-
note) button tune setting can be started.
Manual intonation
By using the “up” and “down” buttons the “INTONATION” icon can be found on the
display: The required intonation can be given by the number buttons according the
chart based on the virtual piano. Using “left” and “right” buttons we have opportunity
to jump 1-1 octave up or down in the gamut. This function works even if the memory
is empty.
Settings
The service menu of the device can be activated by selecting the “SETTINGS” icon:
Menu:
•Condition: Details of the device
•Display: The appearance settings of the remote control and the display. The brightness of hymn
number display and the hymn verse display can be adjusted separately by the remote control.
There is possibility to assign timeout value to particular displays. When it elapses the given
command automatically ceases.
•Sound settings: The volume of intonation can be adjusted concerning the remote control and
clock separately. The length of the intonation can be adjusted as well.
•Language: The language of the remote control can be selected here.
•USB setting: The USB plug of the device can be adjusted in the following ways: the content of
the SD card –what the device contains –can be displayed on the computer as a driver or
software update can be done on the device.
•Time setting: There is possibility to give the time of the clock in the time setting menu by using
the keyboard of the remote control. The successful time assign is shown by light what runs
through the 1-12 numbers on the clock front, like in the case of the GPS synchronization.
Because of the autonomous operation of the clockwork the time doesn’t retool immediately on
the clock surface (the time is updated in every hour). The update can be forced by pressing the
“RESET” button at the back of the clockwork.

8. oldal, összesen: 21
PROCONTROL ELECTRONICS LTD
www.procontrol.hu
PRELIMINARY
•Setting of the time zone: By adjusting the time zone –during the GPS synchronization –can be
given to which time zone should the time be adjusted.
The electronic structure of CCxx display clocks
An intelligent controller card (1488-13 plan No.) is built in the clock.
The brain of the system is an STM serial ARM7 microcontroller what controls over a communication by
embedded firm ware. The verse numbers are illuminated by 24 pcs of bright LED behind the clock front.
The heavy-duty LEDs are located on the laser-cut cooling wreath, PCBs. The following devices are set up
on the back of the clock: AC adapter what ensures the main power, antenna and the jacks of the external
speakers.
Nr option
The hymn number display uses three-digit 7 segment LED displays made of 172 pcs of small LEDs. The
mentioned display is connected to the control PCB by ribbon. The hymn number and hymn verse display
are driven by FET power switches.
Time synchronizing option, DCF and GPS options
The clock can derive the time from the following sources:
1. Own quartz
2. DCF synchronizing with built-in antenna (Only in Europe)
3. DCF synchronizing with connected external DCF antenna (Only in Europe)
4. GPS synchronizing with connected GPS antenna (Global)
5. GPS synchronizing with connected external GPS antenna (Global)
Own quartz
The advantage of the built-in own quartz is that it always works and economical. The disadvantage is
that it cannot change automatically the summer-winter time at the its accuracy is limited. The shown
time needs to be corrected regularly and the time change has to be done manually by hands. On the
places where many clocks work within a hall the mentioned method cannot be applied because it
doesn’t ensure the perfect combined timing of the clocks.
DCF synchronizing with built-in antenna
DCF synchronizing with the built-in ferrite antenna can be used in Europe. The DFC time signal is
broadcasted by the DFC transmitter at 77,5 KHz near Frankfurt.

9. oldal, összesen: 21
PROCONTROL ELECTRONICS LTD
www.procontrol.hu
PRELIMINARY
Its advantage is that always accurate and it can change the summer-winter time automatically. The
signal can be received well and reliably to 800-1000 km distance from Frankfurt in normal building
constructions. Its disadvantage is that in edge or outside of the broadcasting district the signal is
uncertain. It cannot be used in noisy environment nor bad reception conditions (steel constructed
buildings, concrete walls etc.)
DCF synchronizing with connected external antenna
In that case if the DFC synchronizing with the built-in ferrite antenna in noisy circumstances or in bad
reception conditions (steel constructed buildings, concrete walls etc.) cannot be used then ea.: an ANT-
DCF-O type, external DCF roof antenna –fixed on the roof-mast –should be used. By using this the
reception is reliable often in 1500 km distance from Frankfurt.
GPS synchronizing with connected GPS antenna
The GPS synchronizing –built up by the USA and nowadays globally applied Global Positioning System –
based on satellite navigation system. Its advantages are the following: it ensures the accuracy second by
second and it doesn’t need to be adjusted manually.
By building in a GPS option the CCxx series clocks have an SMA type antenna connector on the backside
where the ANT-GPS-I antenna can be connected (the ANT-GPS-I can be found in the option list). The
antenna has a 5 meter long connecting cable what can be extended by an SMA-15m extension to 20
meters. The antenna is a palm-sized box what can be placed everywhere outside of the building ea.: has
to be fixed on the backyard front wall or on the window sill. It has to be seen directly from the sky.
GPS synchronizing with connected external GPS antenna
If there is no place for antenna which can be reached with 20 m long cable then the ANT-GPS-O signed
external GPS antenna must be applied. This can be placed everywhere without any limitation (ea.: on
the wall, in the window, on the roof)

10. oldal, összesen: 21
PROCONTROL ELECTRONICS LTD
www.procontrol.hu
PRELIMINARY
Master option
By building-up the Master option the CCxx clocks could work as a chief clock. This way the clocks could
control supplementary clocks as well. Using the mentioned option the supplementary clocks don’t need
to have the built-in a DCF nor GPS synchronizing system. The remote control works in the same channel.
Tone option
By building-in a Tone option into the CCxx clocks there comes an opportunity for the start-up-note and
start-up-chord to be sounded. An internal built-in speaker belongs to the Tone option what provides the
intonation of the chosen hymn by pressing the appropriate button of the remote control. (5.6 and 5.7
chapters)
There are external speaker connectors on the clock’s connector panel.
Order
According the to mentioned above in case of order the determination of the clock is made by model
number.
Order examples:
1. CC50-BHW-GPS-Nr-Tone-Temp-Master
The diameter of the clock above is 500 mm and the frame is made of genuine wood intarsia (American
walnut, Canadian maple). GPS synchronization, display of number of hymns, intonation (note or accord),
temperature display of church hall and Master clock function are also built in. The system of this clock

11. oldal, összesen: 21
PROCONTROL ELECTRONICS LTD
www.procontrol.hu
PRELIMINARY
is based on the Global Positioning System, which is an internationally used, satellite-navigated system.
Clocks controlled by this GPS system have the accuracy of one hundredth second, and have no need to
be adjusted. This clock is able to work autonomously and to control clocks (which have no GPS system
inbuilt) as a master clock.
2. CC50-CM-Nr-Slave-AC
It is a chrome metal framed clock measuring 500 mm over, Nr (display of number of songs) and the
adapter are built in but synchronization is not.
-Autonomous mode: it works as a normal quartz clock, and the automatic time
synchronization is not guaranteed.
-Master-Slave mode: in this mode the clock works as a part (slave clock) of a central clock net
system. In this system a master clock synchronizes the slave clocks. The system of this clock
is based on the Global Positioning System, which is an internationally used, satellite-
navigated system. Clocks controlled by this GPS system have the accuracy of one hundredth
second, and have no need to be adjusted.
-Master unit: for 7.2 mode, a master unit is needed. This can be a master clock (synchronised
with a GPS antenna) or an ANT-GPS-O external intelligent antenna. This antenna has to be
placed on the top of the building or on the external wall. The antenna „sees” the GPS
satellites and gets the signals of the atomic clock, analyses them, gives out inner radio signals
which synchronise the slave clocks in the radius of operation. The number of the slave clocks
is optional; they can be song number displayed or normal clocks. A central radiocontrolled
Clock Net system can be achieved, all of the clocks show the accurate time.
Assembly
1. The assembly of CC46-CM-Nr-Slave-AC clock is very easy: it needs only power.
The power source (110V, 127V, 220V, 240V 50-60 Hz) has to be behind the clock. Bound the
cable into the cramp marked on the back of the clock, and hang up the on a nail. Every
connection happens through radio c communication.
2. Assembly of MasterAnt-GPS-O external intelligent antenna:
An active GPS antenna and signal processor is built into the closed and waterproof case of the
antenna. This micro controlled processor sends the signals of the accurate time to the clocks
with its 868 MHz transmitter. The radius of operation of the LoS (Line of Sight) is 100 m.
Depending on the material of the building this radius might be smaller inside the building:
Wireless range is 50-60m, above this range cabled connection is needed.
Size 80 x 70mm + mounting plate
Fixing method:
oTwirl the antenna on the top of the 5/4” pipe hanger. Fix the pipe with shackles and
weathering onto the rafter,

12. oldal, összesen: 21
PROCONTROL ELECTRONICS LTD
www.procontrol.hu
PRELIMINARY
OR
oFix the antenna with its plate onto the facade with 2 wall plugs and screws.
oSwathe:
a./ Radio frequency controlled inner communication: the antenna needs 5VDC power. Plug in
the adapter into a socket near to the antenna, and connect the 5V output cable to the
antenna.
b. / wired inner communication: Join he clock and the antenna with two-wired cable. The
communication happens through this cable and also the power gets to the antenna through
the two-wired cable.
Checking the operation:
The operation of the GPS receiver is signed by a flashing green LED on the bottom.
Fast flashing: GPS synchronization processing, asking for the GPS time from the satellites.
1 flash per second: GPS synchronization is successful. The device has got the accurate time.
1 flash in every 5
seconds: The GPS
antenna works, but
synchronization with
the satellites was
unsuccessful. The
device hasn’t got the
accurate time.

16. oldal, összesen: 21
PROCONTROL ELECTRONICS LTD
www.procontrol.hu
PRELIMINARY
Installation of ChurchClock CC50-NR-Tone-KC
The built-in own quartz watch always works and is economical, extremely accurate. However,
it does not provide automatic time and time synchronization, the adjustment must be done
manually per clock device.
Contents of the package:
•ChurchClock CC50-NR-Tone-Temp-CM-KC vocals, verse, temperature display clock,
start sound option, high-gloss chrome trim, quartz clock mechanism (Built-in 100-240V
and AA battery-operated clock mechanism)
•Wireless Radio Remote Control (for entering the number of songs and verses, for
entering the starting sound. The Clock Set function is still included in the remote
control menu, but cannot be used for quartz watch mechanics.)
Installation steps:
1. Insert a 1.5V AA battery into the mechanical watch.
2. Connect the device to the mains: connect both clocks to the 100-240VAC mains.
1. Insert the plug into a wall socket or extension cord socket. (We provide an American
converter.)

17. oldal, összesen: 21
PROCONTROL ELECTRONICS LTD
www.procontrol.hu
PRELIMINARY
2. The start of the control electronics and the main program is indicated by the number
12 flashing twice within a few seconds.
3. Set the correct time with the screw crown on the edge of the device.
4. With the watch installed, you can hang it in place.
5. Put accumulator is remote control and choose command, eg. send new Hymn uber to
clock.
For detailed user manual see Chuch Clock main manual.
Troubleshooting:
The watch does not receive a signal from the remote control:
- The remote control may be exhausted. Charge the remote control battery.

18. oldal, összesen: 21
PROCONTROL ELECTRONICS LTD
www.procontrol.hu
PRELIMINARY
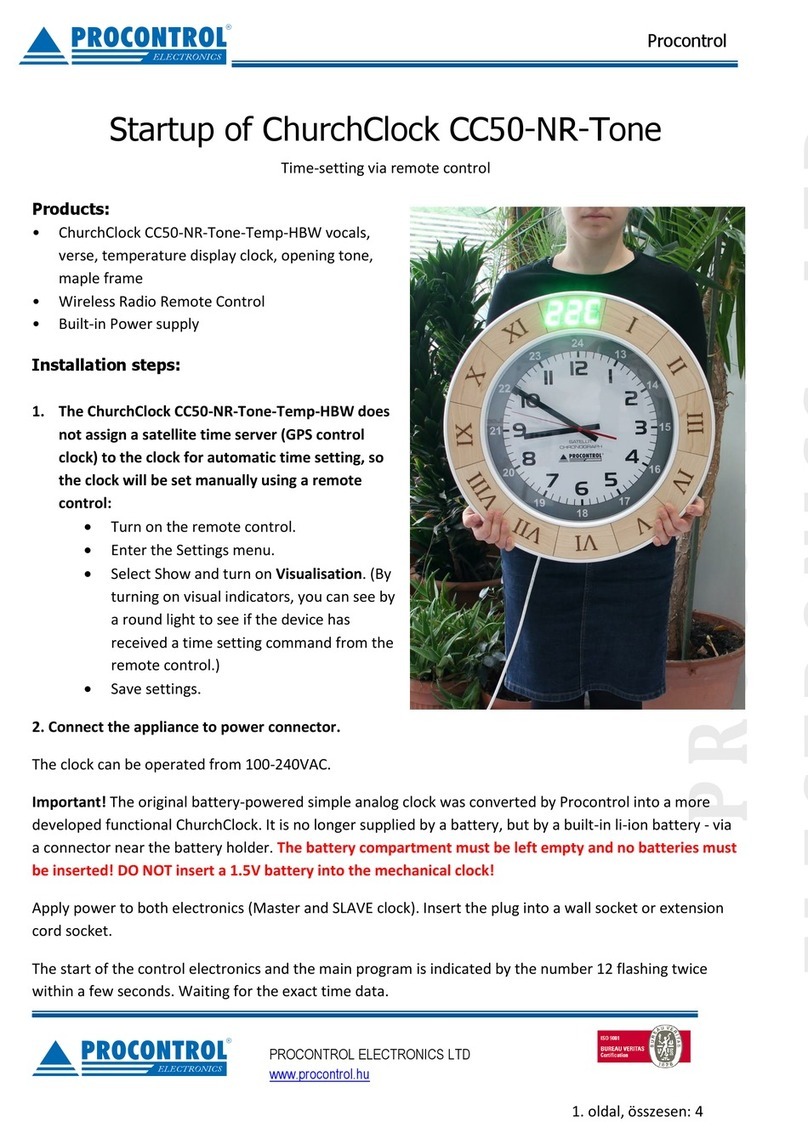
Startup of ChurchClock CC50-NR-Tone-Radio
Time-setting via remote control
Products:
•ChurchClock CC50-NR-Tone-Temp-HBW vocals,
verse, temperature display clock, opening tone,
maple frame
•Wireless Radio Remote Control
•Built-in Power supply
Installation steps:
1. The ChurchClock CC50-NR-Tone-Temp-HBW does
not assign a satellite time server (GPS control
clock) to the clock for automatic time setting, so
the clock will be set manually using a remote
control:
•Turn on the remote control.
•Enter the Settings menu.
•Select Show and turn on Visualisation. (By
turning on visual indicators, you can see by
a round light to see if the device has
received a time setting command from the
remote control.)
•Save settings.
2. Connect the appliance to power connector.
The clock can be operated from 100-240VAC.
Important! The original battery-powered simple analog clock was converted by Procontrol into a more
developed functional ChurchClock. It is no longer supplied by a battery, but by a built-in li-ion battery -
via a connector near the battery holder. The battery compartment must be left empty and no
batteries must be inserted! DO NOT insert a 1.5V battery into the mechanical clock!
Apply power to both electronics (Master and SLAVE clock). Insert the plug into a wall socket or
extension cord socket.
The start of the control electronics and the main program is indicated by the number 12 flashing twice
within a few seconds. Waiting for the exact time data.

19. oldal, összesen: 21
PROCONTROL ELECTRONICS LTD
www.procontrol.hu
PRELIMINARY
3. On the remote control, select Set time function in the Settings menu.
•Enter the current time on the keypad and select Save.
•A running light (the numbers green LED lamps flash in a circle) indicates that the unit has
received the time setting command from the remote control.

20. oldal, összesen: 21
PROCONTROL ELECTRONICS LTD
www.procontrol.hu
PRELIMINARY
4. Power supply for the clock mechanism
Connect the two connectors on the back of the device, behind the clock mechanism (see power
connection of clock mechanics). For this, the hands of the clock start.
Important! The original battery-powered simple analog clock was converted by Procontrol into a more
developed functional ChurchClock. It is no longer supplied by a battery, but by a built-in li-ion battery -
via a connector near the battery holder. The battery compartment must be left empty and no
batteries must be inserted! DO NOT insert a 1.5V battery into the mechanical clock!
5. Press and hold the RESET button on the mechanical clock housing for 2 sec.
The mechanical clock then sets to 12 hours 0 minutes 0 sec by fast-forwarding the hands. If the
controlling electronics have been successfully synchronized, the mechanical clocks will be reset to the
specified exact time within 1-3 minutes after "resetting".
6. With this you clock installed, you can hang it in place.
Clock setting during operating hours:
1. Restart clock electronics with power failure: unplug the wall outlet for 5 seconds, then plug it back in
2. Press and hold the RESET button for 2 seconds
3. Send the time data from the remote control to the watches. The mechanical clocks reset to the
specified exact time within 1-3 minutes after "zeroing".
Table of contents
Other procontrol Clock manuals