PRODIGY Diabetes Voice User manual

PRODIGY Owner’s Manual
Prodigy Diabetes Care, LLC www.prodigymeter.com
50 51
Prodigy Diabetes Care, LLC 1.800.243.2636
PRODIGY Owner’s Manual
Contents of the Prodigy Voice®Meter
The Prodigy Voice®meter is available as a meter kit only.
Pleasereviewthecontentsofyourpurchasetoconrmthatallthe
components are included as listed below:
Meter Kit Includes
• Prodigy Voice®Talking Meter
• Two (2) AAA Alkaline Batteries
• Prodigy®Control Solution (4 mL)
• Prodigy®Test Strips (10 ct)
• Sterile Lancets (10 ct)
• Lancing Device
• Carrying Case
• Complete Instructions:
1. Manual
2. Logbook
3. Quick Reference
4. Warranty Card
Important: Please review the contents of your purchase.
If any items are missing, please return your meter to the place
of purchase.

PRODIGY Owner’s Manual
Prodigy Diabetes Care, LLC www.prodigymeter.com
52 53
Prodigy Diabetes Care, LLC 1.800.243.2636
PRODIGY Owner’s Manual
Key Functions of the Meter
Setting Up the Prodigy Voice®Meter
Test Strip Slot
Insert the test strip here.
The meter will turn on
automatically.
LCD Display
Displays symbols
and test results.
Set Button
Used to setup
the meter.
Data Port
Port for USB Cable
connection to your
computer.
“M” Button
Turns the meter
on or performs
other functions
described in this
manual.
Ear Phone Jack
Used to attach
headphones.
Up & Down Buttons
Used to navigate
through the system.
Repeat Button
Repeats last
message spoken.
Figure 79
Meter Display
Control Solution
Test Symbol
Shows that you are
in control solution
mode.
Test
Result Area
Displays test
results.
Blood Drop
Symbol
Flashes when
sample should
be applied.
Test Strip Symbol
Appears when the
meter is turned on.
Unit of
Measure
Indicates what
unit of measure
the test result is
displayed in.
Low Battery
Symbol
Appears when
the battery
power is low.
Voice Symbol
Shows if audio
function is on.
Temperature
Symbol
Appears when
ambient
temperature
is outside of
operating range.
Memory
Symbol
Appears when
you review the
memory.
Day Average
Indicates that
the displayed
test result is an
average.
Time
Date Figure 80

PRODIGY Owner’s Manual
Prodigy Diabetes Care, LLC www.prodigymeter.com
54 55
Prodigy Diabetes Care, LLC 1.800.243.2636
PRODIGY Owner’s Manual
Speaking Function
The Prodigy Voice®meter talks you through each step of your setup,
testing procedure and memory recall.
When does the
meter speak?
When the meter is
turned on.
When room temperature is
outside operating range; which
is 50°F– 104°F (10°C–40°C).
When the meter is ready to test
( appears on display).
When the test is completed.
(The result appears on display)
When you turn off the meter.
When a used test strip is
inserted.
What does the
meter say?
Thank you for using Prodigy
Voice®. Today’s date November
18, 2009. The time 10:08 PM.
Room temperature is out of
range.
Please apply blood to the
test strip.
Your blood glucose (number)
milligrams per deciliter/
millimoles per liter.
Goodbye.
Test strip has been used.
Replace with a new one.
Setup Steps
The Prodigy Voice®meter has the volume, time, date and unit of
measure presets. However, if you replace the batteries, you should
check the time and date.
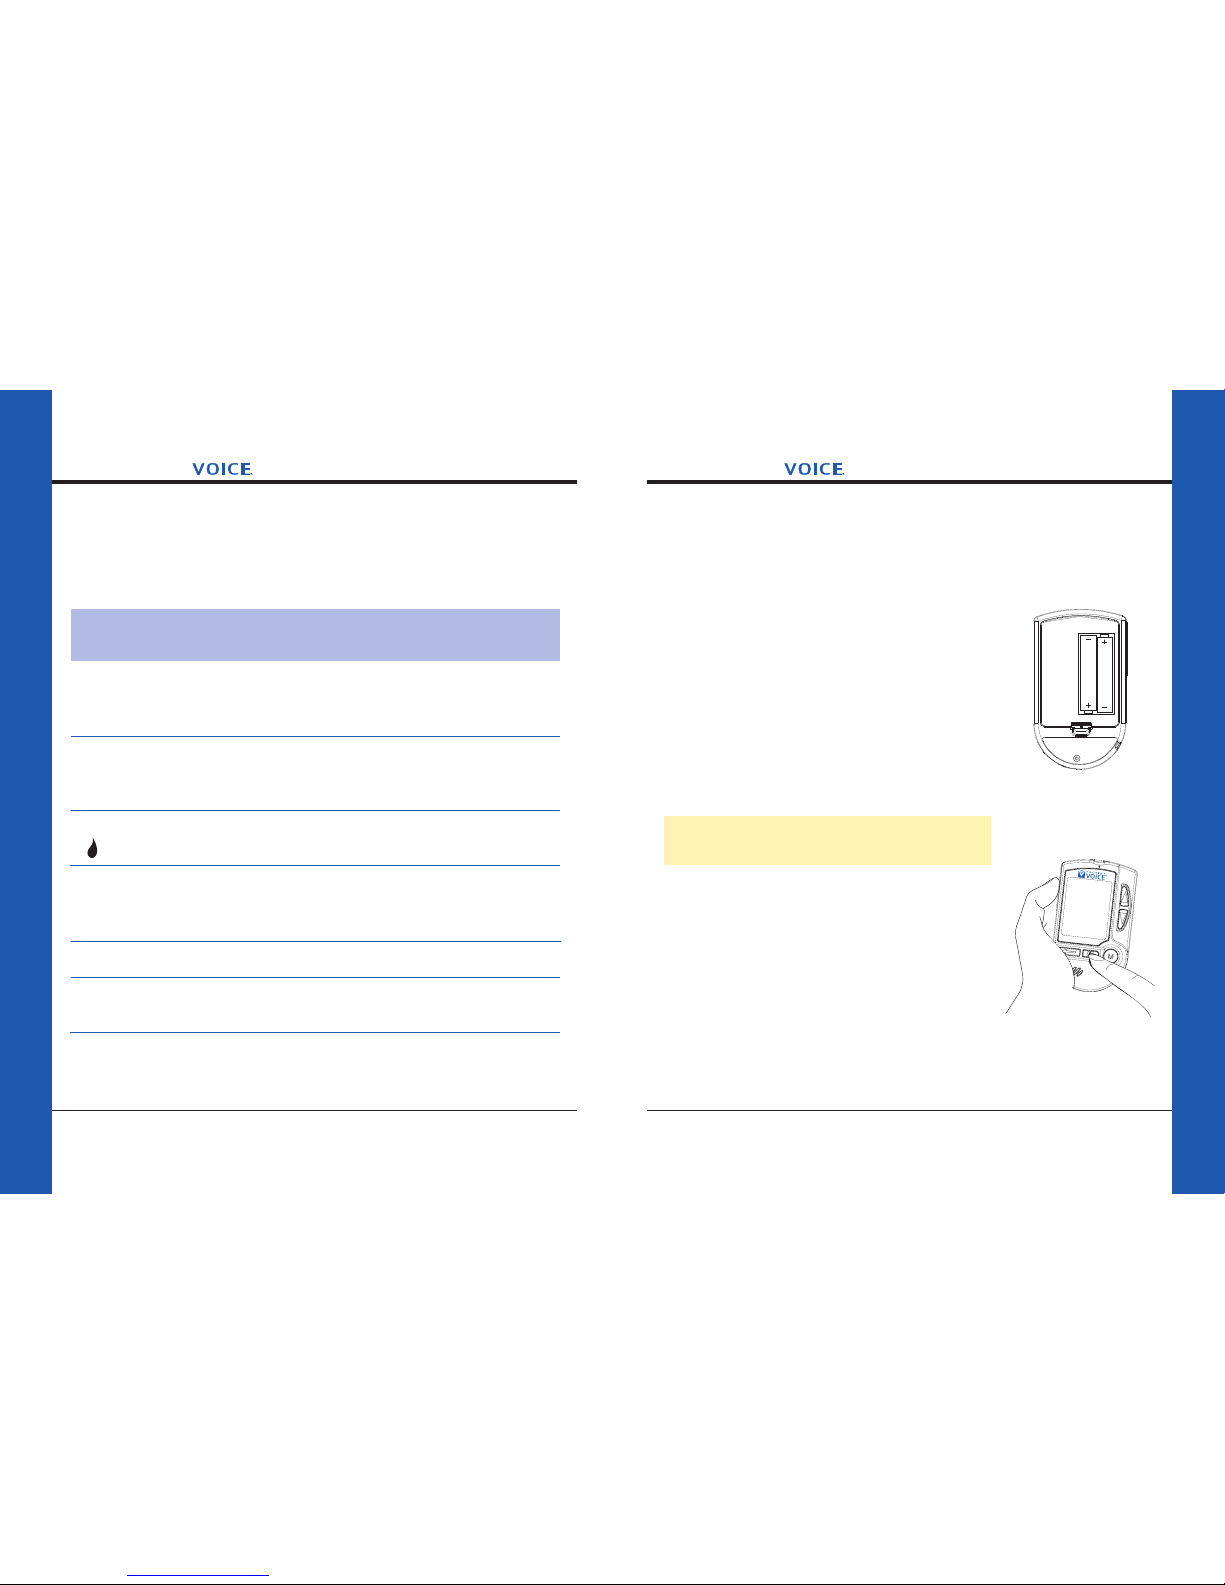
STEP 1: Insert the Batteries
Open the battery cover located on the backside of
the meter. Insert two (2) AAA Alkaline batteries and
align them properly. See Figure 81.
STEP 2: Enter Setup Mode
Start with the meter off. Then press and hold the
“SET” button located on the front of the meter
until the meter speaks. The meter is now in setup
mode. See Figure 82.
Voice speaks: “Your Prodigy®meter is on.
You are now in setting mode.”
Figure 82
Figure 81

PRODIGY Owner’s Manual
Prodigy Diabetes Care, LLC www.prodigymeter.com
56 57
Prodigy Diabetes Care, LLC 1.800.243.2636
PRODIGY Owner’s Manual
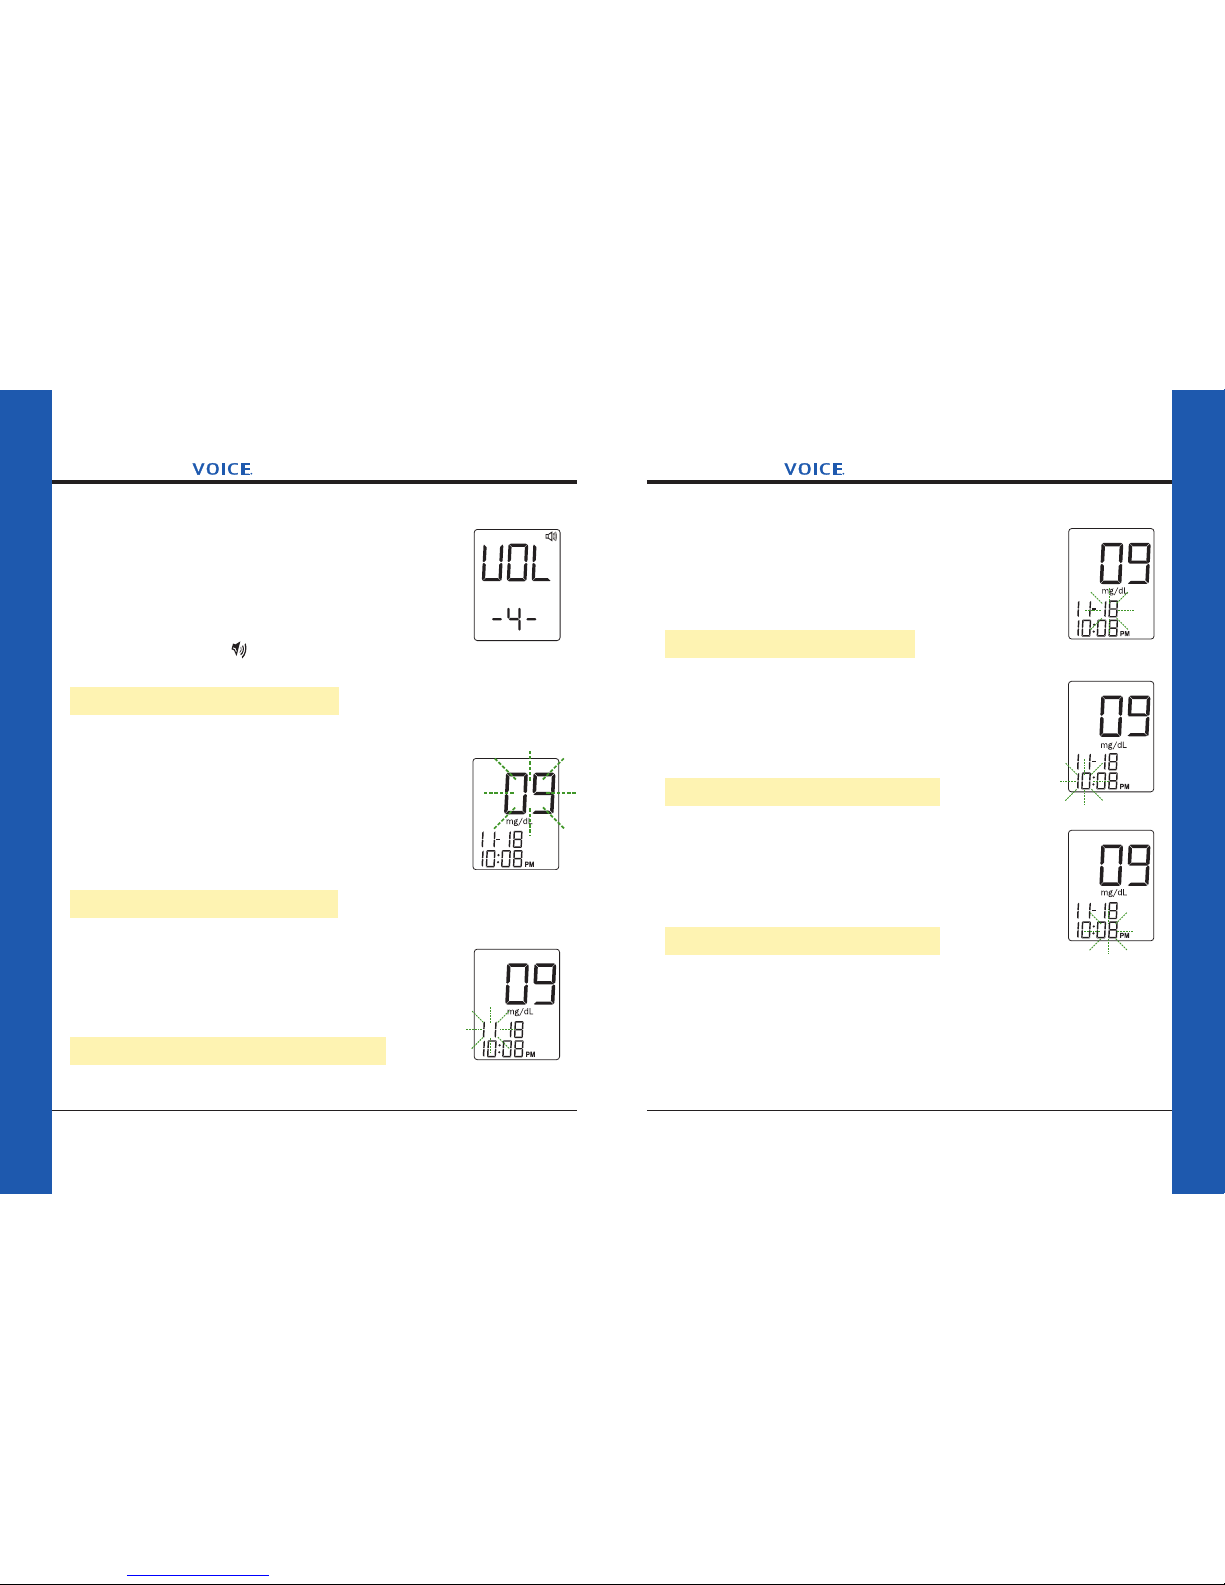
STEP 3: Setting Volume Level
The meter displays “VO L” Press the “Up” or “Down”
button to select the speaking volume. See Figure 83.
• Number 0 indicates that the speaking function is
turned off.
• Numbers 1 to 7 indicate speaking volume from
low to high, where “” is displayed on the LCD
during testing.
Voice speaks: “Volume Level 4.”
Then press the “SET” button and the year segment
willappearandstartashing.
STEP 4: Set the Year
Press the “Up” or “Down” button to advance the year.
With the correct year on the display, press the “SET”
button and the date will appear on the display with the
monthsegmentashing.See Figure 84.
Voice speaks: “The Year 2009.”
STEP 5: Set the Month
Press the “Up” or “Down” button to advance the month.
With the correct month on the display, press the “SET”
buttonandthedatesegmentwillstartashing.See
Figure 85.
Voice speaks: “The Month November.”
Figure 83
Figure 84
Figure 85
STEP 6: Set the Date
Press the “Up” or “Down” button to advance the date.
With the correct date on the display, press the “SET”
button and the time will appear on the display with the
hoursegmentashing.See Figure 86.
Voice speaks: “The Date 18.”
STEP 7: Set the Hour
Press the “Up” or “Down” button to advance the hour.
With the correct hour on the display, press the “SET”
buttonandtheminutessegmentwillstartashing.
See Figure 87.
Voice speaks: “The Hour 10 PM.”
STEP 8: Set the Minutes
Press the “Up” or “Down” button to advance the
minutes. With the correct minutes on the display, press
the “SET” button and the current unit of measurement
willstartashing.See Figure 88.
Voice speaks: “The Minutes 08.”
Figure 86
Figure 87
Figure 88

PRODIGY Owner’s Manual
Prodigy Diabetes Care, LLC www.prodigymeter.com
58 59
Prodigy Diabetes Care, LLC 1.800.243.2636
PRODIGY Owner’s Manual
STEP 9: Select Unit of Measurement
Press and hold the “Up” or “Down” button until the
unit of measurement you are choosing appears on the
display. Press the “SET” button and the memory
segmentwillstartashing.Yourmetercandisplaytest
results in milligrams per deciliter (mg/dL) or millimoles
per liter (mmoL/L). See Figure 89.
• The mg/dL unit is standard in the United States.
• The mmol/L unit is standard in Canada and Europe.
Voice speaks: “Blood glucose unit is mg/dL.”
Important: Day averages are calculated from results obtained
during the 7, 14, 21, 30, 60 and 90 days preceding the current
date and time settings.
STEP 10: Delete Memory
When the “dEL” symbol and the “ ”symbol appear on the display,
you can choose to clear the memory. See Figure 90.
Voice speaks: “Deleting record function: To skip,
press ‘Set’ button. If you press the ‘M’ key for
ve(5)seconds,allrecordswillbedeleted.”
Figure 90
Figure 89
If you do not want to clear the memory, press the
“SET” button to skip this step. If you want to clear ALL
memory, press and hold the “M”buttonforve(5)
seconds. “- - -” will appear to indicate all memory has
been deleted. See Figure 91.
Voice speaks: “All records have been deleted.”
Setup is now completed. “OFF” is displayed before
shut down and the meter will audibly summarize your
settings. See Figure 92.
Voice speaks: “Volume level 4; The date
November 18, 2009; The time 10:08 PM;
mg/dL; Goodbye.”
Figure 91
Figure 92

PRODIGY Owner’s Manual
Prodigy Diabetes Care, LLC www.prodigymeter.com
60 61
Prodigy Diabetes Care, LLC 1.800.243.2636
PRODIGY Owner’s Manual
Tips for Applying Blood to Test Strips without Sight
Usingthefollowingve(5)tipsmayhelpyouplaceabloodsample
into the test strip successfully if you have little or no vision.
The examples describe two (2) ways to bring the sample and the
test strip together. Other techniques may work just as well.
Keep experimenting until you have a technique that consistently works
for you.
Tip One—Smaller has its Advantages
Because the Prodigy Voice™meter is so easy to move around, you can
experiment with many different approaches to determine which works
best for you. Get comfortable holding the meter in one hand while
testing.Themetercanbemovedtowardsyourngeraseasilyasyour
ngercanbemovedtotheteststrip.
Tip Two —Aim for the Tip
The tip of the test strip contains an opening to the absorbent channel
in the center where the blood should be applied. The absorbent
channel draws the blood into the test strip, much like a straw, when the
tip touches the blood sample. Blood should be applied only on the very
tip. Blood applied to the bottom or sides of the test strip may cause
inaccurate readings. It is important that the test strip does not bend at
all when applying the sample.
Tip Three— Using a Sideways Approach
When testing, it may be helpful to rest or hold the meter on one side
ratherthanatorfaceup.Inthisposition,theteststripsticksoutof
one end and the side with the buttons faces towards you.
Theideahereisthatthengercanbebroughttotheteststripfrom
below until it touches the tip of the test strip. Then, the meter can be
Performing a Blood Glucose Test
repositioned so the sample touches the absorbent opening at the end
of the test strip. Notice how the meter can be positioned
so that the test strip can be sticking out to the left or to the right.
This allows for either hand to be used for testing.
Tip Four—Example 1
• Step 1—Place the meter on one side in front of you on a table with
the test strip pointing to the left.
• Step2—Gentlysqueezeangeronthelefthandandobtain
a sample.
• Step3—Bringyourngertowardthetipoftheteststripfromthe
bottom.Placethepuncturesiteonyourngertothetipofthe
test strip.
• Step 4—If you do not make contact with the blood and the meter
doesnotbeginthetest,whilekeepingthengerincontactwith
the test strip, lift the rounded end of the meter from the table so
theroundendoftheteststripisushwiththesample.
• Step 5—Move the test strip slightly, if necessary, until you hear
the meter beep then say “now testing.” Hold the meter
in place until you hear the test result. This procedure can be
used with either hand by starting with the meter resting on the
other side.
Tip Four—Example 2
• Step1—Gentlysqueezethengertobringbloodtothenger.
• Step2—Puncturethenger.
• Step3—Holdthemeterinyourhand.Placeyourindexnger
under the test strip to help you guide the meter to where you
have poked.

PRODIGY Owner’s Manual
Prodigy Diabetes Care, LLC www.prodigymeter.com
62 63
Prodigy Diabetes Care, LLC 1.800.243.2636
PRODIGY Owner’s Manual
• Step 4—Using overlapping dragging motions in an upward
direction, repeat the motion around the puncture sight until you
hear the meter beep then say, “now testing.”
• Step 5—Hold the test strip in place until you hear the meter say
your test results.
Tip Five—Practice, Practice, Practice
As with all new skills, practicing is the key to feeling comfortable
performingthisnewskillwithcondenceandease.Don’tgiveup;
remember to practice, practice, practice. We suggest using Prodigy®
control solution when practicing.
Practice until, with relative ease, you can get a test result that
falls within the target range for the Prodigy®control solution three (3)
tests in a row. It can be helpful to have someone with sight to watch
you practice in order to provide feedback or to answer any questions
you may have.
Performing a Blood Glucose Test
STEP 1: Insert the Test Strip
Insert a test strip with the contact bars end entering
intotheteststripslotrst.Pushtheteststripasfar
as it will go without bending it. The meter turns on
automatically. See Figure 93.
Voice speaks: “Thank you for using Prodigy
Voice®. Today’s date November 18, 2009.
The time 10:08 am. Please apply blood to
the test strip.”
STEP 2: Apply Blood Sample
When the meter shows the “ ” symbol, apply blood
to the opening of the absorbent channel of the test
strip where it meets the narrow channel. Blood will
be drawn into the test strip. See Figure 94.
Important: If you do not apply a blood
sample within two (2) minutes, the meter will
automatically turn off. You must remove the
test strip and re-insert it again to turn on the
meter and restart the test procedure.
Theteststripconrmationwindowshould
becompletelylledbeforethemeterbeginstocount
down.Themeterwillbeepwhentheconrmation
window is full.
Voice speaks: “Now testing.”
Figure 94
Figure 93

PRODIGY Owner’s Manual
Prodigy Diabetes Care, LLC www.prodigymeter.com
64 65
Prodigy Diabetes Care, LLC 1.800.243.2636
PRODIGY Owner’s Manual
Caution: DO NOT:
• Smear or scrape the blood onto the test strip.
• Apply blood to the test strip when the test strip is not in
the meter.
• Put blood or foreign objects into the test strip slot.
Ifyouhavetroublellingtheteststrip,pleasecontactCustomerCare
at 1.800.243.2636 for assistance.
STEP 3: View and Hear Your Result
After the meter counts down from 6 to 1, your blood
glucose test result appears along with the unit of
measurement.
Voice speaks: “Your blood glucose
106 mg/dL.”
The blood glucose test result is automatically stored
in the meter memory. Turn the meter off by removing
the test strip. Discard the used test strip carefully to
avoid contamination. See Figure 95.
Note: If at any time you need to hear the last
message spoken, press the “Repeat” button and
the last message will be repeated. Figure 95
STEP 4: Remove the Lancet
Always use caution when removing the lancet. Take the lancet out
carefully. Place the protective cap back on the lancet’s exposed tip.
If using a twist lancet, place the cap on a hard surface and push the
exposed tip into the protective cap and discard properly.
Caution: If you cannot test due to a problem with your testing
supplies, contact Customer Care at 1.800.243.2636. Failure to test
could delay treatment and/or lead to serious medical conditions.

PRODIGY Owner’s Manual
Prodigy Diabetes Care, LLC www.prodigymeter.com
66 67
Prodigy Diabetes Care, LLC 1.800.243.2636
PRODIGY Owner’s Manual
Using the Meter Memory
The Prodigy Voice™meter stores the 450 most recent blood glucose
test results with date and time in its memory. It also provides you with
7, 14, 21, 30, 60 and 90–day averages of your blood glucose test
results. You can review the individual or average test results.
OPTION 1: Recalling Individual Test Results
While the meter is turned off, press the “M” button
to turn the meter on. After the prompts, press the
“M” button again to enter memory mode and recall
individual test results. Press the “Up” or “Down”
buttons to advance to the next or previous test results.
See Figure 96.
Voice speaks: “Memory record for November 18,
2009, 10:08 PM. Your blood glucose 89 mg/dL.”
Once you scroll through all the individual test results
in the meter memory, “End” will display and the meter
will turn off. See Figure 97.
Note: Once you are in the individual test recall
mode, you cannot advance to the averaging
simply by pressing the “M” button.
Figure 96
Figure 97
OPTION 2: Recalling Average Test Results
While the meter is off, press the “M” button and the
meter will turn on.
Voice speaks: “Your Prodigy®meter is on.
Today’s date November 18, 2009; The time
10:08 PM. Please insert the test strip.”
After the audible prompts, press the “M” button for two (2) seconds
and the meter will recall the 7-day average. See Figure 98.
Voice speaks: “7-day average 106 mg/dL.
Press the “Up” button to advance to the next average test result.
Note: The meter reports 7, 14, 21, 30, 60 and
90–day averages.
Exit the Memory Mode
To exit the memory mode during either option, press and hold the “M”
buttonforapproximatelyve(5)secondsandthemeterwillturnoff.
Important: If you do not press any buttons for two (2) minutes,
the meter will display “OFF” and turn off automatically.
Figure 98

69
Prodigy Diabetes Care, LLC 1.800.243.2636
PRODIGY®Blood Glucose Meters Owner’s Manual
PRODIGY Owner’s Manual
Prodigy Diabetes Care, LLC www.prodigymeter.com
68
Dimensions: 3.94 in. (L) x 2.25 in. (W) x 0.75 in. (H)
100 mm (L) x 57 mm (W) x 19 mm (H)
Weight: 1.2 oz with battery
36 g
Power Source: Two (2) 1.5 Volt AAA Alkaline Batteries
Battery Life: Over 1,000 tests
Display: LCD
Memory: 450 test results with date and time
External Output: USB Data Port
Auto electrode inserting detection
Auto sample loading detection
Auto reaction time count-down
Auto turn-off after two (2) minutes without action
Temperature warning
Operating Condition: 50°F–104°F (10°C–40°C),
below 85% R.H. (non-condensing)
Storage/Transportation Condition: 39.2°F–115°F (4°C– 46°C),
below 85% R.H.
Measurement Units: mg/dL or mmol/L
Measurement Range: 20–600 mg/dL (1.1–33.3 mmol/L)
The specifications may be changed without prior notice.
Specifications
Test results in memory can be transmitted to your personal
computer. Prodigy®Diabetes Management Software and a cable are
needed before installation.
STEP 1: Install Software
Install Prodigy®Diabetes Management Software on your computer.
STEP 2: Connect to a Personal Computer
Connect the cable to your computer. Then, connect the cable to
the data port of the meter. “Lnk” (Pcl appears on the Prodigy Voice®)
will appear if the cable is correctly connected to the meter and PC.
Important: The Prodigy AutoCode®, Prodigy Pocket®and Prodigy
Voice®meters use a USB cable to connect to a computer.
For the Prodigy AutoCode®, Prodigy Pocket®and Prodigy Voice®
meters, “USb” will appear on the display, indicating that the meter
is successfully communicating to your computer. You can begin to
download the data from the meter.
STEP 3: Transmit Data
Follow the instructions provided in the software to transmit data.
Results transmitted will include date and time. Remove the cable and
the meter will automatically turn off.
Caution: While the meter is connected to the PC, it is unable
to perform a blood glucose test.
Viewing Results on a Personal Computer

Prodigy Diabetes Care, LLC www.prodigymeter.com
PRODIGY®Blood Glucose Meters Owner’s Manual
70 71
Prodigy Diabetes Care, LLC 1.800.243.2636
PRODIGY®Blood Glucose Meters Owner’s Manual
Cleaning your System
Your Prodigy® meter should be cleaned whenever it is visibly dirty by
wiping the outside of the meter using a cloth dampened with either
mild detergent mixed with water or 70% isopropyl (rubbing) alcohol.
Do not use bleach or other harsh abrasives to clean your meter.
Do not get any liquids, dirt, dust, blood or control solution inside the
meter through the test strip port or the data port. Never spray cleaning
solution on the meter or immerse it in any liquid.
Lancing Device
Wipe your Prodigy®Lancing Device with a soft cloth dampened with
water and mild detergent or 70% isopropyl (rubbing) alcohol. Do not
immerse the lancing device in any liquid. Do not use bleach.
Disinfecting your System
If your Prodigy®meter is being operated by a second person who is
providing testing assistance to the user, the meter and lancing device
should be decontaminated prior to use by the second person.
Lancing Device
Disnifect your Prodigy®Lancing Device about once a week. After
cleaning the device, unscrew the cap and place it in 70% isopropyl
(rubbing) alcohol for several minutes. Make sure the cap is completely
dry before reattaching it to the device.
Please contact Customer Care if you have any questions at
1.800.243.2636.
Caring for your Prodigy®Meter
Storing Your System
The Prodigy®meters do not require special maintenance.
• Store the meter, test strips and control solution in the carrying
case after each use in a cool, dry place.
• Do not refrigerate.
• Do not store in the kitchen or bathroom.
*Your meter is a precision instrument. Please handle it with care.
Battery
The Prodigy Voice®and Prodigy AutoCode®meters come with two (2)
1.5 V AAA alkaline batteries. The Prodigy Pocket™meter comes with
one (1) CR2032 battery. Batteries are manufactured in a charged state
and not designed for recharging. Recharging the batteries can cause
battery leakage, or in some cases, high pressure rupture. Replace all
batteries at the same time.
Warning: Batteries can explode or leak and cause burns if
installed backwards, disassembled, charged or exposed to water,
reorhightemperatures.
Low Battery
The meter will alert you when the power is getting low by displaying two
(2) different messages:
1. When the “ ” symbol appears alone on the display, the meter
is functional and the result remains accurate, but you should
change the battery as soon as possible.
2. When the “ ” symbol appears together with the “E-b” symbol
on the display, the battery does not have enough power for a test.
You must change the battery before using the meter.

Prodigy Diabetes Care, LLC www.prodigymeter.com
PRODIGY®Blood Glucose Meters Owner’s Manual
72 73
Prodigy Diabetes Care, LLC 1.800.243.2636
PRODIGY®Blood Glucose Meters Owner’s Manual
Battery Replacement
To replace the battery, make sure the meter is turned off.
STEP 1: With the meter off, press the buckle on the battery cover and
lift up to open the cover.
STEP 2: Remove the old battery(s) and replace with new one(s).
Be sure to align the battery(s) properly.
STEP 3: Close the battery cover. If the meter does not power on after
you have replaced the battery(s), check that the battery(s) is correctly
installed.
STEP 4: Turn the meter on by pressing the “M” button to check the
time and date. Replacing the battery(s) does not affect the meter’s
memory (previous test results stored in the memory). However, the
date, time and units settings may need to be updated.
Caution: As with all small objects, the battery should be kept away
from small children. If the battery is swallowed, seek medical
assistance immediately.
Special Messages
Special messages and Error messages help to identify certain
problems but do not appear in all cases when a problem has occurred.
Improper use may cause an inaccurate result without producing an
error message.
In the event of a problem, refer to the information under “Action” in the
“Error Messages” section. If you have a problem, please refer to the
“Troubleshooting Guide” section. If you follow the actions recommend-
ed but the problem is not resolved, please contact Customer Care at
1.800.243.2636 for assistance.
System Troubleshooting
Message What it means
“Lo” appears when your result is below
the measurement limit, which is less
than 20 mg/dL (1.1 mmol/L).
“Lo” indicates hypoglycemia (low blood
glucose). You should immediately consult
your healthcare professional.
“HI” appears when your result is above
the measurement limit, which is higher
than 600 mg/dL (33.3 mmol/L).
You should immediately consult your
healthcare professional.

Prodigy Diabetes Care, LLC www.prodigymeter.com
PRODIGY®Blood Glucose Meters Owner’s Manual
74 75
Prodigy Diabetes Care, LLC 1.800.243.2636
PRODIGY®Blood Glucose Meters Owner’s Manual
Error Messages
Message Description
What it means: Appears when the
battery cannot provide enough power for
a test.
Action: Replace the battery immediately.
What it means: Appears when inserting a
used test strip.
Action: Test with a new test strip. If the
problem persists, please contact
Customer Care at 1.800.243.2636.
What it means: Appears when the
environmental temperature is out of the
system operating range (50°F–104° or
10°C– 40°C).
Action: Repeat the test after the meter
and test strip are within the operating
temperature range.
What it means: Low blood alert
Action: Apply more blood to the test
stripwithinve(5)secondsoftheerror
message. If time runs out, simply insert a
new test strip.
Troubleshooting Guide
Battery exhausted. Replace the battery.
Battery incorrectly Check that the battery is
installed or absent. correctly installed.
Test strip inserted Insert the test strip correctly with
upside down or the bar end entering into the test
incompletely. striprst.
Defective meter. Please contact Customer Care at
1.800.243.2636 for assistance.
vThe meter does not display a message after inserting a
test strip.
Probable Cause Action
vThe test does not start after applying the sample.
Probable Cause Action
Insufcientblood Repeatthetestusinganewteststrip
sample. with a larger blood sample.
Defective test strip. Repeat the test with a new test strip.
Sample applied after Repeat the test with a new test strip.
automatic shut-off. Apply sample only when the “ ”
(Two (2) minutes after symbol appears on the display.
last user action).
Defective meter. Please contact Customer Care at
1.800.243.2636 for assistance.

Prodigy Diabetes Care, LLC www.prodigymeter.com
PRODIGY®Blood Glucose Meters Owner’s Manual
76 77
Prodigy Diabetes Care, LLC 1.800.243.2636
PRODIGY®Blood Glucose Meters Owner’s Manual
vThe control solution test is out of range.
Probable Cause Action
Error in performing
the test.
Control solution bottle
not shaken well.
Expired or contaminated
control solution.
Control solution that is
too warm or too cold.
Test strip deterioration.
Meter malfunction.
Read the instructions
thoroughly and repeat
the test again.
Shake the control solution bottle
vigorously and repeat
the test again.
Check the expiration date or
the discard date of the control
solution.
Control Solution, meter,
and test strips should come
to room temperature
(68–77°F/20–25°C)
before testing.
Please repeat the test with a
new test strip.
Please contact Customer Care
at 1.800.243.2636
for assistance.
Comparing Meter and Laboratory Results
The test results you obtain from your meter may differ somewhat from
your laboratory results due to normal variation. Meter results can be
affected by factors and conditions that do not affect laboratory results
in the same way (see test strip package insert for typical accuracy
and precision data as well as important information on limitations).
To make an accurate comparison between meter and laboratory
results, follow the guidelines below.
Before you go to the laboratory:
• Perform a control solution test to make sure that the meter is
working properly.
• It is strongly recommended to fast for at least eight (8) hours
before doing comparison tests.
• Take your meter with you to the laboratory.
While at the laboratory:
• Make sure that the samples for both tests (the meter test and the
laboratory test) are taken and tested within 15 minutes of each
other.
• Wash your hands before obtaining a blood sample.
• Never use your meter with blood that has been collected in a gray
top test tube.
• Use fresh capillary blood only.
You may still have a variation from the result because blood
glucoselevelscanchangesignicantlyovershortperiods,
especially if you have recently eaten, exercised, taken medication or
experienced stress.1In addition, if you have eaten recently, the blood
glucoselevelfromangerstickcanbeupto70mg/dL(3.9mmol/L)
Information About your Prodigy®Meter

Prodigy Diabetes Care, LLC www.prodigymeter.com
PRODIGY®Blood Glucose Meters Owner’s Manual
78 79
Prodigy Diabetes Care, LLC 1.800.243.2636
PRODIGY®Blood Glucose Meters Owner’s Manual
higher than blood drawn from a vein(venous sample) used for a lab
test.2
Therefore, it is best to fast for eight (8) hours before doing
comparison tests. Factors such as the amount of red blood
cells in the blood (a high or low hematocrit) or the loss of bodily
(severe dehydration) may also cause a meter result to be
different from a laboratory result.
References: 1) Surwit, R.S., and Feinglos, M.N.: Diabetes Forecast (1988), April,
49-51. 2) Sacks, D.B:“Carbohydrates.” Burtis,C.A, and Ashwood,E.R.(ed.),Tietz
Textbook of Clinical Chemistr y. Philadelphia:W.B. Saunders Company (1994),959.
Performance Characteristics
•Accuracy: ±15 mg/dL when glucose <75 mg/dL
±20% when glucose >75 mg/dL
•Precision: This study shows the CV (correlation variation)
is less than 5%.
•The devicehas been to meet the following standards:
98/79/EC, IEC 60601-1, IEC 61010-1, IEC 60601-1-2,
IEC61326, and ISO 15197
Expected Test Results
Time of day Plasma glucose Your target range
range for people
without diabetes
Before meal
(mg/dL)/(mmol/L)
After meals Less than
180 mg/dL (10 mmol/L) (mg/dL)/(mmol/L)
Bedtime Not
(mg/dL)/(mmol/L)
Between 2 AM Not
and 4 (mg/dL)/(mmol/L)
Source: ADA Clinical Practice Recommendations 2012
Please work with your doctor to determine a target range that works best for you.
Your Prodigy®meter is designed to help you and your healthcare professional
manage your diabetes. You must always rely on your healthcare professional
to interpret your test results and to decide how to treat your diabetes.
Unxpected Test Results
Unexpected test results can occur. When this happens, please refer to
these cautions.
Low BloodGlucose Test Results
Falselow results may occur if you are severely dehydrated. If you think
you areseverely dehydrated, contact your healthcare professional
immediately.
70-130 mg/dL
(3.8 - 7.2 mmol/L)

Prodigy Diabetes Care, LLC www.prodigymeter.com
PRODIGY®Blood Glucose Meters Owner’s Manual
80 81
Prodigy Diabetes Care, LLC 1.800.243.2636
PRODIGY®Blood Glucose Meters Owner’s Manual
If your test result is lower than 70 mg/dL or “Lo”
appears on your meter screen, this could be a result
of hypoglycemia. Although this result could be due to
atestingerror,itisbesttotreatrstandretestlater.
Contact your healthcare professional immediately.
See Figure 99.
High Blood Glucose Test Results
If your test result is higher than 180 mg/dL, this could be a result of
hyperglycemia. If you are uncertain about this test result, retest. If the
result continues to be higher than 180 mg/dL, contact your healthcare
professional immediately.
If “Hi” appears on your meter screen, this could be a result
of severe hyperglycemia (results higher than 600 mg/dL).
Retest your blood glucose. If “Hi” appears again, contact
your healthcare professional immediately. See Figure 100.
Repeated Unexpected Test Results
If you continue to get unexpected test results, check your
blood glucose monitoring system by performing a control solution test.
Refer to “Performing a Control Solution Test” section in this manaul.
Unusual Red Blood Cell Count
A hematocrit range (percentage of red blood cells in the blood) that is
extremely high (above 55%) or low (below 30%) can also cause false
readings.
Figure 99
Figure 100
Accuracy of Meter Measurements
FAQ: Can two (2) blood glucose meters produce different readings
that are from the same blood sample? Does this make one reading
more accurate than the other?
Answer: Yes, different meters can produce different readings using
the same blood sample.
No, this does not necessarily mean that one result is more
accurate than the other.
The reasons for this are as follows:
1. The FDA recognized standard for glucose meter accuracy is
ISO 15197: In Vitro Diagnostic Test Systems—Requirements
for Blood Glucose Monitoring Systems for Self Testing
in Managing Diabetes Mellitus. This standard sets accuracy
requirements that manufacturers must meet before being
approved by the FDA to market their glucose meters.
2. The accuracy requirements for the blood glucose monitoring
system—meters and test strips—as stated in ISO 15197
is this:
Ninety-vepercent(95%)oftheindividualglucoseresults
shall fall within ±15 mg/dL (0.83 mmol/L) of the results
of the manufacturer’s measurement procedure at glucose
concentrations < 75 mg/dL (<4.2 mmol/L) and within ± 20% at
glucoseconcentrations≥75mg/dL(≥4.2mmol/L).
How does this answer the FAQ?
The accuracy of the system is determined by a clinical study using
100 blood samples at interval glucose concentrations ranging from

Prodigy Diabetes Care, LLC www.prodigymeter.com
PRODIGY®Blood Glucose Meters Owner’s Manual
82 83
Prodigy Diabetes Care, LLC 1.800.243.2636
PRODIGY®Blood Glucose Meters Owner’s Manual
< 50 mg/dL to over 400 mg/dL measured using both the
manufacturer’s meter and a clinical blood glucose analyzer for
comparison (reference measurement).
Example 1
If the manufacturer’s reference measurement is 70 mg/dL this
means that the meter measurements are considered accurate if they
fall within ± 15 mg/dL of 70 mg/dL (from of 55 mg/dL to 85 mg/dL).
If meter A produces a measurement of 60 mg/dL and meter B
measures 80 mg/dL, then both are in the acceptable range and meet
the accuracy requirement.
Each manufacturer has met the System Accuracy requirement as
part of its testing to be cleared for marketing. In the System Accuracy,
testing a distribution of blood glucose readings will result at the
various glucose concentration levels for one manufacturer’s system.
This is the same for other manufacturer’s systems. Because of the
range of acceptable readings for the accuracy requirement, identical
readings from two different meters on the same blood sample may
not happen.
Symbols Information
Do not re-use. Single use only.
Consult Operating Instructions.
Keep away from sunlight.
Keep dry.
Temperature limitation.
Use by.
Date of manufacture.
Batch code.
Catalog number.
Serial number.
Control.
LOT
REF
SN
CONTROL
Symbol Referent

Prodigy Diabetes Care, LLC www.prodigymeter.com
PRODIGY®Blood Glucose Meters Owner’s Manual
84
Limited Lifetime Warranty
Prodigy Diabetes Care, LLC extends a limited lifetime warranty to
consumers who purchase a new Prodigy®brand meter. Under this
limited lifetime warranty, your new meter is covered from the original
date of purchase, as long as it has not been altered, or
misused. Under this limited lifetime warranty, Prodigy®will replace, free
of charge, the meter ifitis defective in material or workmanship.
NO OTHER WARRANTIES, EXPRESS OR IMPLIED, ARE MADE. PDC WILL
NOT BE LIABLE FOR ANY INCIDENTAL OR CONSEQUENTIAL DAMAGES
RESULTING DIRECTLY OR INDIRECTLY FROM THE FAILURE OF THE
PRODUCT TO PERFORM IN ACCORDANCE WITH SPECIFICATIONS.
Some states do not allow the exclusion or limitation of other express
or implied warranties or incidental or consequential damages, sothe
above limitations or exclusions may not apply to you.
Warranty Information

©2012 Prodigy Diabetes Care. Prodigy®, Prodigy Pocket®, Prodigy Voice® and Prodigy AutoCode® are registered
trademarks of Prodigy Diabetes Care. All other trademarks are property of their respective owners.
All rights reserved. PCM262 Rev.4 01/12
AR REP Advena Ltd; 33 Bridge Street,
Hereford HR4 9DQ, UK
EC REP
For Customer Care
call: 1.800.243.2636
www.prodigymeter.com
Prodigy Diabetes Care, LLC 1.800.366.5901
9300 Harris Corners Parkway, Suite 450
Charlotte, NC 28269
Table of contents
Popular Blood Glucose Meter manuals by other brands

Bayer HealthCare
Bayer HealthCare Ascensia Contour Blood Glucose Monitoring... user guide

Polymap Wireless
Polymap Wireless Polytel GMA3 user manual

Accu-Chek
Accu-Chek Aviva owner's booklet

Roche
Roche Accu-Chek Mobile quick start guide

Palmdoc
Palmdoc Palmdoc I user guide

AgaMatrix
AgaMatrix Presto owner's guide