Progression Fitness iFold7 User manual

O
WNER’&S
M
ANUAL
iFold7

TABLE OF CONTENTS
SAFETY PRECAUTIONS
-------------------------------------------------------
1-2
BEFORE BEGINNING
-------------------------------------------------------
3-4
FEATURES
-------------------------------------------------------
5
EXERCISE GUIDELINES
-------------------------------------------------------
6-7
WARM-UP & COOL-DOWN
-------------------------------------------------------
8-9
ASSEMBLY PART LIST
-------------------------------------------------------
10
CHARDWARE PACK
--------------------------------------------------------
11
ASSEMBLY STEPS
-------------------------------------------------------
12-15
FOLDING & MOVING INSTRUCTIONS
-------------------------------------------------------
16-17
MAINTENANCE
-------------------------------------------------------
18-19
COMPUTER INSTRUCTION
-------------------------------------------------------
20
GENERAL OPERATION
-------------------------------------------------------
21-25
TROUBLESHOOTING
-------------------------------------------------------
26
EXPLODED DRAWING
-------------------------------------------------------
27-29
PARTS LIST
-------------------------------------------------------
30-32
CIRCUIT DIAGRAM
-------------------------------------------------------
33
W
W
WARRANTY
-------------------------------------------------------
34

--
1
!SAFETY PRECAUTIONS
Thank you for purchasing the Progression iFold7. Even though we made great efforts to ensure the quality of each product, occasional errors, and/or
omissions do occur. In any event should you find this product to be defective or missing a part please contact the Flaman Fitness location you purchased it
from.
Be sure to read the entire manual before assembly and operation. Also, please note the following safety precautions:
"Before beginning any exercise program consult your physician.
"Keep children and pets away from this equipment at all times, this is not a toy.
"Only one person at a time should use this equipment. If dizziness, nausea, chest pains, or any other abnormal symptoms are experienced while using
this treadmill, stop the workout at once and consult a physician immediately.
"The treadmill should not be used by persons weighing more than 136 kg (300 lbs).
"Inspect your machine prior to exercise to ensure that all nuts and bolts are fully tightened.
"Keep hands and feet away from all moving parts.
"Always use this treadmill on a clear and level surface. Do not use it outdoors or near water.
"Do not insert any object into any openings.
"Before using this equipment to exercise, always do stretching exercises to properly warm up by slow walking for 5 minutes on the treadmill.
"Always wear proper clothing and walking or jogging shoes when exercising. Do not wear loose fitting clothing that could get caught in the equipment.
"Turn off the power after usage.
"Pregnant women should consult with their physician before beginning an exercise program.
"Drink hydrating fluids (water) before, during and after any exercise.
"This treadmill is designed for home use only. Do not use for light institutional or commercial applications.
"Assemble and operate the treadmill on a level, solid surface.
"Please make sure that there must be a safety area of 200 cm ×100 cm behind the treadmill while exercising.
"Before using this machine please lubricate the running belt first. Lubricate every 30 hours of usage or once a month to prolong the lifetime of this
machine.
"Regularly check your treadmill for damages and abrasion. Please pay special attention to the rear roller cover, antiskid pad, handlebars, side rail and
running belt. Please read this manual carefully and observe the instructions.
"Damaged parts need to be replaced instantly and please only exercise again once properly repaired.

--
2
"Please make sure enough space is available around the item for set-up and use.
"Please make sure that levers or other adjusting mechanisms do not interfere with the moving area during exercise.
"Turn the switch off and unplug the power cord when the treadmill is out of use.
"Incorrect and excessive exercise can harm your health.
"Do not exceed 4 hours of use per day
Before starting any exercise program consult your physician. This is especially important for individuals over the age of 35 or persons with pre-existing
health problems. Please read all instructions carefully.
The treadmill is tested according to EN 957-1/-6, class HB for home-use with a maximum user weight of 136 kg (300lbs) and is not suitable for
commercial use. This item may only be used in the way described in this manual.
Maximum overall dimension: 188cmx85cmx126cm
Maximum noise level around the treadmill is 70 dB(A)
The weight of the treadmill is about 78 kg (171.6lbs).
Attention: The treadmill should only be assembled by the manufacturer, its service agent or similarly qualified persons.
This treadmill is not intended for use by persons (including children) with reduced physical, sensory or mental capabilities, or lack of experience and
knowledge. If the supply cord is damaged, it must be replaced by the manufacturer, its service agent or similarly qualified persons in order to avoid a
hazard.

- 3 -
!BEFORE BEGINNING
Clean your area:
1. Remove the treadmill from box and place on a level ground. It is recommended that you place a protective covering under the treadmill, such as a mat.
2. Place in an area that will meet minimum clearance requirements.
Front & Side: 1ft /30cm
Back: 6ft /180cm
3. Whenever moving or setting up the treadmill, the deck must be in the upright position with the deck safety lock securely engaged.
4. To place the iFold7 in operating position, release the deck safety lock then lower the deck with the end caps until it rests completely on the ground.
5. Make sure safety cord is plugged into the treadmill.
6. Plug unit into outlet following the grounding guidelines below.
GROUNDING:
This unit must be properly grounded to ensure safe operation. Should this equipment fail to perform properly, grounding reduces the chance of electrical
shock.
Helpful Tips
Straddle the running belt and allow it to start moving at a safe speed before stepping on.
Hold the handlebar while adjusting the controls.
Focus your eyesight ahead to help maintain your balance.
Wear comfortable, good-quality walking or running shoes.
Warm-up and cool–down before and after your workout period

- 4 -
IMPORTANT TREADMILL WARNINGS AND CAUTIONS
In order to reduce the risk of fire, electric shock, burns or injury, please read and understand the following precautions before operating.
DANGER: To reduce the risk of electric shock, always unplug this appliance from the electrical outlet immediately after use and before cleaning.
WARNING: To reduce the risk of burns, fire, electric shock or injury to persons, an appliance should NEVER be left unattended when plugged in.
Unplug from outlet when not in use, and before putting on or taking off parts. Do not operate under blankets or pillow. Excessive
heating can occur and cause fire, electric shock or injury to persons.
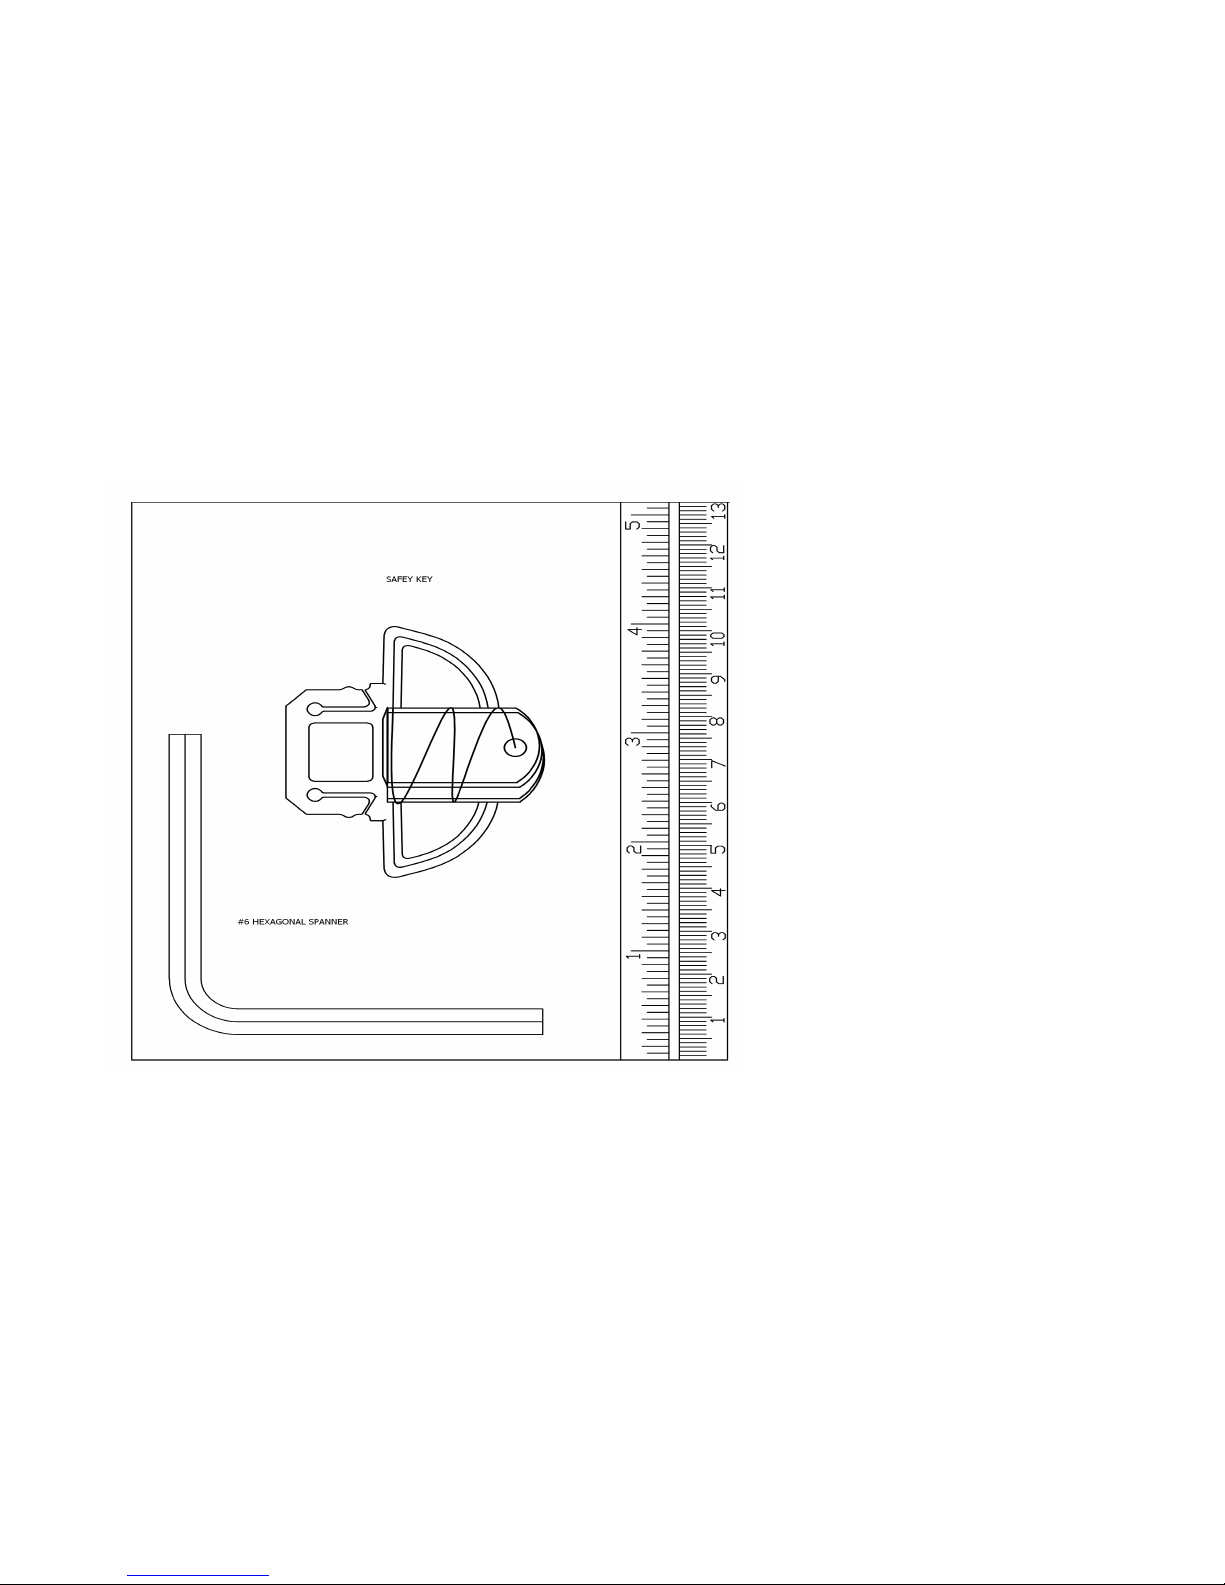
CAUTION:
Before operating the treadmill you have to pull out the slip safety key in the
direction of the arrows, ( the treadmill will enter into a protection program if
you switch on the treadmill without pulling out the safety key)
The safety key stops the treadmill at any point in your workout .
In case of emergency, seize the handlebar and lift your body, then stand on the ground.
Helpful Instructions
Straddle the tread belt and allow it to start moving at a safe speed before stepping onto it.
Hold the handlebar while adjusting the controls.
Focus your eyes straight ahead to help maintain your balance.
Wear comfortable, good-quality walking or running shoes.
Warm-up and cool–down before and after your workout period
- 5 -
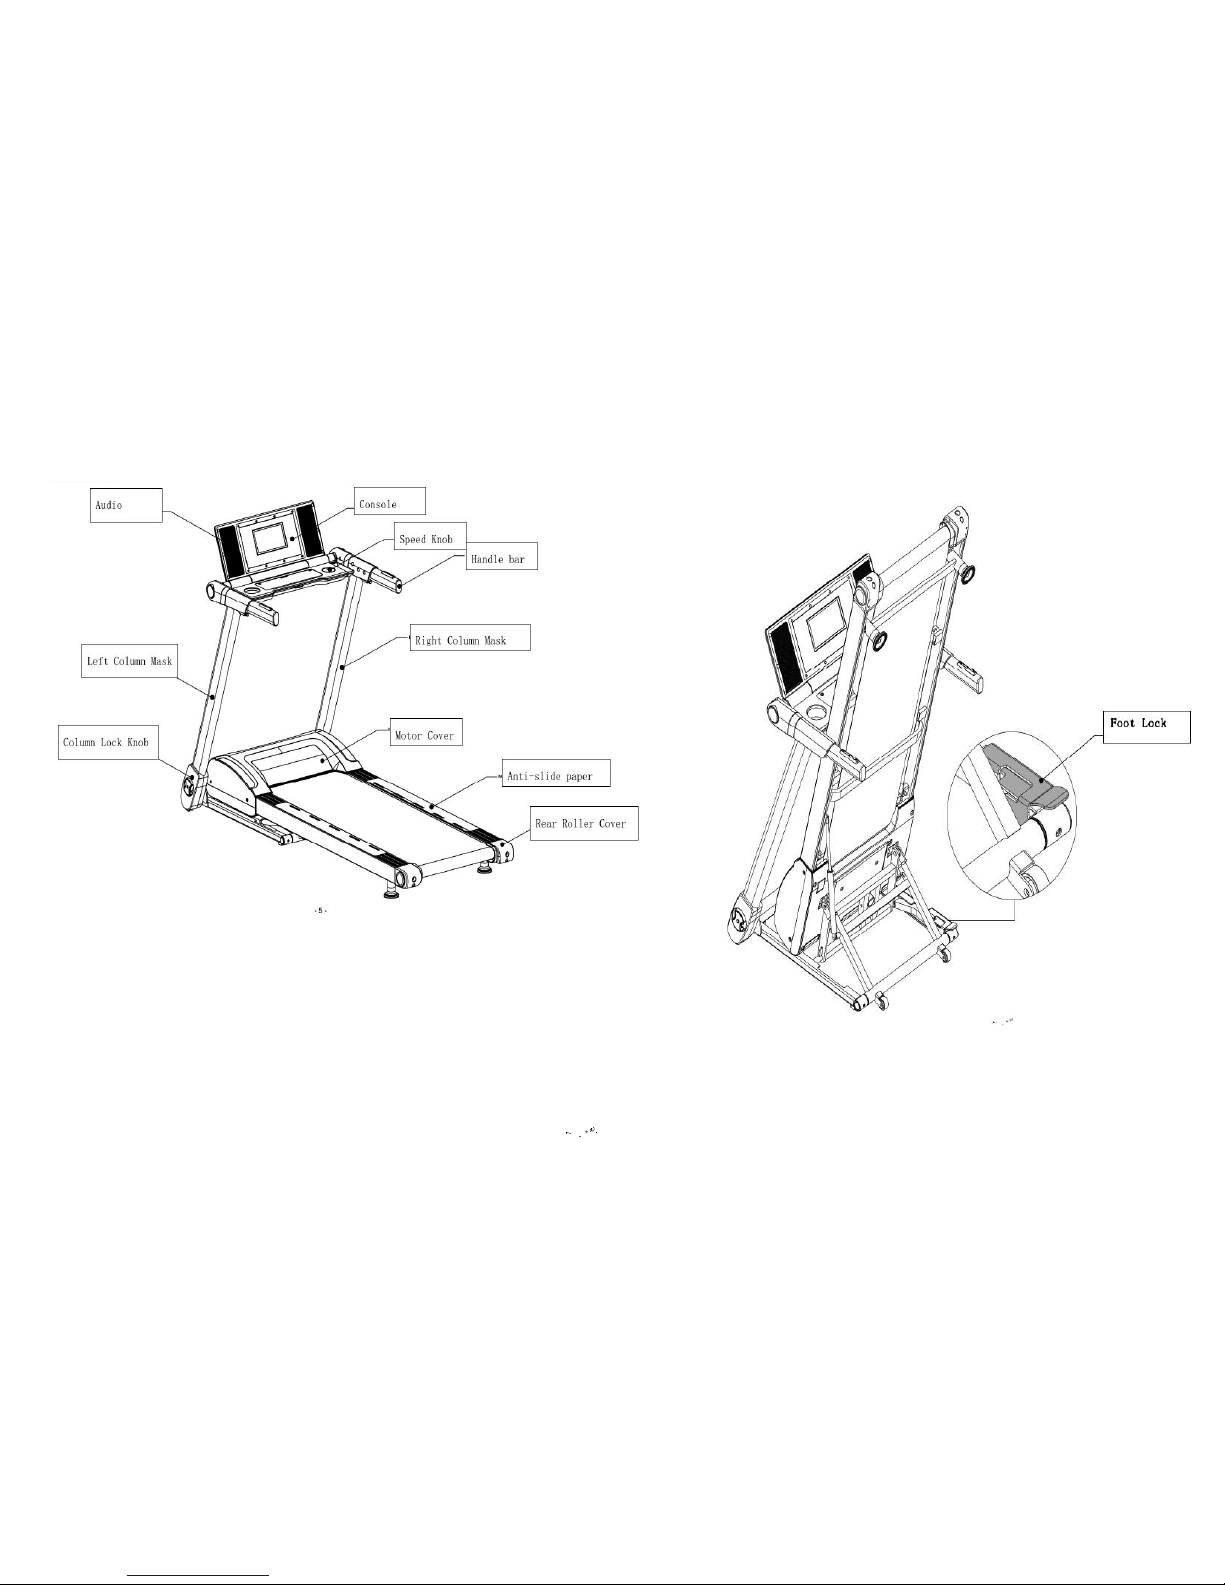
!FEATURES

- 6 -
!EXERCISE GUIDELINES
Check with your physician before beginning any type of exercise program. People who have diabetes or high blood pressure, a family history of heart
disease, high cholesterol or have led a sedentary lifestyle should get a medical check-up and a stress test before working out. Medical research has
shown us that there is an amount of exercise which is enough to condition the cardio respiratory system and the muscles of the body. The amount of
exercise is between 60% and 85% of your maximum heart rate measured during a training session. This range allows enough exercise to achieve fitness,
but not an exercise amount to cause injury.
If at any time during exercise you experience dizziness or chest pain stop immediately and seek medical advice
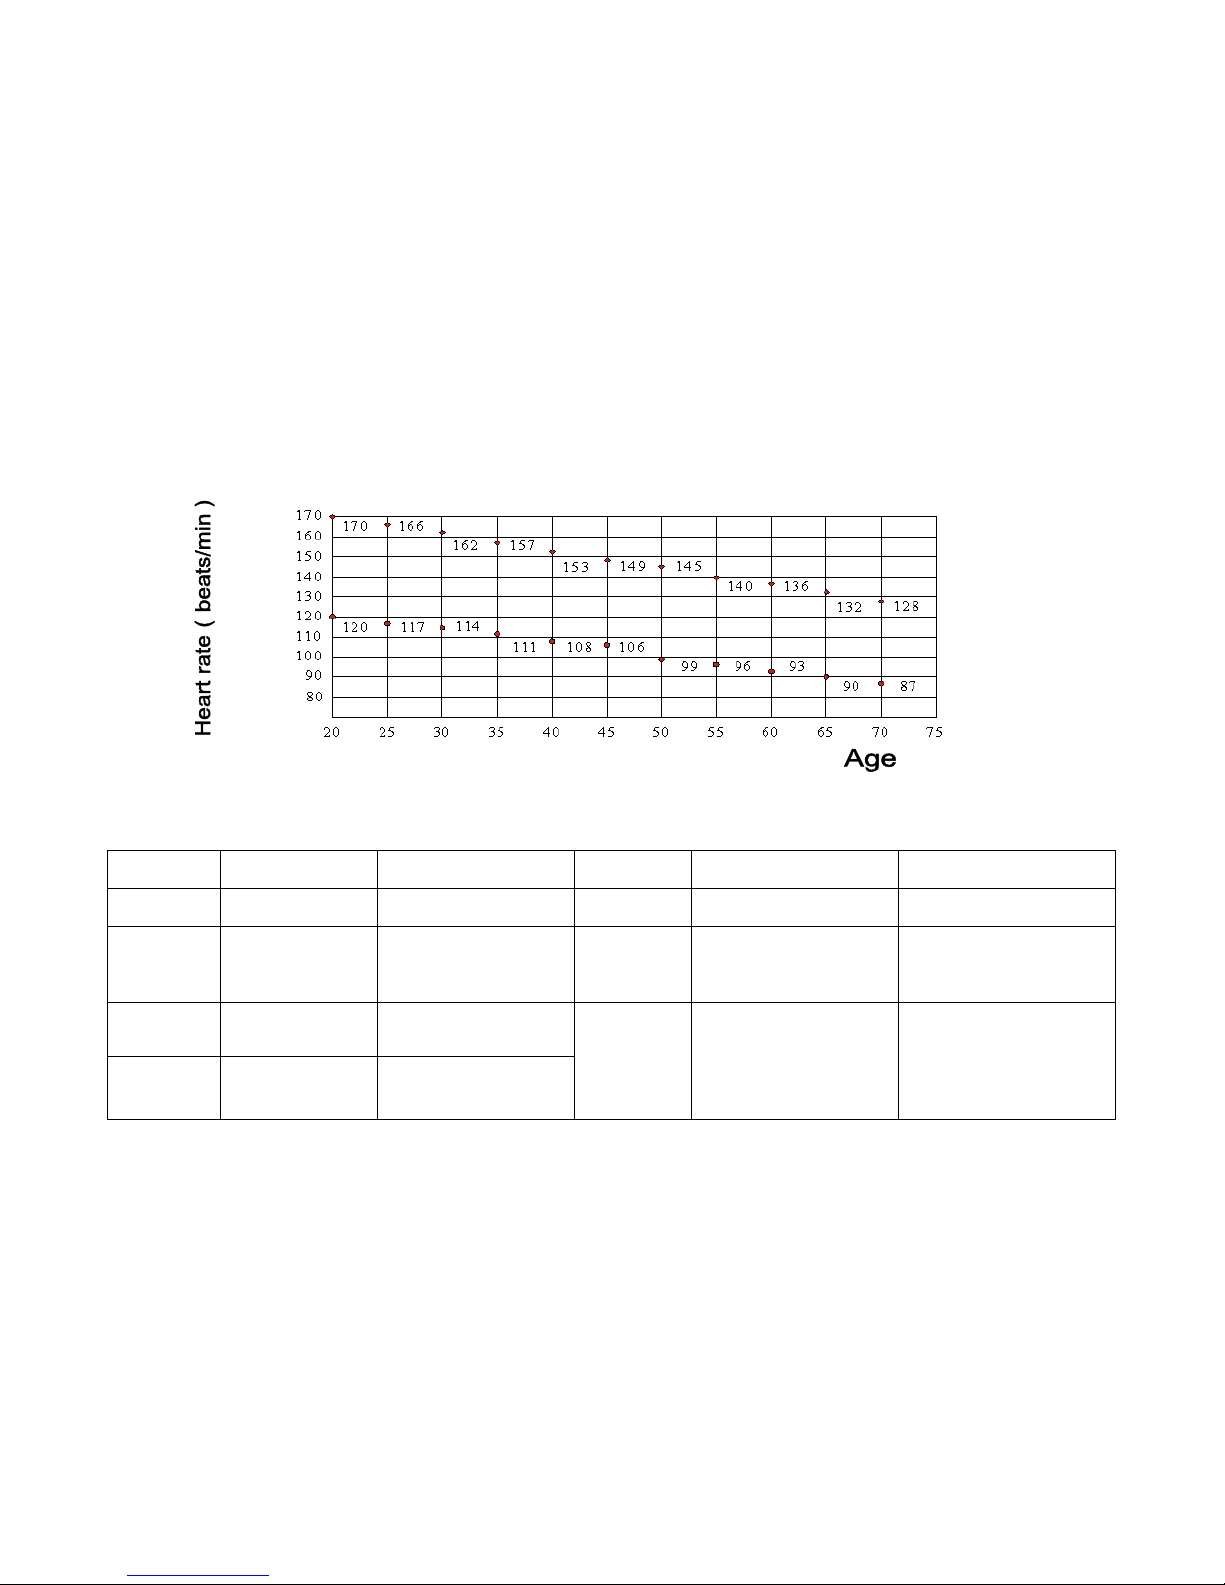
TARGET HEART RATE ZONE
220-your age=maximum heart rate
Do not workout at your maximum heart rate. The recommended heart rate zone is between 60% and 85% of your maximum heart rate.
- 7 -
EXERCISE IN YOUR TARGET HEART RATE ZONE
Age
BEGINNER TREADMILL PROGRAM
Exertion level
Duration
Exertion level
Duration
WEEK 1
Easy
6~12minutes
WEEK 5
Moderate
22~28minutes
WEEK 2
Easy
10~16minutes
WEEK 6
Slightly higher or
slightly lower
20 minutes
WEEK 3
Moderate
14~20minutes
WEEK 7
Add interval training
3 minutes at moderate
exertion with 3 minutes at
higher exertion for 24
minutes
WEEK 4
Moderate
18~24minutes

--
8
!WARM-UP & COOL-DOWN
A successful exercise program consists of a warm up, aerobic exercise and a cool down. Warming up is an important part of your workout and should start
off every session. It prepares your body for more strenuous exercise by heating up and stretching out your muscles. At the end of your workout, repeat
these exercises to reduce sore muscles. We suggest the following warm-up and cool-down exercises:
HEAD ROLLS
Rotate your head to the right for one count, feeling the stretch up
the left side of your neck. Next, rotate your head to the left for one
count. Finally, drop your head to your chest for one count.
SHOULDER LIFTS
Lift your left shoulder up toward your ear for one count. Then lift
your right shoulder up for one count as you lower your right shoulder.
SIDE STRETCHES
Open your arms to the side and continue lifting them until they are
over your head. Reach your right arm as far upward toward the ceiling
as you can for one count. Feel the stretch up your right side. Repeat
this action with your left arm.
9
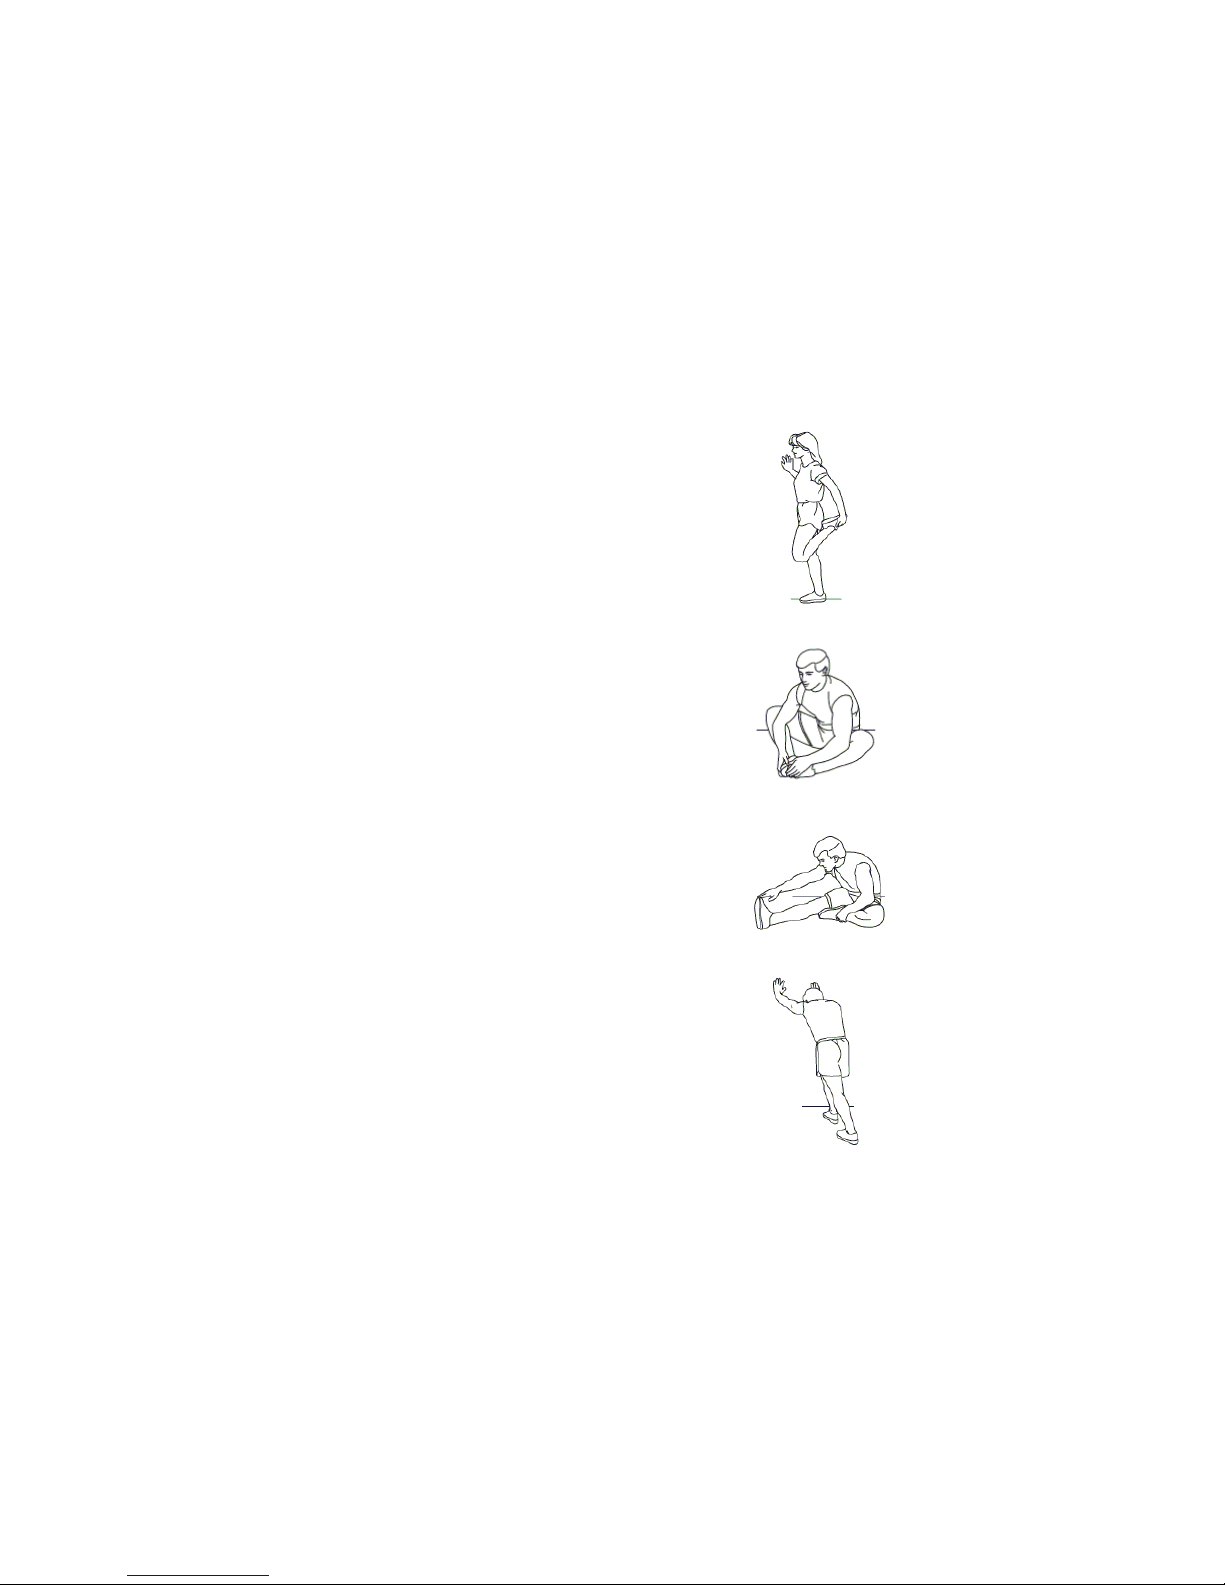
QUADRICEPS STRETCH
With one hand against a wall for balance, reach behind you and pull your
right foot up. Bring your heel as close to your buttocks as possible. Hold
for 15 counts and repeat with left foot up.
INNER THIGH STRETCH
Sit with the soles of your feel together with your knees pointing
outward. Pull your feet as close into your groin as possible. Gently
push your knees toward the floor. Hold for 15 counts.
HAMSTRING STRETCH
Sit with one leg extended. Bring the sole of the opposite foot toward
you and rest it against the inner thigh of your extended leg.
Reach toward your toes as far as possible. Hold for 15 counts,
then relax. Repeat 3 times for each leg. Stretches: Hamstrings,
lower back and groin.
CALF STRETCHES
Lean against a wall with your right leg in front of the left and your arms
forward. Keep your left leg straight and the right foot on the floor; then
bend the left leg and lean forward by moving your hips toward the wall.
Hold, and then repeat on the other side for 15 seconds

10
!ASSEMBLY PART LIST
11
!HARDWARE PACK

12
!ASSEMBLY STEPS
STEP 1 :Remove the treadmill from the box and place on a level ground. Pull out the left and right column mast knob
respectively. According to the direction of the arrow, rotate the knob to unlock position.
Pull out column mast knob
Rotate column mast knob

13
STEP 2 :Hold the A and B handlebars and raise them until they lock. Important: You will hear a “click” sound when it is
locked. Release your hands when column mast has been locked and rotate the column mast knob at the
bottom to stabilize.
Column mast knob switch

14
STEP 3 :Rotate the console downward by bringing handlebars A and B towards the back of the treadmill. (See diagram
below). Once in the proper position use the handlebar lock device to stabilize the console.
Console lock device
15
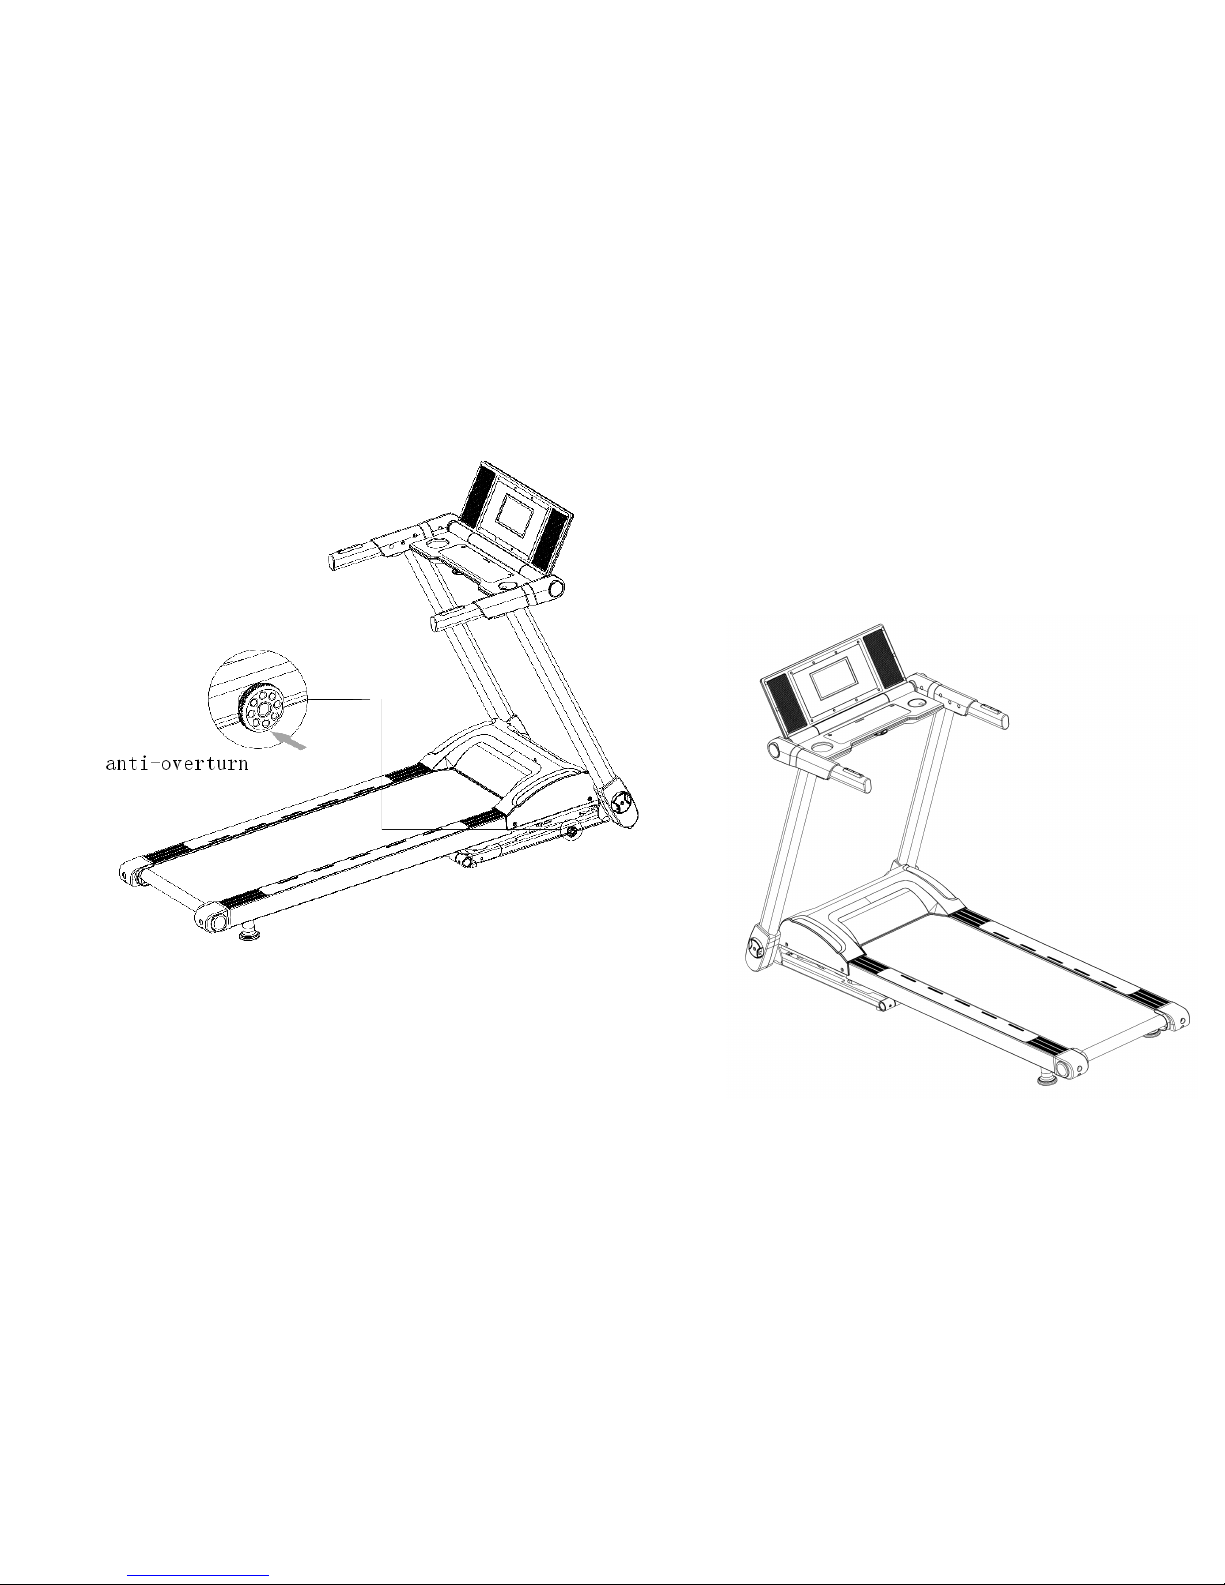
Step 4. The final step is to revolve the anti-overturn knob to stabilize.
16
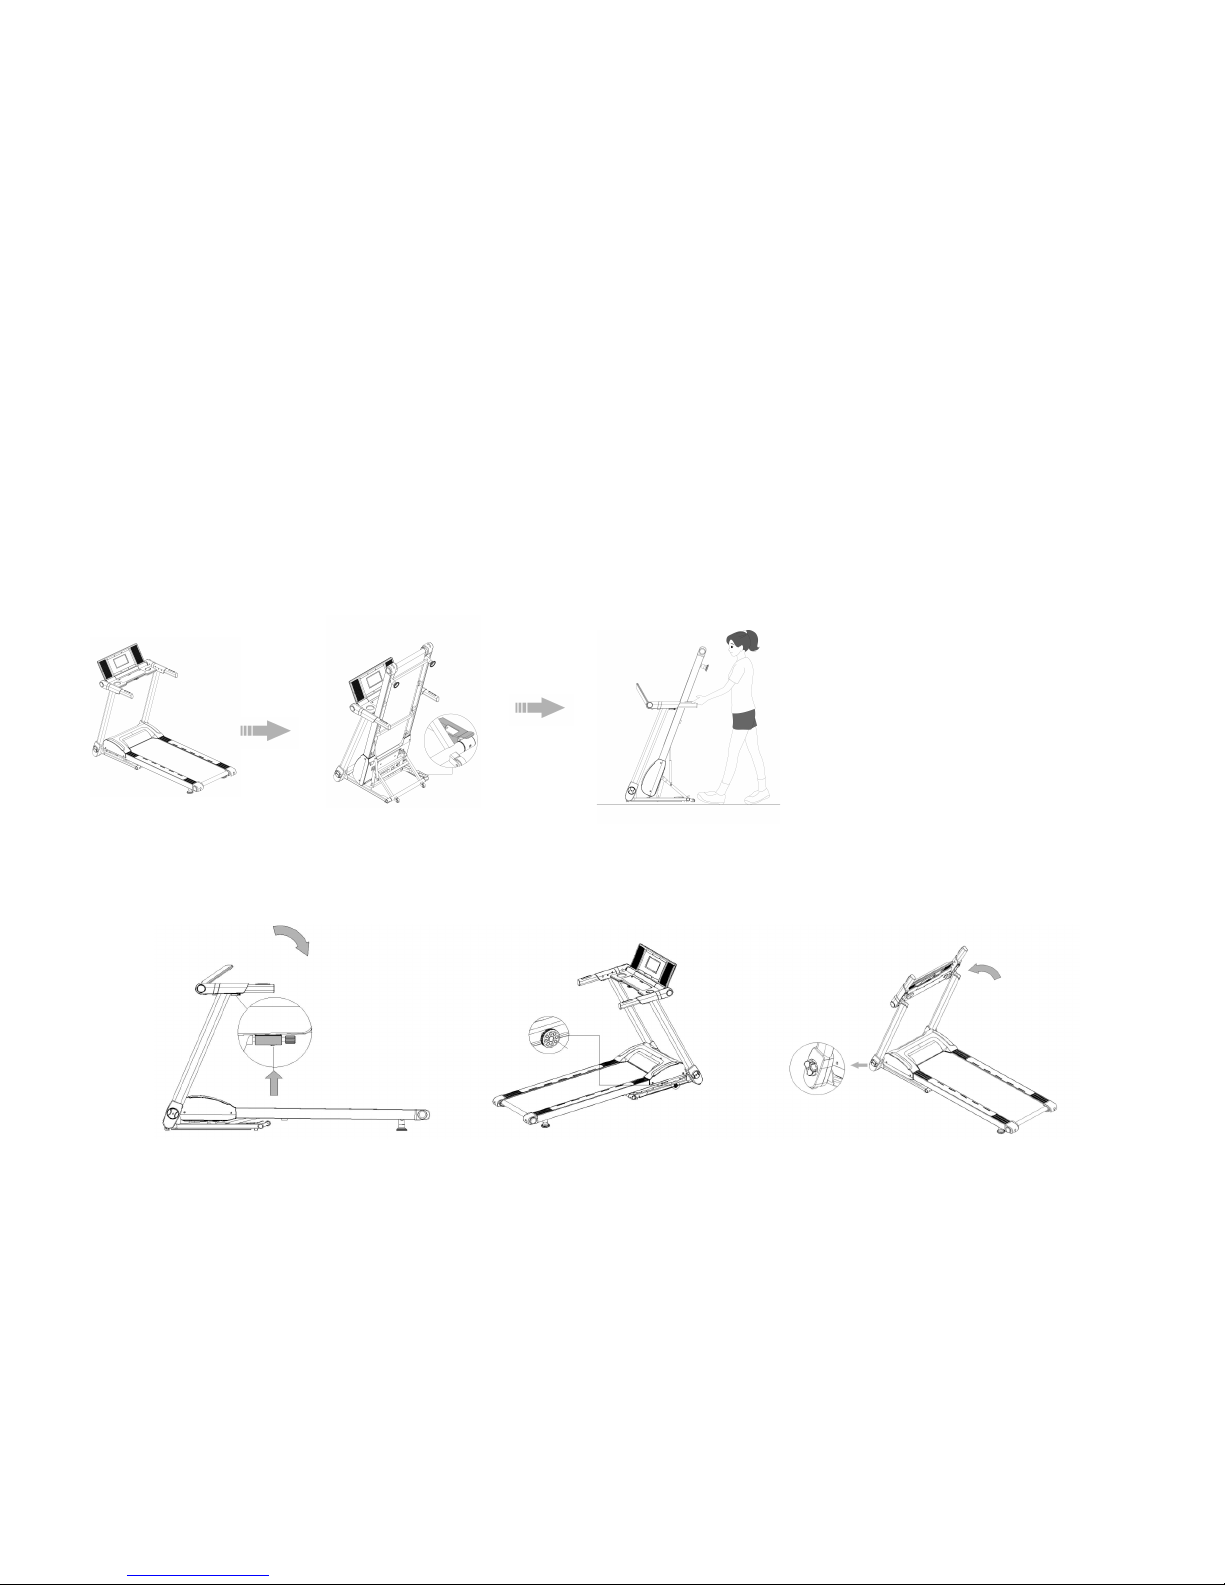
!MOVING & FOLDING INSTRUCTION
MOVING:
A: To move to another spot and store upright or use in new location: Fold the running deck up by grabbing the end of the running deck
and lifting up. Make sure the pedal is locked. Hold the handlebars, then you can move the treadmill.
B: To fold the treadmill down for storage:
1. Unlock the display lock device 2.Revolve the anti-overturn 3. Unlock the column lock device

17
4. Revolve the column as the direction of arrow 5.Folding the treadmill
Once the treadmill is folded as above, grasp the end of the running deck, lift it and let so the front wheel is still on the ground and
rolled to desired location.

18
!MAINTENANCE
•Warning: To prevent electrical shock, be certain the treadmill is turned off and unplugged for cleaning or routine maintenance.
• Important: Never use abrasives or solvents to clean the treadmill. To prevent damage to the computer, keep liquids away and keep it out of direct
sunlight.
• After each workout: Wipe off the console and other treadmill surfaces with a cloth containing Progression Equipment Cleaner.
• Weekly: Use of a treadmill mat is recommended for ease of cleaning. Dirt from your shoes contacts the belt and eventually makes it to underneath
the treadmill. Vacuum underneath the treadmill once a week.
MAINTENANCE OF RUNNING DECK AND RUNNING BELT
The treadmill is equipped with a powerful maintenance-free system (Intellective lubrication system, auto-tensioner for running belt, auto tensioner for
motor drive belt, etc.). This system will test the treadmill on time and maintenance automatically.
!BELT ADJUSTMENT
All running belts are properly set at the factory. It may stretch or be off-center after use. Stretching is normal during the break-in period. The iFold7 is
equipped with auto-rectify so you should not have to adjust the running belt as it should adjust the running belt according to running belt position. If you
notice any rubbing, noises or burning smells please call for maintenance.
ADJUST THE MOTOR DRIVE BELT TENSION
The iFold7 is equipped with auto tensioner for the motor drive belt.
!TREADMILL LUBRICATION
Lubricating under the tread belt will ensure superior performance and extend its life expectancy. The iFold7 is equipped with an intellective lubrication
system. It should lubricate the running belt automatically based on internal parameters. In the event that you should need to lubricate your treadmill
read below for how to do so.
Table of contents
Other Progression Fitness Treadmill manuals


