Proline CD1200MP3 User manual

CD1200MP3
CD/MP3 MICRO SYSTEM
MICRO-CHAINE CD COMPATIBLE MP3
CD/MP3 MICRO SYSTEEM
MICRO HI FI CD COMPATIBILE CON MP3
HIFIMICROSYSTEM MP3 TAUGLICH
MIKROSYST M CD/MP3
MICRO CADENA CD/MP3
MICRO SYSTEM COM CD/MP3
É
OPERATING INSTRUCTIONS
MANUEL D'UTILISATION
HANDLEIDING
ISTRUZIONI OPERATIVE
BETRIEBSANLEITUNG
POLYNY K OBSLUZE
NÁVOD K OBSLUZE
MANUAL DE INSTRUCCIONES
MANUAL DE INSTRUCOES
Downloaded from www.vandenborre.be

GB-1
Dangerous voltage constituting a
risk of electric shock is present
inside this equipment.
There are important operating and
maintenance instructions in the liter-
ature accompanying this equipment.
Safety information
Mains supply
This equipment is designed to operate from a 230 Volt AC mains supply.Other power
sources may damage it.
Mains plug
We have fitted this equipment with a standard mains plug.
• If the mains lead becomes damaged, it must be replaced by the manufacturer, its service
agent or similarly qualified person with a lead of the same type and rating to avoid a hazard.
• If you cut off the mains plug, for example to fit a different type, please destroy the old
plug as it would be dangerous if inserted into a live power outlet.
• If a fuse is fitted to the plug, remove the fuse before throwing the plug away.
• Carefully follow the wiring instructions supplied with a new mains plug.
• Never use a fused mains plug without the fuse cover.
Mains plug wiring for the UK
In a re-wirable plug the wires in the mains lead of this equipment must be connected as follows.
• The wire-coloured brown must be connected to the terminal that is marked with the letter L.
• The wire-coloured blue must be connected to the terminal that is marked with the letter N.
• Do not connect anything to the earth terminal which is marked E, or
• You must make sure the mains lead is firmly secured under the cord clamp.
Mains fuse
UK standard (BS1363) plugs must have a 3 amp (BS1362 type) fuse fitted. Replace the
plug or have the power lead assembly replaced if the fuse cover is lost.
Symbols
This equipment is double insulated and an
earth connection is not required.
This mark is applied to show the equipment
conforms to European safety and electro-
magnetic compatibility standards.
Safe use and care of your audio equipment
We have designed and made this product to meet European safety standards, but as with
any electrical equipment you must take care to get the longest working life from it and stay
safe. Here are a few tips to help you do this.
Read these instructions carefully before you try to use the equipment.
Protect the mains lead. You must ensure the mains lead cannot be walked on, crushed,
chafed or cut.
Avoid harsh conditions such as wet or damp places, high humidity, strong vibration,
extremely high or low temperatures, strong sunlight and places that are very dusty.
Never push objects into holes and ventilation slots.
To save power, switch off mains power or pull out the mains power plug when you are not
using the equipment, unless the function of the equipment requires a continuous power
supply.
Don't continue to use this equipment if you have spilt liquids in it, if it is damaged in any
way or if it does not work normally. Immediately unplug the equipment and seek expert
advice.
If the mains cord becomes damaged, it should be replaced by the manufacturer, its service
agent or similarly qualified person to avoid a hazard.
Downloaded from www.vandenborre.be

GB-2
This product is intended for domestic use only, any other use may invalidate
the guarantee and might be dangerous.
Ventilation
Place the equipment on a hard flat surface away from direct sunlight and heat
sources. If it is in a cabinet, allow at least a 10cm gap all around. Don't obstruct the
ventilation slots, including those underneath, with soft furnishings. Overheating will
shorten the life of the equipment and increase the risk of fire.
Cleaning
Disconnect the mains supply and use only a lightly dampened soft cloth. Do not
use chemical solvents or strong detergents as these may damage the cosmetic
finish.
Batteries
Remove batteries when the equipment is not to be used for a long time.
Batteries left in equipment may cause damage through deterioration and corro-
sive leakage, invalidating the guarantee. To protect the environment please use
local recycling facilities for battery disposal.Do not dispose of the battery in a fire
(risk of explosion).
Important Safety warnings
• To prevent electric shock, do not remove any cover.
•If anything goes wrong, don't try and fix it yourself, get a qualified service
agent to look at it.
•Do not expose this equipment to dripping or splashing or place any
objects filled with liquids, such as vases, on the equipment.
•Never put a naked flame source on or near the equipment.
• Small parts. Do not let young children play with the equipment.
•There are safety warnings marked on the underside of this product.
Class 1 laser product
This product contains a low power laser device. Invisible laser radia-
tion when open and interlocks defeated.
Avoid exposure to beam.
WARNING:
The mains p The mains plug
shall be the disconnect device and should be freely accessible at all times.
Downloaded from www.vandenborre.be

GB-3
M O D E
PROG.
FOLDERUP
Downloaded from www.vandenborre.be

GB-4
FUNCTION POWER SUPPLY
1. FUNCTION SELECTOR
- Select source of sound CD, OFF, AM or FM,
2. REMOTE CONTROL SENSORE
- Receive the signal from the remote control.
3. CD DOOR
- Press to open/ close the CD door.
4. DISPLAY
- Show the CD functions and AM/FM radio frequency.
5. TUNING CONTROL
- Tune to desired AM//FM radio station.
6. PROG
CD/MP3: - program and review the programmed
tracks number.
7. F
FOLDER
- In Mp3 mode, press to be folder up function.
8. MODE
- Select to different play mode.
9. STEREO HEADPHONE JACK
- 3.5mm stereo headphone jack.
10. SKIP ,
CD/MP3: - skips track backwards or forward.
11. STOP
-Delete program play back
- stops CD playback; erases a CD program.
12.
- Start or pause CD/03 play.
13. VOLUME
- Adjusts volume level.
14. AC INPUT
- Connect the AC power cord to the wall outlet.
15. ANT.
- To improve FM reception.
16. SPEAKER TERMINAL
- to connect the speaker wire.
AC Power
1 . Check if the power voltage, as shown on the
type plate located on the back of the set,
corresponds to your local AC power supply. If it
does not, consult your dealer or service centre
2 . Connect the power cord to the wall outlet. The
power supply is now connected and ready for use.
3 . To switch off completely, unplug the power cord
from the wall outlet.
•Unplug the power cord from the wall outlet to
protect your set during heavy thunderstorms.
•If electric cable is damaged, it must be replaced
by the manufacturer, or by the qualification
persons, in order to avoid a danger.
Downloaded from www.vandenborre.be

BASIC FUNCTIONS RADIO
Switching power on/off: Save energy – For FM, pull out the wire antenna
turn the antenna. Reduce its length if the signal is
To avoid unnecessary energy consumption always too strong (very close to a transmitter).
the source selector to OFF position when you have
– For AM the set is provided with a built-in antenna
GENERAL OPERATION so the
1 . To select your sound source adjust the source antenna by turning the whole set.
selector to CD/OFF/AM/FM.
2 . Adjust the sound with the VOLUME control.
3. To switch off the set, adjust the source selector to
OFF position.
RADIO
Radio reception
1. Slide the FUNCTION selector to a desired AM frequency show on display.
setting - FM or AM.
2. Rotate the TUNING control to find the desired
stations. The AM or FM frequency
NOTE: If you have tuned to an FM
stereo station, the FM stereo LED indicator
will light up. FM frequency show on display.
3. When you have finished listening, slide the
FUNCTION selector to the OFF position to
GB-5
set
the
the
ull
fy
wire antenna is not neede. Direct
switch the power off.
if the station is transmitted in stereo.
shows in the display
finished listening to music.
Downloaded from www.vandenborre.be

CD/MP3 PLAYBACK
COMPATIBLE AUDIO FORMATS
This system is compatible with MPEG1 Audio Layer 3 (MP3) 32, 44.1 or 48kHz formats. The recording format should be in
accordance with ISO9660 CD-ROM file system. MP3 file name requires MP3 or mp3as an extension. Chinese characters
cannot be displayed, although files featuring them can be played.VBR (Variable Bit Rate) files can be played, but playing
time may not be shown correctly. Up to 299 tracks/folders can be played. This system supports playback of songs in
CD-audio (pre-recorded CDs), MP3 and Windows Media formatted Audio (WMA). This system does not support
Digital Rights Management (DRM). This system cannot play songs purchased from iTunes or other songs in AAC format,
songs in ATRAC format or songs purchased from some online music retailers. It may be possible to convert your music
to one of the playable compressed formats, or burn it to an audio CD, depending on the DRM restrictions.
Notice for CDR/CDRW/MP3 users:
Depending on the type of CD burner the disc brand, MP3 compression level and the burning speed, some reading
problems may occur.
PLAYING A CD
This CD-player can play Audio Discs, MP3, CD-R and
CD-Rewritable. Do not try to play CD-ROM, CDi, VCD,
DVD or computer CD.
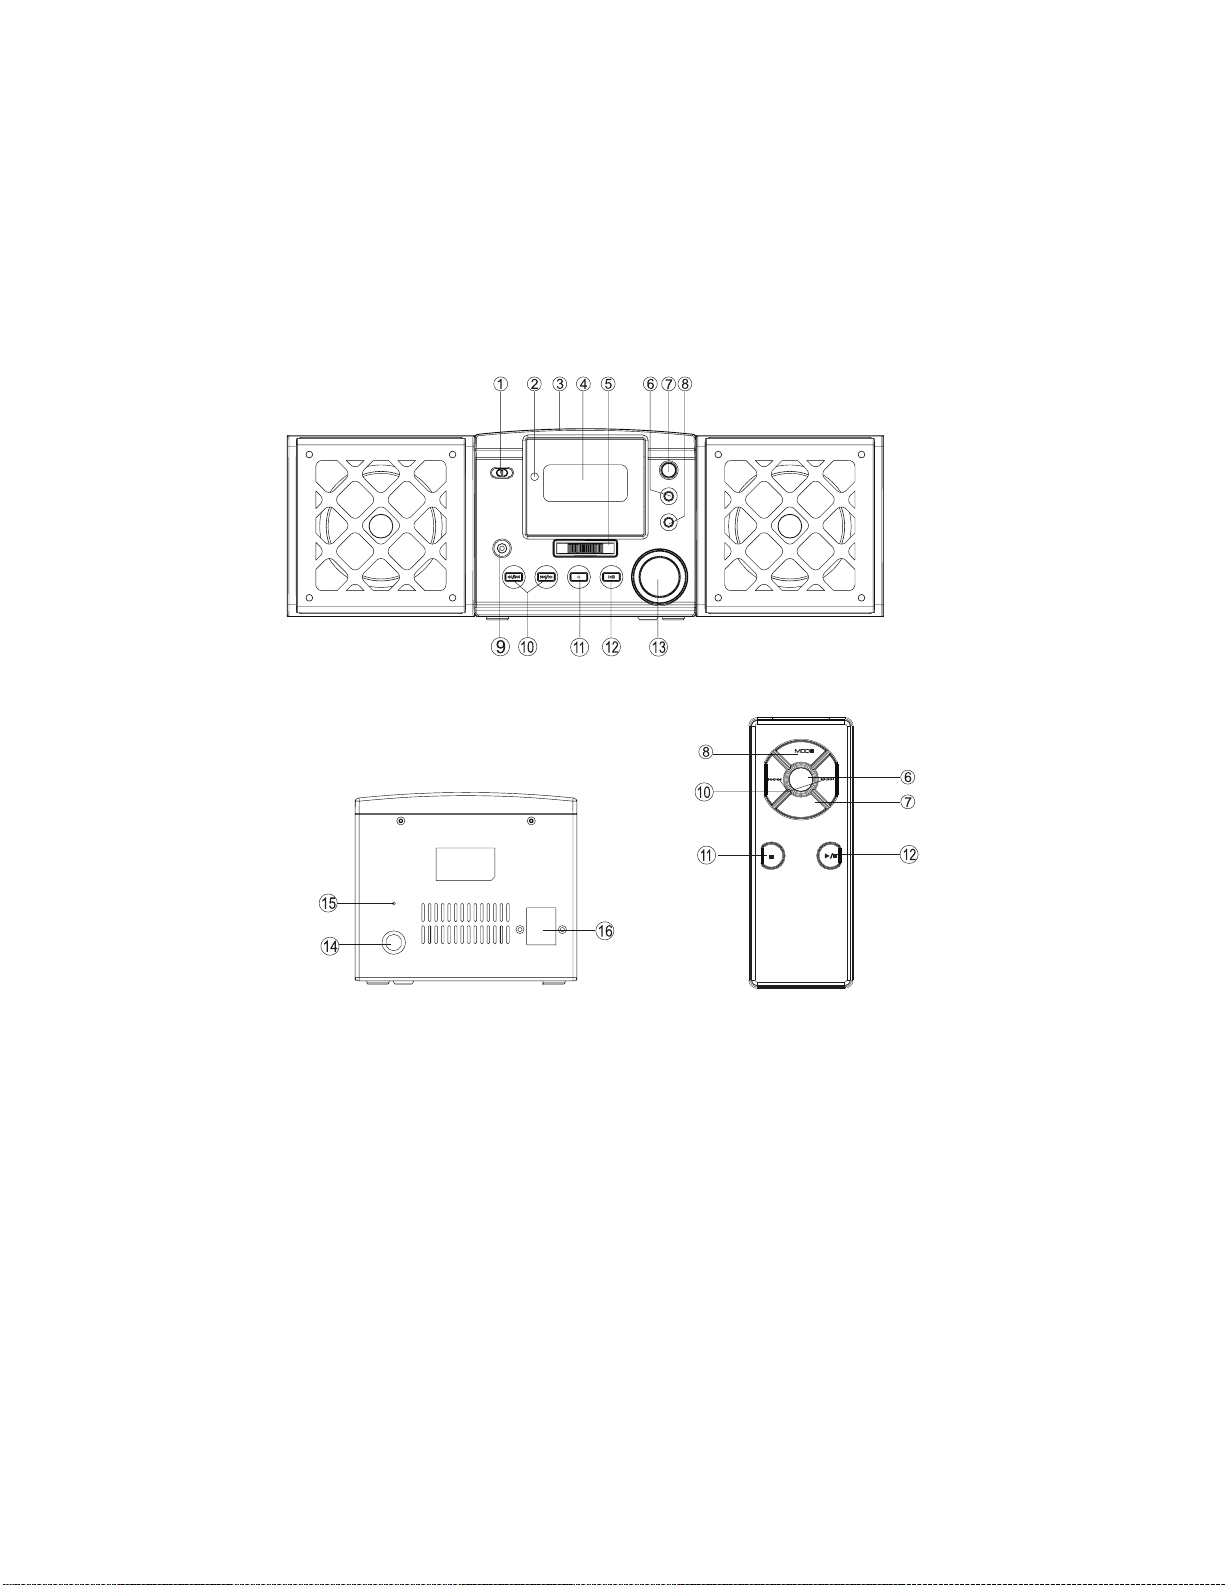
1. Adjust the source selector to CD.
Display: shows -
-- -
and
briefly.
2. To open the CD door, press the CD door at the edge
marked OPEN/CLOSE.
3. Insert a CD, CD-R or CD-RW with the printed side
facing up and press the CD dclose .
4. Press on the main unit or remote control to
start playback.
5. To pause playback press
- To resume, press again.
6. To stop CD playback, press button.
Note: CD play will also stop when:
– you open the CD compartment;
– you select the function switch to OFF ;
– the CD has reached the end.
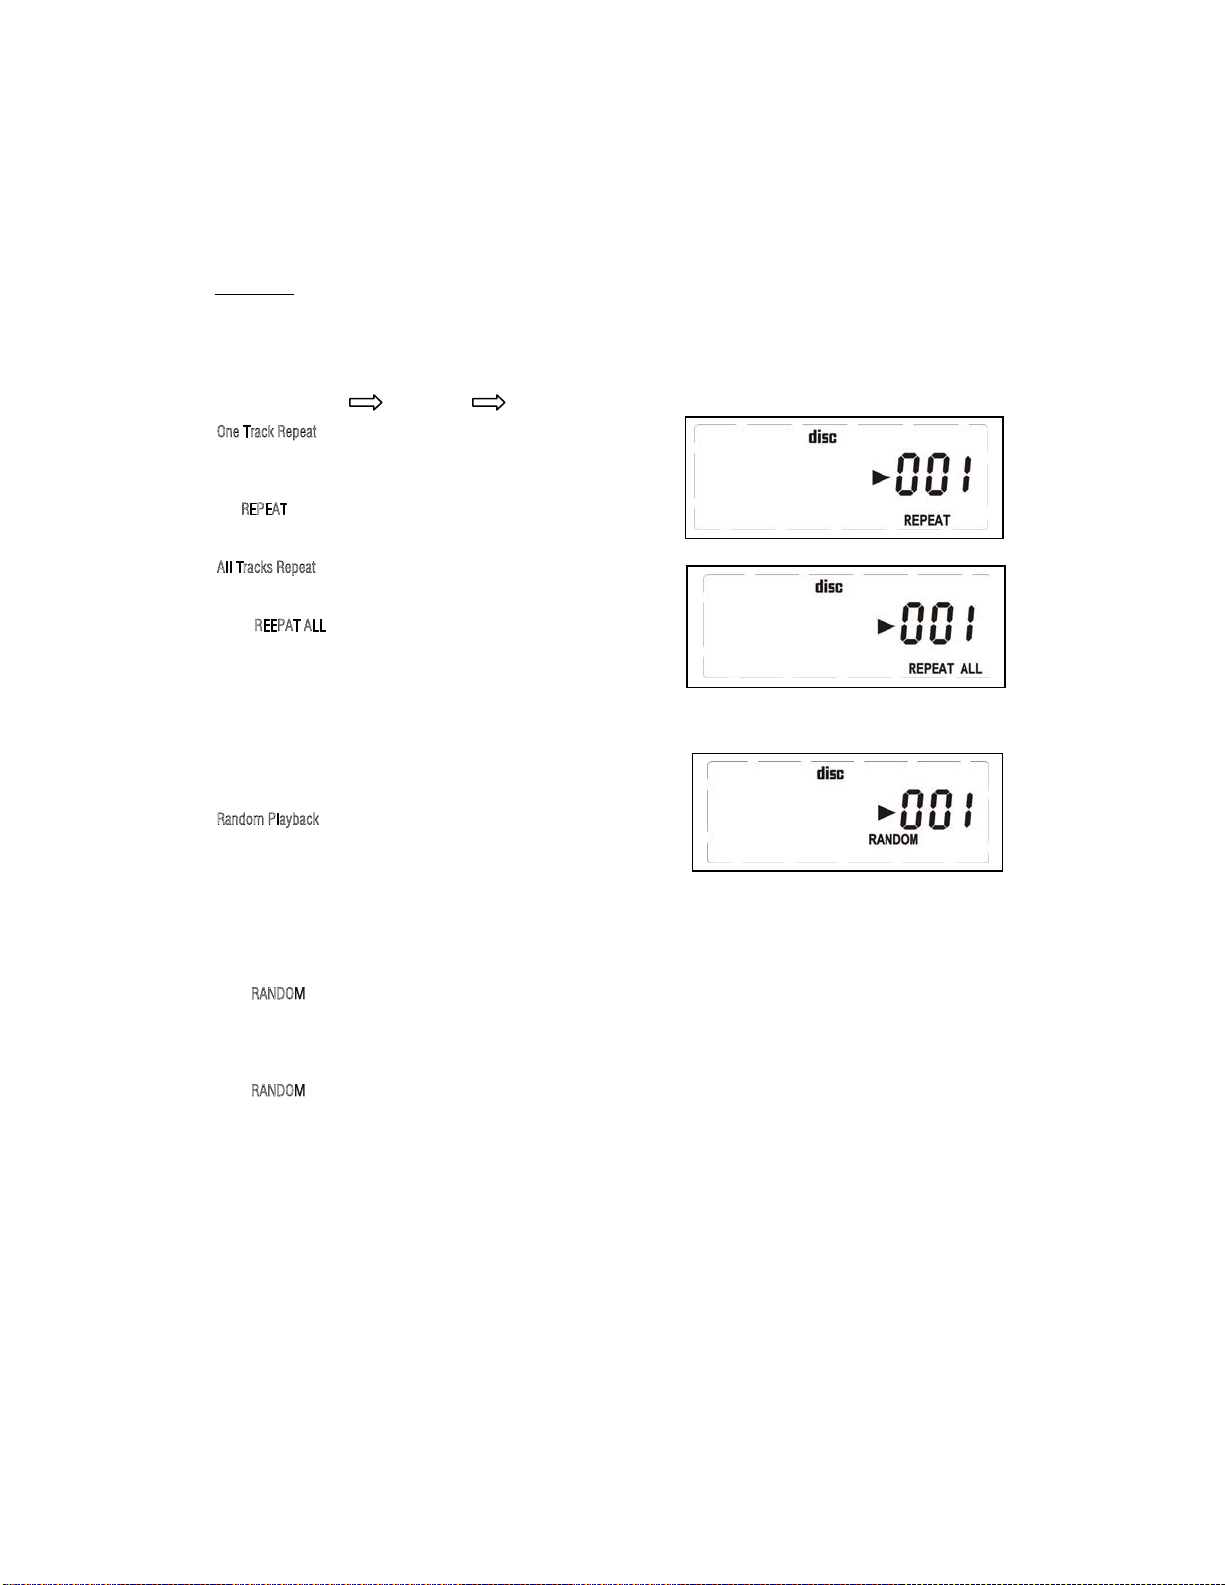
SELECTING A DIFFERENT TRACK
During playback you can use or to select a
particular track.
•If you have selected a track number in the stop or
pause position, press or to start playback.
•Press once briefly for the next track, or press
repeatedly until the desired track number appears
in the display.
•Press once briefly to return to the beginning of
a current track.
•Press more than once briefly for a previous track.
GB-6
Programming track numbers
You may store up to 20 tracks in the desired
sequence. store any track more than once.
1. the PROG. button on main unit or remote, press
or for your desired track.
* You can select the Album by
2. When your chosen track number appears, press
PROG once to store the track.
The display shows PROG and P
P02
briefly
followed by your selected track number.
3. Repeat steps 1 to 2 to select and store all desired
tracks in this way.
4. To play your program, press .
Reviewing your set program
• After playing at least one programmed track, press
or , display will show your stored track numbers.
Erasing a program
You can erase the contents of the memory by:
– opening the CD door;
– slide the function selector to OFF source;
– In Stop mode, press button in twice.
Press
You can
the
repeatedly pressing the
STOP button on the main unit.
For MP3 Playback you can toggle through the available
folders (if supported by the disc) by repeatedly pressing
the FOLDER button on the main unit or the remote.
Downloaded from www.vandenborre.be

PLAY MODE:
Repeat Playback
The Repeat function in this system allows you to continuously repeat a single track, or the entire disc.
The Repeat function can be activated during playback or while the player is stopped.
Repeat Repeat all Random
ne Track Repeat
• Select the track to be repeated and begin playback.
• Press MODE button on the main unit or remote control once.
The REPEAT indicator appears in the display and the selected track
will be repeated continuously.
All Tracks Repeat
• Load the disc in the player and begin playback.
• Press the MODE button on the main unit or remote control twice
• The REEPAT ALL indicator appears in the display. All tracks on the disc
will be repeated continuously.
the “ REPEAT, REPEAT ALL, indicators disappear.
Repeat mode can also be canceled by opening the CD tray, switching
to the AM/FM , you can set to OFF position to return the
system to the Off mode.
Random Playback
The Random playback feature allows you play all the tracks on the disc in
random order.
You can select random playback while the disc is playing or when the player
is stopped.
• Load a CD in the player as usual and then press the MODE button on the remote or on the unit repeatedly until.
The “ RANDOM ” indicator appears in the display. The player will randomly select a track from the
disc and begin playback. Random playback will continue until all tracks have played once, then the
player stops.
The “ RANDOM ” indicator disappears and normal playback will resume from that point.
GB-7
To cancel Repeat playback mode press the STOP button
• To stop Random playback, press the STOP button on the main unit or remote control again.
Downloaded from www.vandenborre.be

MP3/WMA CD Repeat Playback
There are 3 Repeat Playback options with MP3/WMA CDs. In addition to the Repeat 1 Track and Repeat
All Tracks options which are the same for normal CDs, you may also select Directory Repeat Mode to
repeat all the tracks contained in a single Directory.
Repeat Repeat ALBUM Repeat all
To repeat a single track on an MP3/WMA CD
• Select the track to be repeated and start playback as usual.
•
The “REPEAT” indicator appears and the selected track will be repeated
continuously.
To repeat all the tracks in a single Folder (or Album)
• Begin playback as usual.
• Press the MODE button twice.
Both the "ALBUM" and “REPEAT” indicators
the tracks in the directory will be repeated continuously.
To repeat all the tracks on an MP3/WMA CD
• Select the directory to be repeat playback as usual.
•
The “REPEAT ALL” indicator appear on the display and all the tracks on the
disc will be repeated continuously.
To cancel Repeat Playback
• Press the MODE button until the “REPEAT, REEPAT ALBUM, REPEAT ALL,
indicators disappear.
MP3/WMA Random Playback Modes
This function is operated the same way for MP3/WMA CDs as they do for normal CDs.
Random Playback
• Load an MP3/WMA CD in the player. Wait until the reading process is
completed.
• Press the MODE button until the “RANDOM” indicator appears in
the display. The player will play all the tracks on the disc in Random order.
GB-8
s
HEADPHONES
Turn down the volume and plug a standard set of headphones into the headphones socket on the front of the main unit,
then set the required listening volume.
HEADPHONE VOLUME WARNING
Connect headphones with the volume set low and increase it if required. Prolonged listening through some headphones
at high volume settings can result in hearing damage.
Press the MODE button on the remote control or the main unit once.
flash in the display and all
current
Press the MODE button on the remote or on the main unit three times.
Downloaded from www.vandenborre.be

MAINTENANCE & SAFETY
Precautions & General Maintenance
•Place the set on a hard and flat surface so that the
system does not tilt.
•Do not expose the set, batteries or CDs to
humidity, rain, sand or excessive heat caused by
heating equipment or direct sunlight.
•Do not cover the set. Adequate ventilation with a
minimum gap of 6 inches between the ventilation
holes and surrounding surfaces is necessary to
prevent heat build-up.
•The mechanical parts of the set contain self-
lubricating bearings and must not be oiled or
lubricated.
•To clean the set, use a soft dry cloth. Do not use
any cleaning agents containing alcohol, ammonia,
benzene or abrasives as these may harm the
housing.
CD player and CD handling
•The lens of the CD player should never be touched!
•Sudden changes in the surrounding temperature can cause condensation to form and the lens of your CD player to
cloud over. Playing a CD is then not possible. Do not attempt to clean the lens but leave the set in a warm environment
until the moisture evaporates.
•Always close the CD door to keep the CD compartment dust-free. To clean, dust the compartment with a soft dry cloth.
•To clean the CD, wipe in a straight line from the centre towards the edge using a soft, lint-free cloth. Do not use cleaning
agents as they may damage the disc.
•Never write on a CD or attach any stickers to it.
GB-9
X
A pleine puissance, l’écoute
prolongée du baladeur peut
endommager l’oreille de l’utilisateur.
Downloaded from www.vandenborre.be

Troubleshooting
If you have any of the problems listed below please use this troubleshooting guide to try and solve them.
A little time spent in this way may save you the inconvenience of returning your equipment.
Problems Items to check
Power
System does not turn on, or
does not respond to
controls.
xMake sure AC mains plug is secure in the outlet, and outlet has power.
xPull the mains plug out for 1 minute then re-connect and try again.If this
does not work, leave the unit unplugged before seeking advice.
CD
Disc won't play xMake sure FUNCTION button is set to CD.
xMake sure disc label is facing up.
xMake sure disc is clean and not damaged. Try another disc.
xPause mode is activated; press the play-pause button again.
Sound skips or pickup
sticks
xMake sure disc is clean and not badly scratched.
xVibration can cause the disc to skip.
RADIO
Poor FM reception xMake sure the FM antenna is extended.
xTry rotating the unit.
xMove the unit away from other operating electrical equipment such as
motorised appliances, transformers, televisions and microwave ovens.
xPlease be aware the structure of some buildings blocks radio waves.
NO SOUND xTurn the volume up.
xAre the headphones connected to the unit, remove them.
REMOTE
Wrong functions or
Short range
xInsert new batteries
xAim from straight in front of the remote sensor.
GB-10
Downloaded from www.vandenborre.be

Specifications:
General
Power supply : AC 230 V~ 50 Hz
Power consumption : 14 Watts
Dimensions of unit : 458(W) X 230 (H) X 147 (D) mm.
Weight (Main Unit & Speaker Box ) : 3.20 Kgs
Tuner Section
Frequency range : AM 540 - 1600 KHz.
: FM 88 - 108 MHz.
Amplifier Section
Output Power (RMS) : 2 x 1.5Watt
Speaker System
Speaker : 1 Way 2 speakers
Impedance : 8 Ohms 3W
Specification subjects to be changed without notice.
GB-11
Downloaded from www.vandenborre.be

IMPORTANT DISPOSAL INSTRUCTIONS
As a responsible retailer we care about the environment.
As such we urge you to follow the correct disposal procedure for your product,
batteries and packaging materials. This will help conserve natural recourses
and ensure that it is recycled in a manner that protects health and the
environment.
You must dispose of this product and its packaging according to local laws and regulations. Because
this product contains electronic components and sometimes batteries, the product and its accessories
must be disposed of separately from household waste when the product reaches its end of life.
Contact your local authority to learn about disposal and recycling.
The product and if applicable, its batteries should be taken to your local collection point for recycling.
Some collection points accept products free of charge.
The battery type used in this product is 1X CR2025 Lithium.
This battery is located in the remote and is readily accessible.
Remove the battery cover located on the bottom of the remote. Remove the battery from the battery
compartment.This battery must be disposed of at your local collection point.
If something doesn't seem to work
If there is something about your appliance which you do not understand and you live in the UK
you can phone our help line during normal office hours on: 0113 2793520
Calls are charged at standard rates.
We apologise for any inconvenience caused by minor inconsistencies in these
instructions, which may occur as a result of product improvement and development.
Kesa U.K HU1 3AU 28 / 03 / 2008
GB-12
Downloaded from www.vandenborre.be

FR-1
Informations de sécurité
Alimentation électrique
Votre appareil a été conçu pour fonctionner à partir d'une prise secteur 230 V, CA. Son
branchement à une autre source de courant risque de l'endommager.
Prise du cordon
Nous avons prévu une prise standard pour le cordon d'alimentation de votre appareil.
• Pour remplacer le cordon d'alimentation, adressez-vous au constructeur, à son centre de
service ou à une personne qualifiée pour éviter tout risque d'électrocution.
• Si vous remplacez la prise même, jetez immédiatement l'ancienne avant que quelqu'un
ne l'introduise, par mégarde, dans une prise secteur qui fonctionne.
• Si vous changez la prise et que celle-ci est protégée par un fusible, enlevez le fusible
avant de jeter la prise.
• Observez scrupuleusement les instructions de câblage fournies avec la nouvelle prise.
• N'utilisez pas la prise sans le cache-fusible.
Câblage de la prise pour le Royaume-Uni
Si vous montez une nouvelle prise sur le cordon d'alimentation de votre appareil,
branchez les fils comme suit :
• Branchez le fil marron sur la borne marquée de la lettre L.
• Branchez le fil bleu sur la borne marquée de la lettre N.
• Ne branchez aucun fil sur la borne marquée de la lettre E ou du symbole ( ).
• Vérifiez que le fil est maintenu fermement dans la bride.
Fusible de prise
La loi anglaise exige que les prises standard (BS1363) soient équipées d'un fusible 3
ampères (type BS1362). Remplacez la prise ou tout le cordon en cas de perte du
cache-fusible.
Symboles
Cet appareil est doublement isolé et donc
ne nécessite aucun branchement à la terre.
Cette mention indique que l'appareil est
conforme aux normes européennes en
matière de sécurité et de compatibilité
magnétique.
L'électronique de votre appareil est
alimentée par une tension dangereuse ;
attention aux risques d'électrocution.
Ce guide contient des instructions
d'utilisation et d'entretien importantes.
Précautions d'utilisation et d'entretien de votre équipement audio
Nous avons conçu et fabriqué cet appareil en accord avec toutes les exigences
européennes en matière de sécurité, mais il vous incombe de l'entretenir et de l'utiliser
conformément à toutes nos instructions pour le conserver longtemps en parfait état de
marche et ne pas vous exposer à un danger. Voici quelques conseils pour cela.
Lisez attentivement toutes les instructions avant d'utiliser votre appareil.
Protégez le cordon d'alimentation. Déployez le cordon d'alimentation de manière
qu'il ne puisse être écrasé, piétiné, arraché ou coupé.
Ne le posez pas dans un environnement difficile, par exemple une pièce
humide, un air fortement humide, des vibrations, des températures très élevées ou très
basses, les rayons directs du soleil ou un endroit excessivement poussiéreux.
N'insérez aucun objet par les fentes et les ouvertures d'aération.
Pour économiser de l'énergie, éteignez votre appareil et débranchez-le du secteur
lorsque vous ne l'utilisez pas, à moins qu'une fonction ne requière une alimentation continue.
N'utilisez pas votre appareil s'il a été en contact avec un liquide, s'il est endommagé
d'une manière ou d'une autre ou s'il ne fonctionne pas normalement. Dans l'un de ces trois
cas, débranchez immédiatement l'appareil du secteur et demandez conseil à un technicien
qualifié.
Si vous constatez un dommage sur le cordon d'alimentation, apportez votre appareil au
constructeur, à un centre de service après-vente ou à un technicien qualifié pour le
remplacer ; cette opération présente, en effet, un risque d'électrocution.
Downloaded from www.vandenborre.be

FR-2
Cet appareil est destiné à un usage domestique uniquement ;
toute autre utilisation invalide la garantie et vous expose à un
danger.
Aération
Posez votre appareil sur une surface stable et plane, non exposée aux rayons
directs du soleil et éloignée de toute source de chaleur. Pour une installation
à l'intérieur d'un meuble, prévoyez un espace libre d'au moins 10 cm tout autour
de l'appareil. Veillez à ce que les ouvertures d'aération soient constamment
dégagées, y compris celles se trouvant sous l'appareil. Toute surchauffe réduit la
durée de vie de l'appareil et présente des risques de début d'incendie.
Nettoyage
Débranchez l'appareil du secteur avant toute opération de nettoyage et utilisez
uniquement un chiffon légèrement humide. Les solvants chimiques et détergents
puissants risquent d'endommager le revêtement.
Piles
Retirez les piles de l'appareil lorsque vous n'envisagez pas d'utiliser ce dernier
avant longtemps. Elles risquent sinon de se détériorer et de fuir, et ce faisant
d'endommager l'appareil sans pouvoir recourir à la garantie. Déposez vos piles
usagées auprès d'installation de recyclage pour protéger votre environnement.
Ne jetez pas les piles dans le feu, elles risquent d'exploser.
Avertissements de sécurité importants
• N'ouvrez pas le couvercle de votre appareil pour ne pas risquer une
électrocution.
• En cas d'anomalie, n'essayez pas de résoudre vous-même le problème,
mais
apportez votre appareil à un technicien qualifié.
• Évitez tout contact de votre appareil avec un liquide et ne posez aucun
récipient contenant un liquide, par exemple un vase, sur votre appareil.
• N'approchez aucune flamme nue de votre appareil.
• Votre appareil contient de petites pièces. Ne laissez pas les enfants jouer
avec.
• Des avertissements de sécurité sont marqués en dessous de cet appareil.
Produit laser de classe 1
Cet appareil intègre un dispositif laser basse tension.
Risque d’exposition à des rayons laser lorsque l’appareil
est ouvert ou le système de verrouillage est inopérant.
Évitez toute exposition directe au rayon laser.
AVERTISSEMENT :
La déconnexion totale du secteur s'effectue en débranchant le cordon
d'alimentation de la prise secteur, aussi veillez à ce que celle-ci soit
tout le temps accessible.
Downloaded from www.vandenborre.be

FR-3
M O D E
PROG.
FOLDERUP
Downloaded from www.vandenborre.be

FR-4
ÉLÉMENTS DE COMMANDE
1. SÉLECTEUR DE FONCTION
- Sélectionne la source audio : CD, OFF (arrêt),
AM ou FM
2. DÉTECTEUR DE LA TÉLÉCOMMANDE
- Détecte les signaux envoyés par la télécommande.
3. PORTE DU COMPARTIMENT DE CD
- Appuyez pour ouvrir/fermer la porte du
compartiment de CD.
4. ÉCRAN
- Affiche les fonctions de lecture CD et la fréquence
radio AM/FM.
5. RECHERCHE DE STATION
- Change la fréquence radio AM//FM.
6. PROG
CD/MP3 : - programme une liste de titres que vous
voulez écouter et permet de parcourir les titres
programmés.
7. RÉPERTOIRE
- Arrête la lecture d'un CD ; efface un programme de
lecture CD.
8. MODE
-Sélectionnez un mode de lecture différent
9. Connecteur pour des écouteurs/un casque stéréo
- Sortie casque/écouteurs 3,5 mm
10. DEFILEMENT ,
CD/MP3 : - parcourt les titres en avant ou en arrière.
11. STOP
- Annule la lecture d'un programme
12.
- Démarre la lecture d'un CD/MP3 ou marque une
pause dans la lecture.
13. VOLUME
- Ajuste le niveau sonore.
14. CONNECTEUR POUR L'ALIMENTATION ELECTRIQUE
- Reçoit le cordon d'alimentation pour brancher
l'appareil sur le secteur.
15. Antenne FM
- Permet d'améliorer la réception FM.
16. BORNES DE CONNEXION DES HAUT-PARLEURS
- Reçoit les fils de liaison aux haut-parleurs.
ALIMENTATION ELECTRIQUE
Alimentation secteur CA
1 . Vérifiez que le courant fourni par la prise
secteur correspond à la tension indiquée
sur la plaque de spécifications fixée à
l'arrière de votre appareil. Si ce n'est pas
le cas, consultez votre revendeur ou un
centre de service.
2 . Branchez le cordon d'alimentation sur le
secteur. Votre appareil est alimenté en
courant et est prêt à fonctionner.
3 . Pour le déconnecter complètement du
secteur, retirez le cordon d'alimentation
de la prise secteur.
• Pour protéger votre appareil par temps
orageux, débranchez-le de la prise secteur.
• Pour remplacer le cordon d'alimentation,
adressez-vous au constructeur, à son
centre de service ou à une personne
qualifiée pour éviter tout risque
d'électrocution.
Downloaded from www.vandenborre.be

FR-5
FONCTIONS PRINCIPALES
Mise en marche/arrêt : économie d'énergie
Pour éviter une consommation électrique inutile,
basculez toujours le sélecteur de FONCTION sur la
position OFF lorsque vous n'utilisez pas votre appareil.
PROCÉDURE GÉNÉRALE
1 Sélectionnez une source audio (CD/OFF/AM/FM) à
l'aide du sélecteur de FONCTION.
2 . Tournez le bouton de VOLUME jusqu'à entendre la
musique à un niveau sonore confortable.
3. Pour éteindre votre appareil, amenez le sélecteur de
fonction sur la position Arrêt (OFF).
RADIO
Réception de la radio
1. Poussez le sélecteur de FONCTION sur la bande de
fréquences FM ou AM.
2. Tournez le bouton de recherche de station (TUNING)
jusqu'à capter la station que vous voulez écouter.
La fréquence AM ou FM correspondante s'affiche
sur l'écran.
REMARQUE : Si vous écoutez une station FM diffusée en
stéréo, l'indicateur LED de la FM stéréo s'allume.
3. Dès que vous ne voulez plus écouter la radio, poussez
le sélecteur de FONCTION sur la position Arrêt (OFF).
– Pour écouter la FM, déployez
complètement l'antenne. Rentrez-la
quelque peu si le signal est trop fort
(vous êtes très proche de l'émetteur).
– Pour écouter l'AM, votre appareil
intègre une antenne et vous n'avez
rien à faire. Pour améliorer la réception,
essayez diverses orientations de
l'appareil.
RADIO
La fréquence AM est affichée sur l'écran
La fréquence FM est affichée sur l'écran
Downloaded from www.vandenborre.be

FR-6
LECTURE CD/MP3
FORMATS AUDIO COMPATIBLES
Votre appareil lit les formats MPEG1 Audio Layer 3 (MP3) 32, 44,1 ou 48 kHz, enregistrés conformément
avec le système de fichiers ISO9660 CD-ROM. Tous les fichiers MP3 doivent se terminer avec une extension
MP3 ou mp3. Les noms comportant des caractères spéciaux, par exemple des caractères chinois, ne sont
pas affichés sur l'écran, mais vous pouvez malgré tout écouter les fichiers associés. Votre appareil lit les
fichiers VBR (débit binaire variable) mais le temps de lecture affiché ne sera pas f orcément exact. Il gère
jusqu'à 299 titres/dossiers au format CD-audio (CD pré-enregistré), MP3 ou WMA (Windows Media Audio).
Il ne prend pas en charge la fonction DRM (Gestion des droits numérique) et ne lit pas les titres achetés sur
iTunes, les titres au format AAC ou ATRAC et les titres achetés dans un magasin de musique en ligne, sauf
si vous pouvez les convertir dans l'un des formats qu'il lit ou graver un CD audio de ces titres, selon les
restrictions DRM.
Note à l'attention des utilisateurs de CDR/CDRW/MP3 :
La qualité de la lecture de vos CD varie selon le logiciel de gravure, la marque des disques, le niveau de
compression MP3 et la vitesse de gravure que vous utilisez.
LECTURE D'UN CD
Votre lecteur de CD lit les disques Audio,
MP3, CD-R et CD-réinscriptible, mais
non les CD-ROM, CDi, VCD, DVD et
CD d'ordinateur.
1. Sélectionnez la source audio CD.
L'écran affiche brièvement - - -.
2. Appuyez sur le bord de la porte du compartiment
de disque, marqué OPEN/CLOSE, pour découvrir le
plateau de disque.
3. Posez un CD, CD-R ou CD-RW sur le plateau,
la face imprimée orientée vers le haut, et appuyez sur
le bord de la porte pour la refermer.
4. Appuyez sur la touche de l'appareil ou de la
télécommande pour démarrer la lecture.
5. Réappuyez sur cette touche pour marquer une
pause dans la lecture.
- Réappuyez sur pour reprendre la lecture.
6. Pour arrêter complètement la lecture, appuyez sur
la touche .
Remarque : la lecture s'arrête également lorsque :
– vous ouvrez le compartiment de CD ;
– vous basculez le sélecteur de fonction sur la
position arrêt (OFF) ;
– le lecteur a terminé de lire tous les titres du CD.
SÉLECTION D'UN AUTRE TITRE
Vous sélectionnez un autre titre à l'aide des
touches et .
• Si vous avez sélectionné un numéro de titre depuis
le mode stop ou pause, appuyez sur la touche
ou pour démarrer la lecture.
• Appuyez une fois rapidement pour lire le titre
suivant ou appuyez sur autant de fois que
nécessaire pour afficher le numéro du titre que vous
voulez écouter sur l'écran.
• Appuyez une fois rapidement sur pour revenir
au début du titre actuel.
• Appuyez une fois de plus sur pour revenir au
titre précédent.
Pour changer de dossier si votre disque MP3 comporte
plusieurs dossiers, appuyez sur la touche FOLDER de
l'appareil depuis le mode stop, autant de fois que nécessaire.
Programmation d'une liste de titres
Vous pouvez créer une liste d'au plus 20 titres
que vous voulez écouter dans l'ordre que vous
désirez. Un même titre peut apparaître
plusieurs fois.
1. Appuyez sur la touche PROG. de l'appareil
ou de la télécommande et sélectionnez un
premier titre à l'aide des touches et .
* Pour sélectionner tout l'album, appuyez à
plusieurs reprises sur la touche STOP de l'appareil.
2. Dès que le numéro de ce titre apparaît sur
l'écran, appuyez une fois sur PROG pour
l'enregistrer dans la mémoire de l'appareil.
L'écran affiche PROG et P02, suivi du numéro
de titre sélectionné.
3. Répétez les étapes 1 et 2 pour tous les
autres titres que vous voulez programmer.
4. Appuyez sur la touche pour
démarrer la lecture de la liste.
Affichage des titres programmés
• Procédez à la lecture d'au moins un titre de
cette liste puis appuyez sur ou pour
afficher les numéros des titres programmés.
Effacement de la liste programmée
Pour effacer la liste programmée que vous
venez de créer :
– ouvrez le compartiment de disque ;
– basculez le sélecteur de fonction sur la
position Arrêt (OFF) ;
– appuyez deux fois sur la touche depuis
le mode Stop.
Downloaded from www.vandenborre.be

FR-7
MODE DE LECTURE
Mode répétition
Vous pouvez réécouter plusieurs fois un même titre ou tout le disque. Activez pour cela la fonction
Répéter, pendant une lecture ou à l'arrêt.
Répéter Répéter tout Aléatoire
Répéter un titre
• Sélectionnez le titre et démarrez la lecture.
• Appuyez une fois sur la touche MODE de l'appareil ou
de la télécommande.
L'indication REPEAT apparaît sur l'écran et le lecteur termine
la lecture en cours puis recommence.
Répéter tout le disque
• Posez le disque sur le plateau et démarrez la lecture.
• Appuyez deux fois sur la touche MODE de l'appareil ou la
télécommande.
• L'indication REEPAT ALL apparaît sur l'écran. Le lecteur lit
tous les titres du disque puis recommence.
Pour désactiver le mode répétition, appuyez sur la touche
STOP, autant de fois que nécessaire pour faire disparaître
les indications REPEAT et REPEAT ALL sur l'écran.
Autre méthode : ouvrez le compartiment de disque, passez en
mode AM/FM ou USB, ou basculez le sélecteur de fonction sur
la position OFF pour éteindre l'appareil.
Lecture aléatoire
Le mode aléatoire vous permet de lire les titres du disque dans
un ordre quelconque.
Vous activez ce mode alors que le lecteur lit un disque ou est arrêté.
• Chargez un CD comme indiqué précédemment et appuyez sur la touche MODE de votre appareil
ou de la télécommande.
L'indication RANDOM apparaît sur l'écran. Le lecteur lit un premier titre choisi totalement au hasard.
Il procède ainsi avec tous les titres du disque puis s'arrête.
• Pour interrompre à tout moment une lecture aléatoire, appuyez sur la touche STOP de votre
appareil ou de la télécommande. L'indication RANDOM disparaît de l'écran et le lecteur revient en mode de lecture normal.
Downloaded from www.vandenborre.be
Table of contents