Prolux Hard Floor Cleaner User manual
Prolux Hard Floor Cleaner
Owners Manual
For your safety please read the Owners Manual in its entirety

Congratulations on your purchase of your new Prolux Hardfloor Polisher and Cleaner! With the Prolux
Hardfloor Cleaner you can quickly clean, scrub, polish, buff, wax, and shampoo. From cleaning floors to
scrubbing tile to polishing floors the Prolux Hardfloor Cleaner is designed to do it all. With its 2 year
warranty, simple to use design, and multiple cleaning attachments it is designed to be one of your most used
appliances.

Index Page
Product Specifications …...........................................................................................3
Safety Instructions….….…........................................................................................3
Parts List & Unit Description….…………………………………………………….4
Assembling the Unit …....…......................................................................................7
Using the Unit in Waxing/Polishing/Scrubbing/Waxing............................................9
Storing the Unit…………………...………………………….…………………….14
Suggest Settings for Cleaning different floor surfaces..............................................17
Polishing Precautions......…......................................................................................18
Frequently Asked Questions……..............................................................................19
Warranty Information…………..........…..................................................................20
Specifications:
•Can be used to clean any hard floor surface from laminate to hardwood to tile.
•Can clean, buff, scrub, polish, wax, shampoo and also spray.
•Uses Different Cleaning brushes from Aggressive pads to fine polishing pads.
•Lightweight and only weights pounds.
•25 foot long power cord.
•Telescoping Wand for different height of users.
•Only Weights 7 lbs
•Ergonomic Handle which folds into buffing T handle.
•400 Watt 120 Volt Motor motor which powers 2 scrubbing/polishing pads.
•2 Year Factory Warranty.
•Designed to save you time.
Safety Instructions:
·This floor waxing machine is only used for household rather than commercial waxing or other
outdoor purposes.
·Please carefully read the Operating Instruction before using this floor waxing machine to ensure
operation safety and correctness.
·To prevent electric leakage or electric shock, this floor cleaning machine can’t be placed in water
or cleaned with water directly.
·This floor cleaning machine is not a toy, no children can operate this floor waxing machine
without permission or get close to the operating floor waxing machine.
·Before starting this floor waxing machine, please make the handle is locked vertical first and then
insert the power plug in the wall outlet.

·During operation of the floor waxing machine, don’t tilt the waxing head or insert hands or other
body parts into the bottom of the waxing head to prevent danger.
·When stopping using this floor cleaning machine or changing discs, please remove the power
plug firstly.
·When using this floor waxing machine, please don’t crush or run it over the electric power wires.
·Don’t use this floor waxing machine on wet ground environment or any ground containing liquid,
lit cigarette, burning ash or other high temperature places.
·Wet cloth with water shall be used for cleaning the floor waxing machine, otherwise it may cause
damage to the unit.
·When any part of this floor waxing machine has failure, please stop using this floor waxing
machine. Please your authorized dealer you bought the unit from.
If the flexible power wire is damaged, it shall be replaced by authorized service center.
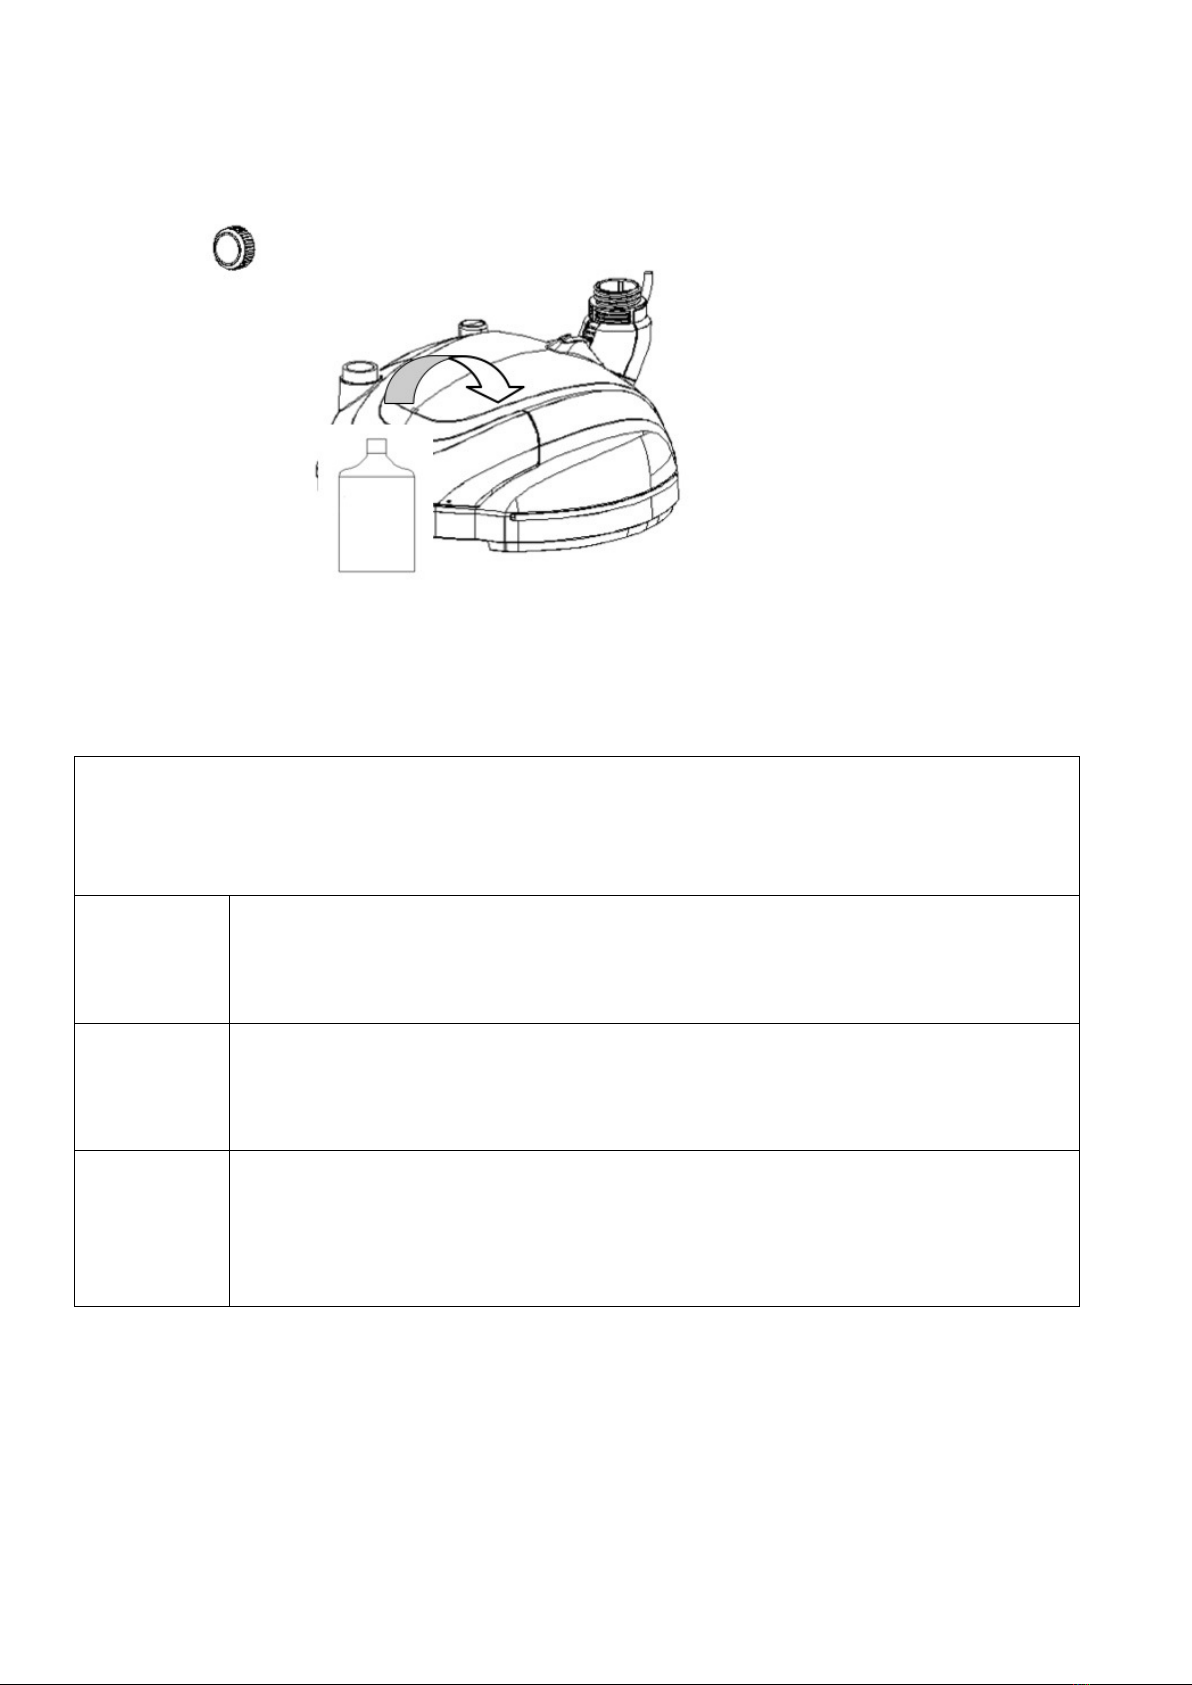
Included Parts List
Packing List
Name
Quantity
Polishing Head
1
Handle component
1
Extension pipe component
1
Floor polishing fine Pad
2
Floor polishing scouring pad
2
Fine Polishing Seat
2
Rough Polishing Brush Disc
2
Operating Instruction
1

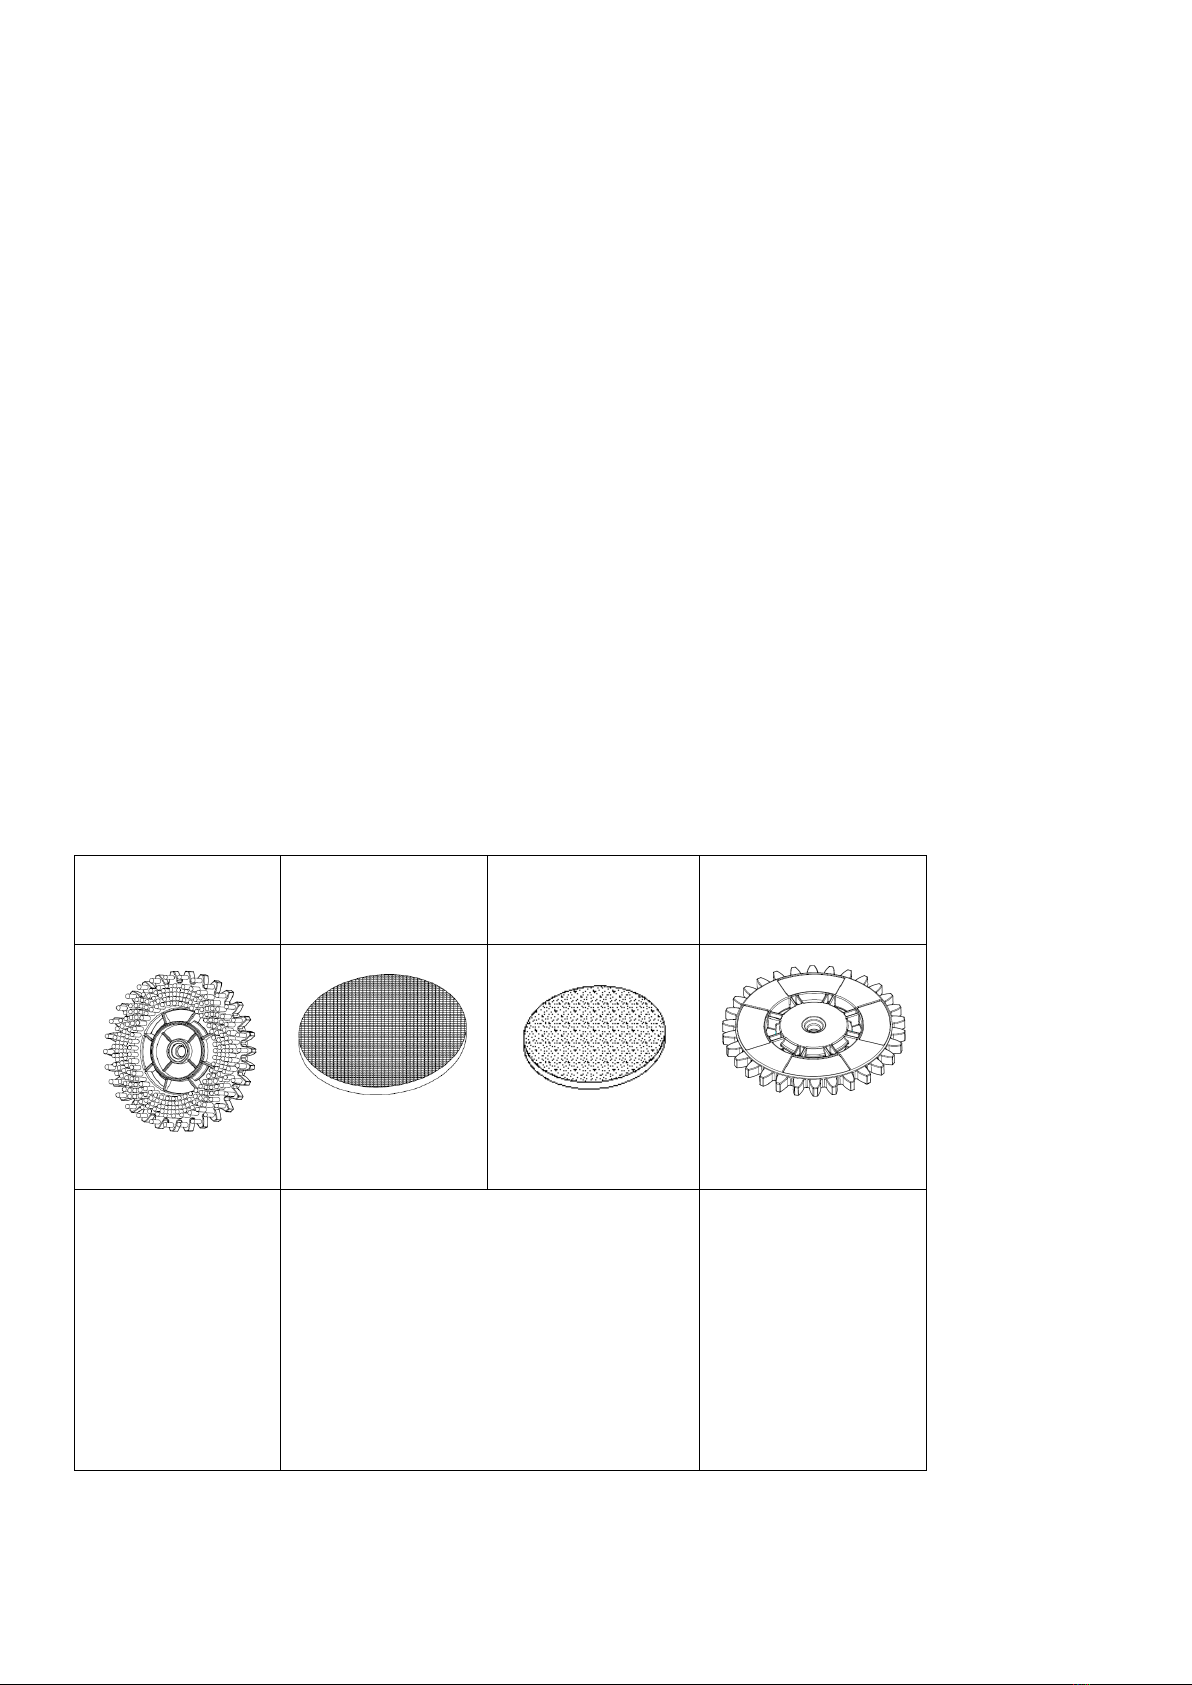
Floor polishing fine pad
Floor polishing scouring pad
Fine Polishing Seat
Rough Polishing Brush Disc
Parts Description
·Rough Polishing Brush Disc:
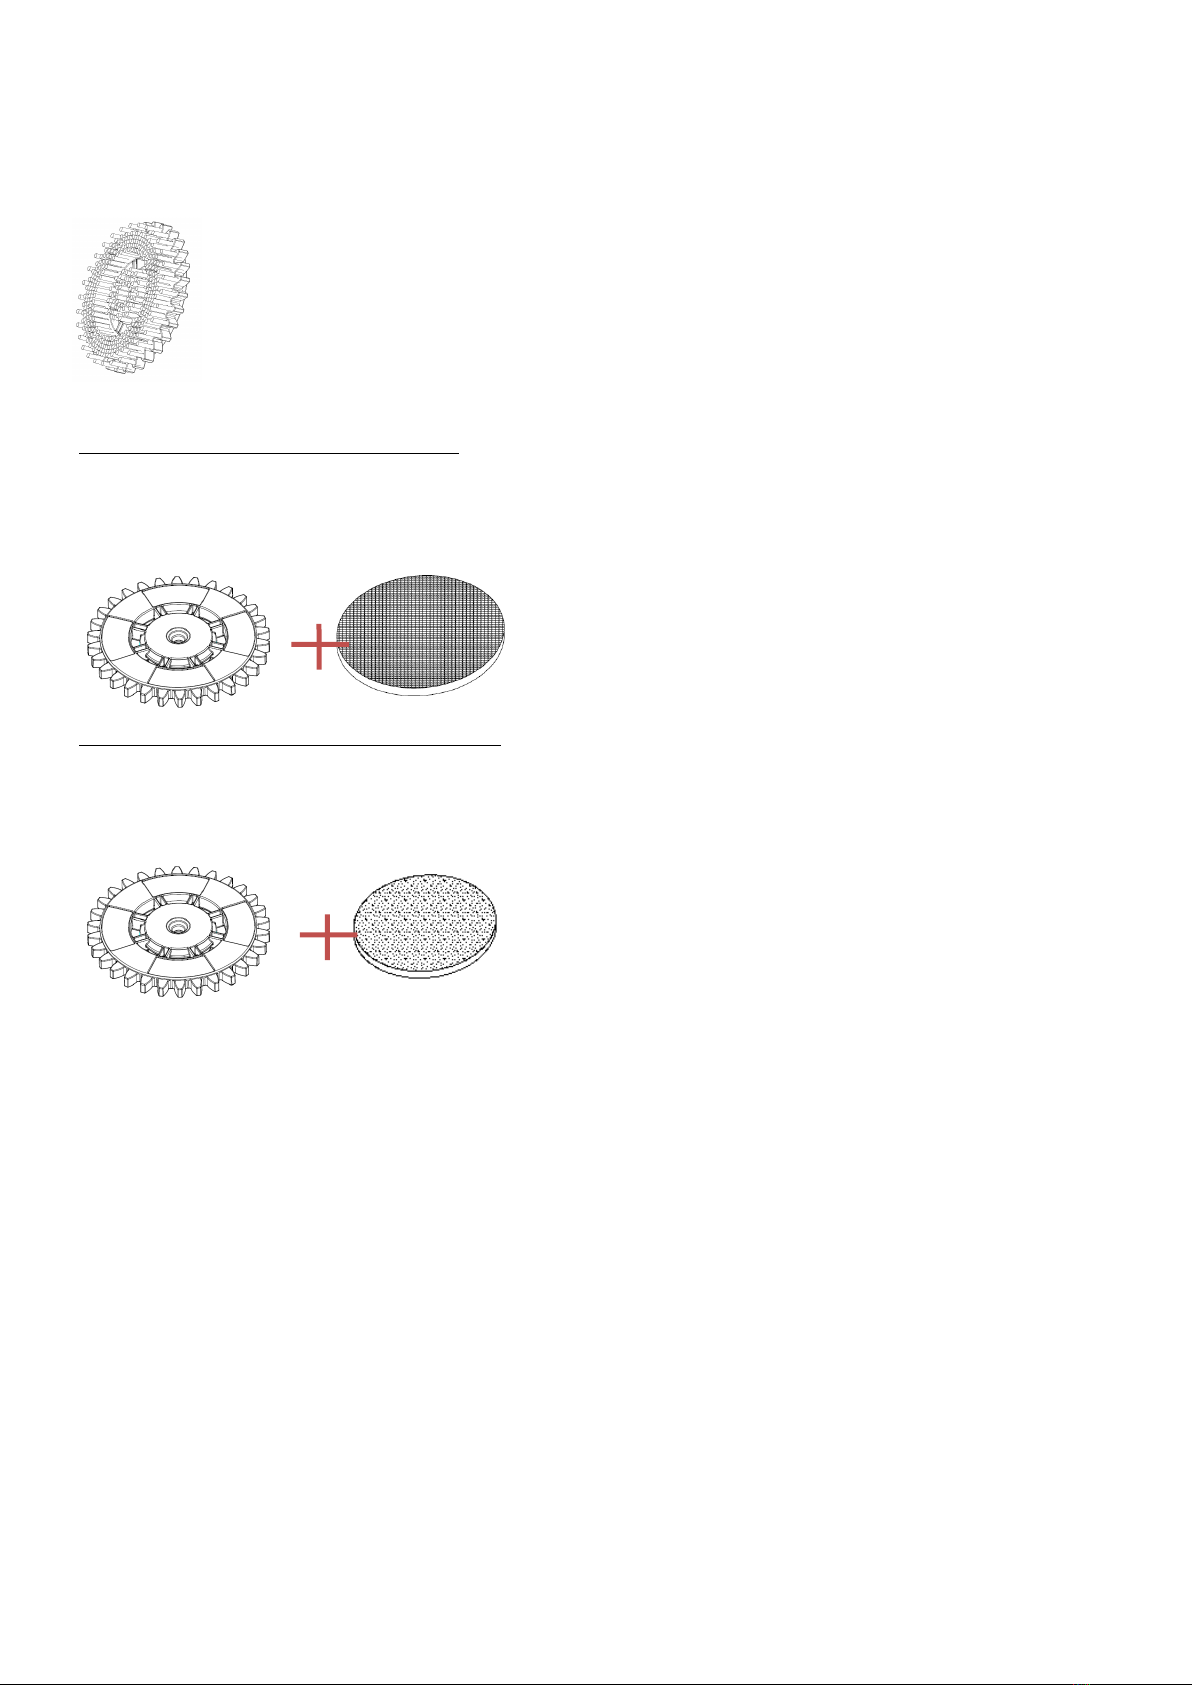
The Rough Polishing Brush Disc is composed of Nylon brushes and is used for aggressive cleaning and
scrubbing. Users tend to use this brush for tile and grout scrubbing and hardwood floor stripping.
·Fine Polishing Seat + Polishing Fine Pad:
The Fine Polishing Seat + Floor Polishing Fine Pad is used for final polishing, buffing or cleaning of floor
surfaces. It may also be used briefly on carpet surfaces if one of the Fine Polishing Seat + Polishing Fine Pad’s
are removed. In case the user is using the unit to wax your hardwood floors the polishing fine pad would be
used in final step to polish floors.
·Fine Polishing Seat+ Polishing Scouring Pad:
The Fine Polishing Seat + Floor Tile Polishing Scouring pad is used for scrubbing and cleaning floors. It can
be used to scrub all floor surfaces BUT beware that it can cause permanent scratching on fine surfaces like
wood surfaces. Always check with your floor manufacture first and test a small area before proceeding with
this step.
Steps to Cleaning:
For most (not all) floor surfaces the following steps are typically used to clean.
1. For aggressive stains and cleaning use the “Rough Polishing Brush Disc”and user may use spraying
method of unit to spray cleaner on floor surface while cleaning.
2. For stains not as aggressive user may use the “Fine Polishing Seat + Scouring Pad”and user may use
spraying method of unit to spray cleaner on floor surface while cleaning.
3. Final Cleaning Method is to use “Fine Polishing Seat + Polishing Fine Pad” to clean up left over
moisture on floors and for final polishing.
Precautions:
·During use, please be sure to use the Fine Polishing Seat. If the user discovers that the machine has
increased resistance during use, please stop the machine immediately to check it and ensure that the Fine
Polishing Seat is dry. If you have any questions, please contact your authorized dealer you bought the unit from.
The motor of the unit has a build over use mechanism which will turn off the unit if it is being used to hard. If this
occurs check unit to make sure nothing is causing increased resistance. If unit turns off again avoid cleaning
that surface.

·In order to get better polishing and cleaning effect, please uniformly polish every square yard of ground for
more than one minute.
·Do not clean the Fine Polishing Seat with water to avoid degumming.
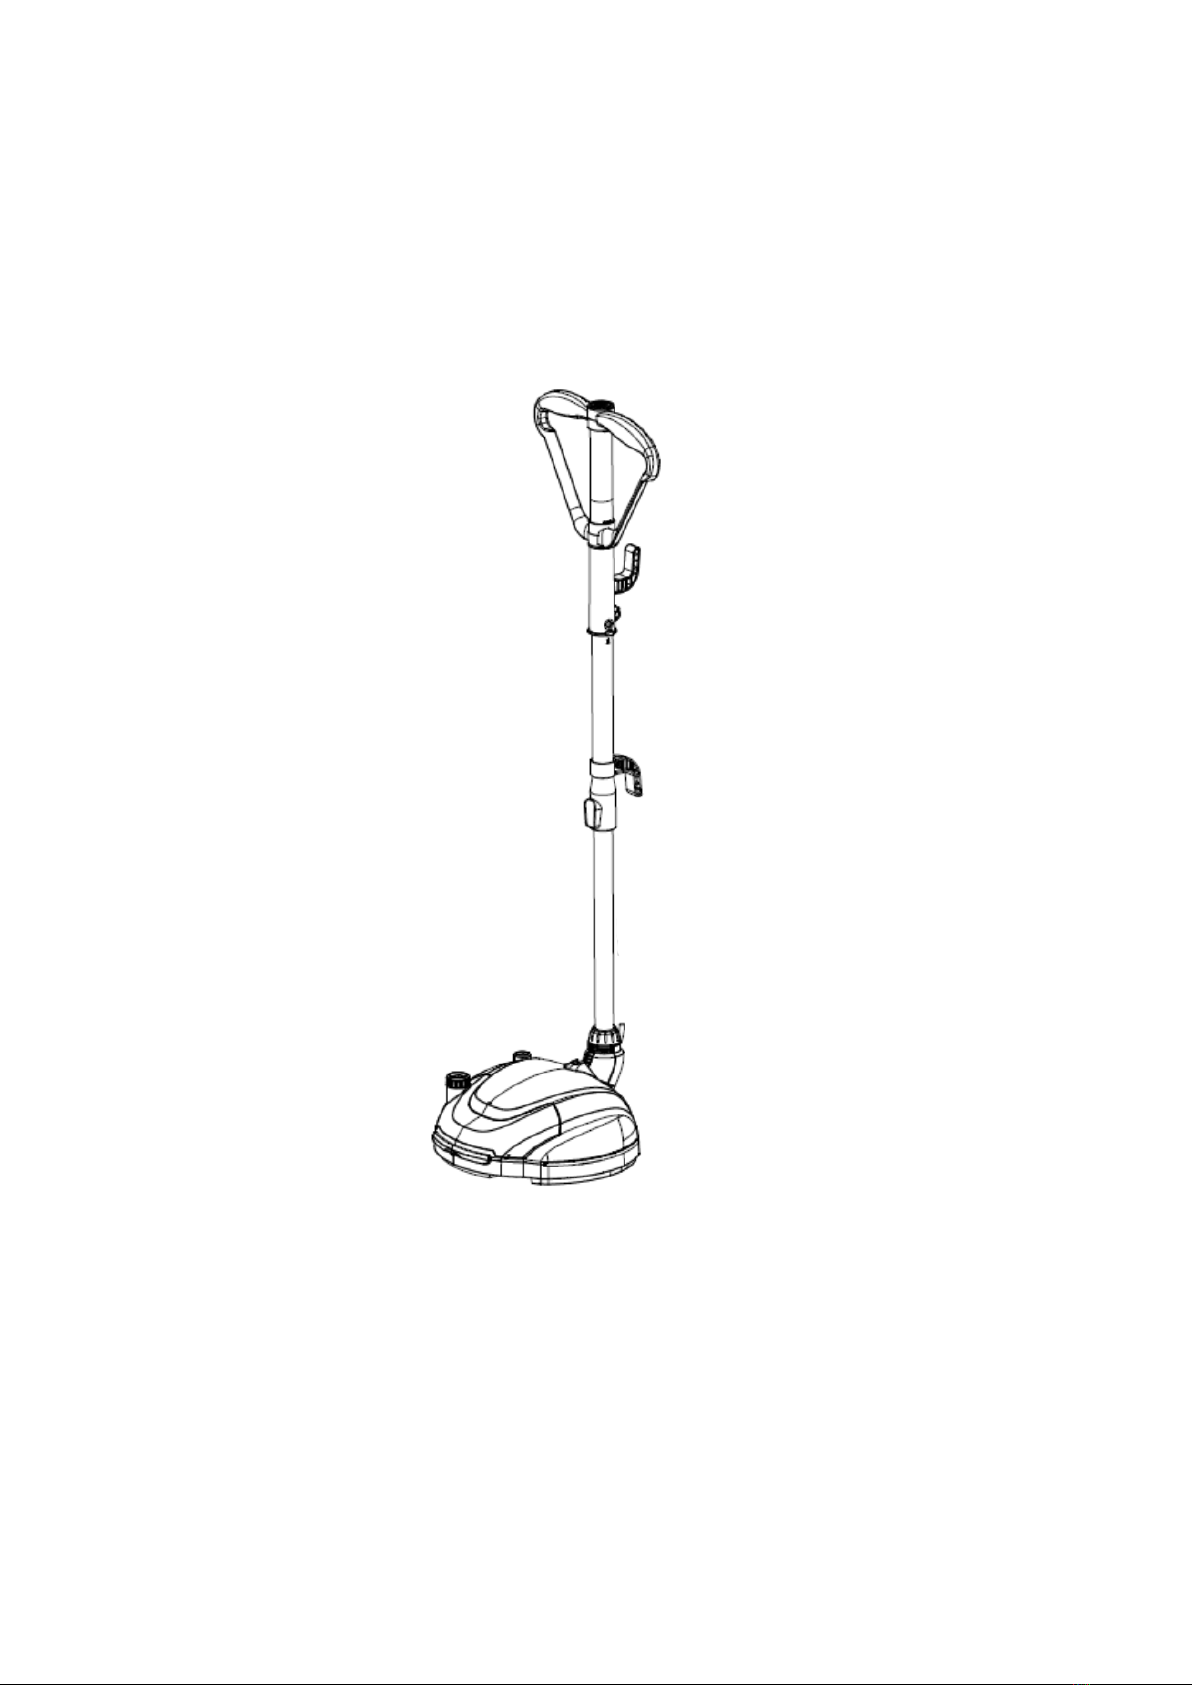
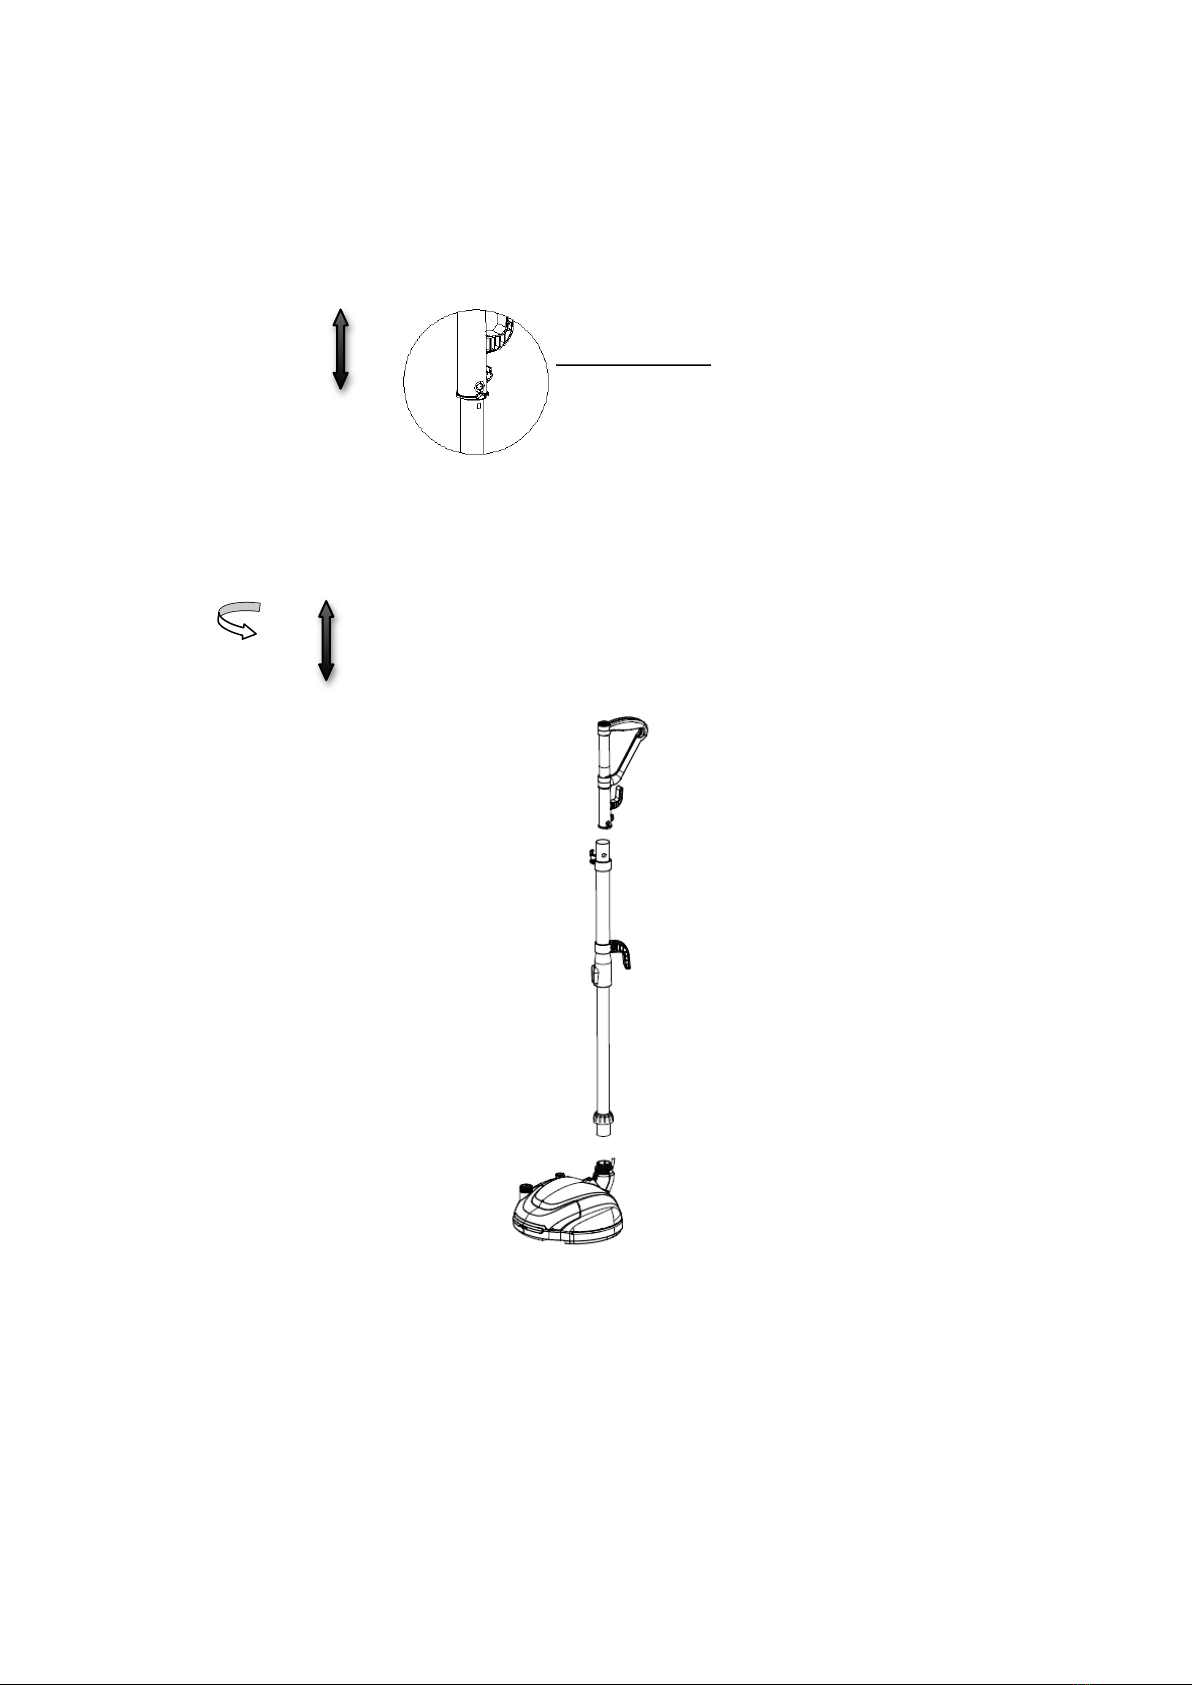
Installation of Parts to Assemble Unit
·Installation of handle part and extension pipe:
Insert the 2 handle parts to the mounting hole until hearing “click”sound as shown in the image below.
·Connection of Rough Polishing Brush Disc (or Fine Polishing Seat) to the Polishing head
Hold the Rough Polishing Brush Disc (or Fine Polishing Seat) by hand and make it align to the Rough Polishing
Brush Disc (or Fine Polishing Seat) with the special section hole of the gear on the waxing head. Press the
Rough Polishing Brush Disc (or Fine Polishing Seat) to the Polishing head, as shown in the arrow in the image
below, until hearing “click”sound.
(If needing disassembling, apply pulling force to the Rough Polishing Brush Disc (or Fine Polishing Seat)

near the roller by hand, until the Rough Polishing Brush Disc (or Fine Polishing Seat) pops off.
Align at the special section hole and slightly press it
·Connection of handle, extension pipe component and waxing head
Connect the lower end of the extension pipe with the Polishing head connector until the locking ring can’t be
rotated clockwise anymore.
How to use the Unit for Polishing, Buffing, Scrubbing or Waxing
·One-handed handle operation (best for using unit going forward and back)
When left and right handles are folded and combined, it is available for one-handed cleaning.

·Two-handed operation (best for cleaning side to side)
After left and right handles are rotated by 90°leftwards and rightwards and completely folded opened by 180°,
they are available for two-handed operation. Two-handed operation can more accurately control movement
direction and speed of the floor polishing machine; therefore, during fine polishing, two-handed operation mode
is recommended to get excellent polishing/buffing/scrubbing/waxing effect.
·Safety Stand By Mode
When the unit’s handle is locked in the upright position the unit will power off for safety. For the user to
being using the unit they simply release the handle and as the angle of the handle changes enough (see images
below) then the unit will power on and the brushes may start spinning for polishing/buffing/scrubbing/waxing.

Standby Mode
Switch between Standby Mode and Polishing Mode.
Polishing Mode
·Adjusting the handle length to fit the user
Push the sliding button on the extension pipe and pull the extension pipe to adjust the length of the
extension pipe.

·Properly adjust the application angle
Slightly tilt the waxing head and then slightly step on it with feet to adjust the application angle of the
handle.
·Wax oil or Cleaning Solution
Loosen the Solution Knob and fill the solution container with Solution or Wax and avoid spilling. After filling,
tighten the Solution knob.
Adjust the extension
pipe length
Slightly step on it with feet
·Instructions of the Polishing Machine!
1. Cleaning
and Check
Before starting the polishing work, please clean the floor and ensure that there are no
granular hard objects under the Polishing machine; otherwise, your floors may be
scratched.
2.
Preparations
Install the Rough Polishing Brush Disc on the Unit. Adjust the metal extension pipe to a
proper operation height and set the Unit with the handle locked in the upright position.
3.Start and
stop
The handle position has the built-in power switch. When the handle is in an upright
position, the power switch will be turned off; when the handle is in a working position, the
power switch will be turned on.

4. Solution
spraying
switch and
indication
The solution spraying switch can only control the spraying pump. When the user presses
the solution spraying switch the switch turns on and a green indicator light will turn on.
When this happens, it will enter into the pre programmed solution spray work cycle.This
is where it will spray solution then pause for several seconds and spray solution again. It
is designed so right when you run out of solution or wax on your floors then it spays
again. If you have run out of solution before it sprays on the next automatic spray then
slow down your polishing movements of the unit until the sprays are perfectly timed. If
you need it to spray manually you turn on the spray switch then after it sprays turn off the
switch and repeat this until you have the desired amount of manual spray.
Note: This unit is designed for residential use. It is recommended that the machine
shouldn’t be continuously used for more than 30 minutes at a time, which can be
restarted after several minutes of the unit cooling down.
5. Drying
If your application requires that you allow your floors to dray after solution or wax
application allow at least 15 minutes or until your floor is dry.
6. Rough
Polishing
Cleaning
Mode
Insert the power cord; slightly step on the upper cover of the waxing head with feet; pull
the handle to form a proper working angle between the extension pipe of the floor waxing
machine and the waxing head. Push the handle part of the floor waxing machine to drag it
back and forth, and use the Rough Polishing Brush Disc for uniform polishing on the
ground, please uniformly polish every square yard of floor for more than one minute
5.Wax coating
and Rough
Polishing
Mode
Insert the power plug; slightly step on the upper cover of the waxing head with feet; pull
the handle to form a proper application angle between the extension pipe of the floor
waxing machine and the waxing head. Push the handle part of the floor waxing machine
to drag it back and forth,
In such case, activate the wax spraying function and uniformly spray Wax or essential oil
(as specified by the floor manufacturer).
For uniform rough polishing on the floor, please uniformly polish every square yard of
ground for more than one minute.
6. Drying
After waxing and rough polishing mode, allow at least 15 minutes to dry the floors (or until
floors are properly dried).
7.Fine
polishing
Use the Fine Polishing Seat and perform fine polishing to the floor with the same
polishing method (as mentioned in #5 above) until the floor is polished.
·Polishing can be carried out on the floor or floor tile
Floor Polishing Fine Pad
Floor Tile Polishing Fine Pad and Scouring Pad
·In order to get the best effect during Spraying Solution cleaning it is suggested to use non sticky solution. If
solution is to sticky the floor surface and floor waxing machine may be damaged. It is important to follow any
instructions from your floor manufacturer as well.
Storage
·Vertical storage
①Push the extension pipe button to shorten the extension pipe.
②Wind the power wire on the coiling hook at the back of the engine and the remaining power wire of the plug
can be hung on the hanging hook.

·Storage with the unit disassembled (which can save space).
①Press down the locking button of the extension pipe and pull out the handle component upwards.
②After loosening the locking ring of the waxing head connector counterclockwise, pull out the extension pipe
component.
Locking button of the
extension pipe

Suggestions for settings for different floor types
Part
Hard
Floor
Rough
Polishing
Brush Disc
Polishing fine pad
+ Fine Polishing
Seat brush disc
Polishing
scouring pad +
Fine Polishing
Seat brush disc
Solution
Laminate
floor
Composite
floor
Rocky ground
Artificial stone,
marble,
granite, etc.
Non-slip
naked
ceramic tile
Brick
surface
Cement, brick,
ceramic tile, etc.
Polishing Precautions
1. Before polishing, please check if there are granular hard objects (like sand) under the floor polishing
machine or adhesive foreign matters on the polishing disc; otherwise, the floor waxing machine will be
damaged and your floor will be scratched. Once the floor is scratched, it can’t be recovered.
2. If it is necessary to install or replace the polishing piece before or during polishing, please remove the power
plug.
3. During use, please be sure to keep a Fine Polishing Seat. If discovering that the floor waxing machine has
increased resistance increase during use, please stop the machine immediately to check it and ensure that
the Fine Polishing Seat is dry.
4. It can’t be operated on a wet floors.
5. In order to get better polishing effect, please uniformly polish every square water of ground for more than
one minute.
6. Do not clean the Fine Polishing Seat with water to avoid degumming.
7. Please use the floor waxing machine referring to the Instructions in this manual.
8. When using this floor waxing machine for polishing, please constantly move it on the polishing surface, and
avoid leaving it in one spot. During operation, the machine can’t be operated under heavy load; otherwise,
you floor may be scratched and the motor may over heat.
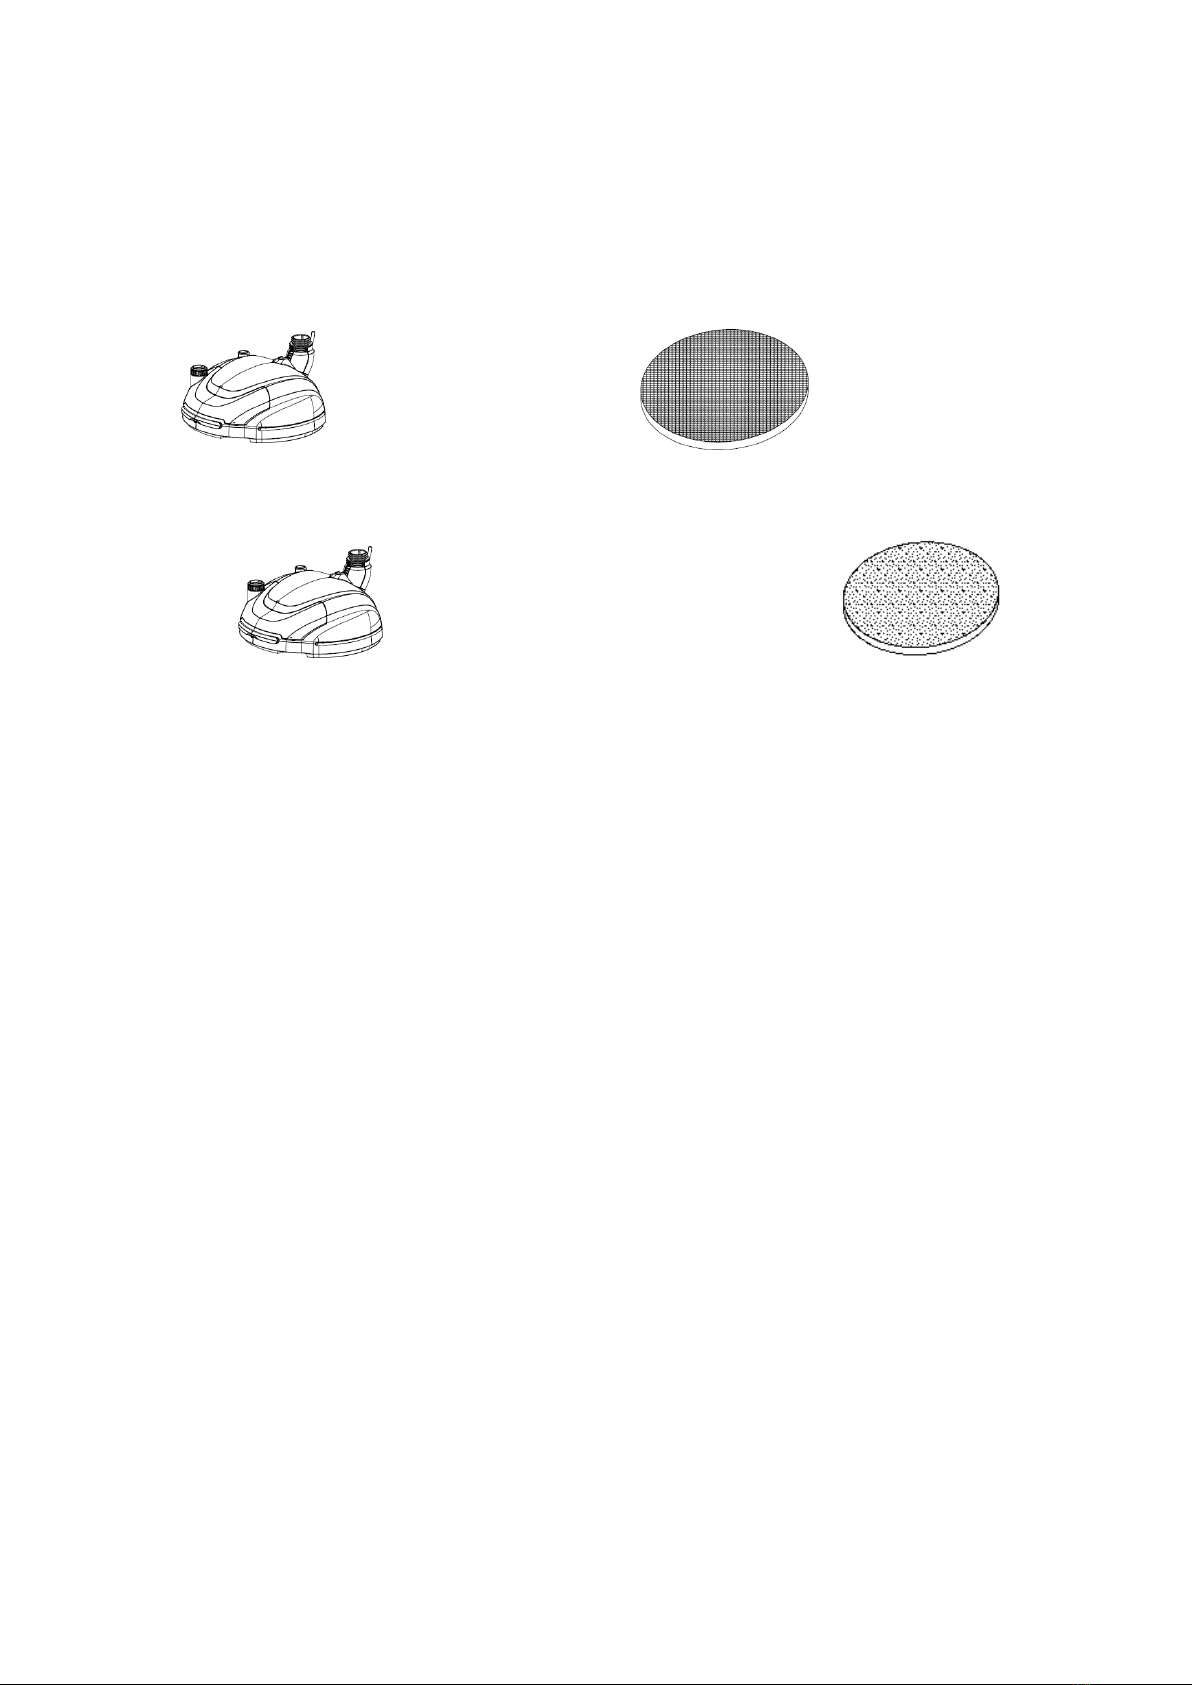
Cleaning and Replacement of Parts
Before part cleaning and polishing, please disconnect the electrical power cord from the wall outlet first.
Rough Polishing
Brush Disc
Polishing fine pad
Polishing scouring
pad
Fine Polishing Seat
brush disc
Washable
Washable
Non-washable
①Clean the
Rough Polishing
Brush Disc with
water.
②Wipe off the
Rough Polishing
Brush Disc with
cloth and dry it.
③Install the parts
in turn.
①Clean the polishing piece (rubbing is
allowed).
②Wipe off the polishing piece with cloth
and dry it (rubbing is allowed).
③Install the parts in turn.
①Clean the Fine
Polishing Seat
with a piece of
clean cloth and
dry it.
②Install the parts in
turn.

Supplementary instruction of cleaning:
If the surface of the Rough Polishing Brush Disc and floor
polishing fine pad has condensed wax water and dirt, it can be
immersed in a suitable amount of warm water with enzymatic
laundry powder for about 20 minutes and then rubbed.
FAQs
Frequent Problem
Possible Cause
Solution
The polishing head
motor doesn’t rotate
It is not powered on
Check if the power socket is firmly
inserted into the wall outlet and the
handle is fully released all the way down
to a working state.
Sharp friction sound
during waxing
Foreign matters in the
brush disc
Check if there are granular hard objects
on the floor and under the waxing head
and clean them.
Running resistance
obviously increases
during waxing
The brush disc has
foreign matters or it is
immersed in liquid
Check if the Fine Polishing Seat and floor
fine polishing fine pad (floor tile fine
polishing scouring pad) is dried.
The floor wax is not
dried.
Time is insufficient
Polish it again after the floor wax is dried.
Floor gets to dry
during spraying
solution mode.
Not enough spray
Make sure nozzle is not clogged and
slow down polishing movement of side to
side until there is enough solution on
floor.

Warranty
The manufacturer Prolux provides warranty of this Appliance for a time period of 1 year on the appliance
and 2 years on the motor, starting from the date on which the appliance is sold to the end user. The repairs
under warranty may only be carried out by an authorized service center. In case of warranty contact your
authorized Prolux dealer you bought the unit from. In case of warranty issues the customer is responsible
for paying for all shipping costs to and from the warranty center and Prolux is responsible for paying for all
parts and labor associated with the warranty claim. When making a claim under the warranty, the proof of
purchase (with purchase date) must be submitted. The warranty will not apply in cases of:
- Non Normal wear and tear (example- commercial use)
- Incorrect use, e.g. overloading of the appliance, use of non-approved accessories
- Use of force, damage caused by external influences
- Damage caused by non-observance of the user manual, e.g. connection to an unsuitable cord
supply or non-compliance with the installation instructions or being dropped.
- Partially or completely dismantled appliances.
- The unit is equipped with a motor over load switch. If the motor trips and turns off it is an indication
that the motor is being over worked. If this happens review manual to avoid the motor from over
working. If the user continues to use the motor and allow it to trip multiple times and later burns out
the motor the warranty will be void.
PROLUX OR ITS DEALERS ARE NOT LIABLE FOR INCIDENTAL OR CONSEQUENTIAL DAMAGES OF ANY
NATURE ASSOCIATED WITH THE USE OF THIS PRODUCT. OUR LIABILITY WILL NOT EXCEED THE PURCHASE
PRICE OF THE PRODUCT.
Some states do not allow the exclusion or limitation of incidental or consequential damages, so the above limitation or exclusion
may not apply to you.
*EXCEPTIONS AND EXCLUSIONS FROM THE TERMS OF THE LIMITED WARRANTY
THIS WARRANTY IS EXCLUSIVE AND IN LIEU OF ANY OTHER WARRANTIES EITHER ORAL OR WRITTEN.
ANY IMPLIED WARRANTIES WHICH MAY ARISE BY OPERATION OF LAW, INCLUDING THE IMPLIED
WARRANTIES OF MERCHANTABILITY AND FITNESS FOR A PARTICULAR PURPOSE, ARE LIMITED TO THE
ONE YEAR DURATION FROM THE DATE OF PURCHASE AS DESCRIBED ABOVE.
Table of contents
Other Prolux Floor Machine manuals

Popular Floor Machine manuals by other brands

Tennant
Tennant T2 Operator's manual

Superabrasive
Superabrasive LAVINA ELITE L25GE user manual

Bona
Bona 1.783 Series Original instructions

Triple S
Triple S ACHIEVER 40 Operating & maintenance instructions

American-Lincoln
American-Lincoln 4366XP 56516751 Instructions for use

Viper
Viper CEX410 Use and maintenance


Husqvarna
Husqvarna PG 690 Operator's manual

Clarke
Clarke Ultra Speed Burnisher Operator's manual

Blastrac
Blastrac BMG-555PRO Original operating instructions

Trusted Clean
Trusted Clean TPL-SS20-TC Owner's manual & parts list

Kärcher
Kärcher KM 75/40 W Bp Original instructions

Blastrac
Blastrac BG-250E Service manual