ProMaxX Clixx'Pixx DrillPunch Pro2 User manual

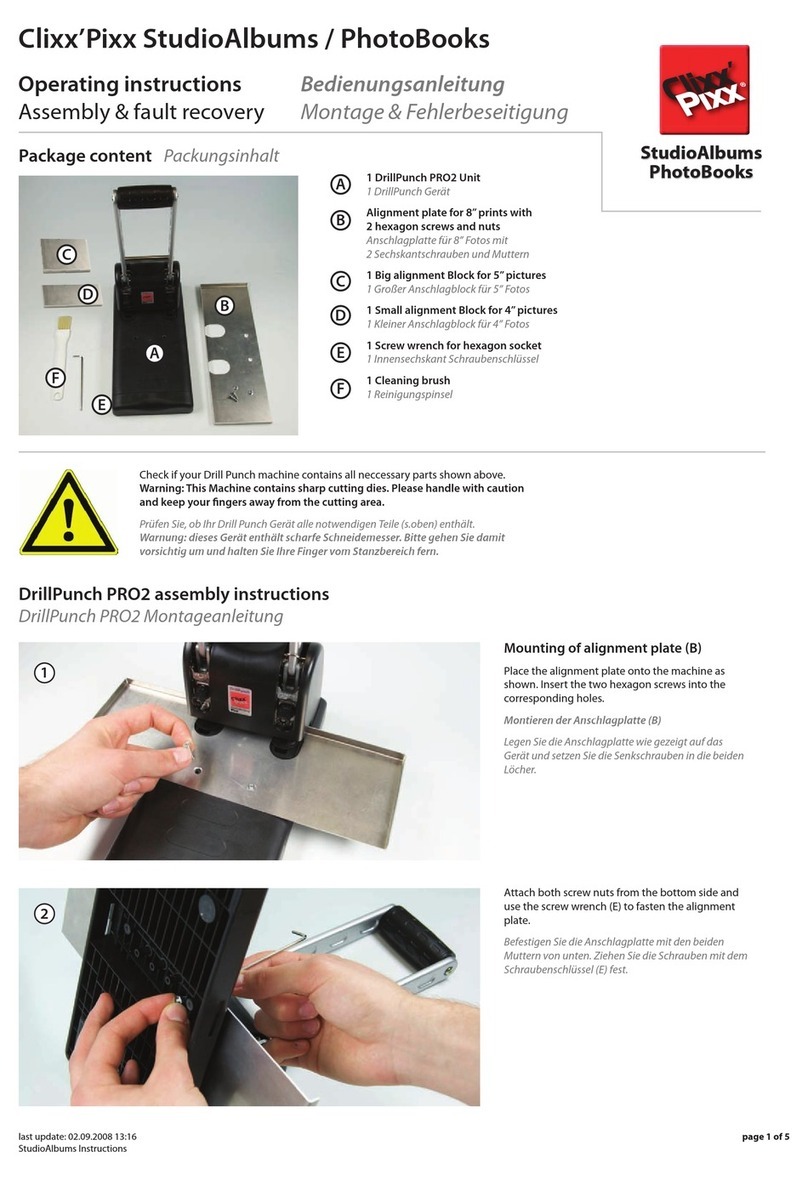
1. Unpack machine system and check
Find these items
StudioAlbums
Check that your Drill Punch pack contains all neccessary parts shown above.
Warning: This machine contains sharp cutting dies. Please handle with caution and keep your
ngers away from the cutting area.
Operating instructions EN 06.2014
Clixx’Pixx DrillPunch Pro2 4-12” 56-1012
Page 1
Transport locking belt
Please remove
Machine
Accessories
2 Limiter Blocks
Cleaning Brush
Alignment Block 12”
Alignment Blocks: 4” 5” 6”
Hexagon Key
Tension
Rubber Band
-Spare/Extra-
6 Counter
Pressure
Disks
2 Alignment Blocks A4
Portrait and Landscape
OPTIONAL !
Art.-Nr. 56-1903

Punch
Alignment
Bar
Tension
Rubber
Band
45°
2. Make system ready
Install PunchAlignmentBar and place LimiterBlocks
StudioAlbums
Page 2 Clixx’Pixx DrillPunch Pro2 4-12” 56-1012
Check correct installation of Punch
Alingment Bar and TensionRubber-
Band
New punches, like this one, are equipped
with a PunchAlignmentBar and a
TensionRubberBand. This assures
punching in a perfect line.
Make sure, both parts are in place as
shown.
Check correct position of Counter
Pressure Disks
Use hexagon key wrench to check that
CounterPressureDisks are all the way
back in their correct position.
Place Limiter Blocks
Install LimiterBlocks as shown.
All pictures up to 8” are drill-punched
using the 2 Limiter Blocks in their
appropriate position.
Remove Limiter Blocks only for pictures
12” high.
1
2
3
4
5
6
7
8
Always drill a complete book of pictures. Do not drill single pictures.
Please align the stack of pictures carefully and x it with your other
hand while punching.
Put a misprint on top of the stack to avoid unwanted marks on the rst
print by the punch hold down.
Clean the working surface and the counter pressure disks with the
brush after every operation (see picture at right).
Rotate the counter pressure disks a little, if the punchings on the last
sheet do not look OK. (See page 5).
The punch clippings are pushed up inside the hollow drills and fall into
the wastbasket on rear of machine. Empty regularly. (See page 5)
The punch is designed for SilverHalide paper and for DryInk paper with
polyethylen layer only!! If you want to use other type of papers,
please contact us for advice.
After intensive use, cutting might get arduous, because cutting edge of
punch becomes dull.
See page 6 for replacement instructions.
4
IMPORTANT
BE GENERALLY
CAREFUL:
WATCH SHARP EDGES
OF CUTTING TOOLS!

Drill binding holes 4”(101,6mm) print height:
Drill binding holes 5“ (127mm) print height:
4” Images are punched only one time.
►Arrange all prints of a book in a clean square pile.
►Use the 4” alignment block as shown and punch the
pile once.
5” Images are punched two times.
►Arrange all prints of a book in a clean square pile.
►Use the 5” alignment block as shown and punch the
pile once.
►Rotate the 5” alignment block by 90° and punch the
pile of prints the second time.
StudioAlbums
Page 3 Clixx’Pixx DrillPunch Pro2 4-12” 56-1012
3. Drill binding holes
See dierent procedures for dierent book heights
1
2
Drill binding holes 6“ (152,4mm) print height:
6” Images are punched two times.
►Arrange all prints of a book in a clean square pile.
►Use the 6” alignment block as shown and punch
the pile once.
►Rotate the 6” alignment block by 90° and punch
the pile of prints the second time.
1
2
1

►Align the Pile now on the right Limiter Block and
punch the Pile the second time.
12“ Prints are drillpunched 3 times,
with a total of 6 holes
►Arrange all prints of a book in a clean square pile.
►Push stack in the left upper corner and make sure all
sheets stay square in the stack.
►Push handle slowly and punch the pile once.
►Remove Limiter Blocks for Sizes 12” and A4
StudioAlbums
Page 4 Clixx’Pixx DrillPunch Pro2 4-12” 56-1012
Drill binding holes 8”(203mm) print height:
Drill binding holes 12“ (304mm) print height:
8” Images are punched two times.
►Arrange all prints of a book in a clean square pile.
►Use the left Limiter Block as shown and punch the
pile once .
►Now insert 12” alignment block as shown as a spacer
and repeat steps above.
►Now turn 12” alignment block as shown and repeat
steps above.
1
2
3
2
1

Drill binding holes A4Portrait and Landscape:
A4 Portrait has 4 binding holes, A4 Landscape has 3 binding holes.
Insert A4 Portrait alignment block as shown as
a spacer and arrange all prints of the book in a
clean square pile.
Push stack in the left upper corner and make sure
all sheets stay square in the stack.
Push handle slowly and punch the pile once.
Insert A4 Landscape alignment block as shown
as a spacer and arrange all prints of the book in a
clean square pile.
Push stack in the left upper corner and make sure
all sheets stay square in the stack.
Push handle slowly and punch the pile once.
Turn the alignment block as shown and repeat
punching.
Turn the alignment block as shown and re-
peat punching.
StudioAlbums
Page 5 Clixx’Pixx DrillPunch Pro2 4-12” 56-1012
4. Periodical machine care
Please always observe
Counter pressure disk
If the last pictures in a stack are not
cut cleanly, the counter pressure disk
must be rotated. Use hexagon key
wrench to pull it towards you, rotate
it by around 30 degrees to an unused
position and push it in backwards
again rmly.
Emptying the tray
The cut-outs are collected in the back
tray. About every 500 punchings you
have to empty the tray. Tap on the side
of the machine, so that all remains falls
into the tray. Then pull out towards
you and empty. Put back in position.
PortraitLandscape
Replace the counter pressure disk, if
there is no space for further punch-
ings left (like on picture above).
Hint: To remove the counter pressure
disk, push it towards you using the
hexagon key wrench.
1 2
1 2
13
2

StudioAlbums
Page 6 Clixx’Pixx DrillPunch Pro2 4-12” 56-1012
5. Exchange punching dies
1
4
7 8 9
5 6
3
2
Pull PunchAlignmentBar down and
towards you, so it gets out of your
way, as shown on picture 2.
This is how you remove PunchHolder
and punch from the machine.
The head of the punch must glide into
the rail as indicated.
Push in PunchHolder hard
and tighten screw rmly. Then
rearrange PunchAlignmentBar and
TensionRubberBand. Make sure is it
arranged as on picture on page 2 top
picture.
Important: Both punches are
calibrated in the machine. The right
position Punch holder is marked
with a red dot. Do not switch to the
left position!
Tilt PunchHolder again like shown and
carefully move assembly into machine.
Now replace the old punch with a new
one.
Loosen PunchHolderScrew as
indicated..... and tilt the PunchHolder a
little towards you.
This is legal information to potential licensees and business partners and not intended to be an advertising message:
PROMAXX® reserves all rights to the design, function and materials of these photo systems to the extent international patent laws allow. German utility models have been applied in
DE covering the PhotoBook covers, the Clixx‘Pixx Ring System and other proprietary features to allow for worldwide patent protection of these proprietary technologies. PROMAXX®
and Clixx´Pixx® are registered trademarks of PROMAXX® Innovative PC Print Media GmbH, Dietersheim / Munich, Germany. Potential business partner‘s contacts welcome.
All statements, technical Information and recommendations about PROMAXX® products are based upon tests believed to be reliable but do not constitute a guarantee or warranty. In
no event shall PROMAXX® be responsible for claims beyond the replacement value of the defective product or in any way liable or responsible for consequential or incidental dama-
ges. All marks and product names may be trademarks of their respective owners. PROMAXX® all rights reserved.
PROMAXX® Innovative PC Print Media GmbH
Hauptstr.1e • 85386 Dietersheim / Munich • Germany
Fon +49 89 3075 8698 • Fax +49 89 9595 9712
e-mail [email protected]
www.promaxx.de www.clixxpixx.com
Art.Nr. 56-1103
Spare Punching Set Pro2
6,2 mm hole / 4pcs.
Art.Nr. 56-1104
Counter Pressure Disks
Pro2 / 20pcs.
Ordering
Spare
Parts
This manual suits for next models
1
Other ProMaxX Binding Machine manuals
