ProMaxX Clixx'Pixx DoublePageMaker User manual

last update: 14.10.2008 18:06
DoublePakeMaker Instructions
page 1 of 3
Operating instructions
Assembly & fault recovery
Bedienungsanleitung
Montage & Fehlerbeseitigung
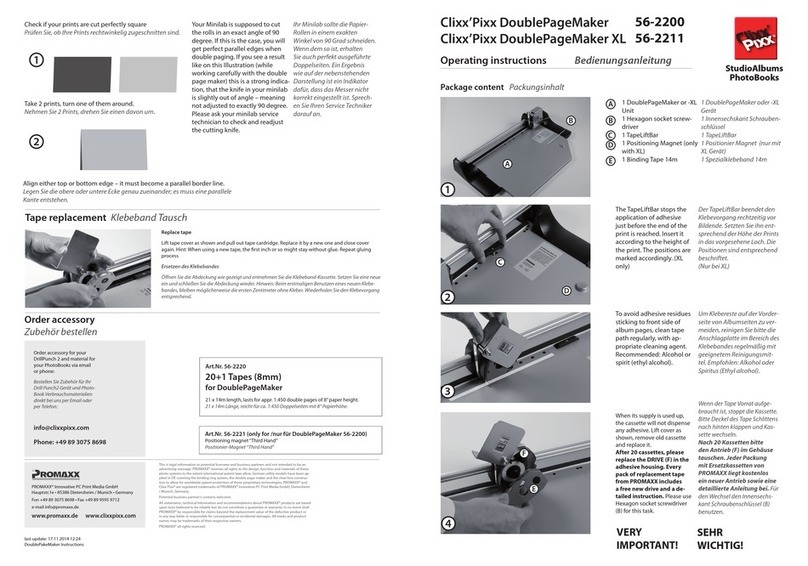
Package content Packungsinhalt
1 DoublePagerMaker Unit
1 DoublePagerMaker Gerät
1 Alignment Block (premounted)
1 Anschlag Block (vormontiert)
1 Binding Tape 14 m (premounted)
1 Klebeband 14 m (vormontiert)
1 Hexagon socket screwdriver
1 Innensechskant Schraubenschlüssel
A
B
C
D
C
A
D
B
Clixx’Pixx DoublePageMaker
StudioAlbums
PhotoBooks
Set up picture height
Insert the Alignment Block into the
hole corresponding to your paper
height:
1st hole (from top): 8”paper height
2nd hole: 6” paper height
3rd hole: 5” paper height
4th hole: 4” paper height
Papierhöhe einstellen
Setzen Sie den Anschlagblock in das
Loch ein, das der verwendeten Papier-
höhe entspricht:
1. Loch (von oben) : 8” (20 cm)
2. Loch: 6” (15 cm) Papierhöhe
3. Loch: 5” (13 cm) Papierhöhe
4. Loch: 4” (10 cm) Papierhöhe
Prepare pictures
Arrange prints in such a way as they
will appear as double pages in the
nal album. Hint: It is recommended
to practice the function of this ma-
chine with a stack of obsolete pictures,
before making the rst commercial
album!
Bilder vorbereiten
Sortieren Sie Ihre Bilder in der
Reihenfolge, wie sie als Doppelseiten
im Album erscheinen sollen. Hinweis:
Es empehlt sich die Funktion dieses
Geräts mit einem Stapel alter Bilder zu
testen, bevor die das erste kommerzielle
Album binden!
Position reverse side of page
Take second print from stack and
slide it along bottom guide as shown
towards edge of rst print. Try to
avoid touching adhesive. Hold rst
print in position.
Rückseitenbild anlegen
Nehmen Sie das zweite Bild vom Stapel
und schieben Sie es unten bündig wie
gezeigt nach links in Richtung der Ecke
des ersten Bildes. Berühren Sie nicht den
Klebsto. Halten Sie das untere Foto an
seiner Position fest.
Tape rst picture
Move tape slider all the way towards
you, then press slightly (A) - (not too
hard!) and move in direction B, until
slide is lifted by alignment block.
Klebstoauf erstes Bild aufbringen
Bewegen Sie den Klebeband Schieber
ganz zu sich. Drücken Sie Ihn leicht an
(A) - (nicht zu fest!) und bewegen Sie
Ihn in Richtung (B), bis er durch den
Anschlagblock angehoben wird.
Align rst picture
Take top print from stack and posi-
tion it face down with the album
outside edge towards the machine
into the left bottom corner guides.
Erstes Bild anlegen
Nehmen Sie das erste Foto vom Sta-
pel und legen Sie es mit der Bildäche
nach unten auf die Arbeitsäche.
Richten Sie es unten und links aus.
(Album Aussenseite zum Anschlag)
Fix second picture
When both prints are aligned perfectly
one on top of other, slowly lower sec-
ond print to adhere to bottom one. Seal
edge with rm pressure, wearing cotton
glove. Proceed with next double page
in same sequence 3-6. Hint: Make sure,
you do not run out of tape. If so, replace
tape cartridge (see “tape replacement”)
Zweites Bild verkleben
Wenn beide Bilder genau aufeinander
ausgerichtet sind, lassen Sie das obere
Foto langsam auf das Untere herab.
Benutzen Sie einen Baumwollhandschuh
und kleben es mit starkem Druck fest.
Fahren Sie mit der nächsten Doppelseite
mit den Schritten 3-6 fort.
Hinweis: Stellen Sie sicher, dass Ihnen
nicht das Klebeband ausgeht. Sollte
dies geschehen, wechseln Sie bitte die
Klebebandkasette (vgl. “Einsetzen des
Klebebandes”
2
1
5
4
3 6
Operating Instructions Bedienungsanleitung
Important: To avoid adhesive residues sticking to front side of
album pages, clean tape path regularly, with appropriate cleaning
agent. Recommended: Alcohol or spirit (ethyl alcohol).
Wichtig: Um Klebereste auf der Vorderseite von Albumseiten zu
vermeiden, reinigen Sie bitte die Anschlagplatte im Bereich des Kle-
bebandes regelmäßig mit geeignetem Reinigungsmittel. Empfohlen:
Alkohol oder Spiritus (Ethyl alcohol).
A
B

StudioAlbum assembly instructions
StudioAlbum Montageanleitung
last update: 14.10.2008 18:06
DoublePakeMaker Instructions
page 2 of 3
The album cover comes with chrome rings already premounted.
Proceed as following:
Turn the album cover 180° as shown and place it on a at surface.
The open side of the ring must be upwards.
Hint: Fix the cover by using a paperweight or similar.
Das Albumcover wird mit Chromringen vormontiert geliefert. Zum
Einhängen der Seiten verfahren Sie bitte wie folgt:
Schlagen Sie den Coverumschlag 180° um wie gezeigt und legen Sie
ihn auf eine ebene Fläche. Die Önungen der Ringe müssen dabei
nach oben zeigen.
Tipp: Fixieren Sie das Cover mit einem
Briefbeschwerer oder ähnlichem.
Use DrillPunch PRO2 machine to punch holes in your doublep-
ages.
Please refer to the Drill Punch PRO2 Manual included with the
machine for further information.
Stanzen Sie mit dem DrillPunch PRO2 Löcher in Ihre Doppelseiten.
Weitere Informationen diesbezüglich nden Sie ihn der Bedi-
enungsanleitung des DrillPunch PRO 2.
Initially take 2 punched prints or 2 double-pages and square them
up.
Now slide the stack into the gap of the rings as shown. When
the prints are completely inserted, turn the pages to the left and
proceed with the next prints. As you get more experienced, you will
be able to insert up to 6 prints / 3 doublepages in one go.
If all pages are inserted, close the book cover again. The album is
now nished and the pages are securely locked.
Nehmen Sie zu Anfangs 2 gestanzte Fotos bzw. 2 Doppelseiten und
richten Sie die Kanten sauber aus.
Führen Sie den Stapel in die Spalte der Ringe ein wie gezeigt. Wenn die
Bilder komplett eingesetzt sind, wenden Sie die Seiten nach links und
fahren mit den nächsten Fotos fort. Nach etwas Übung können Sie bis
zu 6 Fotos bzw.
3 Doppelseiten gleichzeitig einhängen.
Sobald alle Seiten eingehängt wurden, schließen Sie das Albumcover
wieder. Alle Seiten sind nun sicher im Album verankert.
2
1
3
Detail
Remove pages from album
Using the same technique as adding pages, you can also
remove pages from the album.
Start as described in step 1 and pull the last pages out of the
album. Then proceed with the next pictures.
Seiten aus dem Album entfernen
Das Entnehmen von Seiten funktioniert genauso wie das
EInfügen.
Verfahren SIe wie in Schritt 1 erklärt wird und ziehen Sie die
letzten Seiten aus dem Album. Fahren Sie dann mit den übrigen
zu entfernenden Seiten fort.
4

Tape replacement Klebeband Tausch
Replace tape
Lift tape cover as shown and pull out tape cardridge. Replace it by a new one and close
cover again. Hint: When using a new tape, the rst inch or so might stay without glue.
Repeat gluing process
Ersetzen des Klebebandes
Önen Sie die Abdeckung wie gezeigt und entnehmen Sie die Klebeband-Kasette. Setzen Sie
eine neue ein und schließen Sie die Abdeckung wieder. Hinweis: Beim erstmaligen Benutzen
eines neuen Klebebandes, bleiben möglicherweise die ersten Zentimeter ohne Kleber. Wieder-
holen Sie den Klebevorgang entsprechend.
last update: 14.10.2008 18:06
DoublePakeMaker Instructions
page 3 of 3
Fault recovery Fehlerbehebung
Make sure you align both pages correctly as described in
the manual. Hold rst page rmly on the alignment plate,
while aligning the second page.
Stellen Sie sicher, dass SIe beide Seiten korrekt an der
Anschlagplatte ausgerichtet haben. Halten Sie das erste
Foto fest an seiner Position, während Sie das zweite Foto
ausrichten.
Double Pages are not correctly aligned
Doppelseiten sind nicht passgenau verklebt
Please clean alignment plate before every use with appropri-
ate cleaning agent.
Bitte reinigen Sie die Anlageäche vor Benutzung mit einem
geeigneten Reinigungsmittel
The picture surface contains glue remainings
Die Bildseite enthält Klebsto-Rückstände
Order accessory
Zubehör bestellen
This is legal information to potential licensees and business partners and not intended to be an
advertising message: PROMAXX® reserves all rights to the design, function and materials of these
photo systems to the extent international patent laws allow. German utility models have been ap-
plied in DE covering the binding ring system, the double page maker and the clear box construc-
tion to allow for worldwide patent protection of these proprietary technologies. PROMAXX® and
Clixx´Pixx® are registered trademarks of PROMAXX® Innovative PC Print Media GmbH, Dietersheim
/ Munich, Germany.
Potential business partner‘s contacts welcome.
All statements, technical Information and recommendations about PROMAXX® products are based
upon tests believed to be reliable but do not constitute a guarantee or warranty. In no event shall
PROMAXX® be responsible for claims beyond the replacement value of the defective product or
in any way liable or responsible for consequential or incidental damages. All marks and product
names may be trademarks of their respective owners.
PROMAXX® all rights reserved.
PROMAXX® Innovative PC Print Media GmbH
)BVQUTUSFt%JFUFSTIFJN.VOJDIt(FSNBOZ
'POt'BY
e-mail [email protected]
www.promaxx.de www.clixxpixx.com
Order accessory for your
DrillPunch 2 and material for
your PhotoBooks via email or
phone:
Bestellen Sie Zubehör für Ihr
Drill Punch2 Gerät und Photo-
Book Verbrauchsmaterialien
direkt bei uns per Email oder
per Telefon:
Phone: +49 89 3075 8698
Art.Nr. 56-1001
Drill Punch PRO2 Unit
6,2 mm hole / complete set
Drill Punch PRO2 Gerät inkl.
6,2 mm Stanze und Zubehör
(Komplettset)
Album Covers
Art.Nr. 56-1801
4:6 Transparent
Art.Nr. 56-1802
4:6 Polyprop anthracite
Art.Nr. 56-1813
4:6 BlackBoard
Art.Nr. 56-1803
5:7 Polyprop anthracite
Art.Nr. 56-1814
5:7 BlackBoard
Art.Nr. 56-1810
5:7 Decoxal Dark Grey
Art.Nr. 56-1811
5:7 Real Leather black,
1,3mm coated lining
Art.Nr. 56-1805
8:8 BlackBoard
Art.Nr. 56-1804
8:8 Decoxal dark grey
Art.Nr. 56-1807
8:8 Real Leather black, 1,3mm coated lining
Art.Nr. 56-1806
8:10 Real Leather black , 2,3mm velvet lining
Art.Nr. 56-1812
8:10 Real Leather bordeaux ,
2,3mm velvet lining
Art.Nr. 56-1103
Spare Punching Set Pro2
6,2 mm hole / 4pcs.
Art.Nr. 56-1104
Counter Pressure Disks Pro2
20pcs.
Art.Nr. 56-2220
20+1 Tapes (8mm)
for DoublePageMaker
21 x 14m length, lasts for appr. 1.450 double pages of
8” paper height.
21 x 14m Länge, reicht für ca. 1.450 Doppelseiten mit 8”
Papierhöhe.
Art.Nr. 56-2221
Positioning magnet“Third Hand”
Positionier-Magnet “Third Hand”
Other ProMaxX Booklet Maker manuals


