Promega GloMax GM3000 User manual

Revised 12/16
TM397
GloMax®Discover System
Instrucons for Use of Product GM3000
OPERATING MANUAL

Promega Corporaon · 2800 Woods Hollow Road · Madison, WI 53711-5399 USA · Toll Free in USA 800-356-9526 · 608-274-4330 · Fax 608-277-2516 1
www.promega.com TM397 · Revised 12/16
All technical literature is available at: www.promega.com/protocols/
Visit the web site to verify that you are using the most current version of this Technical Manual.
GloMax®Discover System
1. Introduction ................................................................................................................................ 2
1.A. Description ......................................................................................................................... 2
1.B. Specifications ...................................................................................................................... 3
1.C Product Components ........................................................................................................... 6
1.D. Precautions and Special Instructions..................................................................................... 7
1.E. Environmental Requirements ............................................................................................... 9
1.F. Inspection and Unpacking.................................................................................................. 10
2. Setting Up the GloMax®Discover System ..................................................................................... 12
2.A. Setting Up the GloMax®Discover Instrument and Tablet PC ................................................. 12
2.B. Switching On the GloMax®Discover Instrument .................................................................. 13
2.C. Shutting Down the GloMax®Discover Instrument................................................................ 14
2.D. Operating the GloMax®Discover System ............................................................................. 14
3. GloMax®Discover User Interface Screens .................................................................................... 16
3.A. Tablet PC ‘Home’ Screen .................................................................................................... 16
3.B. Quick Read Screens ........................................................................................................... 17
3.C. Protocol Screen ................................................................................................................. 19
3.D. ‘Results’ Screen ................................................................................................................. 31
3.E. Analysis of Results ............................................................................................................. 37
3.F. ‘Settings’ Screen ................................................................................................................ 57
4. Setting Up and Operating the Injector System (optional)............................................................... 68
4.A. Setting Up the Injector System............................................................................................ 68
4.B. Operating the Injector System ............................................................................................ 71
5. Cleaning and Maintenance.......................................................................................................... 74
5.A. General Instrument Care.................................................................................................... 74
5.B. General Cleaning ............................................................................................................... 74
5.C. Tablet PC Care .................................................................................................................. 74
5.D. Cleaning the Injectors ........................................................................................................ 74
5.E Cleaning the Waste Collection Tray ..................................................................................... 75
5.F. Removing or Replacing Inlet and Outlet Plastic Tubing......................................................... 75
5.G. Removing or Replacing Stainless Steel Tubing ..................................................................... 76
6.Troubleshooting ............................................................................................................................ 76
6.A. Error Messages ................................................................................................................. 76
6.B. Common Problems ............................................................................................................ 78
6.C. Use of a USB Flash Drive.................................................................................................... 79

2Promega Corporaon · 2800 Woods Hollow Road · Madison, WI 53711-5399 USA · Toll Free in USA 800-356-9526 · 608-274-4330 · Fax 608-277-2516
TM397 · Revised 12/16 www.promega.com
1. Introduction
1.A. Description
The GloMax®Discover System(a) is a high-performance multimode detection instrument developed with Promega
reagent assays to provide a simple means of detecting advanced chemistries. This instrument provides researchers
superior luminescence sensitivity and dynamic range for both strong and weak bioluminescence experimental
samples as well as seamless integration with Promega’s industry-leading bioluminescence assays. GloMax®
Discover also provides flexible use of filters for fluorescence intensity, BRET(b), FRET, filtered luminescence and
UV-visible absorbance measurements.
The instrument is operated by an integrated Tablet PC, which provides quick and easy navigation through the
control options. Exporting your results is seamless with a variety of options, including export to your local data
network. The GloMax®Discover software also provides many of the required technical elements of a part 11
compliant system (user authentication and authorization, data integrity and protection, electronic signatures and
audit trails) when used with the appropriate laboratory workflow.
Figure 1. The GloMax®Discover System.
7. Appendix................................................................................................................................... 79
7.A. Configuring the Tablet PC................................................................................................... 79
7.B. Icons and Symbols ............................................................................................................. 89
7.C. Warranty and Service......................................................................................................... 90
7.D. Certificate of Decontamination ........................................................................................... 91
7.E. Related Products ............................................................................................................... 92
8. Summary of Changes ................................................................................................................. 95

Promega Corporaon · 2800 Woods Hollow Road · Madison, WI 53711-5399 USA · Toll Free in USA 800-356-9526 · 608-274-4330 · Fax 608-277-2516 3
www.promega.com TM397 · Revised 12/16
1.B. Specifications
Instrument Specifications
Detection Modes Luminescence, Fluorescence Intensity, UV-Visible Absorbance,
Filtered Luminescence, BRET and FRET
Read Type Glow, Flash, Kinetic, Repeat
Sample Format 6-, 12-, 24-, 48-, 96- and 384-well plates
Tablet PC Windows®8.1 or 10 Tablet PC with USB connection to instrument,
wireless connectivity to local network; export to network, cloud or
USB flash drive
Read Speed 96-well plate: less than 1 minute
384-well plate: less than 3 minutes
Automation Compatibility Hardware and software accessible to third party hardware/software
control
Dimensions 18.5in (46.9cm) width
19.5in (46.5cm) depth
10in (25.4cm) height without Tablet PC mounted
16in (35.5cm) height with Tablet PC mounted
Weight Approximately 60lb (27kg)
Power Requirements 100–240 V AC, 50/60Hz
Warranty 1-year parts and labor warranty included
Regulatory Compliance For Research Use Only. Not for use in Diagnostic Procedures.
CE Compliance Pollution degree 2
Installation category II
Indoor use only
Mains supply voltage fluctuations are not to exceed ±10 percent of
the nominal supply voltage
This instrument complies with the requirements of the EU Direc-
tives for electromagnetic compatibility (EMC Directive) and for
electrical safety (the LVD). Compliance with the relevant Directives
was demonstrated by third party testing to the appropriate EN and
IEC standards. The product bears the CE mark on its label as
evidence of compliance and an EU Declaration of Conformity for
the product is available from Promega on request.

4Promega Corporaon · 2800 Woods Hollow Road · Madison, WI 53711-5399 USA · Toll Free in USA 800-356-9526 · 608-274-4330 · Fax 608-277-2516
TM397 · Revised 12/16 www.promega.com
1.B. Specifications (continued)
Luminescence Module Specifications
Detector Top-reading, head-on photon-counting photomultiplier tube (PMT)
Wavelength Range 350–700nm
Detection Limit 3 × 10–21 moles of luciferase
Linear Dynamic Range 9 logs
Cross Talk Less than 3 × 10⁻⁵ (white, 96-well plate, Corning Cat.# 3912)
Filtered Luminescence Filter paddle containing 5 standard filters for luminescence
including: 495nm SP, 530nm LP, 540nm SP, 600nm LP and 450nm
(8nm BP). Additional custom emission filters may also be used.
Contact Promega Technical Services.
Fluorescence Module Specifications
Detector PIN photodiode
Light Source Wavelength-matched LED
Read Position Top-reading
Wavelength Selection Filter paddle with 5 standard excitation and
emission filters. Empty filter positions are available
for custom excitation and emission wavelengths.
Contact Promega Technical Services.
Wavelengths Included UV (Ex: 365nm, Em: 415–445nm)
Blue (Ex: 475nm, Em: 500–550nm)
Green (Ex: 520nm, Em: 580–640nm)
Red (Ex: 627nm, Em: 660–720nm)
AFC (Ex: 405nm, Em: 495–505nm)
Detection Limit 2fmol fluorescein/200µl
Linear Dynamic Range 6 logs (assay-dependent)

Promega Corporaon · 2800 Woods Hollow Road · Madison, WI 53711-5399 USA · Toll Free in USA 800-356-9526 · 608-274-4330 · Fax 608-277-2516 5
www.promega.com TM397 · Revised 12/16
UV-Visible Absorbance Module Specifications
Detector Top-reading, head-on photon counting
photomultiplier tube (PMT)
Light Source Xenon flash lamp
Spectral Range 200–600nm
Filter Wheel 9 absorbance filters included
Wavelengths Included 230, 260, 280, 320, 405, 450, 490, 560 and 600nm
10nm bandwidth
Detection Limit 0.1 O.D.
Dynamic Range 0–4.0 O.D. at 260nm and 280nm
Injector System Specifications
Number of Injectors (optional) Two injectors
Dispense Volume Range 5–200µl in 1µl increments
Plate Compatibility 6-, 12-, 24-, 48- and 96-well plates
Injection Speed 20–500µl per second
Waste Collection Tray volume Approximately 50ml
Void Volume 500µl
Shaker System Specifications
Shaking Pattern Linear or orbital patterns
Shaking Intensity 100–500 cycles per minute
Shaking Orbit 1mm, 2mm and 3mm settings
Heating System Specifications
Temperature Range Ambient +5°C to 45°C
Computer Requirements
Operating System Windows® 8.1 or 10, 64 bit, with USB connection
to instrument
RAM 2GB (4GB preferred)
Disk Space 64GB
Other Requirements Microsoft.NET Framework 4.0 (full version),
Microsoft Excel 2013 Professional

6Promega Corporaon · 2800 Woods Hollow Road · Madison, WI 53711-5399 USA · Toll Free in USA 800-356-9526 · 608-274-4330 · Fax 608-277-2516
TM397 · Revised 12/16 www.promega.com
1.B. Specifications (continued)
Additional Computer Recommendations if Using Your Own PC:
• Disable automatic Windows®updates and virus scans
• Disable automatic power off, sleep or hibernation settings
Disable "Fast Startup". Set the power button to Shut Down, not Sleep.
Disable any other automatically or manually started software that would consume PC resources during
operation.
• Ensure there are no domain policies that would overwrite any of the above settings.
*Note: The Tablet PC that is provided with GloMax®Discover has already been configured for the
settings listed above.
1.C Product Components
PRODUCT SIZE CAT.#
GloMax® Discover System 1 each GM3000
For Research Use. Not for use in Diagnostic Procedures. Includes:
• 1 each GloMax®Discover Instrument
• 1 each Tablet PC containing GloMax®Discover Software
• 1 each Tablet PC AC Power Adapter
• 1 each Tablet Mount Attachment
• 1 each AC Power Adapter with detachable power cord
• 1 each USB Cable
• 1 each 96- and 384-Well Apertures
• 1 each Aperture Plate
• 1 each 1/16 inch and 7/64 inch Hex Wrenches
• 1 each Phillips-Head Screwdriver
Preinstalled:
• 1 each Luminescence Filter Paddle (495nm SP, 530nm LP, 540nm SP, 600nm LP and
450nm [8nm BP])
• 1 each Fluorescence Excitation Modules and Emission Filters for UV (365nmEx/415–445nmEm),
Blue (475nmEx/500–550nmEm), Green (520nmEx/580–640Em),
Red (627nmEx/660–720nmEm) and AFC (405nmEx/495–505nmEm) detection with
1 custom excitation position and 1 custom emission filter position.
• 1 each Absorbance Filter Wheel containing 9 Absorbance filters
(230, 260, 280, 320, 405, 450, 490, 560 and 600nm)

Promega Corporaon · 2800 Woods Hollow Road · Madison, WI 53711-5399 USA · Toll Free in USA 800-356-9526 · 608-274-4330 · Fax 608-277-2516 7
www.promega.com TM397 · Revised 12/16
Available Separately
PRODUCT SIZE CAT.#
GloMax® Dual Injectors with Pump Staon 1 each GM3030
GloMax® Discover Luminescence Filter Paddle 1 each GM3011
GloMax® Discover Fluorescence Filter Paddle 1 each GM3012
1.D. Precautions and Special Instructions
Safety Symbols and Special Markings
5294MA.eps
Danger. Hazardous voltage. Risk
of electrical shock.
Danger. Tension dangereuse.
Risque de choc électrique.
5295MA.eps
Warning. Risk of personal injury
to the operator or a safety hazard
to the equipment or surrounding
area.
Avertissement. Risque de
préjudice corporel pour
l’opérateur ou d’accident avec
l’instrument ou l’entourage.
6687TA.eps
It is important to understand and
follow all laws regarding the safe
and proper disposal of electrical
instrumentation. Please contact
your local Promega Representa-
tive for disposal of the instru-
ment and power supply. Please
follow your institutional
requirements for disposal of the
accessories.
Avertissement. Il est important
de comprendre et de respecter
toutes les lois relatives à la
destruction sure et correcte des
appareils électriques. Veuillez
contacter votre représentant
Promega local concernant la
destruction de l’appareil.Veuillez
respecter les exigences de votre
établissement concernant la
destruction des accessoires.
Warning. Pinch point hazard. Avertissement. Pincez risque des
points.
Warning. UV light hazard. Do not
look directly at the UV light.
Avertissement. UV risques
faibles. Ne regardez pas directe-
ment la lumière UV.

8Promega Corporaon · 2800 Woods Hollow Road · Madison, WI 53711-5399 USA · Toll Free in USA 800-356-9526 · 608-274-4330 · Fax 608-277-2516
TM397 · Revised 12/16 www.promega.com
1.D. Precautions and Special Instructions (continued)
Special Instructions
• Wipe up spills immediately.
• The GloMax®Discover Instrument contains sensitive optical components and precision-aligned
mechanical assemblies. Handle with care.
• Use caution around solvents because they may damage the plastic case of the GloMax®Discover
Instrument.
• Do not submerge the GloMax®Discover Instrument in water.
• Do not expose the GloMax®Discover Instrument to temperatures outside the specified range, as
damage may occur to the unit that will not be covered under warranty.
• Changes or modifications to this unit not expressly approved by Promega could void the user’s authority
to operate the equipment.
• Do not use this device in proximity to sources of strong electromagnetic radiation (e.g., microwave oven)
because they may interfere with the proper operation.
• Do not use this instrument for anything other than its intended use.
• Always disconnect the power before cleaning or performing routine maintenance.
• Do not disassemble the instrument further than specified in this operating manual for routine
maintenance and use.
• If the equipment is used in a manner other than that specified by Promega, the protection provided by
the equipment may be impaired.
• Do not overfill multiwell plate wells because this may lead to spills and/or damage.
• If injectors are installed, check the tubing periodically and replace as needed to avoid leaks.
• Plug instrument and Tablet PC into the same wall socket or outlet strip to assure common grounding.
• Do not leave plate in the instrument after protocol is completed.
Promega Corporaon · 2800 Woods Hollow Road · Madison, WI 53711-5399 USA · Toll Free in USA 800-356-9526 · 608-274-4330 · Fax 608-277-2516 9
www.promega.com TM397 · Revised 12/16
Precautions
Important Safety Instructions—Please save these instructions.
5294MA.eps
Power OFF the GloMax®Discover
before accessing the interior,
installing or cleaning injectors.
Mise hors tension de GloMax®
Discover avant d’accéder à
l’intérieur, l’installation ou le
nettoyage des injecteurs.
5295MA.eps
Close the instrument door when the
GloMax®Discover is not in use.
Fermez la porte de l’appareil
lorsque le GloMax®Discover n’est
pas en cours d’utilisation.
5295MA.eps
The GloMax®Discover is intended
for indoor use only.
Le GloMax®Discover est destiné à
une utilisation en intérieur.
5295MA.eps
Always disconnect the power
before cleaning or performing
routine maintenance.
Déconnectez toujours
l’alimentation avant de nettoyer ou
d’effectuer l’entretien de routine.
5295MA.eps
Always disconnect the AC Adaptor
from the power outlet when not in
use.
Toujours débrancher l’adaptateur
secteur de la prise de courant
lorsqu’il n’est pas utilisé.
1.E. Environmental Requirements
Store and use the GloMax®Discover under the following conditions:
Shipping and Storage Conditions 4–50°C, under noncondensing conditions, up to 75%
humidity
Operating Conditions 5–30°C, up to 75% humidity
Operating Altitude Conditions less than 2,000 meters above sea level

10 Promega Corporaon · 2800 Woods Hollow Road · Madison, WI 53711-5399 USA · Toll Free in USA 800-356-9526 · 608-274-4330 · Fax 608-277-2516
TM397 · Revised 12/16 www.promega.com
1.F. Inspection and Unpacking
Upon receiving the GloMax®Discover System, inspect it carefully and make certain all accessories are included.
Refer to the checklist shipped with the instrument for order-specific items. Save all packaging materials, if
possible, in case the instrument needs to be returned for service. If any item is damaged, contact Promega
11851TA
Figure 2. GloMax®Discover System Accessory Components. Components shown include: Tablet PC,
Tablet PC Stylus, Tablet Fitting for mounting the Tablet PC, Tablet PC AC Power Adapter, Instrument Power
Cord, Instrument AC Power Adapter, USB Cable, 384-Well Aperture, Aperture Plate, 1/16 inch and 7/64 inch
Hex Wrenches, Phillips-Head Screwdriver. Notes: (1) Dual Injectors with Pump Station are sold separately. (2)
The 96-well aperture, Fluorescence Filter Paddle and Luminescence Filter Paddle are preinstalled on the instru-
ment.
Promega Corporaon · 2800 Woods Hollow Road · Madison, WI 53711-5399 USA · Toll Free in USA 800-356-9526 · 608-274-4330 · Fax 608-277-2516 11
www.promega.com TM397 · Revised 12/16
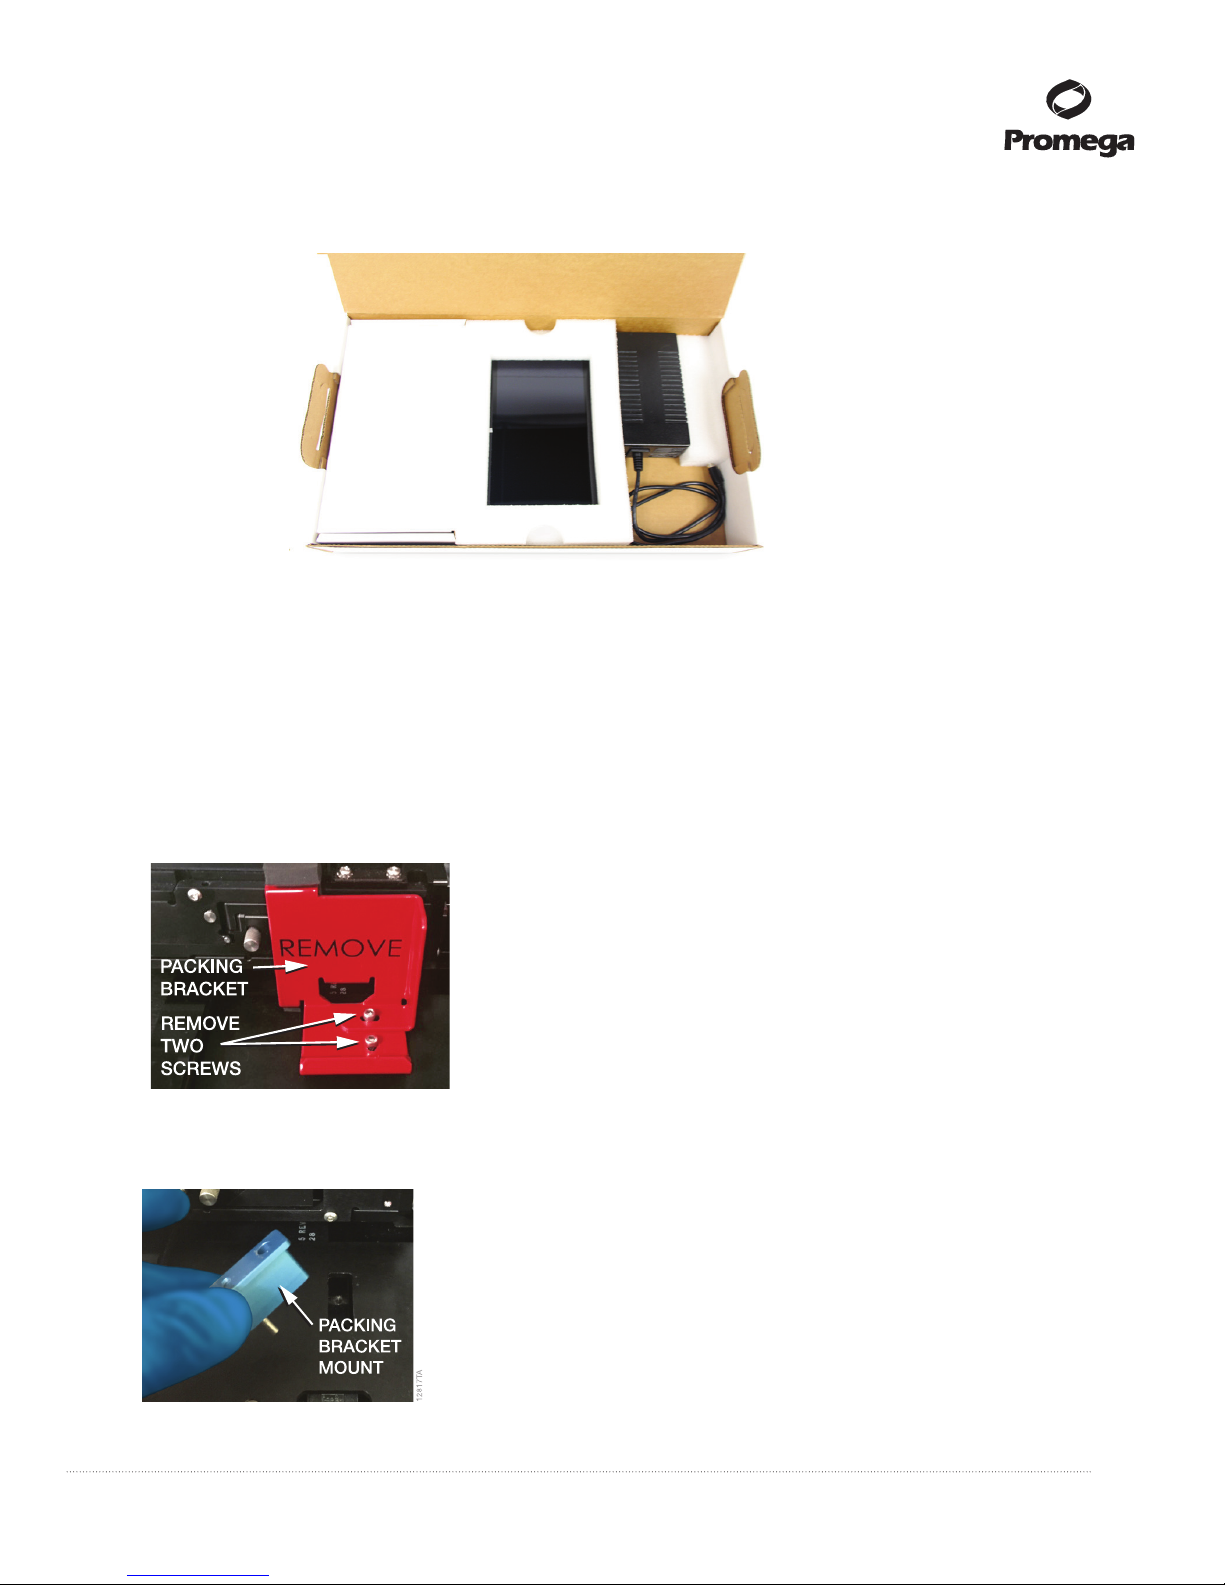
1. Remove the instrument and accessory box from the shipping container.
11852T
A
Figure 3. Contents of the GloMax®Discover System accessory box.
2. Place the GloMax®Discover Instrument on a flat, level surface. Leave at least 7.5 inches (19cm) of clearance
in front of the instrument to allow the instrument door to open without hindrance.
Note: We recommend that two people lift the instrument into position.
3. Ensure that the instrument is placed in a location that will allow you to meet the power requirement specifi-
cations (100–240V AC, 50/60Hz; Section 1.B).
4. Manually open the door of the instrument; use the Phillips-Head Screwdriver to remove the access panel
and the 7/64 inch Hex Wrench to remove the locking screws of the red Packing Bracket.
5. After removing the red Packing Bracket, remove the blue Packing Bracket Mount, and ensure the instru-
ment is free of any packaging material parts.

12 Promega Corporaon · 2800 Woods Hollow Road · Madison, WI 53711-5399 USA · Toll Free in USA 800-356-9526 · 608-274-4330 · Fax 608-277-2516
TM397 · Revised 12/16 www.promega.com
2. Setting Up the GloMax®Discover System
2.A. Setting Up the GloMax®Discover Instrument and Tablet PC
1. Unpack the Tablet PC from its shipping box.
2. Place the Tablet PC in the Tablet Holder on the top of the GloMax®Discover Instrument in the orientation
shown in Figure 4.
11847TA
11848TA
Figure 4. Instrument front and Tablet PC holder setup.
3. Secure the Tablet PC in the Tablet Holder by using the 1/16-inch Hex Wrench to screw the Tablet Mount
Attachment Piece into place.
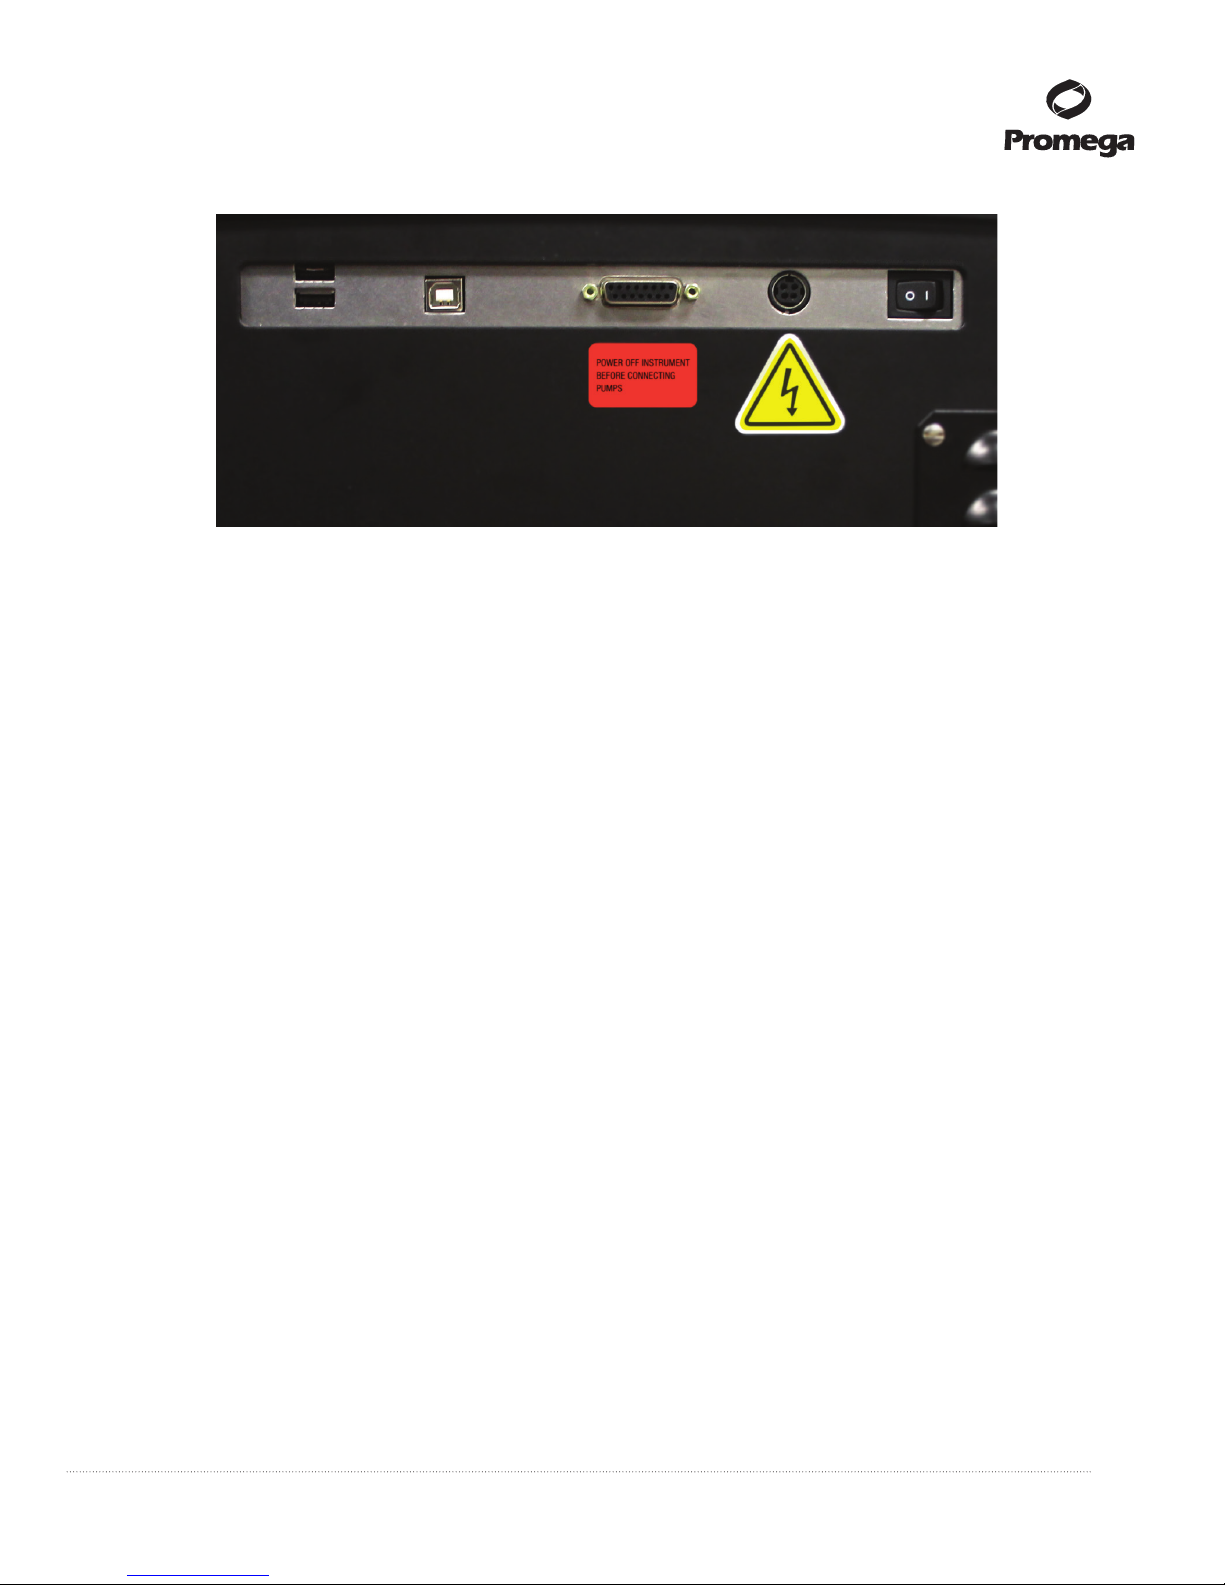
4. Using the provided USB cable, connect the Tablet PC to the USB port on the back of the instrument
(Figure 5).
5. Ensure that the instrument On/Off switch is in the OFF position (Figure 5).
6. Connect the Tablet PC to its power supply, and then connect the Tablet PC Power Cable to a power outlet.
7. Connect the Instrument AC Power Adapter to the back of the instrument and to a power outlet.
Note: We recommend connecting the instrument to an uninterrupted power supply (~500VA).
Promega Corporaon · 2800 Woods Hollow Road · Madison, WI 53711-5399 USA · Toll Free in USA 800-356-9526 · 608-274-4330 · Fax 608-277-2516 13
www.promega.com TM397 · Revised 12/16
12604TB
AB CDE
Figure 5. The back of the GloMax®Discover Instrument. A. Two USB ports. B. USB port to connect to
Tablet PC. C. Injector System connection. D. Power connection. E. On/Off switch.
2.B. Switching On the GloMax®Discover Instrument
1. Switch the instrument AC Power Adapter ON. Switch the instrument ON.
2. An LED light on the front right corner of the GloMax®Discover indicates when the instrument is ON.
3. Power up the Tablet PC by pressing and holding the power button on the perimeter of the Tablet PC.
Note: When powering ON, turn the instrument ON first and then the Tablet. A connectivity message may
appear in the software if the Tablet is powered ON before the instrument. If that occurs power OFF the
Tablet and then power the Tablet back ON.
4. The Tablet PC will begin its start-up protocol. After the operating software starts, either tap on the GloMax®
Discover Software Icon or double tap the GloMax®Discover Software Icon on the Desktop screen to launch
the GloMax®Discover software.
5. The GloMax®Discover System is now ready to use.

14 Promega Corporaon · 2800 Woods Hollow Road · Madison, WI 53711-5399 USA · Toll Free in USA 800-356-9526 · 608-274-4330 · Fax 608-277-2516
TM397 · Revised 12/16 www.promega.com
2.B. Switching On the GloMax®Discover Instrument (continued)
F
11623TA
Exit Back Tools Door Help
igure 6. GloMax® Discover software ‘Home’ screen.
2.C. Shutting Down the GloMax®Discover Instrument
1. Switch the instrument OFF using the On/Off switch on the back of the instrument.
Note: When the instrument is not in use for a prolonged period, it is best to turn OFF the external power
supply using its own On/Off switch.
2. Shut down the GloMax®Discover Software by tapping on the “x” in the upper right corner (Figure 6).
3. Shut down the Tablet PC using the Windows®shutdown procedure appropriate for your tablet PC:
Windows 8: Swipe in from the right edge of the screen, select Settings, then select Power: Shut Down.
Windows 10: From the Desktop screen, swipe upward to expose the Taskbar. Touch the Start button to
open the Start menu, then touch the Power icon on the left side of the Start menu. From the Power drop-
down list, touch the Shut Down item.
Note: When not in use for a prolonged period of time, the Tablet PC should be powered OFF.
2.D. Operating the GloMax®Discover System
1. Open the Door of the instrument by tapping the Door icon on the top right corner of the screen (Figure 6).
When the plate tray extends, add the plate such that well A1 of the plate corresponds to the label “A1” on
the plate tray (Figure 7).
2. Select a protocol of interest or one of the Quick Reads protocols from the Protocols screen or from the
yellow Quick Read options on the Home screen.
!

Promega Corporaon · 2800 Woods Hollow Road · Madison, WI 53711-5399 USA · Toll Free in USA 800-356-9526 · 608-274-4330 · Fax 608-277-2516 15
www.promega.com TM397 · Revised 12/16
3. Close the door using the Door icon on the top right corner of the screen.
4. Select the Start button at the bottom right corner of the screen.
11841T
A
Figure 7. Plate tray extended.
5. Enter the name of the result file by touching inside the text box and entering a name (Figure 8).
11679T
A
Figure 8. Save Results Window.
6. Select Start to begin the protocol.
7. The protocol will begin acquiring data and will display the results in the plate format in real time on the
screen.
8. When the read is finished, an Export button will be active on the bottom left corner of the screen, if you
wish to export the results. If you do not export the results, but want to export them at a later time, you can
find the results by touching the Results button on the home screen. Results are exported to the location
specified in Settings (Section 3.E, Export Folder).

16 Promega Corporaon · 2800 Woods Hollow Road · Madison, WI 53711-5399 USA · Toll Free in USA 800-356-9526 · 608-274-4330 · Fax 608-277-2516
TM397 · Revised 12/16 www.promega.com
3. GloMax®Discover User Interface Screens
3.A. Tablet PC ‘Home’ Screen
The ‘Home’ screen on the Tablet PC is the main launching pad for interaction with the functionalities built into the
GloMax®Discover Graphical User Interface Software. The ‘Home’ screen (Figure 9) contains 6 buttons:
Fluorescence. This Quick Read button allows you to immediately perform a fluorescence read, selecting the plate
type (6-, 12-, 24-, 48-, 96- or 384-well plate, with or without plate lids for 96- and 384-well plates), Excitation
filter wavelength and Emission filter wavelength.
Luminescence. This Quick Read button allows you to immediately perform a luminescence read, selecting the
plate type (6-, 12-, 24-, 48-, 96- or 384-well plate, with or without plate lids for 96- and 384-well plates) and
Integration time.
Absorbance. This Quick Read button allows you to immediately perform an absorbance read, selecting the plate
type (6-, 12-, 24-, 48-, 96- or 384-well plate, with or without plate lids for 96- and 384-well plates) and absor-
bance filter wavelength.
Protocols. Pressing the Protocols button will provide you a list of all available protocols. These include preloaded
protocols as well as user-defined protocols. The user can create user-defined protocols from this screen as well.
Smart Protocols provide analysis directly after the measurement is completed.
Results. Pressing the Results button will provide the user a list of all results. The user can view results by
Today, This Month, the last 6 Months, anytime This Year, or All of the results.
Settings. Pressing the Settings button provides the user with instrument information and setup options. For
example, the user can name the instrument, specify where files are exported on the PC or Network drive, specify
filter wavelengths and locations within the custom filter paddle, export log files, and access additional Tools.
11623TA
Exit Back Tools Door Help
Figure 9. GloMax®Discover ‘Home’ screen.

Promega Corporaon · 2800 Woods Hollow Road · Madison, WI 53711-5399 USA · Toll Free in USA 800-356-9526 · 608-274-4330 · Fax 608-277-2516 17
www.promega.com TM397 · Revised 12/16
The Instrument name appears in the title bar of the user interface. The following navigation buttons are displayed
across the top of the user interface window:
Exit. Tapping this button allows you to exit the GloMax®Discover User Interface software and returns to the
Windows®Operating System.
Back. Tapping this button returns you to the previous window.
Tools. Tapping this button expands a list of available tools such as turning the Heater On/Off; accessing the
Injectors to Prime, Reverse Purge and/or Flush; changing the Aperture between 96- and 384-well settings;
changing and/or viewing configurations for Filters (both excitation and emission filters); turning the Shaker
On/Off, and accessing the instrument information (About).
Door. This button toggles the open/closed status of the door on the GloMax®Discover Instrument.
Help. Tapping the Help button (question mark icon) activates the context-sensitive help for the current page of
the GloMax®Discover User Interface.
3.B. Quick Read Screens
Quick Reads are intended to allow users to perform a basic single-step measurement very easily. Simply define the
plate map, select the indicated options for the selected quick read (e.g., excitation/emission wavelengths for
fluorescence, integration time for luminescence, filter wavelength for absorbance). Open the door, insert your
plate, and press the Start button in the lower right corner to begin the plate read.
11624TA
Select
plate
format.
Select Excitation
and Emission filter
wavelengths.
Start
measurement.
Define the Plate Map. Green = selected, Gray = unselected
Figure 10. GloMax®Discover ‘Fluorescence Quick Read’ screen. On the plate map, green wells are
selected.

18 Promega Corporaon · 2800 Woods Hollow Road · Madison, WI 53711-5399 USA · Toll Free in USA 800-356-9526 · 608-274-4330 · Fax 608-277-2516
TM397 · Revised 12/16 www.promega.com
3.B. Quick Read Screens (continued)
11625TA
Select
plate
format.
Select
integration
time.
Start
measurement.
Define the Plate Map. Green = selected, Gray = unselected
Figure 11. GloMax®Discover ‘Luminescence Quick Read’ screen.
F
11626TA
Select
plate
format.
Select
absorbance
filter.
Start
measurement.
Define the Plate Map. Green = selected, Gray = unselected
igure 12. GloMax®Discover ‘Absorbance Quick Read’ screen.

Promega Corporaon · 2800 Woods Hollow Road · Madison, WI 53711-5399 USA · Toll Free in USA 800-356-9526 · 608-274-4330 · Fax 608-277-2516 19
www.promega.com TM397 · Revised 12/16
3.C. Protocol Screen
Touch Protocols from the ‘Home’ screen to access the list of protocols currently present in the software or create
a new protocol. The user can view user-defined protocols by selecting User, view Promega preloaded protocols by
selecting Preset, run a Promega Smart Protocol (see below for more details) or see all protocols by selecting All.
Favorite protocols can be marked by tapping the Star adjacent to the protocol name. After marking a protocol as a
“favorite” those protocols will automatically be listed at the top of the ‘Protocol’ screen to make locating them
easier. There is no limit to the number of protocols that may be selected as favorites.
11627TA
Select Favorites.
Create new
protocol.
View protocols
of interest.
Figure 13. GloMax®Discover ‘Protocol’ screen.
Only user-defined protocols may be deleted, by tapping the red X at the far right of the screen. After selecting to
delete, the user will be asked to confirm the request to delete the user-defined protocol.
F
11628T
A
igure 14. Delete Protocol message from the GloMax®Discover software.
Smart Protocols
Smart Protocols are designed to provide the user with a guided setup of specific assays. Smart Protocols titled
“Demo” should not be run for any other purpose than a demonstration of an assay kit. Following the data
collection, the results are automatically analyzed for the user.
1. Tap the Smart button, and select the protocol of interest.
2. Follow the on-screen instructions. Insert the plate into the instrument.
Table of contents
Other Promega Measuring Instrument manuals

Promega
Promega GloMax Navigator Detection System User manual

Promega
Promega Maxwell CSC Instrument User manual

Promega
Promega Quantus Fluorometer User manual

Promega
Promega GloMax-Multi Detection System User manual

Promega
Promega PowerPlex ESI 17 Fast System User manual

Promega
Promega QuantiFluor E6090 User manual

Promega
Promega DeadEnd G7360 User manual

Promega
Promega GloMax 20/20 User manual


