Prosense QPSL-AP-42 User manual
P.1
P.1
3505 HUTCHINSON ROAD
CUMMING, GA 30040-5860
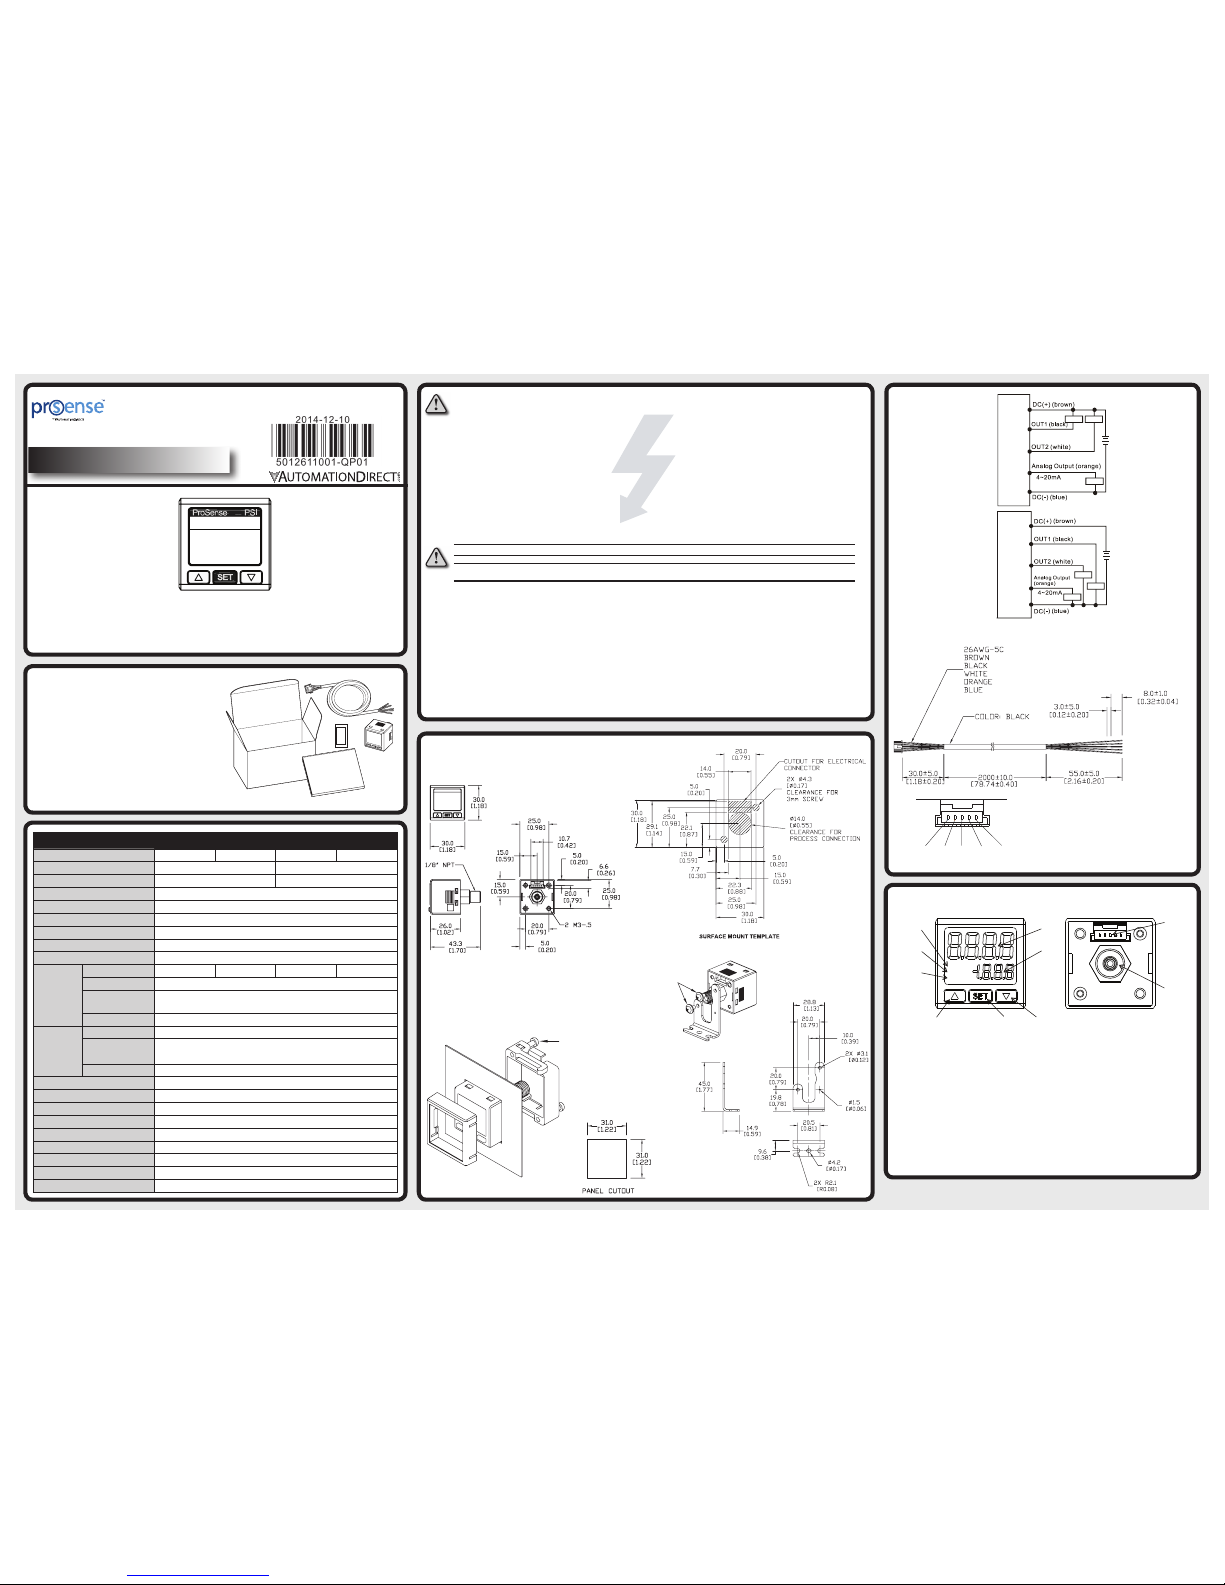
Digital Pressure Switch /
Transmitter
Compact combination Pressure Switch / Transmitter with 2 digital outputs (NPN or PNP)
which may be set individually and an analog 4-20mA output. Perfect for the factory floor
or installed in a control cabinet. The unit comes with a 2 meter cable for easy installation
and has 2 optional mounting brackets available.
Models:
QPSL-AP-42
QPSL-AN-42
QPSH-AP-42
QPSH-AN-42
Box Contents and Unpacking Instructions
• Unpack the QPS Pressure Switch from its
shipping carton. Included in the carton is the
switch, cable and pressure units label and these
instructions.
• Inspect all equipment for completeness. If any-
thing is missing or damaged, immediately call
the AutomationDirect returns department @
1-800-633-0405.
• Inspect the part number to ensure the model
received matches the output type required.
WARNING: To minimize the risk of potential safety problems, you should follow all applicable local
and national codes that regulate the installation and operation of your equipment. These codes vary
from area to area and it is your responsibility to determine which codes should be followed, and to
verify that the equipment, installation, and operation are in compliance with the latest revision of
these codes.
Equipment damage or serious injury to personnel can result from the failure to follow all applicable
codes and standards. We do not guarantee the products described in this publication are suitable for
your particular application, nor do we assume any responsibility for your product design, installation,
or operation.
If you have any questions concerning the installation or operation of this equipment, or if you need
additional information, please call us at 1-800-633-0405 or 770-844-4200.
This publication is based on information that was available at the time it was printed. At
Automationdirect.com® we constantly strive to improve our products and services, so we reserve the
right to make changes to the products and/or publications at any time without notice and without
obligation. This publication may also discuss features that may not be available in certain revisions of
the product.
WARNING! Electric shock danger
ProSense QPS is a pressure measurement device. DO NOT use it out of its specification. Improper
pressure or incorrect wiring may cause injuries to staff or damages to other devices.
1. Keep away from high-voltage and high-frequency environment during the installation to prevent
interference. Avoid using the device in environments which contain: (a) dust or corrosive gas; (b)
high humidity and high radiation; (c) shock and vibration
2. QPS can only be used for air pressure measurement and should avoid corrosive, inflammable or
toxic gas measurement.
3. Make sure the input power is switched off when installing or uninstalling the QPS and the pres-
sure source is off to prevent harm to personnel or equipment.
4. Before switching on the input power, check the signal connection, e.g. the input voltage and
polarity. Voltage that is too high may cause damage to the QPS.
5. Use dry cloth and DO NOT use acid or alkaline liquid to clean the device.
6. Outputs remain active in Setup Mode.
x
QPSL-AN-42
QPSH-AN-42
QPSL-AP-42
QPSH-AP-42
QPS-CBL (Included with each QPS switch/transmitter)
1 - Positive input power (brown)
2 - Digital output 1 signal (black)
3 - Digital output 2 signal (white)
4 - Analog output signal (orange)
5 - Negative power supply input (blue)
12
3
4
5
2
OUT
1
OUT
ANALOG
1
2
3
4
5
678
9
10
1 - Analog output indicator
2 - Digital output 1 indicator
3 - Digital output 2 indicator
4 - Pressure Value (PV)/parameter display (8mm digits)
5 - Setpoint Value (SV)/setup item display (4mm digits)
6 - Increment UP button
7 - SET or Enter button
8 - Increment DOWN button
9 - Cable connection
10 - Pressure connection
Load Load
Load
Load
Load
Load
Wiring
Dimensions
mm [in]
Display, KeyPad and Connections
cmHg
inHg
KPa
MPa
kgf/cm
bar
psi
Pressureunit label
Instructions
Dimensions
mm [in]
M3.5 x 14mm
QPS-PMK - Optional Panel Mount Kit
QPS-FMK - Optional Frame
Mount Kit
Input Power
10.8 to 26.4VDC
PNP
(4-20mA output)
M3-.5 x 6mm
NPN
(4-20mA output)
Input Power
10.8 to 26.4VDC
ProSense QPS Digital Pressure Switch / Transmitter Specifications
Model QPSL-AP-42 QPSL-AN-42 QPSH-AP-42 QPSH-AN-42
Rated Pressure -14.5 to +14.5 psi -14.5 to +145 psi
Maximum Pressure (Proof) 29psi 217psi
Maximum Vacuum -14.5 psi
Pressure Accuracy w3% of full scale
Temperature Influence @ 25°C w2% of full scale
Fluid Measured Air, Non-corrosive gas, Non-flammable gas
Input Power 10.8 to 26.4 VDC
Power Consumption 260mA maximum
Digital
Outputs
Output Type 2-PNP 2-NPN 2-PNP 2-NPN
Maximum Current 100mA each
Response Time 2ms, 4ms, 10ms, 30ms, 50ms, 100ms, 250ms, 500ms, 1,000ms, 5,000ms
selectable
Residual Voltage 1.5 VDC
Analog
Output
Output Type 4-20mA
Maximum Output
Load Resistance 400ΩΩ
Linear Accuracy < w2% of full scale
Process Connection 1/8” NPT outer / M5 inner bore (Nickel Plated Brass)
Case Materials Case = ABS Plastic, Lens = Polycarbonate
Shock Immunity 10 ~ 500 Hz, 10mm 3 axes for 2 hours
Vibration Immunity Max. 100m / s2 3 axes 6 directions, 3 times each
Operating Temperature 0°C to +50°C (32°F to 122°F)
Storage Temperature -20°C to +65°C (-4°F to 149°F)
Altitude < 2,000m
Ambient Humidity 35% ~ 80% (non-condensing)
Approvals cULus - UL 508 (E157382), CE, RoHS

Changing modes:
The QPS will be in the “Run Mode” when it is powered on, displaying PV and SV. Press ;
for more than 2 seconds in this mode to switch to the “Quick Setup Mode”. Press ;for
more than 4 seconds in the “Run Mode” to switch to “Pro Setup Mode”. Press ;more than
2 seconds in the “Quick Setup Mode” or “Pro Setup Mode” to return to the “Run Mode”.
Setting up parameters:
In the three modes, press ;once to select the parameter to set up. When you find the
parameter to set up or modify, use , . to modify the setting.
Menu Navigation
Resetting the ProSense QPS to factory default values:
Hold ;button for 4-5 seconds until display changes to read Pro. Press the ;button 9
times until the display shows off
rst
Using the ,. buttons change the value to on and press ;
When complete the display will read
std
sub
Caution: Outputs remain active in Setup Mode
Pro Setup Mode Quick Setup
Mode
QPS Powered ON
Run Mode
Press ;> 4 secs.
Press ;> 2 secs.
Press
;
> 2 secs.
Press ;> 2 secs.
Accessing QPS Setup Modes:
;
;
;
;
;
Run Mode
Upper limit of OUT1
Lower limit of OUT1
Upper limit of OUT2
Lower limit of OUT2
SV
SV
–1-h
–2-h
–2-l
–1-l
–1-p
–2-p
OUT1 set to
Hysteresis or Window
Mode
OUT2 set to
Hysteresis or Window
Mode
OUT2 set to
Easy Mode
OUT1 set to
Easy Mode
Run Mode
Run Mode
1-H Output 1 high setpoint for hysteresis or window modes
1-L Output 1 low setpoint for hysteresis or window modes
1-P Output 1 high setpoint for easy mode
2-H Output 2 high setpoint for hysteresis or window modes
2-L Output 2 low setpoint for hysteresis or window modes
2-P Output 2 high setpoint for easy mode
;
;
;
;
;
Quick Setup
Mode
OUT1 mode
OUT2 mode
NO/NC of OUT1, OUT2
Output response time
Unit
PV display color
;
;
easy
–ot1
.
,
.
,
–hys
–ot1
WCMp
–ot1
easy
–ot2
.
,
.
,
–hys
–ot2
WCmp
–ot2
1o2o
–noC
.
,
.
,
1C2o
–noC
1o2C
–noC
.
,
1C2C
–noC
Easy Hysteresis Window
Easy Hysteresis Window
–––2
–spd
.
,
.
,
–––4
–spd
––10
–spd
.
,
––50
–spd
OUT1 N.O.
OUT2 N.O.
OUT1 N.C.
OUT2 N.O.
OUT1 N.O.
OUT2 N.C.
OUT1 N.C.
OUT2 N.C.
.
,
––30
–spd
.
,
–100
–spd
.
,
–250
–spd
.
,
–500
–spd
.
,
1000
–spd
.
,
5000
–spd
Unit: ms
r-on
–Clr
.
,
.
,
6-on
–Clr
–red
–Clr
.
,
6ren
–CLr
–Mpa
–unt
.
,
.
,
–Kpa
–Unt
–K6f
–unt
.
,
–psi
–unt
.
,
–bar
–unt
.
,
mmh6
–unt
.
,
cmh6
–unt
.
,
inh6
–unt
MPa* kPa** kgf/cm² bar psi
mmHg** cmHg* inchHg
* Will not be displayed in low pressure type sensor. (QPSL)
** Will not be displayed in high pressure type sensor. (QPSH)
Quick Setup Mode
Additional Help and Support
• For additional technical support and questions, call our Technical
Support team @ 1-800-633-0405 or 770-844-4200
;
;
;
;
Pro Setup
Mode
SV/Setup Item Display
;
;
–std
–sub
.
,
.
,
–off
–sub
unit
–sub
–100
–dsp
.
,
.
,
–250
–dsp
–500
–dsp
Display SV Off Display unit
–––1
–hys
.
,
.
,
–––2
–hys
–––3
–hys
.
,
–––5
–hys
.
,
–––4
–hys
.
,
–––6
–hys
.
,
–––7
–hys
.
,
–––8
–hys
–off
–pWs
.
,
––on
–pws
out1
–dpy
.
,
.
,
out2
–dpy
–and
–dpy
.
,
––or
–dpy
0000
–Cod
.
,
0000
–002
–Pro
–set
Display Response Time
Switching Color Display
1000
–dsp
.
,
.
,
Cp-m
–Cpy
Power Saving
Hysteresis
Code
–off
–Cpy
.
,
Cp-5
–Cpy
Copy Mode
–off
–Asw
.
,
––on
–asw
Analog Output Enable
–off
–rst
.
,
––on
–rst
Reset to Default Settings
;
;
;
;
Slave mode Master mode
Pro Setup Mode
Copyright 2017, Automationdirect.com Incorporated/All Rights Reserved Worldwide
Data Sheet: QPS-QSG P.2
See “Code” for details
Quick Setup Mode
ot1 Mode Selection for Output 1
ot2 Mode Selection for Output 2
EASY Easy Mode (Default) (see examples on Page 4)
HYS Hysteresis Mode (see examples on Page 4)
WCmP Window Mode (see examples on Page 4)
noC Normally Open /Normally Closed output selection
1o2o Output 1 Normally Open & Output 2 Normally Open (Default)
1C2o Output 1 Normally Closed & Output 2 Normally Open
1o2C Output 1 Normally Open & Output 2 Normally Closed
1C2C Output 1 Normally Closed & Output 2 Normally Closed
Spd Output Response Time in milli-seconds - use to minimize digital output fluctuations due to pressure variations
(Default = 2)
CLr Color - set how display color will change based on parameter dPY in Pro Setup Mode
r-on PV display turns red based on output status as set by parameter dPY in Pro Setup Mode (Default)
6-on PV display turns green based on output status as set by parameter dPY in Pro Setup Mode
rEd PV display is always red regardless of Out1 and/or Out2 state
6rEn PV display is always green regardless of Out1 and/or Out2 state
Unt Select Engineering Units
Engineering Units Display Resolution
QPSH QPSL
MPa MPa available only on QPSH-Ax-42 0.001 -
Kpa kPa- available only on QPSL-Ax-42 -0.1
k6f kgf/cm² 0.01 0.001
bAr bar 0.01 0.001
PSi psi (Default) 0.1 0.01
MMH6 mm Hg available only on QPSL-Ax-42 - 1
CMH6 cm Hg avalialbe only on QPSH-Ax-42 1 -
InH6 inch Hg 10.1
Pro Setup Mode
Pro Pro Setup Mode - Displays when entering Pro Setup Mode
Set Setup - Displays when entering Pro Setup Mode
sub SV / Setup Item Display selection
std Display shows SV (Default)
off OFF
unit Display shows Engineering unit, set by Unt in Quick Setup Mode
dsp Display response time rate in milli-seconds (Default = 100)
Hys Hysteresis setting for outputs in EASY and WINDOW modes (Default = 3), applies to both outputs
QPSH
MPa(MPa)1 = 0.001 MPa thru 8 = 0.008 MPa -
kPa(KpA)-1 = 0.1 kPa thru 8 = 0.8 kPa
kgf/cm²(k6f)1 = 0.01 kgf/cm² thru 8 = 0.08 kgf/cm² 1 = 0.001 kgf/cm² thru 8 = 0.008 kgf/cm²
bar(bAr)1 = 0.01 bar thru 8 = 0.08 bar 1 = 0.001 bar thru 8 = 0.008 bar
psi(PSI)1 = 0.1 psi thru 8 = 0.8 psi 1 = 0.01 psi thru 8 = 0.08 psi
mm Hg(MMH6)-1 = 1 mm Hg thru 8 = 8 mm Hg
cm Hg(CMH6)1 = 1 cm Hg thru 8 = 8 cm Hg -
In Hg(InH6)1 = 1 in Hg thru 8 = 8 in Hg 1 = 0.1 in Hg thru 8 = 0.8 in Hg
pWs Power Saving Mode - Turns display back light off. Display values can be viewed momentarily by
pressing the ;button
dpy Switching color display - sets when display changes colors (as set by parameter CLr) based on output
status
out1 Color changes when Output 1 is ON (Default)
out2 Color changes when Output 2 is ON
and Color changes when Output 1 and Output 2 are ON
or Color changes when Output 1 or Output 2 is ON
Cod Code - quick reference to determine the settings of the QPS device (See Code Reference Table - Page 3)
CPY Copy - used to select master and slave when copying settings to other QPS devices
CP-s Copy Slave Mode
CP-m Copy Master Mode
Asw Analog Output Enable (Default = ON)
rst Reset QPS to Factory Defaults

P.3
Analog Output
The analog output is directly proportional to the process pressure over the full range of the device. For example if the process pressure is 0 psi
the 4-20 mA output of a QPSL will be approximately 12 mA or for the QPSH the pressure at 12 mA would be 65.3 psi and for 0 psi the output
would be 5.45 mA. The analog output is enabled as the factory default. It can be disabled with the “Analog Output Enable” parameter in Pro
Setup Mode.
4mA
12mA
20mA
-14.5psi 14.5psi 4mA
12mA
20mA
-14.5psi 145psi
QPSL-xx-42 QPSH-xx-42
0psi 65.3psi
5.45mA
0psi
Process Connection
Use a suitable thread sealant Teflon® tape. Do not use liquid thread
sealant. Always tighten with an open end or adjustable wrench on
the wrench flats. Never use any part of the pressure gauge to tighten
other than the wrench flats that are on the gauge socket. Failure to
do so will severely damage the pressure gauge.
OK
SET
ProSense PSI
CODE (Pro Setup Mode Parameter Cod)
CODE provides a quick method to determine the settings of the QPS parameters (Factory Default 0000 302)Locking the Keys
Lock On: Press ; and .together for 2 seconds until
lock
on
is
displayed. You will then see the display of pressure value (PV) and
setpoint value (SV).
Lock Off: Press ; and ,together for 2 seconds until
lock
off
is
displayed. You will then see the display of pressure value (PV) and
setpoint value (SV).
Lock Display: Press any key in the key locking mode, and you will see
the display of pressure value (PV) and lCk (SV). Release the key and
the PV and SV will return to original values.
QPS is able to copy the parameters from one
device to another.
Electrical connection for copying parameters:
Connect Pin 2 (black) on master to Pin 3 (white) on slave; Pin 3
(white) on master to Pin 2 (black) on slave; Pin 5 (blue) on master
and slave to COM on power supply; Pin 1 (brown) on master and
slave to +24V on power supply.
Setup for copying paramters:
Slave device: In the “Run Mode”, press ;for more than 4 seconds
and release the key after you see
pro
set
. You are now in “Pro Setup
Mode”. Press ; 7 times and find the parameter for setting up the
copy function (See Pro Setup Mode chart). Use ,. to select
Cp-s
Cpy (CP-S refers to Copy-Slave).
Master device: In the “Run Mode”, press ; for more than 2
seconds and release the key after you see
pro
set
. You are now in the
“Pro Setup Mode”. Press 7 times and find the parameter for setting
up the copy function (See Pro Setup Mode chart). Use ,. to
select
Cp-m
Cpy (CP-M refers to the Copy-Master).
Next, press ;for more than 2 seconds and return to the “Run
Mode”.
Now you will see Cp-m on the display and CP-S on the slave
device, indicating that the two devices have been connected. In the
lower display int you will see numbers counting up, referring to
the number of parameters transmitted successfully between the two
devices.
Once the copy of parameters completes, you will see
Cp-m
ok
on the master device and
Cp-s
ok
on the slave device.
After the copy is complete, power the units off and re-connect them
according to the wiring diagram.
Resetting Zero Pressure:
Remove pressure from device before starting.
In the “Run Mode”, press ,. simultaneously, and you will see
0000
adj. The zeroing will start. Release the keys to end the zeroing
sequence.
Code
1st digit 2nd digit 3rd digit 4th digit
OUT1 mode N.O./N.C. OUT2 mode N.O./N.C. Output Response
Time Color Switching Color Display
0Easy N.O. Easy N.O. 2ms
Red when ON
OUT1
1N.C. N.C. 4ms OUT2
2Hysteresis N.O. Hysteresis N.O. 10ms OUT1 and OUT2
3N.C. N.C. 30ms OUT1 or OUT2
4Window N.O. Window N.O. 50ms
Green when ON
OUT1
5N.C. N.C. 100ms OUT2
6– – – – 250ms OUT1 and OUT2
7– – – – 500ms OUT1 or OUT2
8– – – – 1,000ms
Red
OUT1
9– – – – – OUT2
A– – – – – OUT1 and OUT2
B– – – – – Red OUT1 or OUT2
C– – – – –
Green
OUT1
d– – – – – OUT2
E– – – – – OUT1 and OUT2
F– – – – – OUT1 or OUT2
Code 6th digit 7th digit 8th digit
Pressure Unit Display Response Time SV/Setup Item Display Hysteresis Setting
0kPa or MPa
100ms
Standard 1
1kgf/cm² Off 2
2bar Unit 3
3psi
250ms
Standard 4
4mm Hg or cm Hg Off 5
5inch Hg Unit 6
6–
500ms
Standard 7
7–Off 8
8–Unit –
9–
1,000ms
Standard –
A–Off –
B–Unit –
QPS Display
P.4
Data Sheet: QPS-QSG
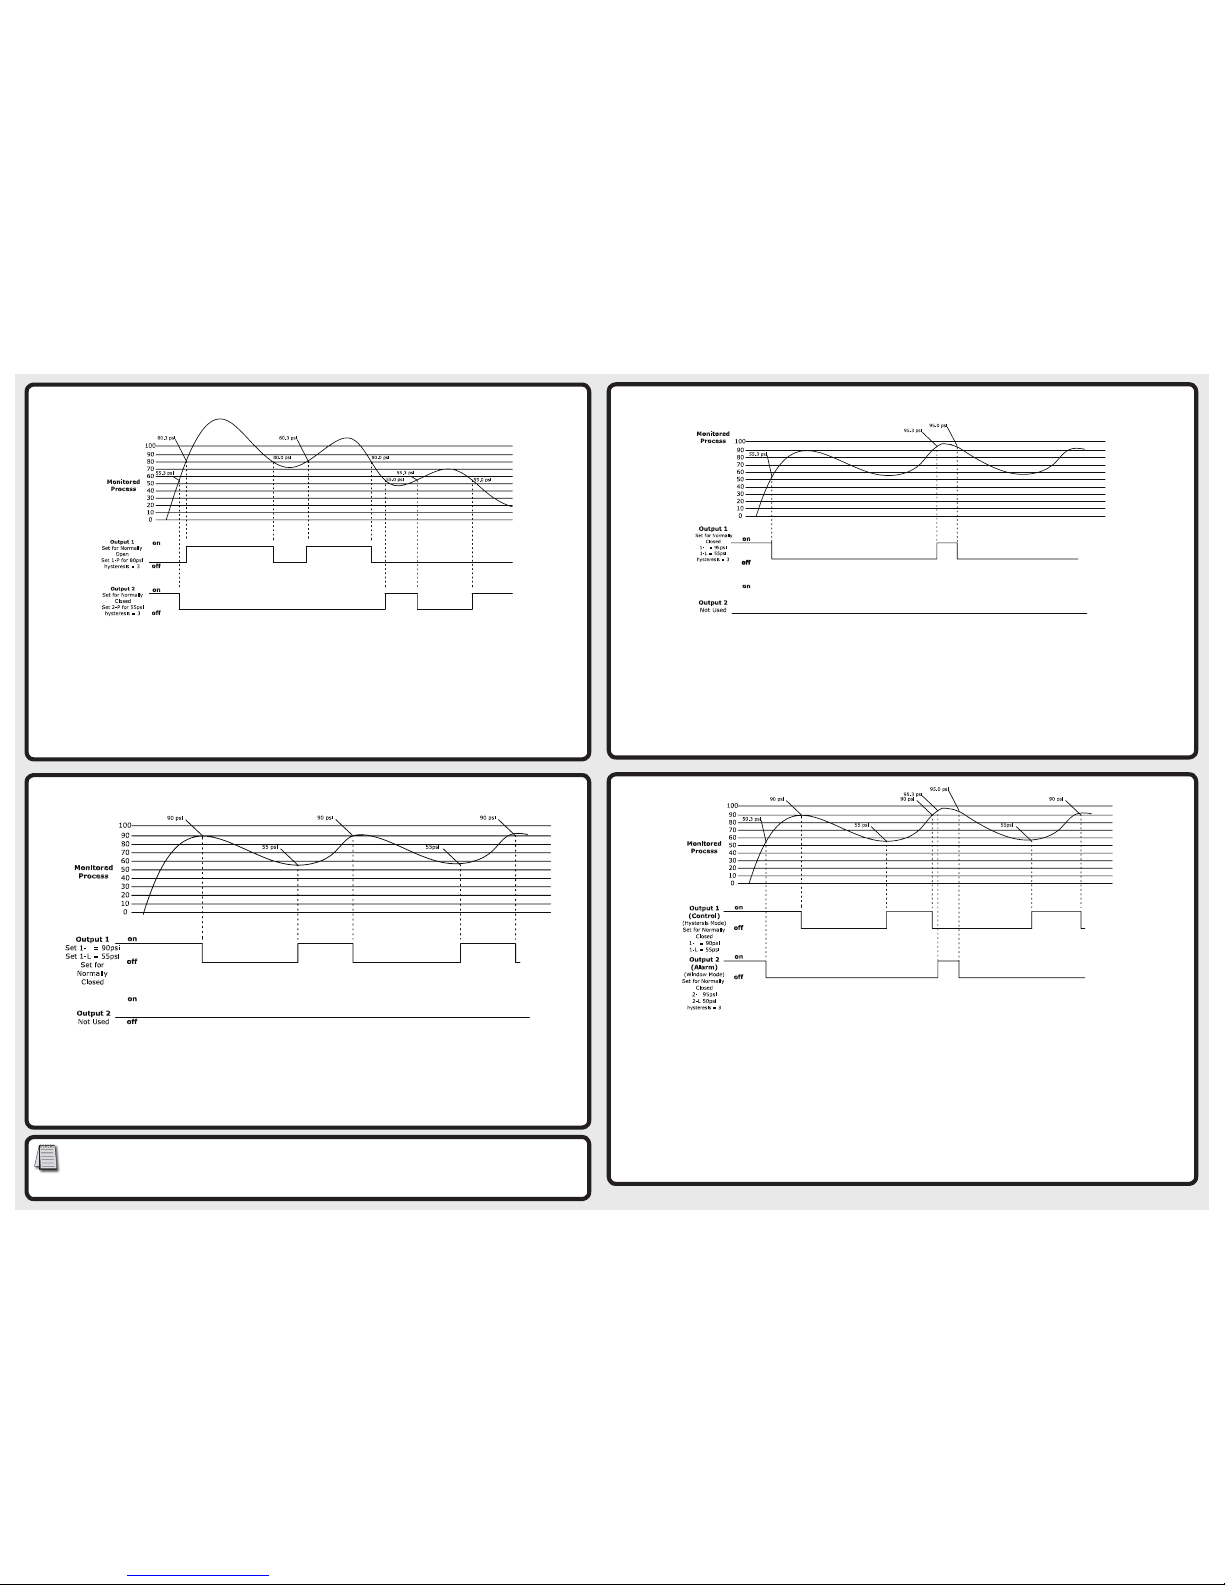
Window Mode: In the example below the output will change state when the measured pressure increases to 55.3psi (1-L SV + HYS)and will
change state again when the pressure increases to 90.3psi (1-H SV + HYS). As the measured pressure decreases back to 90psi (1-H SV) the output
will change state and will change state again when the pressure decreases to 55psi (1-L SV). Each digital output can be individually set.
Using Hysteresis Mode to control the pressure in a tank
Hold ;button for 2-3 seconds until display changes.
Verify 0T1 is set to HYS, if not use the ,. to change and press ;button.
Verify 0T2 is set to EASY, if not use the ,. to change and press ;button.
Verify noC is set to 1C2o, if not use the ,. to change and press ;button.
Press and hold the ; button until the display changes to show the Setpoint and Process values.
Using the ,. set the output 1 1-H level to 90psi.
Briefly press and release the ;button to change to 1-L and set it to 55psi.
Hysteresis Mode: When the measured pressure is greater than the Hi setpoint, the output will change state. When the measured pressure
is less than the Lo setpoint, the output will change state. Each digital output can be individually set.
Using EASY Mode to Set up a Simple Alarm
Hold ;button for 2-3 seconds until display changes.
Verify 0t1 is set to easy, if not use the ,. to change and press ;button.
Verify 0T2 is set to EASY, if not use the ,. to change and press ;button.
Verify noC is set to 1o2C, if not use the ,. to change and press ;button.
Press and hold the ; button until the display changes to show the Setpoint and Process values.
Using the ,. set the output 1 ON level for 1-P to 80psi.
Briefly press and release the ;button to change to 2-P and set the output 2 ON level to 55psi.
Hold ;button for 4-5 seconds until display changes to Pro.
Press the ;button 3 times so that HYS is on the display.
Verify the value 3 is in the lower display, if not use the ,. to change and press ;button
Press and hold the ;button until the display changes to show the Setpoint and Pressure copy values.
Easy Mode: When the measured pressure is greater than pressure setpoint plus the hysteresis setting (SV+hysteresis), the output will
change state. When the measured pressure is less than the pressure setpoint (<SV), the output will change state. Each digital output can
be individually set.
Copyright 2017, Automationdirect.com Incorporated/All Rights Reserved Worldwide
H
H
Hysteresis is defined as: The lag in response of the output in reacting to changes in the process affecting it. For example Setpoint
1-P is set to 80 PSI for output 1 but the output does not change state when the pressure is increasing until the actual pressure
reaches 80.3 PSI (1-P+hysteresis), the output will then change back to its neutral state once the pressure drops below the Setpoint
of 80 PSI. This function known as Hysteresis is used to prevent the outputs from chattering if the process pressure were to hover
close to the Setpoint.
H
H
Using Hysteresis mode to control the pressure in a tank and window mode to generate an alarm
Wire the QPS using the connection diagrams supplied.
Hold ;button for 2-3 seconds until display changes.
Verify 0T1 is set to Hys, if not use the ,. to change and press button.
Verify 0T2 is set to WCMP, if not use the ,. to change and press button.
Verify noC is set to 1C2C, if not use the ,. to change and press button.
Press and hold the ;button until the display changes to show the Setpoint and Process values.
Using the ,. set the output 1 1-H level to 90psi.
Briefly press and release the ;button to change to 1-L and set it to 55psi.
Briefly press and release the ;button to change to 2-H and set it to 95psi.
Briefly press and release the ;button to change to 2-L and set it to 50psi.
Hold ;button for 4-5 seconds until display changes to Pro.
Press the ;button 3 times so that Hys is on the display.
Verify the value 3 is in the lower display, if not use the ,. to change and press ;button.
Press and hold the ;button until the display changes to show the Setpoint and Process values.
Hysteresis & Window Modes of operation for control and alarming
Using Window Mode to create alarm condition
Hold ;button for 2-3 seconds until display changes.
Verify 0T1 is set to wCmp, if not use the ,. to change and press ;button.
Verify 0T2 is set to EASY, if not use the ,. to change and press ;button.
Verify noC is set to 1C2o, if not use the ,. to change and press ;button.
Press and hold the ;button until the display changes to show the Setpoint and Process values.
Using the ,. set the output 1 1-H level to 95psi.
Briefly press and release the ;button to change to 1-L and set it to 55psi.
Hold ;button for 4-5 seconds until display changes to Pro.
Press the ;button 3 times so that Hys is on the display.
Verify the value 3 is in the lower display, if not use the ,. to change and press ;button
Press and hold the ;button until the display changes to show the Setpoint and Process values.
This manual suits for next models
3
Popular Switch manuals by other brands

Savant
Savant PAV-SIPA50SM quick start guide

steute
steute Ex 61 Z Mounting and wiring instructions

Harris
Harris IconMaster Installation and configuration manual

AAVARA
AAVARA PB9000W user guide

Siemens
Siemens SCALANCE X-300EEC Compact operating instructions

Korenix
Korenix JetNet 701 Quick installation guide


