PROTMEX PT3378-WWVB User manual

PT3378-WWVB Manual
Main Features:
1. WWVB Radio control time function
2. Perpetual Calendar Up to Year 2099
3. Time (12/24h format) / Date/ Weekday Display
4. Daily Alarm Function
5. Snooze function
6. Moon phase display
7. Barometric pressure (17.72 inHg~32.50 inHg & 600 hPa/mb~1100 hPa/mb)
8. Indoor & outdoor humidity ( 20%RH ~ 95%RH)
9. Indoor & outdoor Temperature (°F or °C optional)
-Indoor temperature measurement range: 32°F (0°C) ~ 122°F (50°C)
-Remote temperature measurement range: -4°F (-20°C) ~ 140°F (60°C)
10. Temperature alerts.
11. Minimum/maximum display for air humidity and temperature
12. Wireless Remote Sensor:
-433.92MHz RF transmission frequency
-200 feet transmission range in an open area
Weather forecast function
Power Supply:
-Weather Station: 2 x LR6 AA (not included) or use power adapter(included)
-Wireless Remote Sensor: 2 x LR6 AA (not included)
Weather Station Appearance
Part A-Positive LCD
A1: Remote Temperature
A2: Remote Humidity
A3: Remote Temperature Alert
A4: Time/Calendar or Alarm time
A5: Moon Phase
A6: Barometric pressure
A7: Histogram shows the trend of 24 hours of atmospheric pressure
A8: Indoor Humidity
A9: Indoor comfort
PT3378-WWVB Manual
A10: Indoor Temperature
A11: Weather Forecasting
Part B – Side button and power
B1:
” touch field
B2:
”button
B3:
” button
B4: “▲” button
B5: “▼” button
B6: ” button
B7:
”button
B8: “MEM” button
B9: Alarm on/off switch
B10: Power supply socket
B11: USB charger output socket
B12: Battery slots.
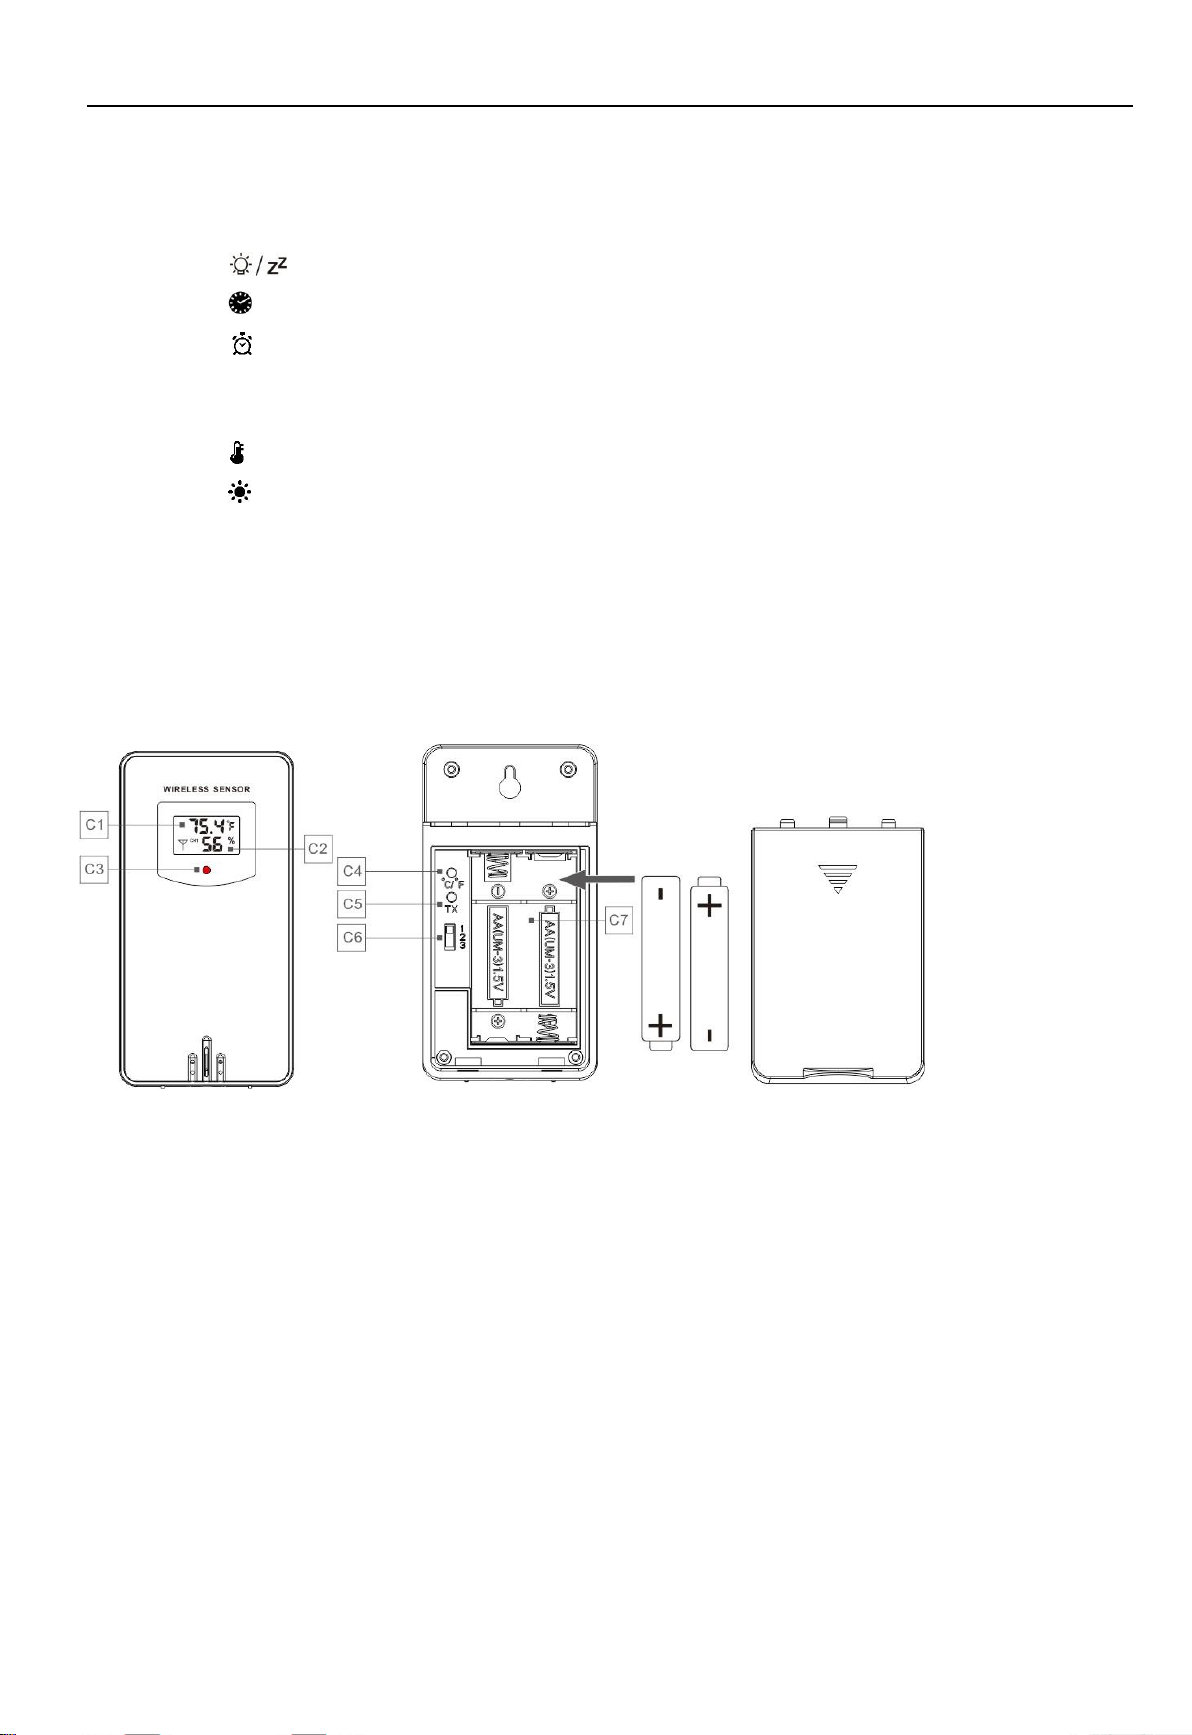
Part C –Wireless Remote Sensor:
C1: LCD display – Temperature
C2: LCD display – Humidity
C3: Signal transmission indicator light
C4: “°C/°F” button
C5: “TX” button (press this button if there is no data displayed on your weather station)
C6: “CHANNEL 1 / 2 / 3” switch
C7: Battery slots

PT3378-WWVB Manual
Initial Operation:
Firstly, turn on the weather station by using 2 AA batteries or the included power adapter, all the icons on the LCD
screen will light up for the first few seconds; the base station starts to detect Indoor temperature and humidity and
finish with a “beep” sound, then the Indoor temperature and humidity will be displayed on the screen.
Secondly, turn on the remote sensor by using 2 AA batteries (not included). The red indicator light on the remote
will flash a few times for the first few seconds then quit flashing after the remote detects and displays the accurate
outdoor temperature and humidity; meanwhile, the indoor weather station will start to make connection with the
remote sensor. Within 3 minutes, the outdoor data will displayed on the indoor weather station.
NOTE: If the outdoor data fails to display on the base unit, please check the following tips to get your solutions:
1) Please check if the selected channel on the remote sensor matches your indoor weather station. If not, please open
the remote cover and choose the right channel.
2) The distance between remote sensor and indoor weather station should not exceed 200ft in open area; too many
walls and other obstacles may weaken the signal transmission.
3) Restart the remote sensor and manually control the signal transmission by pressing TX button.
If the problem still not settled, please contact us at service@gblife.tech, we will help you further.
Reception of the Radio Signal:
After the indoor weather station connected with the remote sensor, it will automatically enter the Radio Control Time
mode. The clock will start to search the WWVB signal after 7 minutes of each restart of the base station, and the
radio icon will start to flash.
The clock will auto carry out the synchronization procedure to recalibrate time at every 1:00 /2:00 / 3:00 am. If the
synchronization fails (the radio icon disappears from the screen), the system will auto make another synchronization
in next hour.
During RC reception, the screen will be off about 1minute and then light up again after the process finished. Or you
can manually stop the searching function by pressing the “▲” button once and the screen will light up
immediately.
If you want to reactivate WWVB signal reception, press and hold the “▲” button for two seconds.
F.Y.I.:
1) A flashing radio icon indicates that the WWVB signal reception has started
2) A continuously displayed radio icon indicates that the WWVB signal was received successfully
3) In order to better recevie radio signals, we recommend placing weather station at least 8 feet away from TVs or
computer monitors.
4) Radio signal is weaker in rooms with concrete walls (e.g.: in cellars) and in offices. In such extreme circumstances,
please place the weather station close to the window.
5) Only the "▲" button is functional under the RC receive mode. If you want the other buttons to work properly again,
please press "▲" button to exit the RC receive mode.
Time Setting:
Date and Second: Short press ” ” button to select date or second displayed on the screen.
12/24hr Format: Press and hold the” ” button for 2 seconds, 12 or 24 starts flashing on the screen and then
use“▲” and “▼” buttons to choose your desired format and press ” ” button to confirm your setting.
Different Time Zone Selection: After your desired time system is settled, the time zone numbers startst flashing, use
“▲” and “▼” buttons to choose 4 different time zones from PST MST CST EST, then again press ” ” button to
confirm your setting.

PT3378-WWVB Manual
DST On / OFF : After time zone is settled, the DST icon will satrts flashing, now use “▲” and “▼” buttons to
set the DST On / Off, press ” ” button to confirm your setting.
Hour / Minute: After DST on / off is settled, the Hour display will starts flashing, use “▲” and “▼” buttons to
set the correct hour and press ” ” button to confirm your setting; then the minute display starts flashing, use
“▲” and “▼” buttons to set the correct minute, then again press ” ” button to confirm your setting.
Date / Month Different Display Mode: After hour /minute are settled, the Month and Date icons starts flashing. Now
use “▲” and “▼” buttons to set the date display on Month/Date or Date/Month, and press ” ” button to confirm
your setting.
Year Setting: After date and month displayed mode is settled, the Year display 2015 starts flashing. Now use “▲”
and “▼” buttons to set the correct year and press ” ” button to confirm your setting.
Month Setting: After correct year is settled, the Month display starts flashing. Now use “▲” and “▼” buttons to set
the correct month.
Date Setting: After correct month is settled, the Date display starts flashing. Now use “▲” and “▼” buttons to set
the correct date and press ” ” button to confirm your setting.
The end of all settings.
F.Y.I.:
Under the system setting mode, if no operation is performed within 10 seconds, the system will exit the setting
mode and revert to normal time display.
4 Different Time Zones:
EST: Eastern Standard Time (E)
-5
CST: Central Standard Time (C)
-6
MST: Mountain Standard Time (M)
-7
PST: Pacific Standard Time (P)
-8
Please correctly set the time zone according to your location, otherwise the clock will not display the right time.
When the Daylight Saving Time System is not implemented in this area, please turn OFF the DST.
Daily Alarm Setting:
Short press ” button once to check the ALARM TIME on display.
How to set the alarm:
Press and hold ” button for 2 seconds until theAlarm Time hour starts flashing on the screen, use the “▲” and “▼”
buttons to set the required hour; short press ” button again and use the “▲” and “▼” buttons to set the required
minute.Finally confirm your alarm settings by pressing ” button.
F.Y.I.:
if no operation is performed within 10 seconds, the system will exit the setting mode and revert to normal time display.
Turn On / Off the Alarm Function:
Turn On: Push the switch to the ” position and there is a ” icon displayed on the LCD screen.
Turn Off: Push the switch to the ” position and the ” icon disappeared from the LCD screen.
F.Y.I.:
The alarm will go on for 2 minutes if you do not turn it off (you can press any button except the ” button to stop
the alarm).
PT3378-WWVB Manual
too cold or too hot
Comfortable
Snooze Function:
Touch the field to activate the snooze function when the alarm goes off, and the alarm will go off in five
minutes.
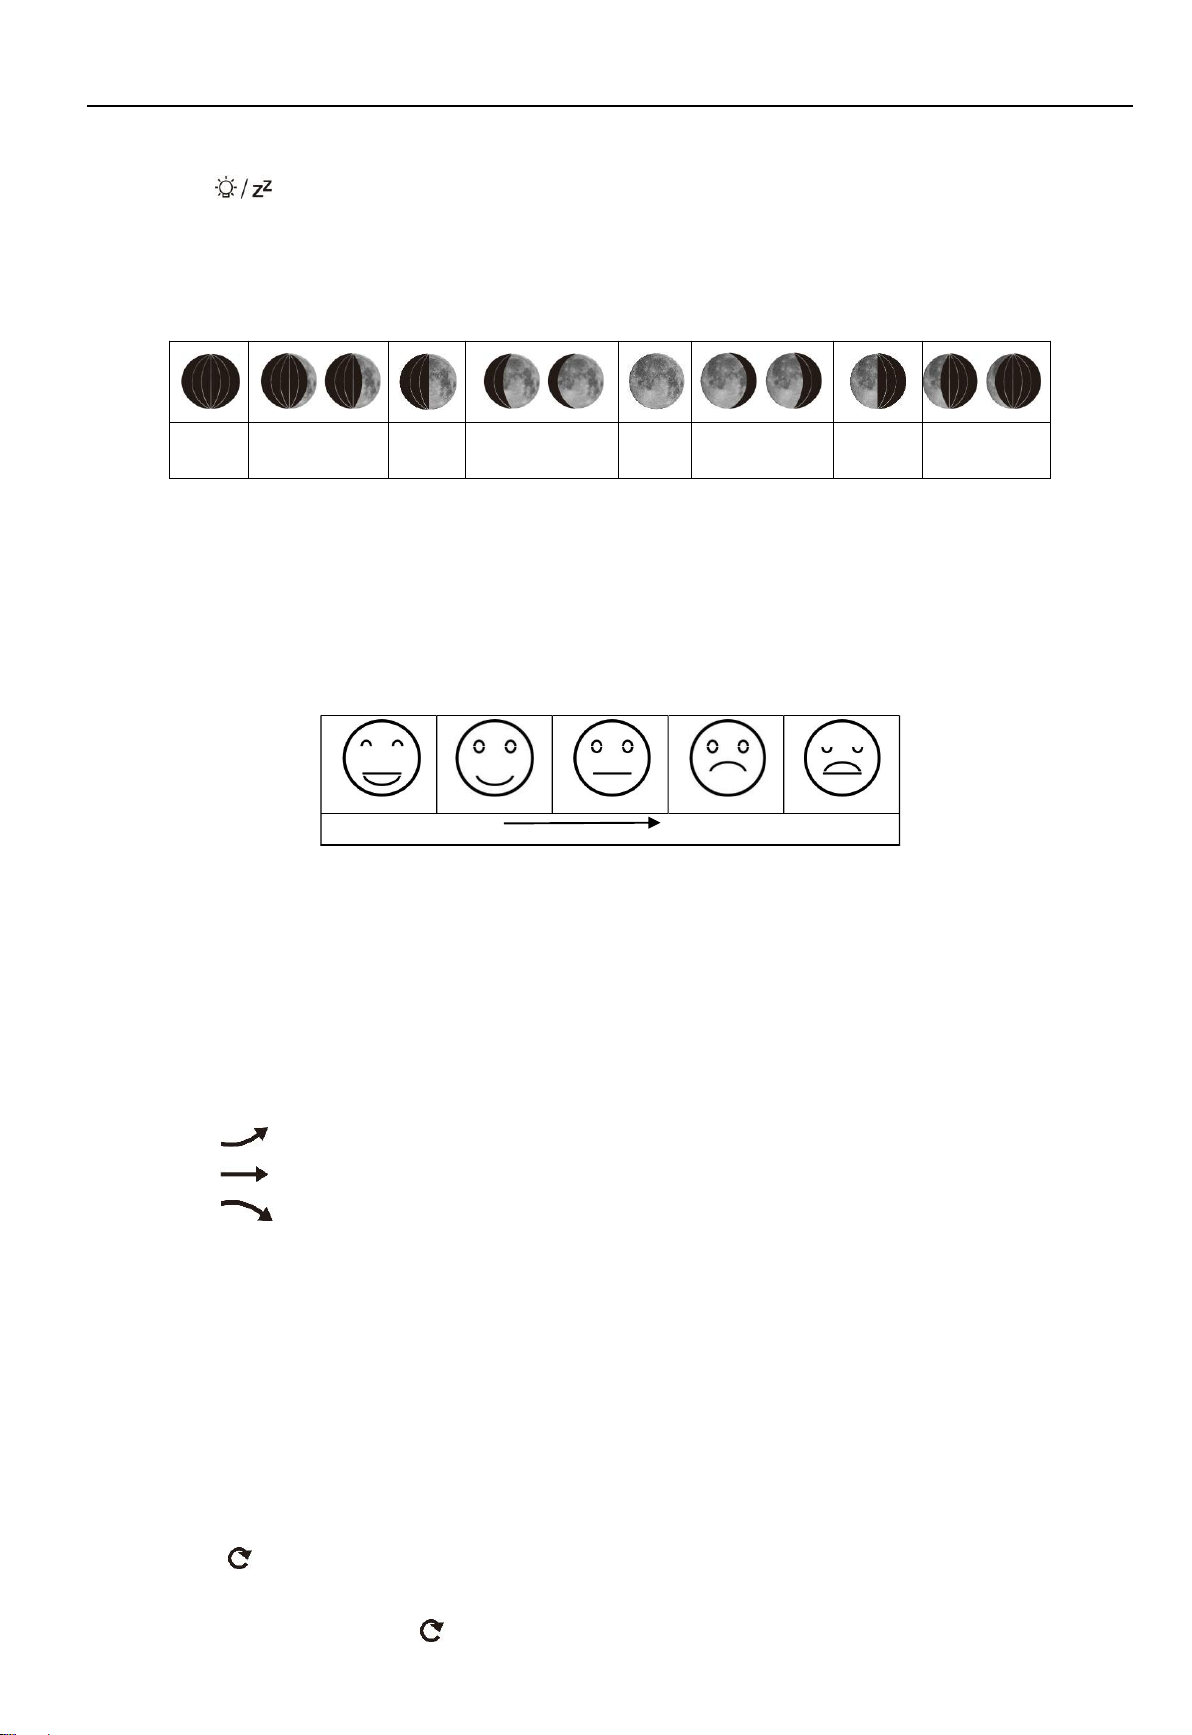
Lunar Phases and Tide Indicator:
The weather station will automatically display 12 lunar phases:
New
moon
Waxing
half-moon
Half-moon
Waxing full
moon
Full
moon
Waning full
moon
Half-moon
Waning
half-moon
°F /°C Temperature Display
The temperature is displayed either in °F /°C. Briefly pressing the “▲” button allows you to switch between the
individual modes.
Comfort Level Display
Indoor comfort level will be displayed according to the indoor temperature and humidity, a total of 5 levels:
Indoor / Outdoor Temperature, Humidity, Barometric Pressure, Temperature and Humidity
Trend
Indoor weather station will dispay the current indoor temperature/humidity/barometric pressure and the
temperature/humidity trend.
After successfully connecting with the remote sensor, the weather station will display the
remote temperature/humidity and the temperature/humidity trend.
Tips for temperature/humidity trend displayed on the screen:
The temperature/humidity is rising.
The temperature/humidity is remaining constant.
The temperature/humidity is falling.
Remote Sensor Transmission:
When the weather station receives signals from the wireless sensor successfully,outdoor temperature and
humidity will be displayed on the LCD screen.
The weather station can connect up to 3 sensors (one sensor included in the package) at the same time. You can
press “▼” button to choose from 1/2/3 channel. When you only have one sensor, please make sure that the
channel on remote sensor matches the one on your indoor base station, otherwise it will not have outdoor data
displayed on the screen.
A symbol " " appears on the screen indicates that the machine enters the Automatic Channel Switching
Mode: weather station will auto switch from 1/2/3 channel once every 5 minutes.To exit the auto mode, you can
short press “▼” button until the " " symbol disappears.
If the weather station fails to receive transmission signal from remote sensor (“- -” display on the LCD), press and

PT3378-WWVB Manual
hold “▼” button for 3 seconds to receive transmission signal manually.
Max / Min Temperature/Relative Humidity
To check the indoor/outdoor maximum and minimum temperature and humidity, short press the
“MEM” button:
First Time: show the maximum temperature and humidity values.
Second Time: show the minimum temperature and humidity values
Third Time: backto the current temperature and humidity values.
To reset the maximum and minimum temperature and humidity, press and hold down the “MEM” button about 2
seconds.it will reset all minimum and maximum data according to the current displayed values.
F.Y.I.:
If the temperature reading is below ranges, the LL.L will be displayed. If the temperature reading is above ranges,
the HH.H will be displayed.
Remote Temperature Alert Setting:
Press and hold the ” button for 2 seconds until the Temperature Alert " (High)icon starts flashing. Use the “▲”
and “▼” buttons to set the required maximum temperature
Short press ” button and the icon starts flashing , use the “▲” and “▼” buttons to set the required minimum
temperature. Press ” button again to confirm your setting.
F.Y.I.:
Before starting the setup procedures, you must select the remote channel, different channels can set different
temperature alarm ranges.
Temperature and Frost Alert:
Press ” button to turn on or off the remote temperature alert. When the remote temperature alarm is activated, the
alarm icon is displayed on the REMOTE SENSOR column.
The alarm will be activated when outdoor temperature exceeds the preset value. It goes off 5 times within 1 minute, and
the icon " " flashes.
When the temperature of REMOTE SENSOR is beween +30°F to + 37°F or –1°C to + 3°C, the frost alarm will be
activated, Icon " flashes.
Low battery:
The battery symbol ” appears on the LCD screen indicates that the batteries in the remote sensor should be
replaced as soon as possible.
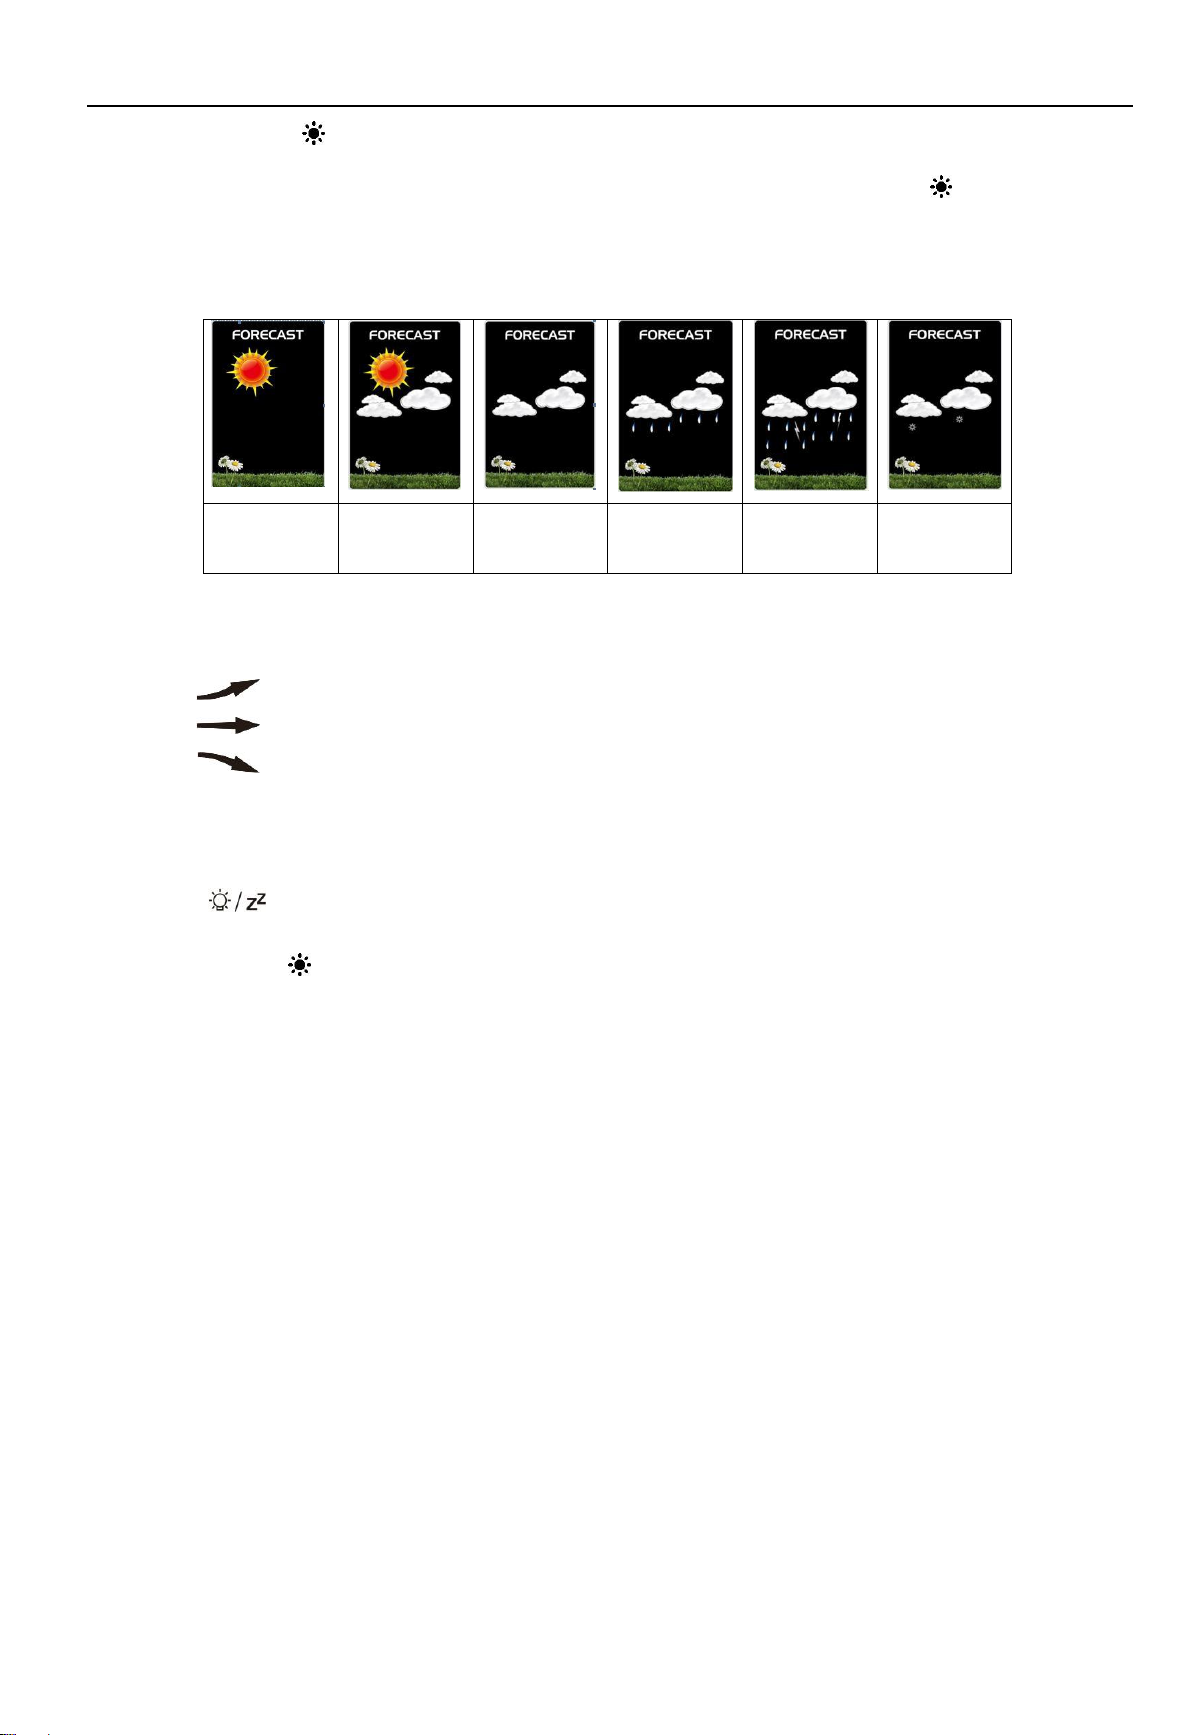
Weather Forecast:
The weather station detects weather conditions for the next 12 hours based on the barometric pressure trend.
Please take the weather forecast from your local weather forecasting service into account as well as the forecast
from your weather station. If there are discrepancies between the information from your device and the local
weather forecasting service, please take the advice of the latter as authoritative.
Selection of the Barometric Pressure Units ( "hPa/mb" or "inHg") : Press and hold the ” button for 2 seconds
until the pressure units startsflashing, use the “▲” or “▼” button to choose desired pressure unit from "hPa/mb"
PT3378-WWVB Manual
or "inHg", and press ” button to confirm your setting.
Manually Reset the Forcast Icons: After confirm your pressure unit by pressing the the ” button, one of the
weather graphics will start flashing, now use the “▲” or “▼” button to choose the correct weather icon according
to current weather conditions if the the base station displays inaccurately.
The weather station displays the following weather icons:
sunny
slightly
cloudy
cloudy
rainy
Heavy rainy
Snowy
The weather station can display the barometric pressure trend.
You may see the following displays on the FORECAST column:
The barometric pressure will rise.
The barometric pressure will remain constant.
The barometric pressure will fall.
Background Lighting
If the product is powered by batteries,backlight lasts about 15 seconds then enters power save mode, you can
touch the " field to reactivate it.
When the weather station is powered by the included power adapter, the backlight will always stay on. Besides,
You can press the ” button to adjust the brightness from 5 levels. Users can adjust different brightness according
to personal preference.

Table of contents
Popular Weather Station manuals by other brands


Thies CLIMA
Thies CLIMA Compact WSC11 Short instructions for use

Oregon Scientific
Oregon Scientific EB313HG user manual

DIG
DIG Leit WWS operating instructions

La Crosse Technology
La Crosse Technology WS6890 Instructional manual

TFA
TFA 35.1065 operating instructions

Bresser
Bresser WEATHER CENTER instruction manual

Vaisala
Vaisala PTB220Case user guide

La Crosse Technology
La Crosse Technology WS-6010U-IT instruction manual

Vitek
Vitek VT-3539 instruction manual

2measure
2measure 250308 Operation manual

La Crosse Technology
La Crosse Technology 9245 Quick setup guide

La Crosse Technology
La Crosse Technology WS-2801-IT instruction manual