Protovapor XPV MINI User manual

PROTOVAPOR
XPV/XPV MINI
Thank you for purchasing the Protovapor XPV/XPV Mini
personal vaporizer. We hope this device will provide many
years of enjoyment!
INCLUDED IN PACKAGE
uProtovapor XPV or XPV Mini Personal Vaporizer
uUSB-to-Micro USB charge cable
u510-to-Ego adaptor (optional)
OPERATING INSTRUCTIONS
Charging
Never charge device unattended!
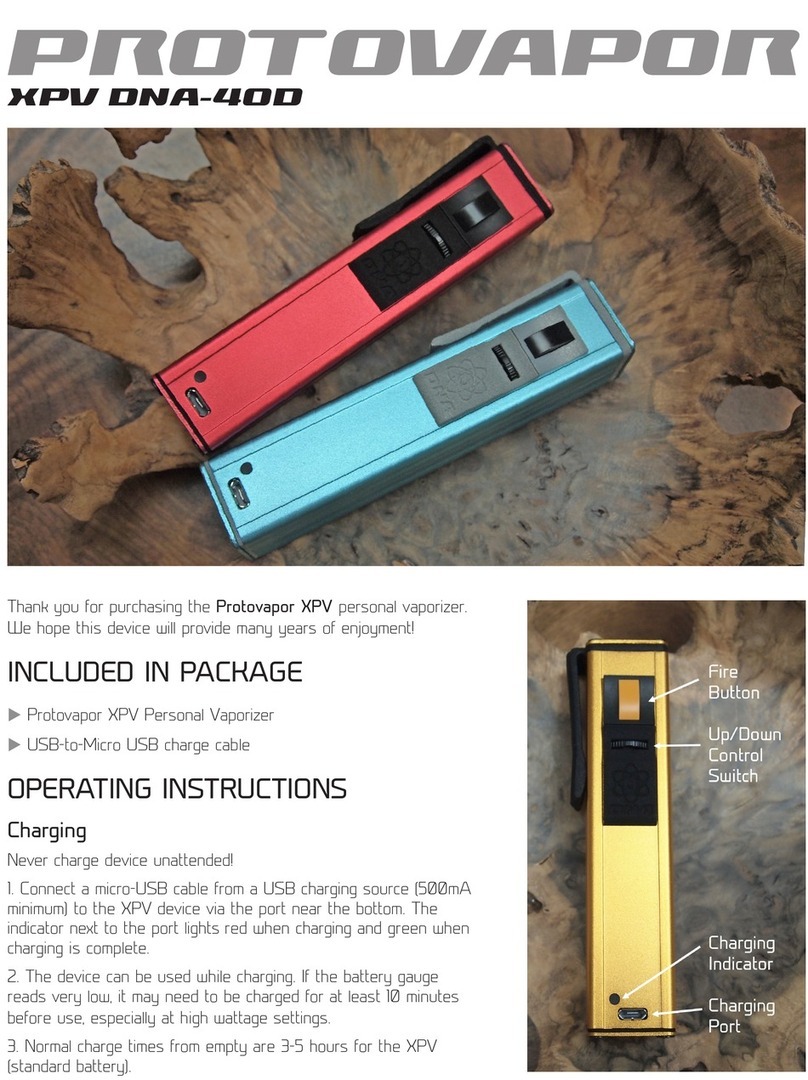
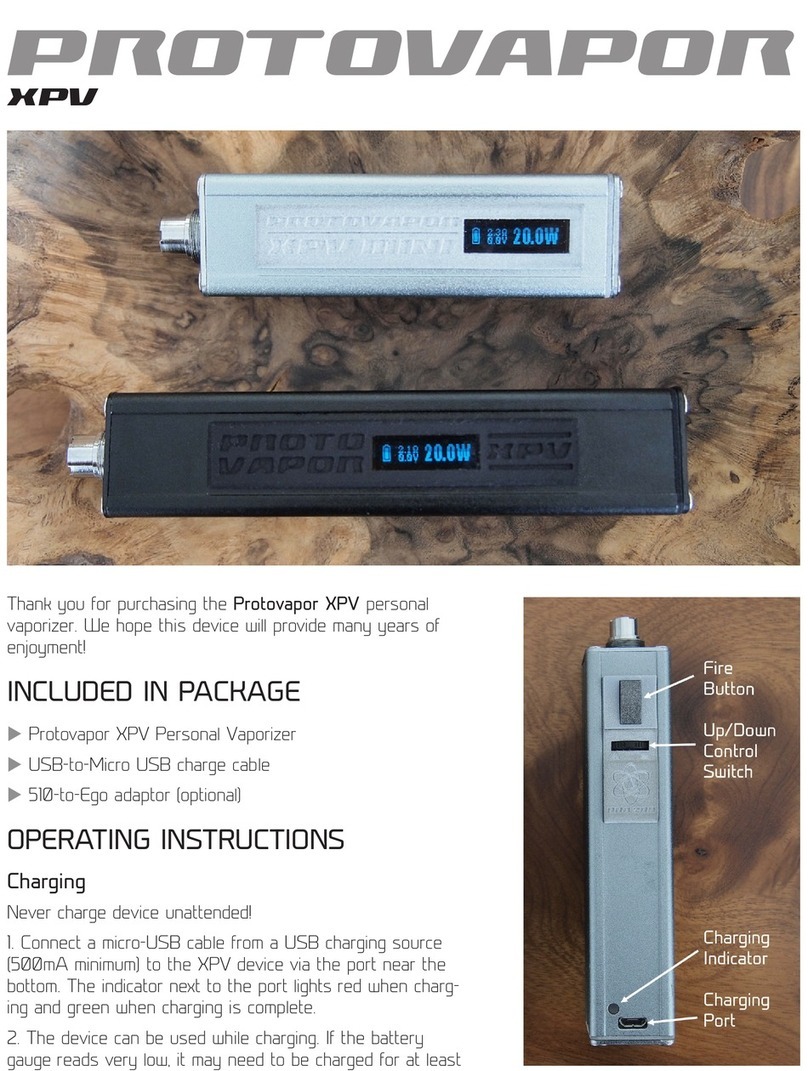
1. Connect a micro-USB cable from a USB charging source
(500mA minimum) to the XPV/XPV Mini device via the port
near the bottom. The indicator next to the port lights red
when charging and green when charging is complete.
2. The device can be used while charging. If the battery
gauge reads very low, it may need to be charged for at least

10 minutes before use, especially at high wattage
settings.
3. Normal charge times from empty are 4-5 hours
for the XPV (standard battery) and about 1 hour
for the XPV Mini.
4. The XPV/XPV Mini should be almost fully
charged upon delivery from Protovapor. It can be
used immediately.
General operation
1. Attach atomizer device containing e-juice to the
connector at the top of the unit. DO NOT OVER-
TIGHTEN!
2. Adjust wattage of device using up/down con-
trol switch under the fire button. Start low if you
do not know the wattage at which your atomizer
works best.
3. Depress firing button and hold while drawing on
the atomizer device.
DNA 20D INFORMATION
Your XPV/XPV Mini is powered by the DNA 20D
board by Evolv Vapor.
Display information
Watt setting (W): The power level currently set
on the DNA 20D.
Battery indicator (Icon): The current state of
charge of the battery.
Volts display (V): The current or most recent out-
put voltage being supplied to the atomizer.
Ohms display: (Ω)The resistance of the atomizer
attached to the device. This is measured only when
the unit is supplying power to the atomizer. At
other times, it shows the most recent measurement.
Other modes
Locked mode: Pressing the fire button five times
with less than .7 seconds between presses will
cause the device to enter Locked mode. In Locked
mode, the device will not fire and the output power
will not adjust accidentally. While in Locked mode,
the screen will be off, except that pressing a but-
ton will show “Locked, Click 5X”. To exit Locked
mode, press the fire button 5 times.
Stealth mode: While locked, pressing the fire and
down control simultaneously for five seconds will
switch to stealth mode. In this mode the display
is off. It will still show error messages and the
“Locked, Click 5X” advisory. To switch back to nor-
mal display mode, from locked mode press the fire
and down control simultaneously for 5 seconds.
This setting is stored to internal flash memory, and
remains if power is removed.
Right Mode and Left Mode: While locked, hold-
ing the fire and up control simultaneously for 5
seconds flips the display. This allows for maximum
flexibility, as well as accommodating left handed
vapers. This setting is stored to internal flash
memory, and remains if power is removed.
Error Messages
The DNA 20D will indicate a variety of error
states. Note: It is normal for the DNA 20D to
display one or two error messages upon wake-up
from sleep. These can be ignored.
Check Atomizer: The DNA 20D does not detect
an atomizer, or the atomizer has shorted out.
Check Battery: The battery is below 3.1 volts. It
probably needs to be charged.
Weak Battery: The battery sags excessively when
firing. This typically means the user is not using a
high rate battery, or the battery is old and de-
graded. It can also mean the battery is not making
good contact.
Too Hot: The DNA 20D has onboard temperature
sensing. It will shut down and display this message
if the internal board temperature becomes exces-
sive.
Too low power setting: The DNA 20D puts out
a minimum of about 3.0-3.4 volts. With low power
settings (7 to 8 watts) and low resistance atom-
izers (below 2 ohms) the DNA will sometimes be
unable to provide a low enough voltage output to
be power regulating. If this is the case, the Ohms
display will be flashing. The device will still operate.
PROTOVAPOR XPV/XPV MINI

Auto power down
The screen will be at full brightness while firing. Af-
ter 15 seconds with no button presses, the screen
will dim. Four (4) minutes after the last button
press, the screen will fade out and the device will
go to sleep mode. Pressing any button will turn the
device and display back on.
ADDITIONAL INFORMATION
Low-profile 510 Connector
The XPV/XPV Mini has a non-adjustable atomizer
connector pin. If the atomizer device does not con-
tact the connector pin correctly, the XPV/XPV Mini
will give a “Check Atomizer” error. Check for liquid
pooling in the pin area, and occasionally wipe the
connector clean of juice and condensation. DO NOT
OVERTIGHTEN ATOMIZERS!
Most atomizers can screw flush with the connec-
tor but those that have center pins that extend
far below outer threading may bottom out. Do not
force the atomizer to screw down, damage to the
connector’s insulator may result.
Maintenance
The XPV/XPV Mini requires no regular mainte-
nance. The device should operate trouble-free
through the life of the battery. Please take care not
to allow e-liquid, water or other foreign substances
to enter the device through the controls, USB port,
etc. Casing can be cleaned with a dry or damp cloth
if needed. Do not use abrasive or caustic cleaning
products.
The display screen is protected by a plastic cover.
Clean this cover with a microfiber lens cloth. Blow
off any foreign objects or dust on the surface first,
or scratching could result.
Occasionally, check the tightness of the screws in
the top and bottom of the casing.
Replacing battery
The battery of the XPV/XPV Mini is connected
with a push connector. It can be replaced without
special tools. This is intended to only be done
when the battery reaches the end of its life. New
batteries with appropriate connectors are available
from Protovapor. Instructions will be provided with
new batteries. Protovapor will install new batteries
purchased from us free of charge (customer covers
shipping).
LIMITED WARRANTY
The XPV/XPV Mini is covered for a period of 90
days from purchase against defects in workmanship
and materials. Internal components including the
DNA 20D board are covered for a period of 1 year
from purchase.
Repairs
Repairs on all components of the XPV/XPV Mini
are available from Protovapor.
SPECIFICATIONS
Output wattage: 7-20 watts
Output voltage: 3.0* to 8.3 volts
Output current: 6 amps max
Atomizer resistance: 0.6** to 3.3 ohms
Efficiency: 93%
Battery:
XPV standard - 2900mah Panasonic high-drain
18650
XPV optional - 1600mah AW IMR 18650
XPV optional - 2000mah AW IMR 18650
XPV Mini standard - 700mah AW IMR 18350
* Approximate, and varies with battery charge state. Approx.
3.4v fully charged.
** Approximate
PROTOVAPOR XPV/XPV MINI
Table of contents
Other Protovapor Vaporizer manuals

