THERMODYNE UTILLIAN 8 User manual
function & form™
2 In the Box
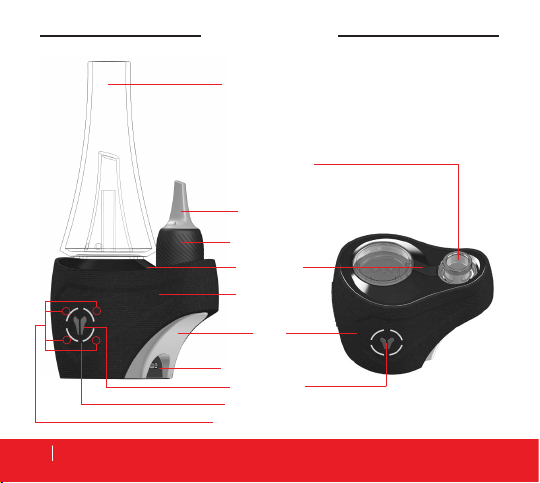
IN THE BOX
Power Buon
Status Interface
Glass Mouthpiece
BurstHit 3D
Heang Chamber™
Mul-Tool
- 1x USB-C Charging Cable
- 1x Carrying Case
- 5x Coon Swabs
- 5x Alcohol Pads
- 2x Ruby Pearls
Carb-Cap Base
Vapor-Path
USB-C Charging Port
Base
Device Case
Interface LEDs (1-4)
12
43

3EN
Disclaimer
Glass Mouthpiece
Air Holes
Boom Hole
ENGLISH -
INSTRUCTION MANUAL
Disclaimer
UTILLIAN™ makes no representations or war-
ranties with respect to this manual and, to the
maximum extent permitted by law, expressly
limits its liability for breach of any warranty
that may be implied to the replacement of
this manual with another. Furthermore, UTIL-
LIAN™ reserves the right to revise this publica-
tion at any time without incurring an obligation
to notify any person of the revision.
UTILLIAN™ is not responsible for any mate-
rial damage or personal injury the device may
cause if used inappropriately, incorrectly or
irresponsibly or in non-compliance with the
safety instructions.
The UTILLIAN 8™ is not a medical device and
cannot diagnose, treat, or cure any illness or
medical condition.
The UTILLIAN 8™ is not a smoking cessation
device.
If you have health problems, consult a physi-

4 Disclaimer
cian before using the UTILLIAN 8™.
The UTILLIAN 8™ is not intended to be used with any illegal, medicinal, or unregulated substanc-
es. Any improper or illegal use of this product will void the limited warranty.
The information provided in this documentation contains general descriptions and/or technical
characteristics of the performance of the products contained herein. This documentation is not
intended as a substitute for and is not to be used for determining suitability or reliability of these
products for specic user applications. It is the duty of any such user to perform the appropriate
and complete risk analysis, evaluation and testing of the products with respect to the relevant spe-
cic application or use thereof. Neither UTILLIAN™ nor any of its afliates or subsidiaries shall be
responsible or liable for misuse of the information that is contained herein. If you have any sugges-
tions for improvements or amendments or have found errors in this publication, please notify us.
All pertinent state, regional, and local safety regulations must be observed when using this prod-
uct. For reasons of safety, only the manufacturer shall perform repairs to components.
5ENExplanation of Symbols
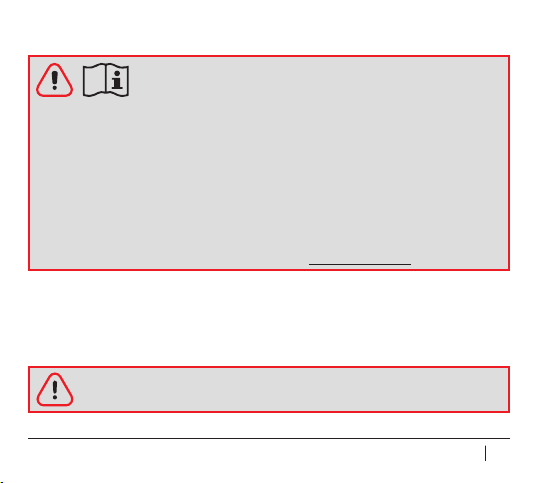
Explanaon of Symbols
Explanaon of Symbols for Potenal Hazards and Safe
& Appropriate Use
Warning
To avoid injury, it is compulsory to follow the instructions marked with
this symbol.
Please read and understand the instructional manual and the following instruc-
tions in their entirety before rst use of the device. Failure to do so may result
in serious injury or death.
Follow the instructions diligently as they are of high importance for your safety
when using or maintaining the device.
Ensure that each person who uses the product has read these warnings and in-
structions and follows them.
Keep all safety information and instructions for future reference and pass them
on to subsequent users of the product.
The latest manual is available for download on www.utillian.com.

6 Explanation of Symbols
Please read and understand this manual and its safety instructions before rst
use of the device. Failure to do so may result in serious injury or death.
Always follow the instructions in the manual when using or servicing the device.
• Only use original UTILLIAN™ accessories and spare parts.
• Keep the UTILLIAN 8™ and its components out of reach from children and
pets.
• Parts of the unit become HOT during normal use. Do not touch the heating
elements, such as the 3D heating chamber, during operation and cooling.
• Do not plug in the UTILLIAN 8™ directly after use or if the device is warm
from heating.
Safety Noce
To avoid damage to the device and equipment, and potential implica-
tions of the damage to life and limb, it is compulsory to follow the in-
structions marked with this symbol.
Warnings & Safety Instrucons

7ENExplanation of Symbols
• Do not place on surfaces that insulate the temperature build-up of the unit
from dissipating (do not place the unit on beds, couches, pillows, clothing, etc.
while charging or if still hot from use), or cover the device.
• Do not store near heat sources.
• Do not expose to extreme temperatures. Condensation of moisture may im-
pair the function of the unit as a consequence.
• Do not expose to moisture and humidity.
• Do not open or touch internal parts when powered on, when hot, or in use.
• Disconnect from power source for maintenance.
• Do not disassemble or tamper with the internal components.
• Do not use if damaged or broken.
• Do not operate unattended.
• Do not operate in an unusual manner.
• Do not use near ammable goods, such as paper, curtains or table cloth.
• Do not use in an explosive or ammable atmosphere.
• Do not operate if ammable cleaning agents or disinfectants, such as isopro-
pyl alcohol, have not fully evaporated.
• Do not use the UTILLIAN 8™ if the base becomes immersed in any liquid.

8 Explanation of Symbols
• Do not use any damaged equipment to charge the device (including damaged
adapters, anything with frayed wires, etc.).
• Do not bend or damage the charger area.
• Do not charge a defective device.
• Do not use a charger with non-standard voltage and current ratings. Use a
charge adapter with a rating not higher than 5 V ⎓2.0 A, that complies with
all currently applicable ofcial regulations.
• Do not forcefully attach or detach the Glass Mouthpiece.
• Examine glass parts periodically for cracks or other defects from handling
and drops.
• Do not use broken or cracked glass. Broken glass has sharp edges that can
cause cuts, handle with care.
Potenal Health Consequences
• Monitor the effect on your symptoms during and after use and immediately
seek medical support if you have concerns.
• Do not use if you suffer from diseases of the respiratory tract or the lungs. The
inhalation of vapor may cause coughing.

9ENEN 9EN
Operation of the Device
Recommendaon before First Use
• Fully charge the battery before rst use.
• Perform a sanitation cycle (pyrolysis) before rst use. Heat up the device with
the highest power or temperature setting for a full cycle in order to purge any
machine oils from manufacturing.
Charging
To charge your UTILLIAN 8™, plug the included USB-C Charging Cable into the
USB-C Charging Port and plug the other end into a wall adapter or computer. The
LEDs of the Status Interface and the LEDs under the Glass Mouthpiece will pulse
in white according to the charge level to let you know the device is charging. When
the LEDs are all glowing solid white, the unit is fully charged. Remove the USB-C
Charging Cable and resume use.
Charge Level
Having plugged in the USB-C Charging Cable, the LEDs will pulse in white in order
to show that the device is charging. The charge level is indicated by the count of
LEDs of the Status Interface. The more charge the battery holds, the more of the 4
Interface LEDs are illuminated.
Operaon of the Device

10 Operation of the Device
• Do not use a charger with non-standard voltage and current ratings. Use a
charge adapter with a rating not higher than 5 V ⎓2.0 A, that complies with
all currently applicable ofcial regulations.
• Do not use any damaged equipment to charge the device (including damaged
adapters, anything with frayed wires, etc.).
• Do not bend or damage the charger area.
• Do not charge a defective device.
• Do not plug in the UTILLIAN 8™ directly after use or if the device is warm
from heating.
• Do not place on surfaces that insulate the temperature build-up of the unit
from dissipating (do not place the unit on beds, couches, pillows, clothing,
etc. while charging or if still hot from use), or cover the device.
11EN
Operation of the Device
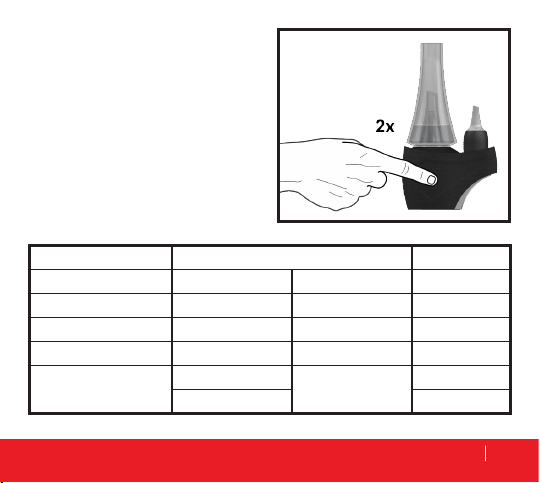
Status Interference Color Paern Percentage
Charge Level Baery Level
1 Interface LED Pulsing White Solid White 0 – 25%
2 Interface LEDs Pulsing White Solid White 26 – 50%
3 Interface LEDs Pulsing White Solid White 51 – 75%
4 Interface LEDs Pulsing White Solid White 76 – 99%
Solid White 100%
Baery Level
Pushing the Power Buon 2 times
quickly will display the battery level.
The more charge the battery holds,
the more of the 4 Interface LEDs are
illuminated.

12 Operation of the Device
Operaon
Filling the Glass Mouthpiece
Fill the Glass Mouthpiece at least to a
level above the 2 Air Holes. The max-
imum lling level is roughly half the
central cone height. If water bursts
land in your mouth during inhalation,
you can either reduce the lling height
in the Glass Mouthpiece or draw in less
intensely.
• Do not ll Glass Mouthpiece while
attached to Base.
• Do not allow water in the Base.
• Do not store device with lled Glass
Mouthpiece.
Max

13EN
Operation of the Device
Aaching the Glass Mouthpiece
When attaching the Glass Mouthpiece
you must pay attention to the alignment
with the Base. Only if the hole in the
Glass Mouthpiece is aligned correctly
towards the Vapor Path, vapor can
travel through your UTILLIAN 8™
and be inhaled. The airow is neither
blocked nor choked if the hole in the
Glass Mouthpiece is adjacent to the
channel in the Vapor Path. You can
easily achieve this if you orient the hole
in the Glass Mouthpiece towards the
Vapor Path, ideally along the axis, which
goes through the Vapor Path, right
through the Mul-Tool.
• Do not forcefully attach or detach
14 Operation of the Device
the Glass Mouthpiece.
• Examine glass parts periodically for cracks or other defects from handling and
drops.
Do not use broken or cracked glass. Broken glass has sharp edges that can
cause cuts, handle with care.

15EN
EN Operation of the Device
Heat Cycle
Pushing and holding the Power Buon
for 2 seconds will engage the heat cycle,
which is being shown through visual
and haptic cues. The LEDs of the Status
Interface will get illuminated one by one
until the heat cycle is engaged. Also, the
device vibrates after 2 seconds.
Heat-up can always be aborted, by
pushing and holding the Power Buon
for 2 seconds. The device will then
vibrate and the LEDs will turn off.
2 s
The heat-up is indicated by pulsing red LEDs. The device heats according to the
last chosen temperature level. The 4 temperature levels can be recognized by the
differing number of the LEDs of the Status Interface:

16 Operation of the Device
• Do not inhale ferociously, this can lead to spillage and may damage the BurstHit
3D Heang Chamber™.
• Parts of the unit become HOT during normal use. Do not touch the heating
elements, such as the BurstHit 3D Heang Chamber™, during operation and
cooling.
The completion of heat-up is indicated by solid green LEDs.
Now your UTILLIAN 8™ is ready and you can start enjoying your material. We
recommend inhaling gently for the best results.
Status Interface Temperature [°C] Temperature [°F]
Temperature Level 1 1 Interface LED 205 – 260°C 400 – 500°F
Temperature Level 2 2 Interface LEDs 260 – 315°C 500 – 600°F
Temperature Level 3 3 Interface LEDs 315 – 370°C 600 – 700°F
Temperature Level 4 4 Interface LEDs 370 – 425°C 700 – 800°F
17EN
Operation of the Device
After this ready-to-use period, the device enters cool-down. During cool-down, the
LEDs pulse in green. You can still inhale the remaining vapor from your material in
this phase of the heat cycle. There is no need to do this fully before the cool-down.
It is recommended to let the BurstHit 3D Heang Chamber™ cool down shortly
in between consecutive heat cycles to avoid it becoming overtly hot and burning
your material.
• Do not use if you suffer from diseases of the respiratory tract or the lungs. The
inhalation of vapor may cause coughing.

18 Operation of the Device
Schematic of the heat cycle of your UTILLIAN 8™ over time.
UTILLIAN 8™ Heat Cycle Schemac
The light signals of the LEDs differ depending on the phase of the heat cycle
(Heating Up, Ready to Use & Cooling Down), which is illustrated in the schematic.
UTILLIAN 8™ Heat Cycle Schema c
(LED Light Indicator)
Temperature
Time
Ready to Use
(Solid Green LEDs)
Heang Up
(Pulsing Red LEDs)
Cooling Down
(Pulsing Green LEDs)

19ENEN 19EN
Operation of the Device
Changing the Temperature Level
Toggle between the 4 pre-set temperature levels by pushing the Power Buon 1
time, while being switched on, starting from the most recent temperature level.
Every single push increases the temperature level by 1. The number of illuminated
LEDs of the Status Interface (Interface LEDs) displays the temperature level. The
color of the LEDs depends on the status,
• pulsing red in the heat-up status,
• solid green in ready-to-use status and
• pulsing green in the cool-down status.
Temperature level 1:
Emphasis on avor facets of your material, vapor production is light.
Temperature level 2:
Combines a rich avor with satisfying vapor production. Nuanced avor is favored
over intense vapor production with this balanced temperature level.
Temperature level 3:
Combines a rich avor with satisfying vapor production. Intense vapor production
is favored over nuanced avor with this balanced temperature level.
Temperature level 4:
Emphasis on massive clouds with only faint avor.

20 Operation of the Device
Filling Your Material
You can load your material right on
the bottom surface of the BurstHit 3D
Heang Chamber™. For unrivaled ease
of use, we recommend simply placing
the Mul-Tool, which has your material,
on top of the Carb Cap Base, covering
the BurstHit 3D Heang Chamber™;
there is no need to apply the material
to the BurstHit 3D Heang Chamber™
surface. Stickier material that does not
drip off will melt off the Mul-Tool onto
the BurstHit 3D Heang Chamber™
surface when heat is being generated.
Table of contents
Languages:


