6
Installation
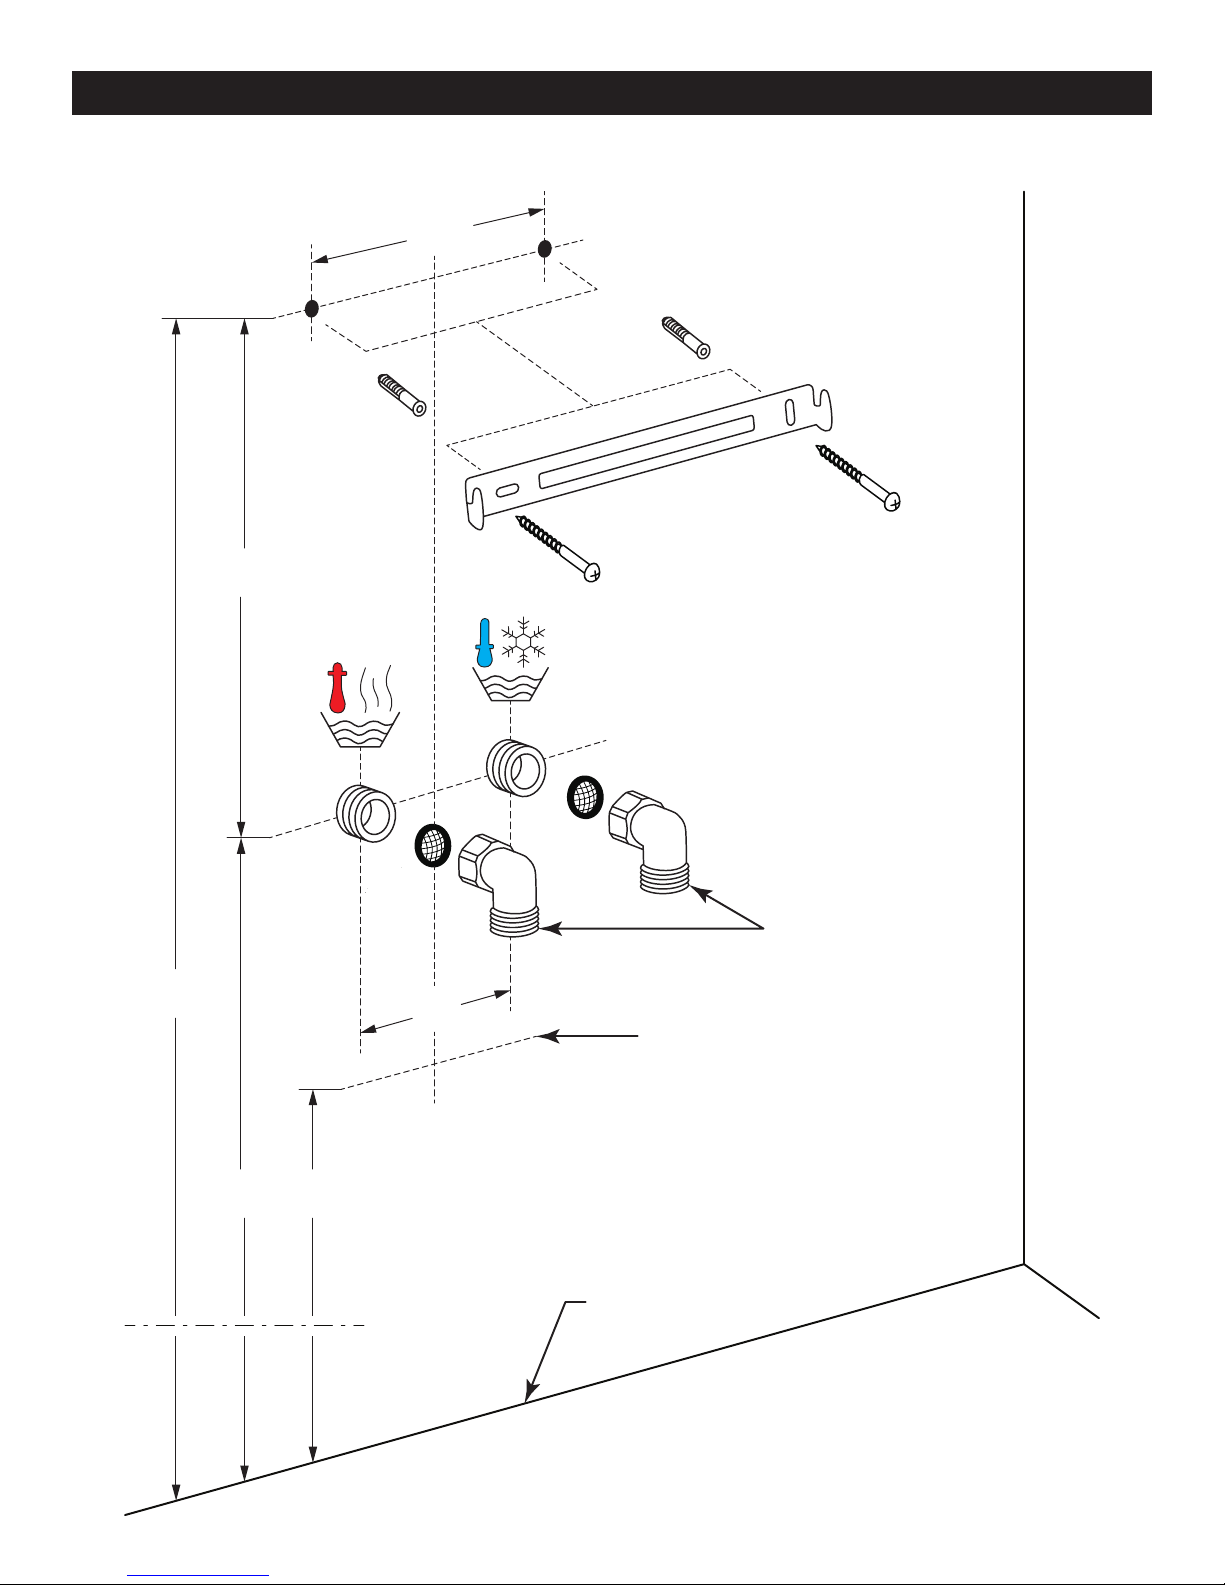
New Construction or Extensive Remodel– New Finished Wall Surface
1. Prior to sheetrock, stub-out ½" hot and cold supply lines
beyond nished wall surface, 4" on center. For best results,
attach 90° brass ttings (available at most hardware stores)
to the stub-outs maintaining ¼"– ½" of space between
the tting and nished wall. The open end of the 90°
brass ttings should point down so the supply lines attach
parallel
to the wall.1
2. The height of the stub-outs is completely dependent upon
the desired mounting height of your Mojave ShowerSpa.
For a person 5'8"– 6'2" we recommend the stub-outs be 31"
from nished oor.2
3. Before installation, make certain that water is COMPLETELY
TURNED OFF to both hot & cold supply lines of shower.
4. Mark location of holes for the mounting bracket, making
sure bracket is level. For a person 5'8"– 6'2" tall, we
recommend placing the holes of the upper bracket at 56"
from nished oor height.3
NOTE—Before drilling holes for the bracket, make certain
Showerspa will rest at against nished wall surface at the
desired mounting height with supply lines connected.
5. Drill ¼" holes through wall surface using a masonry bit. Drill
slowly through wall surface to avoid cracking and chipping.
Insert anchors and securely screw brackets to wall. Before
connecting hot and cold supply lines, hang the ShowerSpa
on wall, check the height and make sure the ShowerSpa is
ush against wall with a secure t.
6. Connect hot and cold water supply lines to stub-outs—
DO NOT OVERTIGHTEN. Before mounting the ShowerSpa,
check ttings to make sure they are secure. Turn on water
and check for leaks. When ttings are leak-free, mount
ShowerSpa on wall.
7.
OPTIONAL
—Seal around body of ShowerSpa with a bead of
silicone. DO NOT SEAL BOTTOM.
Retrot – Existing Shower Replacement
NOTE—In a remodel in which you are not replacing the nished wall surface (tile, or backing material) it is advisable to purchase a
PULSE ShowerSpa model that covers the location of your existing valve assembly—either single handle or two-handle type. If
your PULSE ShowerSpa model does not cover this area, you will need to either choose another PULSE ShowerSpa model that
does or make necessary repairs with appropriate materials (i.e. wallboard, tile, berglass, etc).
1. TURN OFF WATER SUPPLY TO SHOWER. Typically there
is a gate valve where the water main enters the house.
Turning the water valve o at hot water tank does not turn
o cold water supply line.
2. Make certain water is completely turned o to both hot
& cold supply lines of shower. Turn shower valve on, both
hot and cold, to VERIFY WATER SUPPLY IS OFF. Open a
sink faucet in the bathroom in which you are installing the
ShowerSpa to relieve any pressure and help adequately
drain shower supply lines.
3. Remove handle(s) and trim cover(s) of your existing shower
valve, exposing valve body in wall.
4. Locate hot and cold supply lines entering valve. Using a
reciprocating saw with sharp metal saw blade, cut existing
valve out, preserving threads of the supply lines entering
valve. You should also cut the riser within wall supplying the
existing shower head. Carefully twist and remove valve.
5. Unscrew old shower head from shower arm, then unscrew
shower arm from wall.
6. Water lines must be extended to the outside of wall
cavity, 4"on center. For best results, attach 90° brass
ttings (available at most hardware stores) to the stub-
outs maintaining ¼"–½" of space between the tting and
nished wall. The open end of the 90° brass ttings should
point down so the supply lines attach parallel to the wall.1
7. Make certain that when you connect to the stub-outs they
DO NOT INTERFERE with the backside of the ShowerSpa
after mounting.3
8. Mark location of holes for the mounting bracket, making
sure bracket is level. For a person 5'8"– 6'2" tall, we
recommend placing the holes of the upper bracket at 56"
from nished oor height.3Before drilling holes for bracket,
make certain Showerspa will rest at against nished wall
surface at the desired mounting height with supply lines
connected.
9. Drill ¼" holes through wall surface using a masonry bit. Drill
slowly through wall surface to avoid cracking and chipping.
Insert anchors and securely screw brackets to wall. Before
connecting hot and cold supply lines, hang ShowerSpa on
wall, check the height and make sure ShowerSpa is ush
against the wall with a secure t.
10. Connect hot and cold water supply lines to stub-outs—
DO NOT OVERTIGHTEN. Before mounting the ShowerSpa,
check ttings to make sure they are secure. Turn on water
and check for leaks. When ttings are leak-free, mount
ShowerSpa on wall.
11.
OPTIONAL
—Seal around body of ShowerSpa with a bead of
silicone. DO NOT SEAL BOTTOM.
1 Additional ttings or longer supply lines may be necessary depending on your specic situation.
2The desired mounting height of ShowerSpa determines height of the ½" stub-outs. The stub-outs must be located at a height allowing
supply lines to be connected and body of ShowerSpa to rest at against nished wall.
3The mounting height can vary depending on several factors (i.e. location of supply lines, interference from ShowerSpa plumbing, old
valve access area, personal preference, etc.)


 owner's manual")