Pumpables GENIE ADVANCED Installation instructions

Genie Advanced
Full Manual

Welcome to Pumpables

Issues with your pump
Getting help

We’ll guide you through getting to know your Genie Advanced
later in this manual, but for now, here’s a list of everything that’s
included with your pump.
What’s in the box
Pump unit
Charger +
4 international plugs
Belt Clip Lanyard
The full manual also tellsyou all the
tips and tricks for your Liquid Kit.

Intended use & safety
Genie Advanced Double Electric Breast Pump with Liquid Pumping
System is a portable breast pump to help lactating women express
and collect milk.
The Genie Advanced is a closed system
breast pump. Your milk collection kit should
not be shared between users.
Clean and sanitize all parts that come in
contact with your breast and breastmilk prior
to first use. Wash all parts that come in
contact with your breast and breast milk
after every use.
Inspect all appropriate pump components
before each use.
If tube becomes mouldy, discontinue use and
replace tube. If breast milk backup occurs,
clean the tube before your next pumping
session.
DO NOT use antibacterial or abrasive
cleaners/detergents when cleaning breast
pump or breast pump parts. Never put
breast pump motor in water or sterilizer, as
permanent damage can be caused to the
device.
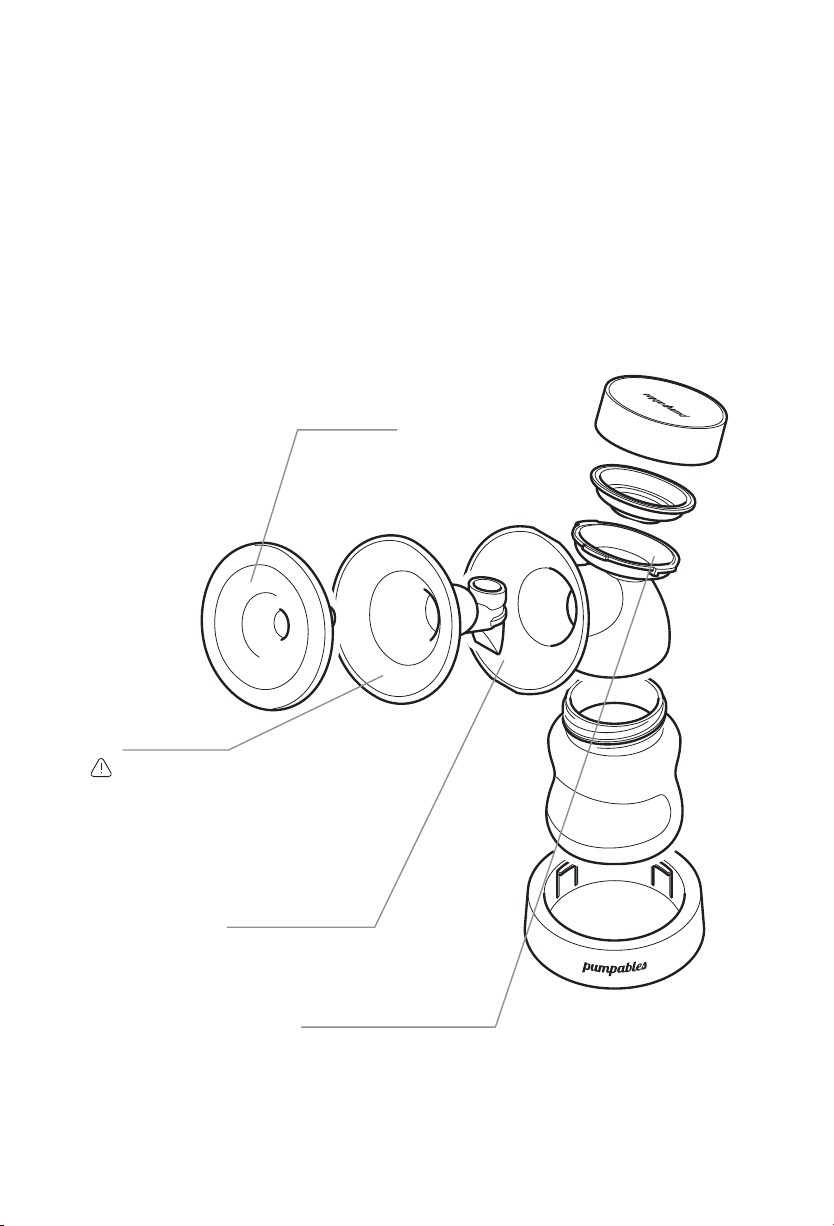
DO NOT attempt to remove the breast shield
from your breast while pumping. Turn the
breast pump off and break the seal between
your breast and breast shield with your
finger, then remove the breast shield from
your breast.
If pumping is uncomfortable or causing pain,
turn the unit off, break the seal between the
breast and the breast shield with your finger
and remove breast shield from your breast.
Plastic bottles and component parts become
brittle when frozen and may break when
dropped. Take appropriate care in handling
bottles and components.
d
d
d
d
d
d
d
d
d
d
d
d
d
d
d
d
d
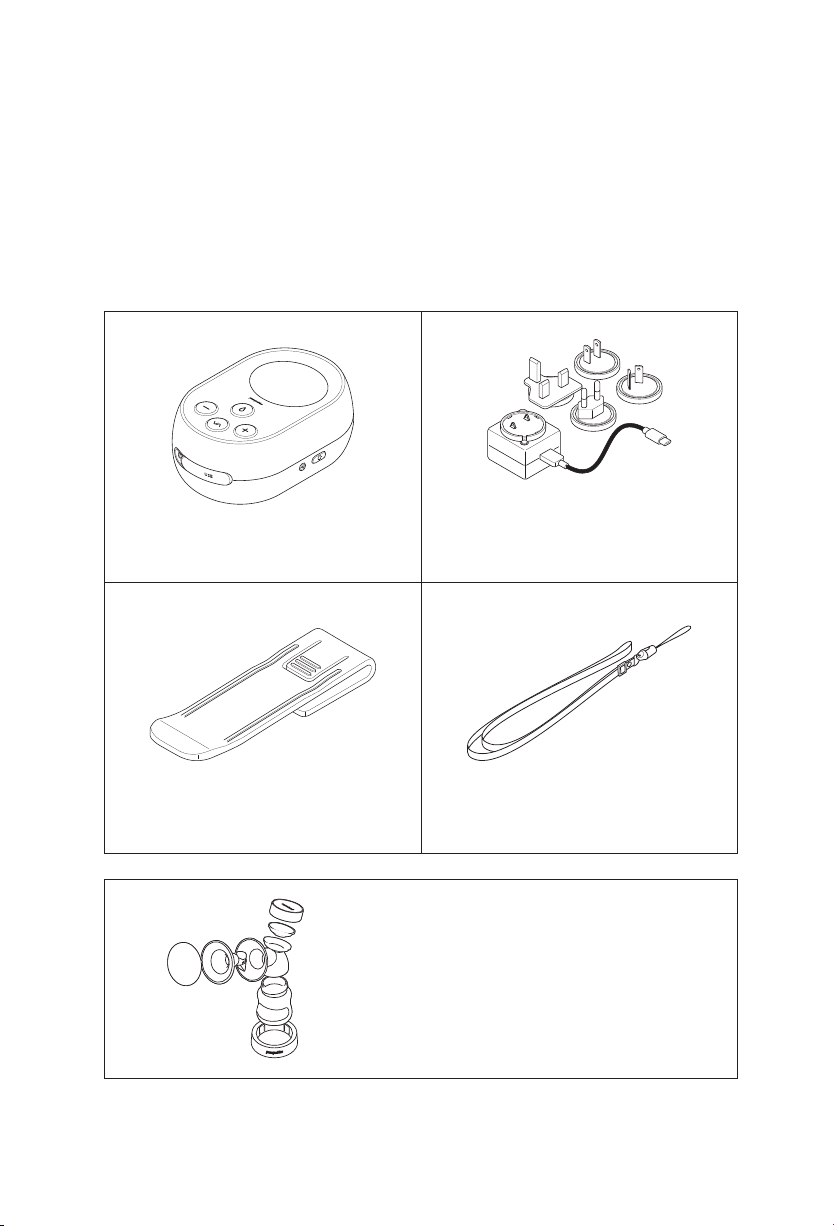
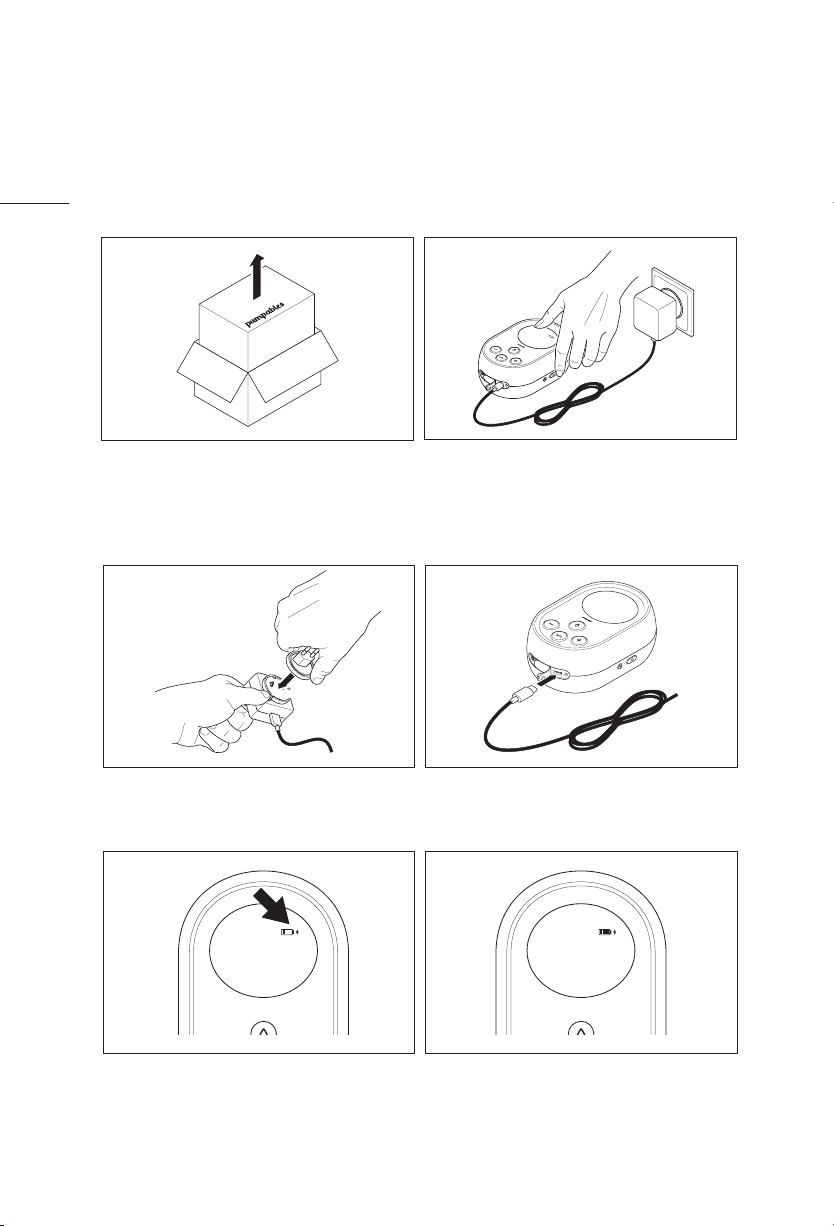
The power adapter is a part of the breast
pump. Please always check the power
adapter before use and if damage is found,
discontinue use. Make sure the voltage of the
power adapter is compatible with the power
source. Plug the power adapter into the
breast pump first, then into the power
source.
Do not use outdoors or operate where
aerosol products are being used, or where
oxygen is being administered
Do not use while bathing, or place device
where it can be submerged in water. If the
device falls into water, do not reach for it and
immediately disconnect from electrical
outlet.
Do not leave device unattended when
plugged into an electrical outlet. Do not
position the breast pump such that it is
difficult to disconnect the adapter plug from
the main power supply.
Close supervision is necessary when used
near children or people with disabilities.
Do not use attachments not recommended
by the manufacturer.
Keep cord away from heated surface.
Never drop or insert objects into any opening
or tubes.
Use product only for its intended use.
5

6
Get to know your
Genie Advanced
0 1
00:07
0 1
CYC LEVACU UM
Letdown Mode
Fast mode to trigger letdown
Expression Mode
Mode with three speed levels to
keep the milkflow going
Battery
Up to 3 hours of battery life
On/Off Button
Long press (2 sec.): On/Off
Short press: Pause/Resume
USB Charging
Mode Button
Swap between letdown mode and
expression mode
Settings Button
Swap between setting the vacuum
and cycle level in expression mode
Program Mode
Record and play your own program
Vacuum and Cycle Level Buttons
Adjust vacuum and cycle level settings
You should find your Genie Advanced simple to use. Run through the
functions below before you get started, and if you need help, just ask.

Get to know your
Liquid Kit
Getting to know the parts of your Liquid Kit will help you get the
most out of them. It can be confusing the first time you assemble
the kit, so let us know if you need help.
Shield Cover
While you're not using the pump,
place the shield cover over the
open end of your Liquid Kit.
Liquid Insert
Careful with your Liquid insert - it’s fragile!
The Liquid insert sits insides your shield
assembly, and fits around your breast.
During pumping, the Liquid insert will
draw on your nipple, similar to how your
baby does. This provides a more effective,
comfortable experience.
Shield Cover
Your shield assembly encases the Liquid
insert, and connects to your bottle.
Backflow Prevention
The shield assembly has an integrated
diaphragm which prevents milk from
backflowing down tubing, protecting the
motor and tubing from moisture.
7

Getting started
Sterilising your accessories before first use
Sterilise everything on left. You can sterilise the bottle stand and
shield cover if you like but it’s not necessary. Never sterilise or
immerse tubing or seal cap
You can use any sterilising method that you prefer. Here are
instructions for sterilising using the boiling method:
Make sure the pot you choose is large so accessories don’t ‘bump’ into each other.
Parts can warp if they bump into each other during sterilising.
1. Choose a big pot
8

9

You can start using your pump right
away out of the box. Once it’s time to
recharge, charging time is approxi-
mately 4.5 hours.
You can use the pump while charging.
00
00:00
00
CYCLEVACUUM
Charging your pump
When assembling the adaptor, make
sure it clicks into place.
CLICK
Plug into pump.
Lighting icon will blink during charging.
00 00:00 00
CYC LEVACU UM
Lighting icon will stop blinking when
fully charged.
00 00:00 00
CYC LEVACU UM
Getting started
10

Getting started
Assembling your Liquid Kit
11

12
Slide the Liquid insert inside the shield assembly and ensure it is attached firmly.
Make sure the valve is secure.
PRESS
Ensure insert is flush with shield. Place seal diaphragm on the shield assembly. Tip
- use your finger to ensure the edge is flush. This is important so the kit is airtight.
L03
20:30
80
CYCLEVACUUM
Attach your seal cap & then use your tubing to connect your accessory kit to the
pump motor. Don’t forget to cover the unused air port if you’re single pumping!

To attach the belt clip, slide it into the
opening until you feel it click into
place.
To remove the belt clip, press down and
then slide the belt clip up.
Using the belt clip
Attaching the lanyard
To attach the lanyard, slide the thin
end through the attachment point on
Genie Advanced.
Then pull the other end of the lanyard
through the loop until tightened.
Getting started
13

Understanding the
controls
Press the power button for 2 seconds to turn on Genie Advanced.
Start Genie Advanced
2 seconds
Press the mode button to swap between expression & letdown mode.
Switch between modes
0 1 00:02 0 1
CYCL EVACUU M
Letdown mode
Vacuum level : 1-10
A light, fast pattern of suction that
mimics how your baby triggers
letdown, the start of milkflow
A slower, stronger pumping mode
that helps draw out milk and keep
it flowing
Expression mode
Vacuum level : 1-10
Cycle speed : 1-3
14

Changing settings in letdown mode
0 1 00:07
VACUUM
In letdown mode you can change the vacuum level only.
Increase the vacuum level with the button and decrease it with the button.
Changing settings in expression mode
0 1 00:07 0 1
CYCLEVACUUM
In expression mode you can adjust both vacuum level and cycle speed. There are
3 cycle speeds available on each vacuum level.
Press the settings button to toggle between vacuum level and cycle speed.
Increase the vacuum or cycle level with the button and decrease it with
the button.
CYCLE
VACUUM
Press the power button to pause pumping during a session. Press the power
button again to resume pumping. If no buttons are pressed, the pump turns off
after 1 minute.
Mode icon blinks when pumping is paused.
Pause pumping during a session
03
02:00
02
CYCLEVACUUM
15

Save program to
Genie Advanced
Press the program button for 2
seconds to start recording.
00
00:00
00
CYCLEVACUUM
2 sec.
When flashes, adjust the settings
as best suit you.
00 00:00 00
CYCLEVACUUM
Save a favorite program to Genie Advanced’s
internal memory
Press the power button to pause
and resume while recording.
03
02:00
02
CYCLEVACUUM
The program icon in the screen shows
that your program has been stored.
0 1 00:02 0 1
CYCLEVACUUM
Press the program button for 2
seconds to save the recording.
00
00:00
00
CYCLEVACUUM
2 sec.
To record a new program, delete the
existing program first by pressing the
program button and the minus
button for two seconds
0 1
00:02
0 1
CYCLEVACUUM
2 sec.
16

To play your pumping program, press
the program button for 2 seconds.
00
00:00
00
CYCLEVACUUM
2 sec.
The program icon in the screen flashes
while your program plays.
0 1 00:02 0 1
CYCLEVACUUM
Start your program
Press the mode button to end
the program and go back to manual
mode.
0 1 00:02 0 1
CYCL EVACUU M
The pump stops when the program is
finished, and the timer starts flashing. If
no buttons are pressed, the pump turns
off after 1 minute.
After deleting your stored program,
the program icon will disappear from
the screen.
0 1 00:02 0 1
CYCL EVACUU M
Delete your program before recording a new one
Press the program button and
minus button for 2 seconds to
delete the stored pump program.
0 1
00:02
0 1
CYCLEVACUUM
2 sec.
17

18
Liquid Insert
Replacing parts
Seal Diaphragm
Breastshield Assembly Tubing
Replace if moisture has entered the tubing, it
slips off the pump or parts from stretching or
shows signs of wear and tear.
Occasional Pumping
i.e. a few times a week
Exclusive Pumping
i.e. 8 times a day
2-3 Months 2-4 Weeks
Every Month3-4 Months
Check regularly
replace as
needed
Every 6 months
Some parts of your kit need replacing regularly, depending on how
often you pump. This is important! Worn out parts are the most
common reason for a decrease in output. Here’s an overview of
what to replace when:

19
Technical specifications
Vacuum Range
Cycle Speed (Expression Mode)
Cycle Speed (Massage Mode)
Net Weight
Warranty
Battery Life
Time to Charge
Motor Life
Country of Origin
Certification
Color
Pump Type
Dimensions
Power Supply
Material
Voltage Input
Voltage Output
Battery Type
Li-Ion Battery Power
Total Power
Noise
Operating Conditions
Storage andn Shipping Conditions
Electric Shock Protection
15 - 330 mmHg
24 - 70 CPM (variable)
70 CPM (constant)
0.33 kg (0.73 lbs)
2 Years
3 Hours
4.5 Hours
800 Hours
China
CE
Blue and White
Single or Double
128mm x 87mm x 58mm (5.04 in x 3.43 in x 2.28 in)
Rechargable Lithium-Ion Polymer Battery or AC Adapter
ABS, PP and Silicone
100 ~ 240 Vac 50/60
5V 2A
Lithium-Ion Polymer Battery
3.7V, 2700mAh
10W
Less than 45dB (A)
5°C~40°C, 15%~90%Rh 800hPa to 1060hPa.
-25°C~60°C, 15%~93%Rh
Class II

20
Warranty
This product is warranted by Pumpables to be free from defects in material
and manufacturing for a period of two years from the date of purchase. This
warranty does not cover damage caused by accident, misuse, abuse, improper
maintenance, unauthorized modification, or connection to an improper power
supply. The warranty does not cover wear and tear caused by the regular use of
this product.
Issues or defects should be reported to Pumpables as soon as possible after
discovery. Pumpables reserves the right to investigate the issue or defect before
taking any remedy. In the event of defect, at Pumpables’ option, Pumpables will
replace the product free of charge or arrange repair. All efforts will be made to
reduce inconvenience to the user. Where possible, arrangements will be made for
the return of faulty / defective products to Pumpables to improve quality control
and aid product improvement.
If you need assistance with correct usage, care or warranty when using this
Table of contents
Other Pumpables Breast Pump manuals