Illustrations de lʼannexe
1. Démontez les portes (illustr. A)
2. Montez les lampes (illustr. B/B1/B2/B3)
La ligne dʼalimentation doit être hors tension!
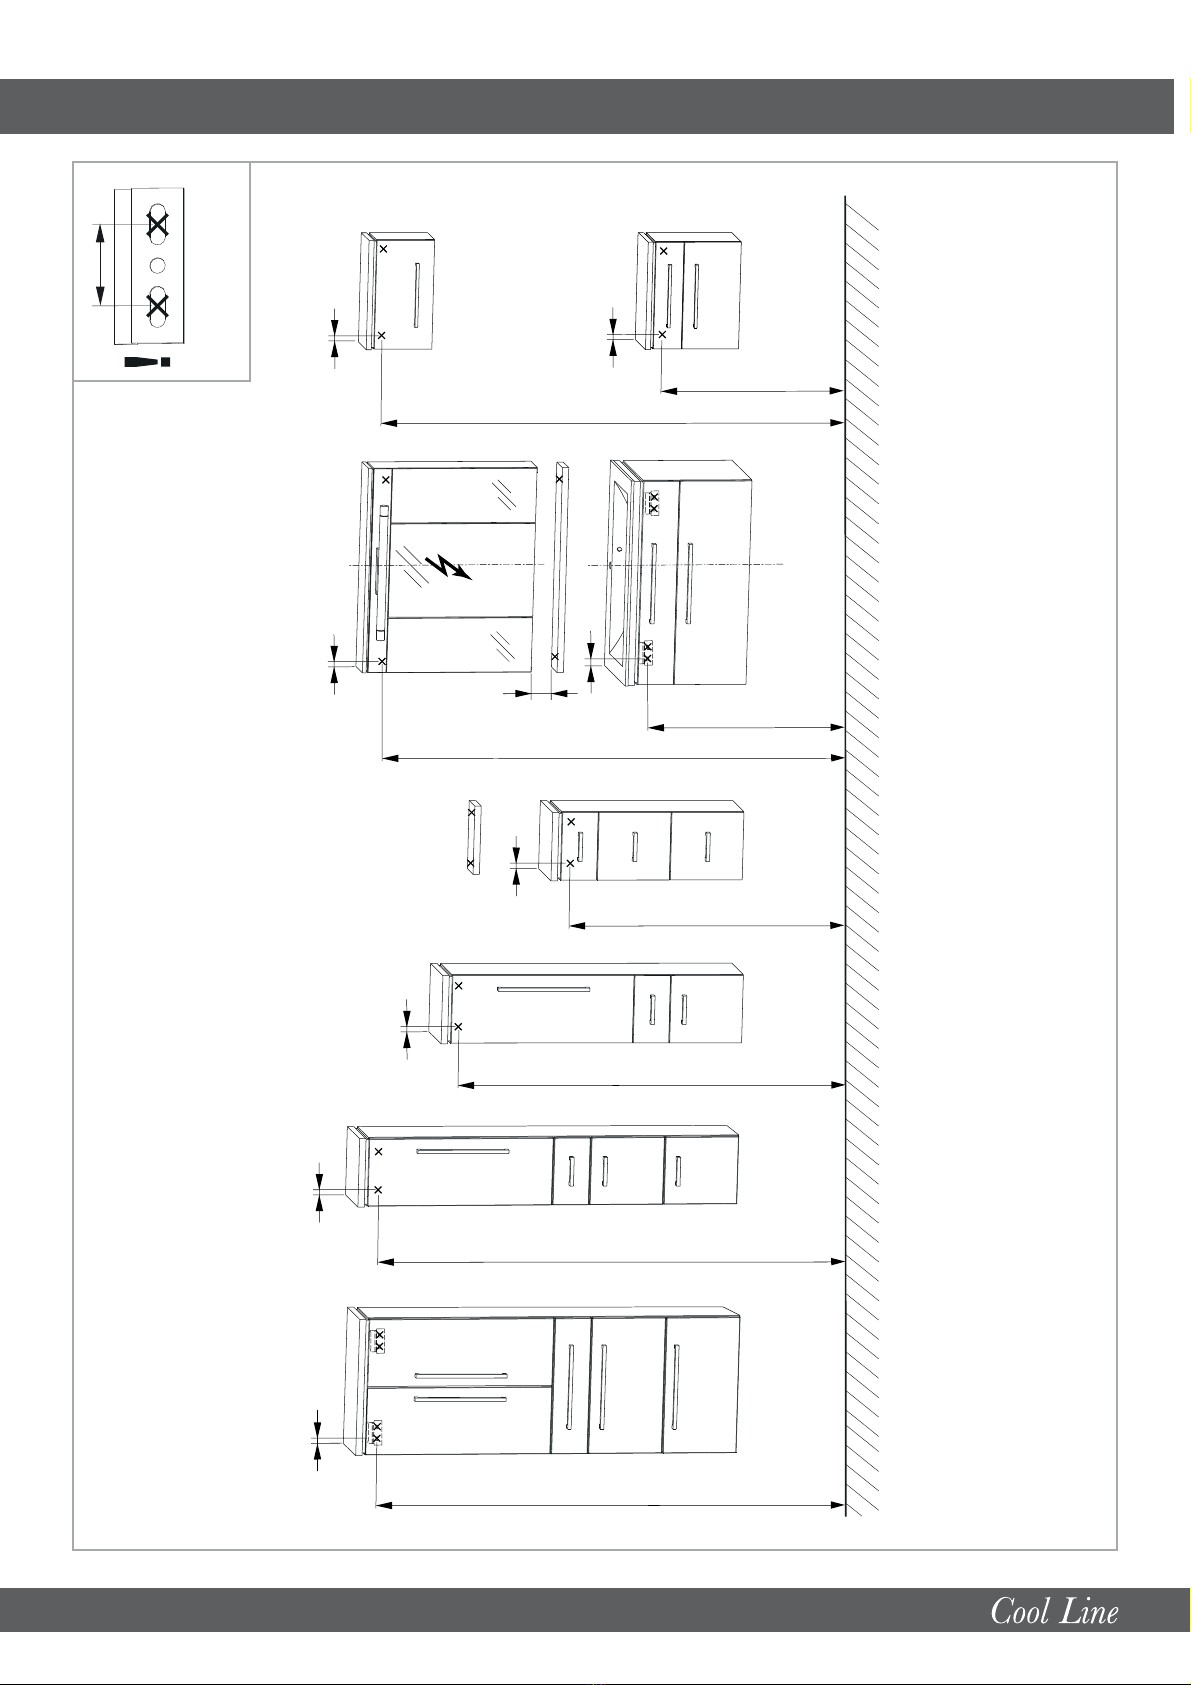
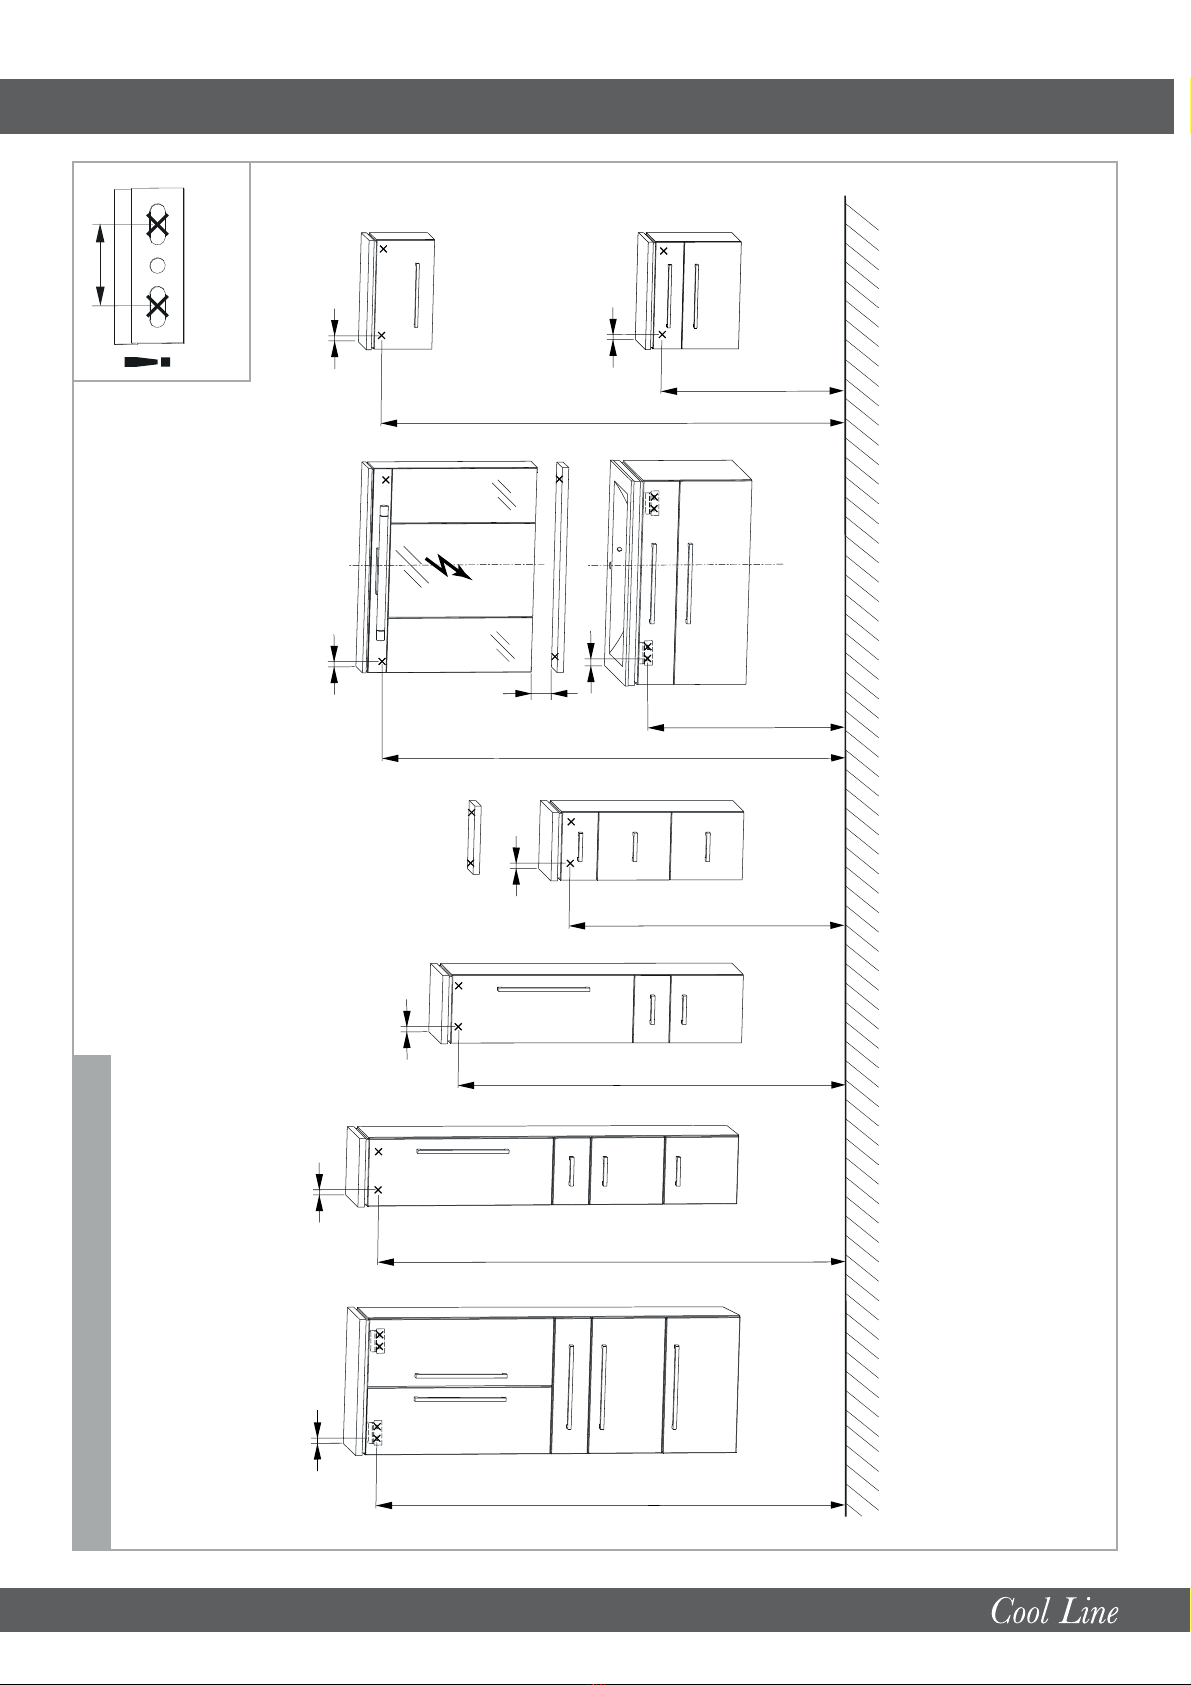
3. Accrochez les meubles
∙ Armoire de toilette/Panneaux de miroir
(milieu armoire de toilette = milieu branchement dʼeau)
∙ Eléments supérieurs, Armoires centrales,
éléments du haut, eléments du bas
∙ Armoire haute
∙ Elément sous plan de toilette/Lavabo
(milieu élément sous plan de toilette =
milieu branchement dʼeau)
4. Alignez les panneaux de miroir (illustr. C)
5. Alignez les éléments (illustr. D/D1)
6. Monter lʼarmoire emboîtable (illustr. E)
7. Monter le lavabo en verre
∙percer un trou de passage (illustr. F)
∙scier la place pour le lavabo (illustr. F1)
∙poser la plaque support du lavabo (illustr. F2)
∙fixer la plaque support (illustr. F3)
∙coller le lavabo avec la plaque support (illustr. F4)
∙presser fort le lavabo et la plaque support (illustr. F5)
∙ Procédez à lʼétanchéité du lavabo (illustr. F6/F7)
8. Poser la robinetterie (illustr. G)
∙ Attention: Utiliser les joints en caoutchouc.
∙Ne pas serrer trop fortement la robinetterie!
9. Vissez le plan de toilette (illustr. H)
∙ Attention: ne pas percer le plan de toilette!
∙ Utilisez les vis fournies.
10. Montez les portes (illustr. I)
11. Monter lʼamortisseur de porte (illustr. J)
12. Alignez les portes (illustr. K/K1/K2)
13. Adaptez le ferrement pour clapets (illustr. L)
14. Adaptez les tiroirs (illustr. M/M1)
15. Remplacez la/les ampoule(s) (illustr. N)
• Scie à guichet
• Perceuse/Perceuse sans fil
• Perceuse électrique à percussion Ø 8 mm
• Mèche à bois Ø 4 mm, Ø 10 mm
• Mètre pliant/Mètre à ruban
• Niveau à bulle dʼair
• Tournevis cruciforme 3,5 mm
• Clé pour vis à tête creuse 4 mm
• Clé plate, ouverture 10 mm
• Serre-joints
• Crayon
• Silicone
(nettoyage avec produit incolore et sans solvant)
• Ne confiez le montage quʼà des personnes compétentes
•Mise en garde: un montage incorrect entraîne des risques!
• Vérifiez si le mur est approprié pour le montage et si le
matériel de fixation disponible est utilisable compte tenu des
forces existantes.
• Lisez attentivement lʼinstruction de montage avant de
procéder au baignoire.
• Le matériel de fixation fourni nʼest prévu que pour des murs
massifs, suffisamment portants.
• Seul du personnel qualifié est autorisé à effectuer la
mise en place dʼinstallations électriques selon les normes en
vigueur ( en R.F.A. DIN VDE 0100-701 (VDE 0100-701):2008-10).
• Les armoires de toilette/panneaux de miroir électrifiés
doivent présenter une distance minimum de 60 cm jusquʼà la
baignoire/douche.
• Les prescriptions de sécurité et les normes du pays respectif
doivent être observées.
7
CONSIGNES DE SECURITE
OUTILS
• Attention : ne pas utiliser de produits chimiques, de pro-
duits spéciaux pour tâches ou de produits abrasifs corrosifs!
• Pour le nettoyage des meubles, le mieux est dʼutiliser un
chiffon humide imbibé dʼun peu de liquide-vaisselle.
• Veillez à ce que des résidus de gouttes ne restent pas sur le
bord inférieur des meubles de salle de bain.
• Nettoyez le miroir avec un chiffon humide ou une peau de
chamois.
• Nettoyage aisé du lavabo au moyen de tout produit de
nettoyage standard, sans grains.
INSTRUCTION DʼENTRETIEN
ORDRE DU MONTAGE
i
Attention: veillez à conserver les instructions; elles contien-
nent des informations relatives à lʼinstallation et au fonction-
nement des produits!
CONSERVEZ LES INSTRUCTIONS
i
poignées, etc…) avec le bon de livraison et/ou lʼétiquette des
articles sur lʼemballage.
• Attention: nʼenlevez les capuchons protecteurs des portes de
lʼarmoire de toilette quʼaprès le montage des portes afin que
les bords du miroir ne soient pas endommagés.
• Compensez les différences de niveau par des revêtements
muraux, par exemple, carrelage partiel, par des liteaux
dʼécartement appropriés.
• Renforcez les murs qui ne sont pas suffisamment portants.
• Distances de perçage de BSSA suivant la vue dʼensemble des
cotes.
• Montage des meubles avec barrette dʼaccrochage:
- Elément sous plan de toilette
- armoire haute (avec largeur de 600 mm)
• Toujours fixer la barrette de suspension à lʼaide de 2 vis !
• Observez les différentes hauteurs dʼaccrochage de lʼarmoire
de toilette et des panneaux de miroir.
• La distance latérale entre les meubles peut être choisie librement.
•
Ne pas trop serrer les robinets et le système dʼécoulement.
•
La liaison entre la vasque et le plan de toilette est réalisée avec
de la silicone (nettoyage avec produit incolore et sans solvant).
• Prendre soin de ce meuble vasque en verre!
INFORMATIONS IMPORTANTES
• Assurez-vous, lors de la livraison, que lʼemballage ne
présente pas de dommages extérieurs.
• Vérifiez le nombre de meubles de salle de bain fournis et
les kits de quincaillerie correspondants (vis, capuchons,
INFORMATIONS IMPORTANTES