PXN 9607 PRO User manual

W i r eless Controller
Quick S t a r t G uid e

- 08 -
Product Overview
Thank you for choosing PXN’sproduct and
supporting our brand. Please read the manual
carefully before using.
Functional Features
Compatible with SWITCH console and PC.
Wireless connection with SWITCH console by
Bluetooth.
With TURBO function on SWITCH.
Built-in dual vibration motors with adjustable
ZR
R
ZL
L
HOME
(ON/OFF)
Indicator
TURBO
USB Charging Port
Joystick

Support NFC function on SWITCH.
High-efficiency lithium battery with smart power
saving technology, providing longer playing time.
- 09 -
System Requirement
SWITCH Console
Step ①: Enter System settings Controllers and
Sensors, Select Pro Controller Wired Connection.
The option state is ON;
Step ①: Clicking (Home) button of Switch console to
Step ②: Press + (Home) buttons for 3 seconds to
power on the Controller, 4 LED lights to flash
orderly, meaning in the connecting state;
Step ③: After 3-5 seconds,when LED indicator light
keeps on, the controller connects successfully.
Support Platform: SWITCH console/PC
Support System: SWITCH console system,
Windows 7/8/10
Wireless Connection
Step ②: Under the Situation of Controller Power-off
SWITCH console: Connect Controller with
SWITCH Dock: Connect SWITCH Dock with
controller by USB cable;
SWITCH console by USB cable with TYPE-C OTG;
Wired Connection
enter homepage, Select Controller icon
Change Grip/Order;

Step ③: Connect successfully when LED1 indicator
flashes.
Adjustable Vibration (Switch console Only)
- 10 -
NFC Function(
Wireless Connection Only
)
PC Platform
Wired Connection
When the controller connect with switch console
successfully, You can use amiibo on Nintendo
Switch by tapping them to the NFC touch point
on the Controller. You’ll uncover surprising new
features!
the gampad with PC by USB cable;
-How to adjust it?
After the controller connect with switch console
successfully, Press L+R+ZL+ZR at same time.
Three Levels of Vibration
Step ①: Press the controller button, Connect
levels of adjustments.
The controller vibration frequency have three
Vibration Levels Indicator
LED1 Flashing
LED2 Flashing
LED3 Flashing
LED4 Flashing
Weak
Medium
Strong
OFF

Step ②: LED 1+ LED 4 indicator light flashing;
- 11 -
Step ③: Gamepad Checking
POWER OFF/ON
The controlller enters sleep state after 10 seconds
disconnection.
The controlller enters sleep state after 5 minute no
Sleeping Function
Charging Function
Power supply: Standard USB 5V, could use mobile
charger, computer, etc USB interfaces to charge, full
charged time is 2-3hours.
Charging indication:
Power off (4 LED flashing), Full charged
( 4LED light off);
Charging in working condition, current LED Flash,
keep light on when full charged;
When the battery is low, current LED blinking,
please charge in time.
WIN7/8/10, enter control interface device and
printer controlller icon game control setting,
choose feature test.
Power On: Long press (Home) button 1 second
Power Off: Long press (Home) button 3 seconds
to power off.
to power on.

- 12 -
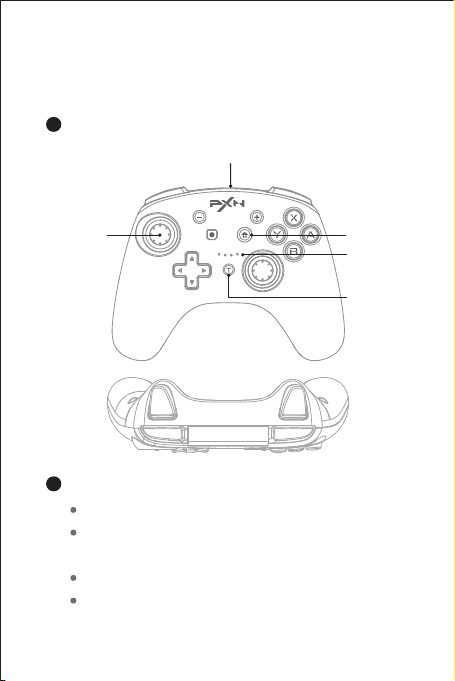
Under sleeping state, Press (Home) button of
gamepad to power on.
action.
When the controlller occurs to functional disorder,
dead halt or other abnormalities, it can be reset
power-off by pressing the switch in the reset slot
on the back of the controlller and press the HOME
button to restart connecting.
Reset Function
Available Buttons for TURBO: A, B, X, Y, L, R, ZL, ZR.
TURBO Setting: Press " + Available function
button " at the same time, then this button has
TURBO function. LED indicator flashes when
operation.
TURBO Function
When the controller stays Power-off status, press
the , and buttons simultaneously,
the 2 groups of LED lights of controller would
flash alternately (LED1/2 & LED3/4) .
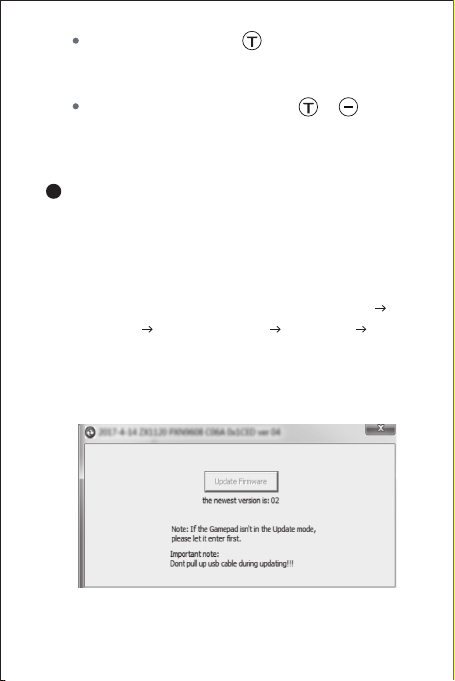
Please place the controller at horizontal plane,
then press the button, the controller would
automatically finish Sense Calibration in 3 seconds.
Horizontal Plane Calibration
for Gyroscope of Controller

- 13 -
③ Long- Press left stick ↓ and connect the controlller
to the USB port of PC with USB cable at same
Service Download center Game tool find
the firmware upgrade software of PXN-9607 Pro
download and release the software.
② Open the firmware software, the interface is as
follows:
Firmware Update
If the SWITCH console system is upgraded, the
controlller cannot adapt to the new system, and the
firmware can be upgraded through the computer.
The upgrade steps are as follows.
① Go to the official website (www.e-pxn.com)
TURBO Clearing: Press " + Available function
button" at the same time,then the TURBO function
be cleared. LED indicator keeps on when operation.
Clear All TURBO Buttons: Press " + "
at the same time, all set TURBON button function
be cleared.

- 14 -
⑤ Follow the on screen prompt to request and
your update. Reboot the controlller, connect with
Switch console.
The Update Firmware option on the interface is
time.
activated to indicate that the connection is
successful, and click this option to upgrade.
④ Click ‘YES’ to confirm the upgrade.

- 15 -
Specification
Product Mode PXN-9607 PRO
Connection Pattern Bluetooth/wired connection
Working Power Built-in 550mAh lithium battery
Working Current 26mA
Packing Dimension Appr. 185*172*75mm
Dimension Appr. 153*125*55mm
Weight Appr. 211g
Application Temperature 10-40℃
Application Humidity 20~80%
Attentions
1. Avoid fierce vibration. Don't take apart, revise
and mend by yourself.
2. Don't let water or other liquid entering inside of
the controlller to make any damages.
3. Don't store in places of high humidity,
temperature, heavy oil or smoke.
4. Don't drop the controlller into fire or explosion
danger may be caused by built-in battery.
5. Children should be under the custody of adults to
use this product.
Table of contents
Other PXN Video Game Controllers manuals