Pyle Pro PDCD6000MP User manual


-
1
-
TABLE OF CONTENTS
NOTE ON USE …………………………………………………………2
FOR SAFE AND EFFICIENT OPERATION …………………………2
DESCRIPTION OF THE FUNCTIONS …………………………………3
FUNCTION OF THE MAIN UNIT……………………………………………3
FUNCTION OF THE CONTROL UNIT………………………………………4
LCD INSTRUCTION ………………………………………………………6
PARAMETER SETTING INSTRUCTION …………………………………7
CONNETIONS ……………………………………………………………9
BAS I C OPE R AT I O N … … … … … … … … … …………………1 0
LOADING AND EJECTING THE DISC……………………………………10
TRACK SKIP …………………………………………………………10
ANTI SHOCK MEMORY …………………………………………………11
MATCHING THE BEATS PER MINUTE …………………………………12
BEAT MATCHING USING PITCH BEND…………………………………12
OPERATION OF CUE AND LOOP …………………………………13
BEFORE SWITCHING OFF THE POWER …………………………14
TROUBLESHOOTING GUIDE ………………………………………14

-
2
-
NOTE ON USE
BE CAREFUL OF HIGH TEMP ERA-
TURE
TO AVOID DUST& MOISTURE TO AV OID PLACING ON UN-
STABLE LOCATION
DO NOT USE CHEMICALS
IF OUT OF WORK, CONTACT
SALES AGENCY IMMEDIATE LY
KEEP AWAY FROM TV &
MAGNETISM
DO NOT OPEN THE CASE CARE WITH THE POWER CORD
For Safe and Efficient Operation
•Select the installation location of your unit carefully.
Avoid placing it in direct sunlight. Also avoid locations
subject to vibration and excessive dust, heat, cold or
moisture. Keep away from sources of hum such as
transformers or motors.
•Do not use this compact disc player where there are
extremes in temperature ( below 41 oF/5 oC or
exceeding 95 oF/35 oC ).
•Do not open the cabinet as this might result in damage
to the set or electrical shock.
•Be sure your hands are clean when handing discs.
Never insert a disc which has a crack on its surface.
•When disconnecting the power cord from the AC
outlet, always grasp it by the plug. Never pull the cord.
•Do not use force when operating the switches and
buttons.
•Before moving the set, be sure to disconnect the
power cord and all connecting cables.
•To keep the laser pickup clean, do not forget to close
the disc tray.
•Do not attempt to clean the unit with chemical
solvents as this might damage the finish. Use a clean,
dry cloth.
•Keep this manual in a safe place for future reference.
SAFETY CERTIFICATION
Laser Diode Properties
Material: Ga.-Al-As
Wavelength: 755-815 nm (25oC)
Laser Output: Continuous Wave max. 0.5mW
CAUTION:
USE OF CONTROLS OR ADJUSTMENTS OR
PERF ORMANCE OF PR OCEDURES OTHER THAN
THOS E S PECIFIED HEREIN MAY RES ULT IN
HAZARDOUS RADIATIO EXP OSURE.
To prevent electric shock do not remove cover (or
bottomscrews). No user serviceable parts inside refer
servicingtoqualifiedservicingpersonnel.

-
3
-
IMPORTANT SAFETY INSTRUCTION
1. Read these instructions.
2. Keep these instructions.
3. Heed all warnings.
4. Follow all instructions.
5. Do not use this apparatus near water.
6. Clean onlywith a damp cloth.
7. Do not block any of the ventilation openings. Install in accordance with the manufacturer's instructions.
8. Do not install near any heat sources such as radiators, heat registers, stoves, or other apparatus (including amplifiers) that
produce heat.
9. Do not defeat the safety purpose of the grounding-type plug. A grounding type plug has two blades and a third grounding
prong. The third prong is provided for your safety. When the provided plug does not fit into your outlet, consult an electrician for
replacement of the obsolete outlet.
10. Protect the power cord from being walked on or pinched particularly at plugs, convenience receptacles, and the point where
the y exit from the apparatus.
11. Onlyuse attachments/accessories specified by the manufacturer.
12. Use only with a cart, stand, tripod, bracket, or table specified by the manufacturer, or sold with the
apparatus. When a cart is used, use caution when moving the cart/apparatus combination to avoid
injury from tip-over.
13. Unplug this apparatus during lightning storms or when unused for long periods of time.
14. Refer all servicing to qualified service personnel. Servicing is required when the apparatus has been
damaged in any way, such as power-supply cord or plug is damaged, liquid has been spilled or objects have fallen into the
apparatus, the apparatus has been exposed to rain or moisture, does not operate normally, or has been dropped.
DESCRIPTION OF THE FUNCTIONS
Function of the Main Unit :
1.POWER (Power Switch)
Press the power switch to turn the unit on, and the LED
indicator will be light. To switch the POWER off by pressing
the POWER switch again.
2.DISC SLOT
Insert and remove the disc.
3.EJECT BUT TON
Press to eject the disc.
NOTE: Disc won’t be ejected unless stop or pause button
has been push first.
4.DISC INDICATOR
It lights up after loading the disc.
5.AC INPUT
Connecting this power cord into an AC wall outlet with the
proper AC voltage.
6.LINE OUT (Output Jacks)
The audio from each CD player is output from these jacks.
Connect to the line input of the mixer.
7.CONNECTOR PORTS
The 8-pin termination permits the connection of the main unit
to the control unit 1.
8.CONNECTOR PORTS
The 6-pin termination permits the connection of the main
unit to the control unit 2.
9.DIGITAL OUT
The digital from each CD player is output from these jacks.
Connect to the line input of the D/A Amplifier.
10.START/PAUSE
This connector is used for fader start; connect it to a mixer,
and remote control the “START/PAUSE”by moving the fader
of mixer.
11.TACT -LOCK option
Select the type of switch in the mixer for FADERSTART wire
remote control.
12.MEMORY CARD SLOT (OPTION)
Load SD card for playback or copy MP3 audio file from
computer through USB cable.
Insert Card: Press the card to the slot gently. On the
display, the mark above CARD lights up.
Remove Card: Draw out the card, the mark above
CARD is off.
Loading MP3 file: During writing data to the card, the
display will sho w ”PC LINK”, and all function keys are
locked, only the EJECT key is workable.
13.USB PORT (OPTION)
Connect to a computer’s USB connector with USB cable.
USB Driver disc is attached for installing the driver program, it’s
designed to work with Microsoft Windows 98/Me/2000/XP.
Function of the Control Unit
230V
50Hz
115V
60Hz

-
4
-
40
1.UNIT 1-CONTROL OPERATION PANEL
This operation panel remotely controls the main unit 1.
2.UNIT 2- CONTROL OPERATION PANEL
This operation panel remotely controls the main unit 2.
3.EJECT BUTTON
Press to eject the disc.
Note: Disc can’t be ejected unless the stop or pause
button has been pushed first.
4.MAT RIX L.C.D
Display the details of music data, please refer to the LCD
instruction (page 6)
5.CONT./SINGLE BUTTON ( OUTRO)
To press this button it can switch between auto cue
single and continue. The selected mode is indicated on
the display.
*AUTO CUE SINGLE - After each track, the unit pauses
at the beginning of next track. The playback starts from
audible point.
*CONTINUE -To play all tracks continually.
*OUTRO - The unit will play the last 30 seconds of each
track.Press the button for 3 seconds to switch OUTRO
function.
Note: OUTRO is not available for MP3 music.
6.T IME / ST OP BUTTON
This button switches the time display between total
re maining time, ea ch re maining time a nd elap sed
playing time . The unit will be in the “stop ”mode if you
continue pre ssing the button for 3 seconds.
7.SEARCH BUTTON
Pressed the button to switch the function of Jog Dial
betwe en SE ARC H and P ITCH BEN D.
When the indicator LE D is light, dial the jog for quick
searc h fo rward and ba ckward.
When the indicator LED is off, dial the jog for pitch
bend function.
If the jog is unmoved fo r 8 seco nds, the indica tor is o ff,
and the jo g is fo r pitch be nd function.
8. TRACK BUTTON
These buttons select the trac k to be playe d.
9. +10 BUTT ON
Pressed the b utton to fo rward 10 tracks. If you forwa rd 10
track s, and the tracks over tota l tra cks, the unit will jump to
track 1 ...
10. PLAY/ PAUSE BUTTON
Ea ch press of this butto n ca use s the op eration to change
be tween PLA Y and PAUS E mode s.
11. CUE BUTTON
The cue function a llows the CD returning to the memorized
point. In PA USE mode, pressing the CUE b utton to se t the cue
point, and the CUE b utton blinks; in PLAY mo de, press this
button to pause the unit at the me morized point.
12. BOP BUTT ON
The playba ck will automatically play fro m the CUE po int upon
the button is pre ssed.
13. PITCH BUTTON
Se lect the pitch change range from ±8 %, ±16 %, ±3 2%,
±100%. The playback spee d will change when you mo ve the
pitch contro l slider.
14. PITCH CONTROL SLIDER
To ma tch the choices of p la yb ack s pe ed (8%, 16%, 3 2%,
100%), yo u can choo se what ra nge you want between
minimum (up side ) and maximum (bottom s ide) b y moving the
pitch contro l slider.
15. PITCH BEND + / - BUTTON
When ea ch of the two CD players is playing, the pitch bend
function allows the positio n of the bass bea t to be matched
after the pitch has been adjuste d. The p itch will auto matically
rise up to + 16% from the curre nt setting while pre ssing the “+
“button. While pressing the “–“b utton, the p itch will
automatically drop to - 16 % from current se tting. By the way of
changing the pitch the pos ition of the bea ts ca n be ma tched.

-
5
-
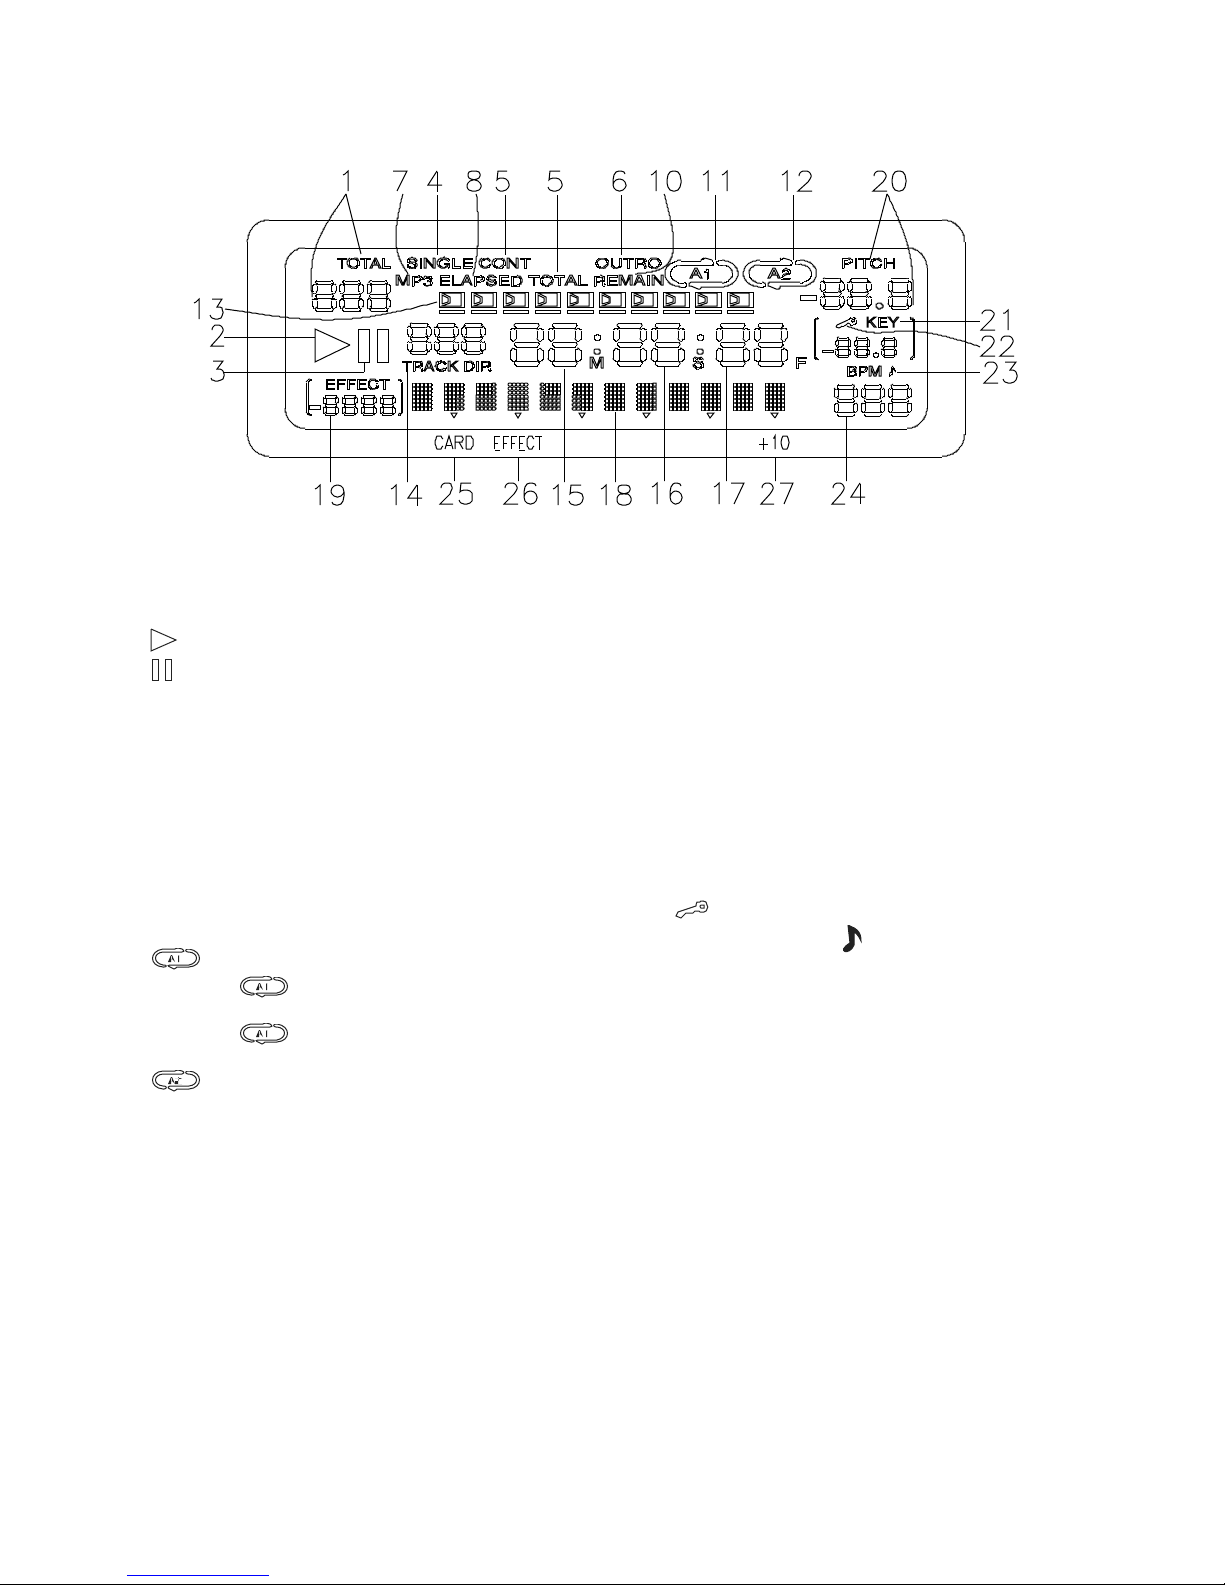
16. ON/OFF BUT TON (PITCH)
Press the butto n to be PITCH ON mod e, press it
again on the PITCH ON mode, and blinks with unit
on the PITCH OFF mo de.
17. 3 HOT -CUE
This unit will allow you to play from 3 cue points
instantly.
a. Set CUE memory: Pres s the MEMO button first,
and then pres s the CUE button to comp lete the CUE
setting, then this C UE button will light up.
b. Play” CUE” memory: Upon p re ssing specific CUE
button, it will flash ab out 5 s econds.
Note : Th is fun ction is not av aila ble du ring p erfo rm
REV E RSE s oun d effe ct.
18. SAM. BUTTON
Samp ler is a k ind of sound effect tha t you rec ord the music
from the track. While pla ying the music, you ca n use the
samp ler to mix with music. The ma ximum length is 3 2
seconds.
a. Set start p oint: Press the MEMO key, and then press SAM
button, after memo rizing the SA M button flashes quickly (2
times in 1 se c)
b. Set End p oint: Pre ss the SAM butto n again, when the end
point is mem orized, the S AM butto n lig hts up (not flash).
c. Play Sa mpler: During PLAY mode, press the SA M button,
then the button will fla sh slowly. (1 time in 1 sec)
NOTE: Refer to parame te r setting instruction for sampler
adjustme nt
19. JOG WHEEL
*Speed Control (SEARCH indicator off)
Rotating the wheel, in p lay mo de, will change the p layback
speed ac cordingly. While ro ta ting clockwise , the player
speed increa se ; ro tating counterclockwise, the s pee d
decreas e.
*Search (SEARCH indicator lights)
Rotating the wheel, the player will forward o r back ward
quic kly. The searching speed changed accord ing to the
dialing speed. It can be carried out by one fra me increm ent.
20. Seamless Loop (2 set)
There is A, B/LOOP/ EXIT, RELOOP buttons.
1 . A BUTTON---“start point” (A point. Also, Cue 1 could be A
point) After setting up the A point, the red Led light up
2 . B/LOOP/ EXIT BUTTON: ---“ End point”(B point). Press the B
/LOOP button to s et up the B point and start the loop playback
automatically. Loop lights on the display and the 3 LEDs flash.
Press this button again to exit the LOOP playback.
3 . Return to the loop playback by pressing the RELOOP while in
performance. However, if your want to return to loop playbac k,
you c an press RELOOP BUTTON
4 . Change “ START POINT” and” END POINT” by pressing the
A& B/ LOOP/ EXIT button again
5 . The interval between A and B point must be more than 20
frames; otherwise, the B point will be canceled, then LOOP
function dis appear and LOOP fades on the display
21. SOUND EFFECT/ DIRECT ACCESS
BUTTONS
* SOU ND E FF E CT OF F
The buttons are direct acc ess keys (0~9). To selec t the
number of the tra ck you would like to p lay.
* SOU ND E FF E CT ON
The buttons is for sound effect control and it lights up when
the sound effect be chosen and off when the button is
pressed again.
NOTE: How to set up the parameter; please refer to
parameter setting instruction. (Page7)
SCRATCH: Move the JOG Wheel backward or forward like
sc ratching a turntable record. This sound effect can be performed
independently, or in parallel with other effect.
BRAKE: To change the speed of PAUSE and START. This sound
effect can be performed independently, or in parallel with other
effect.
REVERSE: The music is playing backward. This sound effect can
be performed independently, or in parallel with other effect.
PHASER: It sounds like the airplane takes off
FLANGER: It sounds like another kind of airplane takes off. .
FILT ER: There are bass & treble. To increase the parameter value,
it will cut bass off but keep treble. To decrease the parameter value,
it will cut treble off but keep bass.
CHO P: The music is chopped with break.
PAN: Alternatly playing right and left signal
ECHO: Have the effec t a s ECHO.
22.SOUND EFFECT ON/OFF SWIT CH
Press the EFFE CT button to activate or dea ctivate the
so und effect. While the effect is a ctiva te d, o n the dis play
the mark above the effect is light. .
23.EFFECT SELECT KNOB
The parameter of sound effect c an be pre-s et. Turn the knob until
the LCD shows the effect name that you want, push the button to
selec t it, and turn this button again to select from the menu for
setting parameter.
24.EFFECT SCOPE KNOB
After the me nu of e ffect is se lected , turn this knob to
choose the parame te r, the relative value can be shown in
the LCD.
(Please refe r to pa ge 7 with the Parame ter Setting
Instruction for details)
When the unit is not under parame ter adjustme nt, the
display does not show the effect name, this knob ca n be
used to ad just the KE Y scale, and press it to lock the key
(the display will show )
25.RELAY
Press the “REL AY” button to a ctivate. When one unit is in
play mode, a nd the other unit is in “pa use ” mode; pause
the pla ying unit, the other unit will automa tically start to play
(the button will blink).
26.BPM BUTTON
Yo u can get the BPM numbe r auto matically o r manually.
Pressing the BPM BUTTON for 3 se conds to switch
between auto and manual control. The BEAT will be
shown o n the display! Under the manual mode, tap ping
this butto n to ge t the b ea t value.
27.KEY ON/OFF SWITCH
Press the button to switch KEY mode on or off.
KEY OFF: The dis play shows the “KEY” in blinking, and the
key changed according to the pitch change. The key
parameter adjustment is not in effect
KEY ON: The “KEY” lights on the display, turning the
SCOPE knob to adjust the key. Slide the pitch slider will also
change the key.
KEY LOCK: Press the SCOPE knob to loc k the key as s et,
sliding the pitch slider does not c hange the key.
Please refer to parameter setting instruction. (Page 8)
28.CARD: Switch the playba ck sourc e to memo ry card.
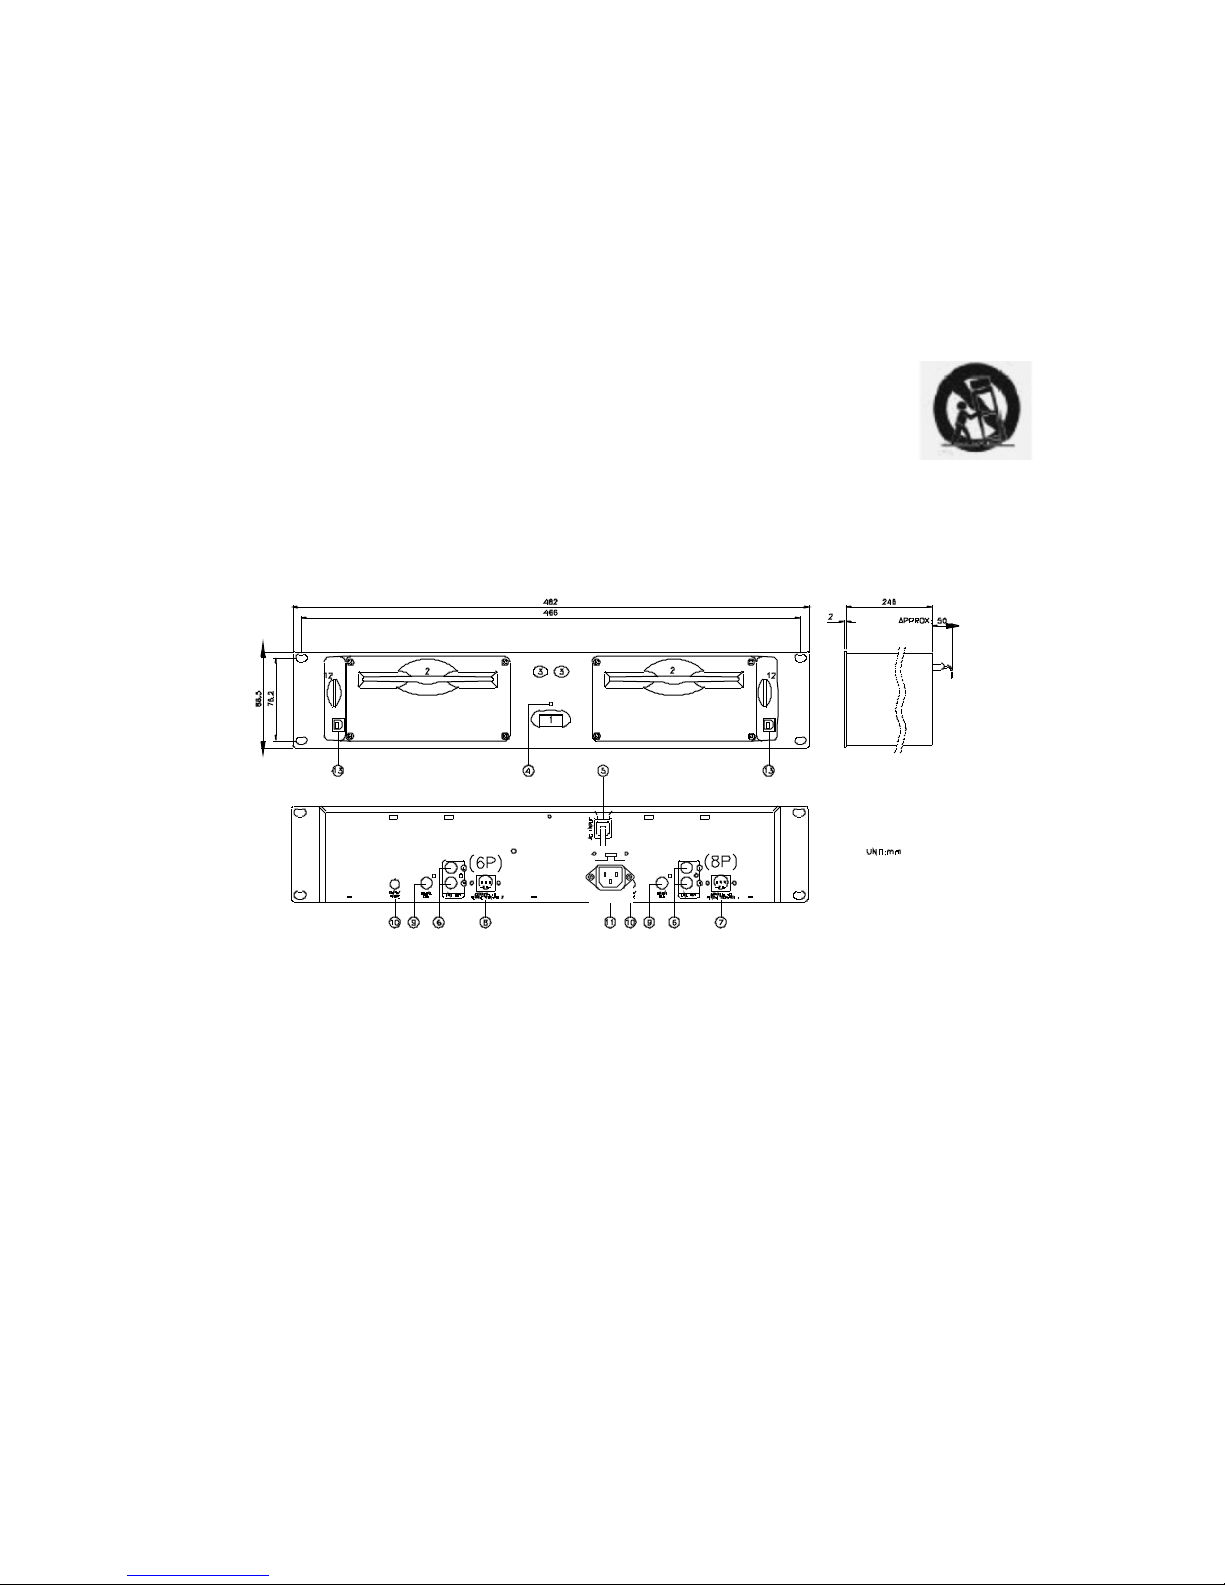
29.CONNECTOR PORT
The 8-pin(6-p in) termination permits the connection o f the
co ntrol unit to the main unit.
30.SLEEP:
Leave the unit unused fo r 30 minutes; the mac hine will shut
off automatically.

-
6
-
LCD INSTRUCTION
1. TOTAL TRACK – the track number of the CD or CARD.
2. – The unit is in play ing.
3. – The unit is paused
4. SINGLE – Shows when the unit is set to play only one track.
5. CONT – Shows when the unit is set to play the all tracks
continually.
6. OUTRO – Shows when the unit is set to play the last 30
seconds of each track.
7. MP3 – Lights up when the unit is playing MP3 file.
8. TIME MODE (ELAPSED) – Shows the time as it is taking
place.
9. TIME MODE(TOTAL) – Shows how much time is left on
full CD, but not for MP3 CD.
10. TIME MODE (REMAIN) – Shows how much time is left on
a particular track.
11. – A1 lights up after setting up start point(A point). A1 and
flash after setting end point (B point) and
start the loop play back automatically. A1 and
light up after exiting the LOOP playback and
in performance.
12. – Refer to SEAMLESS LOOP A1.
13. TIME BAR – Show the time length depending on the setting
of the “TIME” mode.
14. TRACK – Shows the track number that is playing.
15. MINUTES – Shows the minutes elapsed or remaining
depending on mode setting.
16. SECONDS – Shows the seconds elapsed or remaining
depending on mode setting.
17. FRAMES – The CD Player breaks down a second into 75
frames for acc urate cueing. This shows the frames
elapsed or remaining depending on mode setting.
18. EFFECT MODE DISPLAY – Shows the effect name
selected in effect parameter setting mode and
shows the song name in performance.
19. THE PARAMETER OF SOUND EFFECT
20. PITCH – The pitch change range
21. KEY – Lights up when key effects are active and indicates key
position, otherwise it flash.
22. – Lights up when key has been locked.
23. BPM: Manual ; BPM : Auto
24. Number of Beat per minute
25. CARD – Lights up when the unit is reading SD card.
(OPTION FUNCTION)
26. EFFECT – Lights up when the EFFECT function is on.
27. +10 – Lights up and indicate the scope value of effect
parameter to be adjusted 10 units each time.
28. LOADING MP3: During writing data to the card, It will
show ”PC LINK”. (OPTION FUNCTION)

-
7
-
PARAM ET ER SET TING INST RUCT ION
Effect Menu Note
Default Scope
BK/START_T 1 20 (1 unit = 0.1 sec) 0 ~100 (0.1 ~ 10 sec)BRAKE
BK/STOP_T 2 20 (1 unit = 0.1 sec) 0 ~100 (0.1 ~ 10 sec)
PS/BPM_SYNC 3 ON ON / OFF
PS/GAIN 4 50 (%) 0 ~ 100 (%)
SYNC OFF: 50 (1 unit = 0.01 sec)
25~800 (0.25 ~ 8 sec)
PHASER
PS/TIME 5
SYNC ON: 4/1 beat 1/4 ~ 64/1 beat
FG/BPM_SYNC 6 ON ON / OFF
FG/GAIN 7 40 (%) 1 ~90 (%)
SYNC OFF: 50 (1 unit=0.01sec) 25 ~ 800 (0.25 ~ 8 sec)
FLANGER
FG/TIME 8
SYNC ON: 4/1 beat 1/4 ~ 64/1 beat
EC/BPM_SYNC 9 ON ON / OFF
EC/GAIN 10 50 (%) 0 ~ 100 (%)
SYNC OFF: 50 1 ~ 400
ECHO
EC/DELAY_LG 11
SYNC ON: 4/1 BEAT 1 ~ 4/1 beat
FL/BPM-SYNC 12 ON ON/OFF
FL/SCAN_TIME
(FL/BPM-SYNC:ON)
13 8/1 BEAT 1/4 ~ 64/1 BEAT
FL/FREQUENCY
(FL/BPM-SYNC:OFF)
14 50 0 ~100
FILTER
FL/GAIN 15 40 0 ~ 100
PAN/BPM_SYNC 16 ON ON/OFF
PAN/MIX 17 100 (%) 1 ~ 100 (%)
SYNC OFF: 50 (1unit = 0.01sec)
6 ~ 400 (0.06 ~ 4 sec)
PAN
PAN/PERIOD 18
SYNC ON: 1/1 beat 1/64 ~ 4/1 beat
CP/BPM_SYNC 19 ON ON / OFF
CP/WIDTH 20 50 (%) 0 ~ 100 (%)
SYNC OFF: 50 (1unit = 0.01sec) 6 ~ 400 (0.06 ~ 4 sec)
CHOP
CP/PERIOD 21
SYNC ON: 1/1 beat 1/64 ~ 4/1 beat
SPL/MIX_VOL 22 50 (%) 0 ~ 100 (%)
SPL/PITCH 23 0 (%) ±100 (%)
SPL/LOOP_SW 24 OFF ON/OFF
SPL/RESERVE 25 OFF ON/OFF
SAMPLE
SPL/INSERT 26 OFF ON/OFF
ON: +12 ~ -24 keyKEY KEY_SEMITONE 27 ON
OFF: -100% ~ + 100%

-
8
-
PARAM ET ER SET TING INST RUCT ION
NOTE :
1. BK/START_T : The period time before starting music
2. BK/STOP_T : The period time before stopping music
3. PS/BPM_SYNC: Add the PHASER effect to the music in a cyc le
based upon the selec ted beat
4. PS/GAIN: Determine the volume of PHASER effect signal. The
higher ratio with stronger effect.
5. PS/TIME: Determine the length of PHASER effect. SYNC-OFF,
0.25 sec is the shortest, and 8 sec is longest; SYNC_ON, 1/4
beat is the shortest and 64 beats is the longest.
6. FG/BPM_SYNC: Add the FLANGER effect to the music in a
cycle based upon the selected beat
7. FG/GAIN: Determine the volume of FLANGER effect signal. The
higher ratio with stronger effect.
8. FG/TIME : Determine the length of FLANGER effect. SYNC-OFF,
0.25 sec is the shortest, and 8 sec is longest; SYNC_ON, 1/4
beat is the shortest and 64/1 beats is the longest.
9. EC/BPM_SYNC: Add the ECHO effect to the music in a cy cle
based upon the selec ted beat
10. EC/GAIN: Determine the volume of ECHO effect signal. The
higher ratio with stronger effect.
11. EC/DELAY_LG: The delay time of ECHO effect. SYNC OFF,
0.01 sec is the shortest, and 4 sec is longest; SYNC_ON, 1 beat
is the shortest and 4/1 beats is the longest.
12. FL/BPM-SYNC: Add the FILTER effect to the music in a cycle
based upon the selec ted beat
13. FL/SCAN_TIME (FL/BPM-SYNC:ON): Determine the scanning
time of FILTER effect. 1/4 beat is the shortest and 64/1 beats is
the longest
14. FL/FREQUENCY(FL/BPM-SYNC:OFF) : Selec t the band of
frequency. The number increased, The frequency is close to the
treble. The number decrease, The frequency is close to bass.
15. FL/GAIN: Determine the volume of FILTER effect signal. The
higher ratio with stronger effect.
16. PAN/BPM_SYNC: Add the PAN effect to the music in a c ycle
based upon the selected beat
17. PAN/MIX : Determine the volume of signal taken for mixing to the
other side.
18. PAN/PERIOD: Determine the period of PAN effect. SYNC-OFF,
0.06 sec is the shortest, and 4 sec is longest; SYNC_ON, 1/64
beat is the shortest and 4/1 beats is the longest.
19. CP/BPM_SYNC: Add the CHOP effect to the music in a cy cle
based upon the selected beat
20. CP/W IDTH : Determine the ratio of auditable music, the higher
ratio with more audible signal.
21. CP/PERIOD : Determine the period of CHOP effect. SYNC-OFF,
0.06 sec is the shortest, and 4 sec is longest; SYNC_ON, 1/64
beat is the shortest and 4/1 beats is the longest.
22. SPL/MIX_VOL: The ratio of SAMPLE single mixing into the
music.
23. SPL/PITCH: To select the sample pitch range from –100% to
+100%, 0% means sample playback speed is
unchanged.
24. SPL/LOOP_SW : To play the sample music repeatedly
25. SPL/REVERSE: To play the sample music backward to mix with
music.
26. SPL/INSERT : To c ut off the music and insert the sample music .
27. KEY_SEMITONE : SEMITONE_ON, to change the key by half
step, from +12 to –24 key; SEMITONE_OFF, change the key by
perc entage from –100% to +100%.

-
9
-
Connections
Typical connections with a m ixer is illustra te d belo w. Please use it for re ference.
* Connect the connec tion co rd s to the line inputs of your mixe r.
* The connection co rd s and the remo te contro l c onnec tio n ca ble are supplie d with the main unit.
* B e sure to use the re mote control connection cable which has been supplied . Use of another ca ble typ e might cause da mag e.
230V
50Hz
115 V
60Hz

-
10
-
BASIC OPERATION
Loading and Ejecting the Disc
When the disc is loaded, press the EJECT button to
eject the disc (This may be done on either the player or
the remote control side.)
Place a disc in the disc loader
12 cm disc
8 cm disc
Push the disc to the loader.
While the disc is loaded,
the preparation for disc play will
begin.
When preparation is completed, the total tracks number &
total playing time will display.
To the desired track

-
11
-
TRACK SKIP
T o go ba ck thro ugh the track s T o adva nce throu gh the trac ks
T racks change as follows
(This is for a disc containing 4 tracks) T racks change as follows
When this button is pressed once, the CD player will
skip backward to the beginning of the track, press twice
will skip backward to the previous track.
When this button is pressed once, the CD player
will advance to the beginning of the next track.
ANTI SHOCK MEMORY
This CD Player is equippe d with an anti-shock me mory, wish memorize 10 seco nds of music before reading, to be not in
ca se o f shock.
Warning : This system can't work in c ase of repetitive shocks o r vib rations and if the memo ry is no t co mplete ly charged.

-
12
-
MATCHING THE BEATS PER MINUTE
Ma tc h the p itc h b y mo n ito ri ng the mu si c of both UNIT 1 a nd UNIT 2 by e ar. W he n th e te mp o o f the m us ic o f the
se le c te d C D pla ye r i s s lo w c om p a red to th e te mp o o f the o ther playe r, mo ve the s lide r to the + s id e and ma tc h
the te mp o . W he n fa st, mo ve to the - s id e .
Th e fo llo w ing d e s crip ti on i s fo r the c as e of ma tc hi ng the p itch o f UNIT 2 to the pi tch of the m us ic b e ing pla yed
on UN IT 1 .
B
u
y
m
e
o
r
f
f
e r
M
UNIT 1 is playing. Press PLAY/PAUSE to start UNIT 2.
M
u
B
re
f
f
r
o
e
m
y
Both CD players are playing discs .
Listen to UNIT 2 in your headphones.
When UNIT 2 is slow
compared to UNIT 1
When UNIT 2 is fast compared
to UNIT 1
Beat Matching Using Pitch Bend
A d e s crip ti on o f the p ro c ed ure fo r match ing th e bea t of UNIT 1 an d UNIT 2 usi n g the P ITC H BE ND s ti ck i s gi ven
be lo w.
Th is d e sc ri p ti on i s fo r the c a se o f ma tc hing the b e at o f UNIT 2 to the b e a t o f th e mus ic b ei ng p la ye d o n UNIT 1 .
(This p roc e d ure c a n b e d o ne o n e ith e r U nit).
After Matching the BPM's
M
u
B
re
f
f
r
o
e
m
y
BPM’s (Beat Per Minute) are the
same, however the bass beats
are not matched.
When UNIT 2 is ahead. When UNIT 2 is behead.

-
13
-
OPERATION OF CUE (WITH PLAY/PAUSE)
1. In p a us e mo d e , p res s C UE b utton to m e m orize a p oi nt fo r p layi ng b a c k. W e m ea n i t “c ue p o in t”.
2. Afte r “c ue p o in t” i s mem ori zed , i n p lay m od e, pre ss i ng C UE b utto n will re turn the m usi c ba c k to the c ue p o i nt
and k ee p i t i n p a use mo de .
3. P re ss P L AY b utto n a g ai n to p erfo rm fro m “c ue po in t”.
OPERATION OF A AND B/LOOP
1. S et “A P OINT ” un d er p lay m od e b y p re ssi ng A b utto n (witho ut i nterrup tio n du ri ng p la yb a ck ).
2. P re ss B /L OO P to me mo rize the end in g p o in t o f lo op, we me a n it “B P OINT ”. A t the m e a nti m e, it b lin ks L O OP
on the L C D , a n d th e musi c a utom ati ca lly co m es ba ck to “A P OIN T” a nd lo o p s b e twe e n A & B p o ints.
3. W hi le the mu si c lo o p s b e twe e n A & B , p res s to lea ve the lo o p . A t the me a ntime , i t lig hts LOOP o n
the LC D .
4. P re ss RE L OOP a g ai n duri ng playb a ck, it re turn s the loo p functio n.
5. W ithin p la y in te rval, yo u ca n c ha ng e “A P OINT ” & “B P OIN T” b y p ress in g A & B /L OOP bu tto n unde r play m od e.
6. Als o ava i la ble to cha nge “start p o i nt” b y p re ssi ng A b utto n i n pa u se m od e duri ng lo op func ti o n.

-
14
-
BEFORE SWITCHING OFF THE POWER
When you have finished using the CD player, before switching off the power, ensure that the disc is ejected
Do not switch off the power when the
disc in the loader.
POWER OFF
Switch off the power after the disc is
ejected.
POWER OFF
TROUBLESHOOTING GUIDE
If d ifficulties aris e with your comp act dis c player, lo ca te the app arent p ro blem in the le ft-hand column of the ta ble and follow the
co rrective ac tion sugg ested in the right-hand column.
1. Is the compact disc player p ro pe rly connected to the amplifier?
2. Is the am plifier set for the prop er opera tion?
3. Have the ope ra ting instructions for the compact disc playe r been fo llo wed ?
Symptom Possible Cause Corrective Action
The power fails to switch on
when the POWER switch is set
to ON
Poor power plug connection at the AC outlet. Insert the power plug firm ly into the AC outlet.
Disc play does not start The disc is loaded upside down.
The disc is too dirty.
Reload the disc with the label side up.
Clean the disc.
No sound Improper output cable connections.
Improper amplifier operation.
Connect the output cable properly.
Make sure that the amplifier controls are set
properly.
Sound skips The CD player is subject to vibrations or
physical shock.
Change the installation location.
Hum Loose cable connections. Firmly connect all audio plugs.

-
15
-
USB Driver Installation and Operating Instructions
For running program properly, please install the Driver before installing the Application program
I. The driver Setup
1. There are three directories on installation CD, please select the Driver directory.
2. Run setup.exe and finish installation of the driver.
3. Please press YES to reboot the computer, if operating systemis Win98 or Win ME. Please press No to
neglect this step, if operating system is Win 2000 and Win XP.
4. Connect the CD player and computer with USB cable before switching on CD player.
5. Switch on the CD player.
6. When Windows detects your CD player, the New Device Found dialog box appears.
7. Please select Driver directory on installation CD
8. Follow the on screen instructions to complete the setup (The warning box will appear, if operating system is
Win XP. Don’t worry and continue setup.)
9. Continue setup the application program after installation of the driver finishes.

-
16
-
II. Application Setup
1. There are three directories on installation CD. Please select the DJMP3 directory.
2. Follow the onscreen instructions to complete the setup.
3. Run DJMP3 program on START menu after finishing application installation.
III. Application instructions
The files in SD card will automatically be listed in SD card box after running application program.
Drag selected files to file list box and release, the selected files will be added to file list box.
Select the files in SD card box first and press DELETE button, if you would like to delete the files in SD card.
Select the files in file list box first and press DELETE button, if you would like to delete the files in file list
box.
The selected file in file list box will be downloaded to SD card after pressing download button, programming
percentage will be showed in the programming bar.
The description of DJMP3 functions
Before copying, please follow the steps described below:
i. Connect the USB cable
ii. Open the DJ-MP3 program
iii. When the dialogue box shows “please insert SD card”, insert the SD card into the memory card slot
and press the “OK” on the screen.
DJ-MP3 instruction
1. The drive box: Show the selected drive.
2. The directory box: Show the selected directory.
3. The file type box: Select the type of file you would like to show.
4. The file box: Show the files in selected directory.
5. The SD card box: Show the files in SD card.
6. The file list box: Show the files to be downloaded to SD card.
7. The refresh button: Refresh ID information of SD card. To avoiding programcrash, Please press the refresh

-
17
-
button after you changed SD card.
8. The format button: Format SD card, and all the file will be deleted. If the SD card is fresh, format it before the
first use.
9. The exit button: Exit the application program.
10. The download button: Press this button to download files to SD card.
11. The progress bar: Show the downloading progress.
12. The status bar: Displays the total and remaining space of SD card showed in status bar.
13. DJ MP3: Press the button to get the information about the DJMP3 program.
14. Help: Provide help and instruction for the DJMP3 program.
IV. Operation Environment for running DJ/MP3 program
PC: IBM PC/AT or compatible, with 933 MHz or faster Intel®Pentium®III processor
Memory: At least 128MB must be mounted
Hard disc: At least 25MB of memory must be available during installation
Disc drive: Must support CD-ROM and CD-DA playback
Display: Resolution of at least 800 * 600 pixels (SVGA)/high color (16 bits)
Operating system: Microsoft®Windows®98SE/ME/2000/XP
External port: USB1.1 or later version USB ports
NOTE
1. MPEG Layer-3 audio decoding technology licensed from Fraunhofer IIS-A and Thomson
multimedia.
2. The SD logo is trademark. Portions of this product are protected under copyright law and
are provided under license.
3. Microsoft & Windows are trademarks of Microsoft Corporation in the United States and other
countries
4. Pentium is a registered trademark of Intel Corporation.
5. This unit is not to be used for illegal purpose.
Other manuals for PDCD6000MP
1
Table of contents
Other Pyle Pro MP3 Player manuals