Q-See QCW4MP1PT User manual

4MP WI-FI PAN TILT CAMERA
QUICK START GUIDE
ENGLISH / ESPAÑOL
CÁMARA CON PANEO HORIZONTAL E
INCLINACIÓN VERTICAL WI-FI 4MP
GUÍA DE INICIO RÁPIDO

WELCOME!
Congratulations on your latest
purchase and welcome to the Q-See
family. This guide will help get your
camera up and running.
WHAT’S INCLUDED
•(1) QCW4MP1PT Wi-Fi Camera
•(1) Power Adapter
•(1) Mounting Hardware
•(1) Quick Start Guide
STEP 1
Before installing, please register your device on the Q-See Support Portal at www.q-
see.com/register to receive critical updates and support for your system. Registering
will also help us to assist you with any technical or warranty issues if ever necessary.
Please be sure to keep a record of your model number(s) and to save this
guide, as you will need this information if you are ever in need of technical or
warranty support.
NOTE: YOUR USERNAME AND PASSWORD USED TO REGISTER YOUR DEVICE ARE NOT
THE SAME AS THOSE YOU USE TO LOG IN TO YOUR SYSTEM. PLEASE WRITE DOWN YOUR
USERNAME, PASSWORD, AND MODEL NUMBER(S) IN THE SPACES PROVIDED BELOW:
Username:
Password:
Model #:

STEP 2
Plug the camera into a power
source and wait until the indicator
light begins to flash. After 15-30
seconds the light should slowly flash
green which indicates it is ready to
configure. If the light displays solid
red, hold the reset button for 15
seconds to reset the camera.
IMPORTANT: Go through all of
the steps to setup and test your system
before mounting your camera. Visit
www.q-see.com/support to find the
most recent guides and up-to-date support
for your Q-See products.
STEP 3
Download the Q-See Plus app from
the App Store on your mobile device.
Once installed, ensure that your
mobile device is connected to the
Wi-Fi network you wish to use for
your camera. Launch the app on your
mobile device.
STEP 4
Tap on Register and create an
account for the new camera. All
screenshots shown are from the
Q-See Plus app on Android.

STEP 5
Enter an email address to use for your account.
You should immediately receive an email with a
verification code. You will have two minutes to
enter the verification code, so be sure you will
have quick access to the email address used. Tap
Send verication code to mail.
STEP 7
Create a password for your account. You will
enter the same password twice to confirm. Tap
Register Again to continue.
STEP 6
Enter the verification code and click Next.

STEP 8
Enter your email address again and the new
password. Tap Login to continue.
STEP 9
Tap the + symbol to continue. In the following
screen, select “Wi-Fi Camera” for device type.
Next, using your mobile device’s camera, scan the
QR code on the back of the Wi-Fi camera.

STEP 11
In the next screen, tap “Yes, config Wi-Fi”. Enter
your Wi-Fi network’s password and before tapping
“Next”, place your mobile device within 12” of the
Wi-Fi camera. Click “Next” to proceed. Connecting
may take over a minute. Once connected, the LED
on the front of the Wi-Fi camera will turn solid green.
STEP 12
You should then see the confirmation screen.
Tap Start Live Preview and follow the on-screen
prompt to finalize the setup. If the camera is unable
to connect, try temporarily moving the camera
closer to your Wi-Fi router to complete the setup
process. If that doesn’t work, hold the reset button
for 15 seconds and start the process over.
STEP 10
Once the QR code scans, a new screen will appear
with login credentials. Do not edit any of the
credentials. Do not enter a verification code. Tap
OK to continue.

CAMERA FEATURES
The 4MP Wi-Fi Pan Tilt Camera features the
ability to rotate your camera view left to right
(pan) and to adjust your camera view up and
down (tilt).
The camera’s microphone and speaker will
enable you to both hear and speak through
your camera for two-way audio purposes.
The QR code is located underneath the
camera for use when configuring the device.
RESETTING YOUR CAMERA
Your camera’s “reset” button is also its LED
indicator light. Press and hold the reset
button for 15 seconds in order to reset the
camera to its original factory settings.
The LED indicator light will ensure that your
camera is connected to Wi-Fi. A flashing
green light means it is ready to connect. A
solid green light means it is connected to
a Wi-Fi network. A solid red light indicates
that there is problem with the connection.
SPEAKER
CAMERA
LENS
MICROPHONE
QR CODE
NETWORK PORT
MICRO SD
CARD SLOT
POWER
PORT
RESET
BUTTON & LED
INDICATOR


PASO 1
Antes de la instalación, por favor registre su dispositivo en el portal de soporte de Q-See en
www.q-see.com/register para poder recibir actualizaciones importantes y soporte para
su sistema. Al registrar su producto nos será más fácil ayudarlo en caso este tenga algún
problema técnico o de garantía.
Asegúrese de llevar un registro con el número de modelo de su dispositivo y guardar esta
guía; esta información la necesitará si requiere soporte técnico o de garantía.
NOTA: EL NOMBRE DE USUARIO Y LA CONTRASEÑA UTILIZADOS PARA REGISTRAR SU DIS-
POSITIVO NO SON LOS MISMOS QUE LOS UTILIZADOS PARA INICIAR UNA SESIÓN. POR FAVOR
ESCRIBA SU NOMBRE DE USUARIO, CONTRASEÑA Y NÚMERO DE MODELO EN EL ESPACIO
PROVISTO ABAJO:
Nombre de usuario:
Contraseña:
Modelo #:
¡BIENVENIDO!
Felicitaciones por su compra y
bienvenido a la familia Q-See. Esta
guía le ayudará a instalar su cámara y
ponerla en funcionamiento.
QUÉ INCLUYE
•(1) Cámara Wi-Fi QCW4MP1PT
•(1) Adaptador de corriente
•(1) Herramientas de montaje
•(1) Guía de inicio rápido

PASO 2
Conecte la cámara a una fuente de energía y
espere hasta que la luz comience a parpadear.
Después de 15-30 segundos comenzará a
parpadear una luz verde indicando que la
cámara está lista para ser configurada. Si la luz
es roja y sólida, mantenga presionado el botón
de reinicio (reset) durante 15 segundos para
reiniciar la cámara.
IMPORTANTE: Antes de instalar
la cámara, siga todos los pasos de
instalación y pruebe el sistema. Visite
www.q-see.com/support y ahí
encontrará los manuales más recientes
e información actualizada para sus
productos Q-See.
PASO 3
Desde App Store descargue en su
dispositivo móvil la aplicación Q-See Plus.
Una vez instalada, asegúrese de que su
dispositivo móvil esté conectado a la red Wi-
Fi que desea utilizar para su cámara. Lance
la aplicación en su dispositivo móvil.
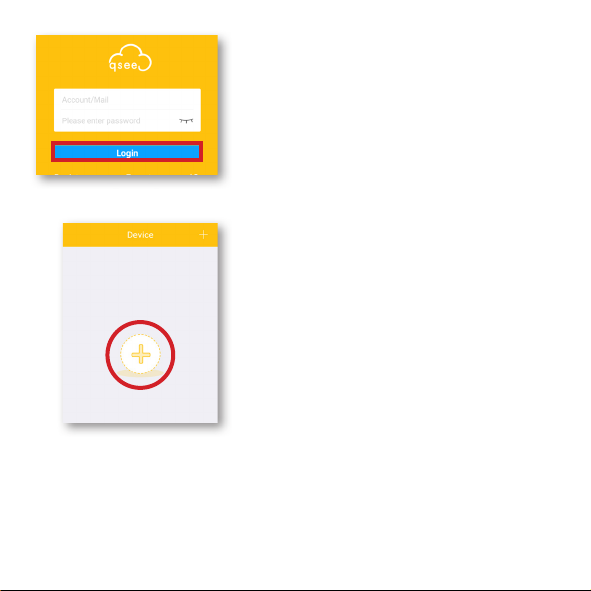
PASO 4
Haga clic en Registrar (Register) y cree
una cuenta para la nueva cámara. Todas las
capturas de pantalla que se muestran son de
la aplicación Q-See en Androide.

PASO 5
Ingrese la dirección de correo electrónico que usará para
la cuenta. Inmediatamente recibirá un correo electrónico
con un código de verificación. Tendrá sólo dos minutos
para ingresar el código de verificación, por eso
asegúrese de tener acceso rápido a la dirección de correo
electrónico que use. Haga clic en Enviarme código de
verificación (Send verication code to mail).
PASO 7
Cree una contraseña para su cuenta. Deberá ingresar la
misma contraseña dos veces para confírmala. Haga clic en
Registrar nuevamente (Register Again) para continuar.
PASO 6
Ingrese el código de verificación y haga clic en Siguiente
(Next).

PASO 8
Ingrese su dirección de correo electrónico nuevamente y
la nueva contraseña. Haga clic en Iniciar sesión (Login)
para continuar.
PASO 9
Haga clic en el Símbolo + para continuar. En la siguiente
pantalla, seleccione Cámara Wi-Fi “Wi-Fi Camera” para
el tipo de dispositivo. Luego, usando la cámara de su
dispositivo electrónico, escanee el código QR ubicado en
la parte posterior de la cámara Wi-Fi.

PASO 11
En la siguiente pantalla haga clic en Sí, config Wi-Fi “Yes,
config Wi-Fi”. Ingrese la contraseña de su red de Wi-Fi
y antes de hacer clic en Siguiente “Next”, coloque su
dispositivo móvil a 30cm de la cámara Wi-Fi. Haga clic en
Siguiente “Next” para proceder.
PASO 12
Luego verá la pantalla de confirmación. Haga clic en
Iniciar vista previa en directo “Start Preview” y siga
las indicaciones que aparecerán en pantalla para finalizar la
configuración. Si la cámara no puede conectarse, intente
llevar temporalmente la cámara más cerca del router de
su Wi-Fi para terminar el proceso de configuración. Si eso
no funciona, presione durante 15 segundos el botón de
reinicio y comience todo el proceso nuevamente.
PASO 10
Una vez que se escanee el código QR aparecerá una nueva
pantalla con credenciales para iniciar sesión. No edite
ninguna de las credenciales. No ingrese ningún código de
verificación. Haga clic en OK para continuar.

CARACTERÍSTICAS DE LA
CÁMARA
La Cámara con paneo horizontal e inclinación
vertical Wi-Fi 4MP puede girar la visión de la
cámara de izquierda a derecha (paneo) y graduar
la cámara de arriba a abajo (inclinación vertical).
El micrófono y parlante de la cámara le permitirán
escuchar y hablar a través de la cámara para fines
de audio bidireccional.
El código QR está ubicado debajo de la cámara;
deberá usar el código para configurar el
dispositivo.
PARLANTE
LENTE DE LA
CÁMARA
MICRÓFONO
CÓDIGO QR

REINICIO DE SU CÁMARA
El botón de “reset” (reinicio) de su cámara es
también la luz indicadora LED. Presione y sostenga
presionado el botón de reinicio durante 15
segundos para reiniciar la cámara a sus ajustes
originales de fábrica.
La luz indicadora LED confirma que su cámara
esté conectada a Wi-Fi. Cuando la luz es verde
y parpadea quiere decir que la cámara está lista
para conectarse. Una luz verde sólida significa
que la cámara está conectada a la red de Wi-Fi.
Una luz roja sólida indica que hay problemas con
la conexión. PUERTO
DE RED
RANURA PARA
MEMORIA
MICRO SD
PUERTO DE
ALIMENTACIÓN
BOTÓN DE
REINICIO Y
INDICADOR
LED

Rev. 9/13/17, QCW4MP1PT GQCW4MPT-ES-V1
WARRANTY & SUPPORT
Q-See is always here to answer your questions and take your valued suggestions. Visit us at
www.q-see.com/support for 24/7 support and access to our Support Portal.
GARANTÍA Y SOPORTE TÉCNICO
Q-See está siempre presente para responder a sus preguntas y para acoger sus
sugerencias. Visítenos en www.q-see.com/support para acceder a nuestro Portal de
soporte técnico en línea que está a su disposición 24 horas al día, 7 días a la semana.
DISCLAIMER: Although Q-See has made every effort to ensure that the information in this
guide was correct at the time of printing, Q-See does not assume any liability to any party for any
loss, damage, or disruption caused by any errors, omissions, or typos that may occur.
EXENCIÓN DE RESPONSABILIDAD: A pesar de que Q-See ha hecho todo lo posible
para garantizar que la información contenida en esta guía sea la correcta al momento de la
impresión, Q-See no asume responsabilidad alguna y declina expresamente toda responsabilidad
para con cualquier parte debido a pérdida, daño o interrupción provocada por errores, omisiones o
errores tipográficos que puedan producirse.
Other manuals for QCW4MP1PT
1
Table of contents
Languages:
Other Q-See Digital Camera manuals
Popular Digital Camera manuals by other brands

Adaptive Recognition
Adaptive Recognition Vidar installation guide

VADDIO
VADDIO QUICK-CONNECT CCU Z700 Installation and user guide

Olympus
Olympus CAMEDIA C-765 Ultra Zoom Reference manual

Motorola solutions
Motorola solutions L6Q installation guide

Panasonic
Panasonic Lumix G G1 Brochure & specs

Prosilica
Prosilica GC640 user manual