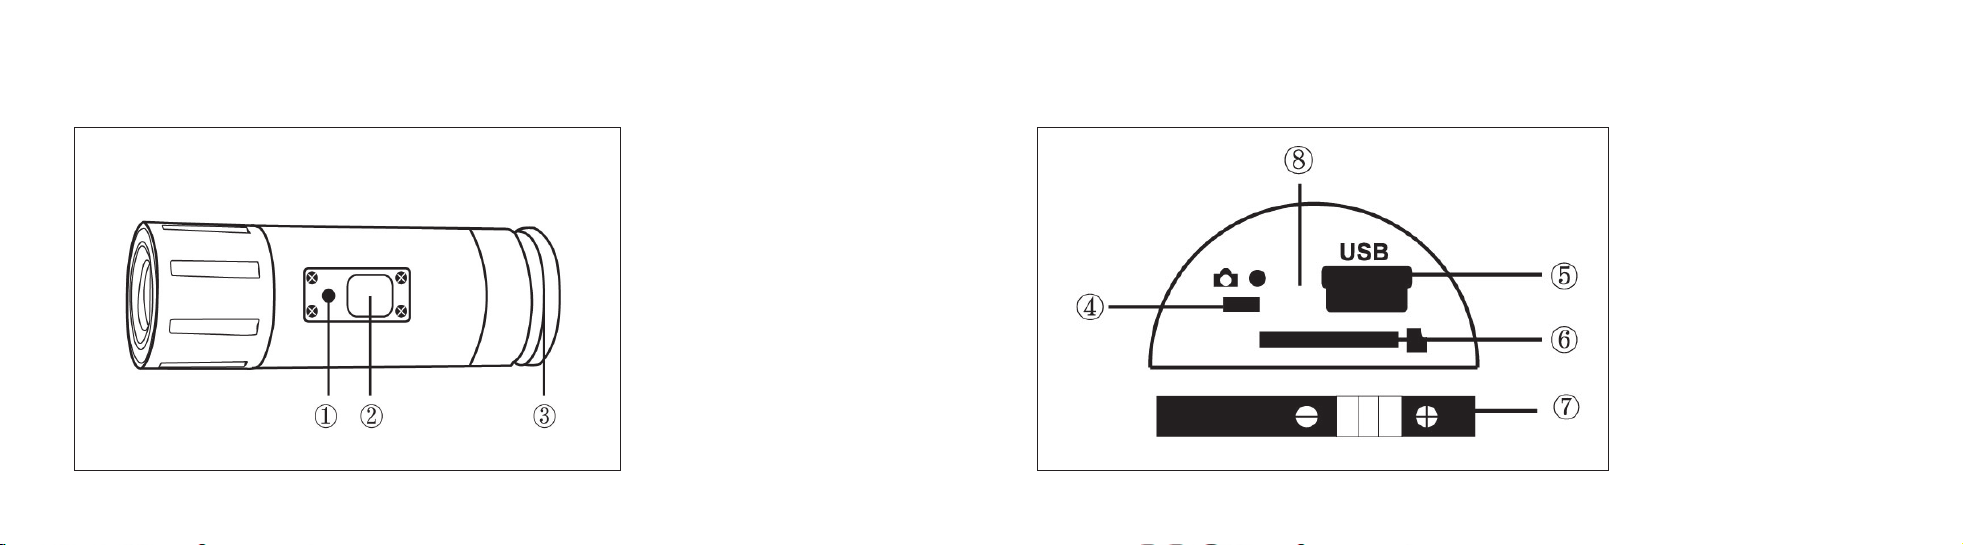
QCAMZ HD 720p User manual

// English
QCAMZ HD 720p
135° Wide Angle // Waterproof Action Cam

Introduction
Thank you for purchasing the QCAMZ HD! Record your limits with this waterproof
HD action cam!
It is highly recommended for you to read this user manual carefully in order to fully
understand how to operate the QCAMZ HD correctly.
Table of Contents
What’s in the box?
How to use
Camera Overview
Initial set up
Charging the battery
Power ON/OFF
Taking a video
Taking snapshot photos
Memory capacity chart
Playback on your computer
On a Mac
Date & time setting
Webcam setting
LED status table
Removing/Installing battery
Repairs
Technical specications
Warranty
Warning

What’s in the box? 1. QCAMZ HD with Sound Cap
2. Camcorder Mount
3. Universal Mount
4. Roll Bar Mount
5. Magic Tape
6. Adhesive Stickers 2pcs
7. Waterproof Cap
8. Rubber O-Rings 6pcs
9. Silicon Grease
10. Hand Safety Strap
11. Rechargeable Lithium-Polymer battery
12. USB Cable
13. User Manual

How to use the QCAMZ HD
1. Camcorder on Handlebar 2. Camcorder on Vented Helmets
Roll Bar Mount Camcorder Mount Magic Tape Universal Mount Camcorder Mount

Using QCAMZ HD for water sports
When using the waterproof cap remember to put some silicon
grease to the rubber O-ring from time to time, especially before
using the camera in water. Make sure to close the rear cap tightly.
Only use the camera in water with the waterproof cap!
Rubber O-Rings Silicon Grease Waterproof Cap
3. Camcorder for Non-vented Helmets
Adhesive Sticker Universal Mount Camcorder Mount

Camera Overview
1. LED
2. Power / Shutter
3. Rear cap
4. Mode switch
5. USB Port
6. Micro SD card slot
7. Battery
8. Microphone

Initial set up
1. Make sure the camera is OFF before inserting or removing the Micro SD card!
2. Unscrew the rear cap from the back of the camera ③.
3. Put your Micro SD card (max up to 32GB) into the slot with the card label facing
down (contacts up). Use your ngernail to do this. You will hear a click sound once
the Micro SD card is in place. Then screw the rear cap back on tightly.
Only use Micro SD cards Class 6 or above.
4. If no Micro SD card is inserted into the camera, the LED light on top of the ca-
mera will start ashing red and green for approx. 30 secs and then auto shut-off.
5.The Micro SD card must be blank; meaning without images from other sources
on it. If you are using a Micro SD card previously used with other cameras, please
make sure you format the Micro SD card in your computer before using it with
your QCAMZ HD. New cards can be used straight from the packaging.

Charging the battery
Unscrew the cap located at the back of the camera ③ and connect the camera
with the USB cable to your PC ⑤ or charger (optional). The LED light will light up
blue while charging and will turn itself off once the battery is fully charged.
Before the rst use charge the battery for 10 hours!
You can record apporx. up to 120 minutes with one charge.
Power on/off
Turn on the camera // Press and hold the POWER/Shutter button for approx. 3
seconds until the green LED turns on and the red LED ashes twice. The camera
will vibrate once long, indicating it is now in stand-by mode.
Turn off the camera // Press and hold the POWER/Shutter button again for
approx. 3 seconds. The red LED light will ash twice and go off. The camera will
vibrate twice, indicating it switches off.
Standby mode // If the camera is in standby mode without activity, it will auto
switch off after approx. 3 mins to conserve battery power.

Taking a video
To take a video the camera must be set to video mode. To check unscrew the cap
located at the back of the camera ③. The video/photo switch ④ must be set to the
right for the video recording standby mode, screw the cap back on tightly.
Turn on the camera. Then press the Power/shutter button ② once shortly to start
video recording.
The camera will vibrate one short time and the LED will ash red while the video is
recording. Push the Power/shutter ② again to stop the recording. The camera will
vibrate two short times and the red LED will stop ashing.
Take Snapshot Photos
Unscrew the cap from the back ③, set the video/photo switch ④ to left for the
photo standby mode, screw the cap back on tightly.
Turn on the camera. Press the shutter button ② to start taking photos.
The camera will vibrate one short time and the LED will ash red. The camera
automatically takes a photo every 3 seconds until the battery is empty or the
Micro SD card full. Press the Power/shutter button again to stop the recording.
The camera will vibrate two short times and the red LED light will stop ashing.

Memory capacity chart
Below chart will show you the possible number of photos and videos according to
memory card size. Please use only Micro SD Cards Class 6 or above!
Memory capacity chart
Mode 4GB 8GB 16GB 32GB
HD Video Recording 720P 40 min 80 min 160 min 320 min
Digital Photos 8388 16776 33552 67104

Playback on your computer
Turn off the QCAMZ HD! Unscrew the cap at the back ③, plug the USB cable into
the USB Port ⑤ of the camera and connect the other end to your computer. Turn
on the camera! The camera will automatically be recognized as USB device. You
can now download the les directly from the Micro SD card inside your camera.
Alternatively you can take out the Micro SD card while the camera is turned off (!),
put it into a card reader and connect it to your PC.
The camera must be turned on in order to connect it to the computer for
the download. Do not remove the battery!Trying to watch the video at
the same time can lead to disruptions and unknown outcome!
On a MAC
Using the provided USB cable, connect the camera to your Mac. Turn on the ca-
mera and the MAC OS will recognize it as an external hard drive.
IMPORTANT TIP FOR MAC USERS:
When deleting les from your Micro SD cards you must empty the rubbish bin of
your computer before removing it or unplugging the camera. If you do not follow
these instructions, photos and videos will not be completely erased from your
card.

Date & time setting
Download the time.txt le from
www.qcamz.us\Downloads\QCAMZ HD
Date & Time Quick Setup for QCAMZ HD:
Open the le “time.txt” and change the date & time as follows:
YYYY.MM.DD hh:mm:ss
Y = year h = hour
M= month m = minutes
D= date s = second
1. Unscrew the cap from the back of the camera ③, remove the Micro SD
from the camera and put it into your PC card slot.
2. Copy the “time.txt” le to your Micro SD. Then put the card back into your
camera and screw the rear cap back on tightly.
3. Press the Power button and now date and time has been updated
automatically!
*Once you format your Micro SD card the time and date settings will be lost!*

Webcam setting
Please go to www.qcamz.us\Downloads\QCAMZ HD if you like to use the
QCAMZ HD as a webcam.
LED status table
Green LED Red LED Blue LED
Standby On Off Off
Battery charging Off Off On
Taking a video On Flashing Off
Taking a photo On Flashing Off
No Micro Sd card Asynchronous ashing Off
Micro SD card full Fast synchronous ashing Off
Data transfer Flashing Off On
Removing/Installing battery
The battery is designed to have a tight t to maximize reliability in highly active
situations. To remove the battery, pull it out of the battery holder.
It is intentionally not easy to do, but the battery will come out.
Additional batteries and mount packages are available at www.qcamz.us
Repairs
Most helmet cameras are used for recording extreme sports and outdoor activi-
ties. This increases the danger of damaging the camera. The warranty does not
cover any damage that has occurred during sporting activities.
Before giving up on your QCAMZ HD check with us to see if we can help.

Technical Specications
Optics: • 135° Wide Angle View @720p Mode
• f/2.4, xed focus glass lens
Video: • HD Resolution: 1280x 720 @ 30fps
• Light Sensitivity: 1.4 V/lux-sec
• Video Format: MJPG codec, .AVI le format
• Exposure Control: Auto
• White Balance: Auto
Audio: • Built-in microphone
Photo: • Camera: 5.0 Mega Pixels (2560 x 1920)
• Sensor Type: 1 / 4” HD CMOS
• Format: JPEG
• Capture mode: Auto snapshot every 3 seconds
Memory: • Micro SD card, up to 32 GB capacity (not included)
(Class 6 or above recommended)
• Avg. Record Time: 10-15min/GB
Product size: 84 x 30 mm // Weight: 85g (without battery)
Operating Systems (for USB Drive): Win ME, 2000, XP, Vista; Win7; Mac OS X 10.6+
Charger (optional): Input: AC 110 ~ 240V 50/60Hz
Output: DC 5.0 - 5.5V ....450 - 550mA

Warranty:
This product is covered by Limited Warranty on parts and labour from the date of
original purchase. The warranty period depends on the legislation of the country of
residence. Purchases must be made through an authorized dealer. The warranty
covers defects in workmanship and materials.
The warranty does not apply to units, which have been damaged or abused inten-
tionally or unintentionally. Purchase from individuals or unauthorised internet web-
sites voids the warranty.
The warranty does not apply to units where the rear cap was incorrectly closed,
to cosmetic damage, to units that have been modied or have modied parts on
them. Tampering with or altering the unit will void the warranty. Any unauthorized
service will void the warranty.
The original sales receipt must be produced for any warranty service.
The warranty does not cover any damage that may occur during sports activity. It
is the user’s responsibility to securely attach the QCAMZ HD to any sports equip-
ment.

WARNING:
The form and functions of QCAMZ HD, accessories, logos, and all graphics are
the patented, protected property of Alvission Group Ltd. Any attempt by anyone
other than our authorised dealers to copy or reproduce any of the above without
permission of Alvission Group Ltd. or its appointed dealers will be met with legal
action. Alvission products are available for purchase only from authorised dealers.
Thank you very much for purchasing QCAMZ HD and we are sure you will
enjoy this product!
This manual is subject to technical changes without prior notice.
www.qcamz.us

Table of contents
Other QCAMZ Action Camera manuals