qfix RapidHeat RT-2075-110 User manual

Qfix |440 Church Road |Avondale, Pennsylvania 19311 USA |+1 610-268-0585 |+1 610-268-0588 |www.Qfix.com
PRODUCT GUIDE &
USER MANUAL
RT-2075-110 & RT-2075-220
RapidHeat™ Oven

English |2
Qfix | 440 Church Road |Avondale, Pennsylvania 19311 USA | +1 610-268-0585 | +1 610-268-0588 |www.Qfix.com |2007856_C
Contents
INSTRUCTIONS FOR THE INSTALLER
I. WARNING 3
II. PRELIMINARY OPERATIONS 4
III. INSTALLATION AREA 5
IV. PREPARING FOR INSTALLATION 6
V. ELECTRICAL CONNECTION 7
VI. CABLE CONNECTION 8
VII. SPECIFICATIONS 9
VIII. EC-CONFORMITY DECLARATION 11
INSTRUCTIONS FOR THE USER
I. WARNING 12
II. USING THE OVEN FOR THE FIRST TIME 13
III. MAINTENANCE 14
IV. TROUBLESHOOTING 16
V. DIGITAL OVEN CONTROL PANEL 17
VI. INSTRUCTIONS FOR OVEN USE 18
VII. PROGRAMMING THE OVEN 19
VIII. PARTS LIST 22

English |3
Qfix | 440 Church Road |Avondale, Pennsylvania 19311 USA | +1 610-268-0585 | +1 610-268-0588 |www.Qfix.com |2007856_C
INTRODUCTION
This Product Guide and User manual contains information for the installation, use, and maintenance of
this oven. The objective of this manual is to enable the technician and user to take all measures and
precautions necessary for the safe, efficient, and long-term use of the RapidHeat™ oven.
Keep this manual in a safe place for the entire life cycle of the product as a reference for the
designated operators and specialized technicians.
If this manual is lost or damaged, a replacement manual must be requested directly from the Qfix.
Qfix is not liable for any damage caused by inappropriate use of the oven, modifications, or repairs
carried out by unauthorized personnel or used with spare parts not recommended by Qfix and not
intended for use with this model.
This oven complies with the EEC directives in force.
INSTRUCTIONS FOR THE INSTALLER
I. WARNING
Read this Product Guide and User manual carefully before beginning installation and start-up
operations.
All installation, assembly, assistance, and maintenance must be conducted by qualified personnel in
accordance with local laws enforcing product and workplace safety.
Incorrect installation, assistance, maintenance, cleaning, tampering, or modifications can cause
malfunction, damage, and breakage.
The oven must be used for heating thermoplastic material only. Any use other than heating
thermoplastic material is forbidden and potentially dangerous. Refer to the Instructions for Use Manual
for the applicable thermoplastic material.

English |4
Qfix | 440 Church Road |Avondale, Pennsylvania 19311 USA | +1 610-268-0585 | +1 610-268-0588 |www.Qfix.com |2007856_C
CHECK COMPONENTS
II. PRELIMINARY OPERATIONS
Upon receipt of the product, inspect the packaging
and the oven to verify no tampering or damage has
occurred. Inform the carrier and Qfix immediately of
any damaged or missing parts. Indicate the product
code “Ref” and serial number “Ser. No.” and attach
a photo. The Product Code and Serial Number can be
found on the information plate on the back of the
oven.
WARNING: the oven may shift position during
transport and may cause damage to the oven or may
cause bodily injury. Use suitable transport capable of
supporting the weight of the oven. Do not drag, lean,
tilt, or flip the oven. Lift oven up straight from the
ground and place into a horizontal position.

English |5
Qfix | 440 Church Road |Avondale, Pennsylvania 19311 USA | +1 610-268-0585 | +1 610-268-0588 |www.Qfix.com |2007856_C
III. INSTALLATION AREA
The installation area should be kept clear to ensure doors, corridors, and passageways
are accessible.
The oven shall be installed in enclosed and well-ventilated areas (not outdoors).
Before positioning the oven, verify the overall dimensions and the exact positions of the
electrical power outlet.
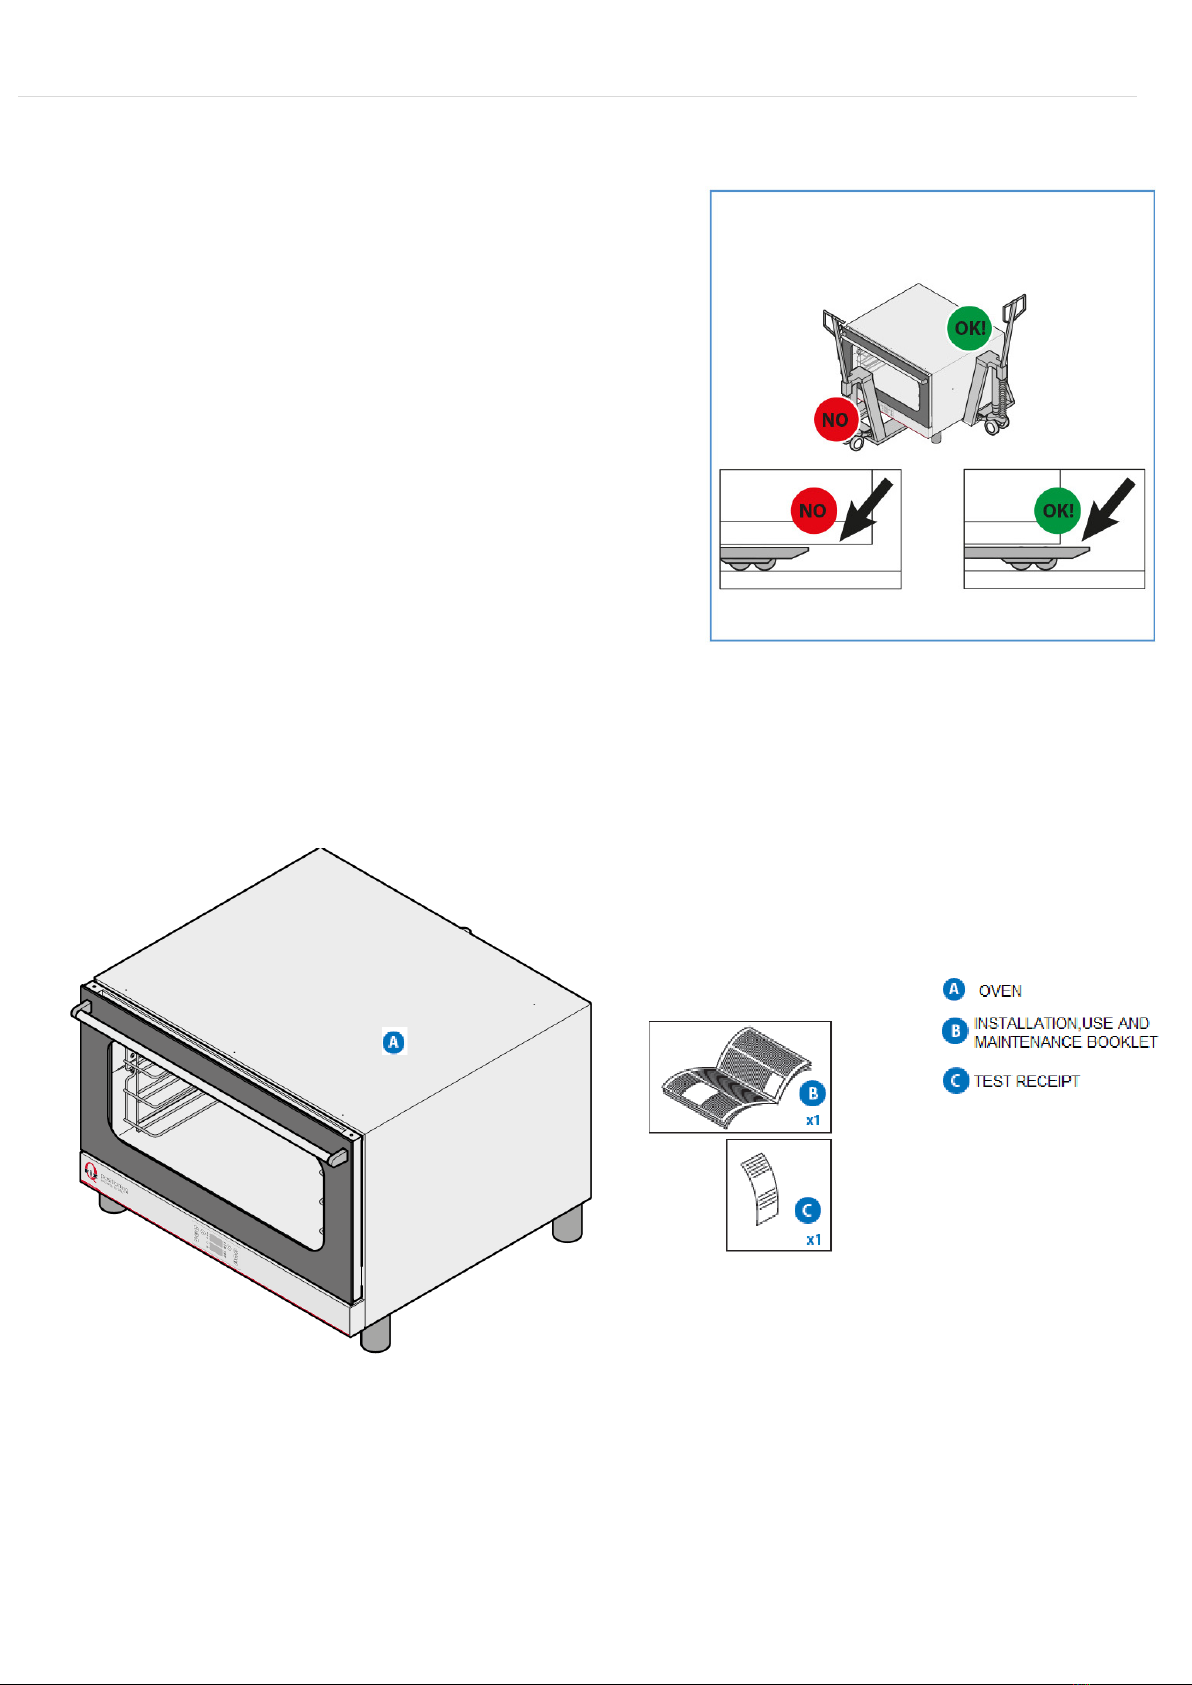
The oven must be placed on a flat surface. Verify that the oven will not slip, fall, or flip
over.
The installation area must be able to support the weight of the oven. See the
information plate on the back of the oven for the gross weight.
The oven should be positioned to allow for easy access to the back of the oven for
maintenance.
The oven should be located near the connections to the power outlet.
To facilitate easy viewing of the thermoplastic during the softening process, it is
recommended the inside of the oven be approximately at eye level. A suggested
installation height of 160 cm (5.25 feet) is recommended. When positioning the oven on
top of cabinets, stainless steel tables, or other ovens, consider the height requirements
of the user.
The oven is not meant to be tightly fitted inside an enclosure. A 10 cm (4 inch) gap must
surround the oven.
Do not place the oven near heat or other hot liquids.
Do not place the device near materials such as walls,
furniture, screens, or containers of flammable liquids such
as gas canisters due to fire hazards.
Maintain the following distances from machinery: 50 cm
(20 inches) from the oven sides, 50 cm (20 inches) above
the top of the oven, and 70 cm (28 inches) from behind the
oven.
Verify the door may be fully opened.
The vents and aeration slits should be open and clear of
obstructions.

English |6
Qfix | 440 Church Road |Avondale, Pennsylvania 19311 USA | +1 610-268-0585 | +1 610-268-0588 |www.Qfix.com |2007856_C
IV. PREPARING FOR INSTALLATION
Remove the outer packaging (wooden crate and/or carton box) and dispose of in accordance with local
laws.
REMOVING PROTECTIVE FILM
Remove the protective film from the external
walls. (See image). Do not use a sponge, razor,
or sharp object to remove the protective film.
Remove all product documentation from
inside the oven.
Remove all plastic packaging.

English |7
Qfix | 440 Church Road |Avondale, Pennsylvania 19311 USA | +1 610-268-0585 | +1 610-268-0588 |www.Qfix.com |2007856_C
FEET ADJUSTMENT
Screw the adjustable feet to the underside of the oven.
Do not use the oven without its feet.
Do NOT remove the feet. The feet allow airflow to cool the oven,
preventing the oven from over-heating and damaging the
components.
The oven must be placed on a level, flat surface. Use a leveling tool to
verify a horizontal, level position. If needed, the feet can be adjusted
individually by screwing or unscrewing them as needed to achieve a
horizontal, level balance.
V. ELECTRICAL CONNECTION
WARNING: Connection to the power outlet must be conducted by a qualified and authorized
technician according to national, international and local laws in the country where installed.
Before connecting to the power outlet, ensure that the frequency (Hz) and voltage (V) meet the
requirements indicated on the information plate on the back of the oven.
WARNING: if the oven does not come with a trolley to facilitate transport, it is recommended to
connect the oven first to the power outlet and then place the oven into position in the work area to
ensure the power cable is not damaged during placement. This process enables easy and safe
connection.
OVENS WITH CABLE AND SINGLE-PHASE PLUGS
Ovens with the 3xAWG14 15A Hospital Grade cable and plug: the plug should be inserted into the
appropriate power socket. The product must be positioned to ensure the plug is always accessible.
Only the cable can be substituted. If substituting the cable, be advised the ground wire is yellow green.
Substitution of the cable must be completed by a qualified, authorized technician.

English |8
Qfix | 440 Church Road |Avondale, Pennsylvania 19311 USA | +1 610-268-0585 | +1 610-268-0588 |www.Qfix.com |2007856_C
VI. CABLE CONNECTION
Proceed as follows to connect the power supply wire to the terminal board:
•(A1) Loosen the tops of the cable gland. Open the lower part of the back of the oven by loosening
the screws.
•(A2) Feed the new cable through the cable gland. Connect the cable voltage to the terminal strips
following the connection diagram on the label on the back of the oven. Only connect what is
indicated by inserting the copper bridge and the electricity cable together under the screws, in
the tightening direction, so that the cable and the bridge are tightly fixed by tightening the screw.
•(A4) Close the lower part of the back of the oven by tightening the screws. Fit the cable by
tightening the cable gland top.
Erroneous connection may lead to overheating of the terminal board leading to blowout and electric
shock.
Check that all the connections are tight before connecting the oven to the power outlet.
PE = Yellow/Green: “GROUND” protection conductor.
N = Blue: neutral conductor.
L1, L2, L3 = Brown, Grey, Black: live conductors
Verify that there is no static discharge between live and ground. Check the limit switch continuity
between the external casing and the ground wire of the power outlet. Use a multi-tester to conduct
these operations is recommended.

English |9
Qfix | 440 Church Road |Avondale, Pennsylvania 19311 USA | +1 610-268-0585 | +1 610-268-0588 |www.Qfix.com |2007856_C
VII. SPECIFICATIONS
Distributed by Qfix
440 Church Road
Avondale, Pennsylvania 19311 USA
+1 610-268-0585 | sales@Qfix.com
Manufactured by Piron SRL
Via Belladoro, 25
35010 Cadoneghe (Pd) – ITALY
Products
•110V: RT-2075-110
•220V: RT-2075-220
INFORMATION PLATE

English |10
Qfix | 440 Church Road |Avondale, Pennsylvania 19311 USA | +1 610-268-0585 | +1 610-268-0588 |www.Qfix.com |2007856_C
Ref: reorder number QFIX
Art: model number PIRON
Ser. No. serial number, different for each product
Type: product model according to its technical properties
Date of Manufacture, YYYY
Power consumption: oven nominal power kW
Power supply: TERMINAL CONNECTION TYPE: device tension in V, number of phases and
neutrals (3N = 3 phases more neutral).
Supply frequency: oven frequency in Hz.

English |11
Qfix | 440 Church Road |Avondale, Pennsylvania 19311 USA | +1 610-268-0585 | +1 610-268-0588 |www.Qfix.com |2007856_C
VIII. EC-CONFORMITY DECLARATION
2014/35/UE Low Voltage Directive in accordance with standards:
BS EN 60335-2-42 + A1:2008
Household and similar electrical appliances – Safety – Part 2-42: Particular requirements for
commercial electric forced convection ovens, steam cookers and steam-convection ovens
BS EN 60335-1:2002 + A11:2004 + A1:2004 + A12:2006 + A2:2006 + A13:2008 +A14:2010
Household and similar electrical appliances. Safety. General requirements
BS EN 62233:2008
Measurement methods for electromagnetic fields of household appliances and similar apparatus with
regard to human exposure
2014/30/UE Electromagnetic Compatibility Directive in accordance with standards:
BS EN 55014-1:2006 + A1:2009
Electromagnetic compatibility. Requirements for household appliances, electric tools and similar
apparatus. Emission
BS EN 55014-1:1997 + A1:2001 + A2:2008
Electromagnetic Compatibility – Requirements for Household Appliances, Electric Tools and Similar
Apparatus – Part 1: Emission – Product Family Standard
IEC 61000-6-3:2006 + A1:2009 + A2:2009
Electromagnetic compatibility (EMC) – Part 6-3: Generic standards – Emission standard for residential,
commercial and light-industrial environments
IEC 61000-4-2:2008
Electromagnetic compatibility (EMC) – Part 4-2: Testing and measurement techniques – Electrostatic
discharge immunity test

English |12
Qfix | 440 Church Road |Avondale, Pennsylvania 19311 USA | +1 610-268-0585 | +1 610-268-0588 |www.Qfix.com |2007856_C
INSTRUCTIONS FOR THE USER
I. WARNING
Read this Product Guide and User Manual carefully. This manual provides indications regarding
safety and use of the oven.
Maintain manual as a reference at all times.
Incorrect installation, assistance, maintenance, cleaning, tampering, or modifications can cause
malfunction, damage, and breakage.
Warning Symbols and Descriptions
Heated/Hot Surface Hazard
WARNING: When in operation, the oven will be hot to the touch. Use care when
operating the oven. To avoid potential burns, avoid touching the exterior of the oven
during oven operation. Use hand protection to prevent burns.
CAUTION: Material heated in the oven may be hot. Use care to prevent burns when handling heated
material.
The oven must only be used for heating thermoplastic material. Any use other than heating
thermoplastic material is forbidden and potentially dangerous. Refer to the Instructions for Use
Manual for the applicable thermoplastic material.
The oven is intended for professional use and should be used by qualified personnel only:
•Do not leave the oven unattended in the presence of children and ensure children do not have
access to the oven.
•Do not position sources of heat near the oven.
•Do not position flammable materials or flammable liquids near the oven to avoid risk of fire.
•Use fingers to regulate the digital panel options; other objects may damage the oven and void
the warranty.
Damaged glass door components must be replaced immediately (contact Qfix at +1 484-720-6054 or
techsuppor[email protected]om).
If the oven is not in use for long periods of time (several days), unplug the oven from the power
outlet.
Qfix is not liable for any damage caused by inappropriate use of the oven, modifications, or repairs
carried out by unauthorized personnel or used with spare parts not recommended by Qfix and not
intended for use with this model.
This oven complies with EEC directives in force.

English |13
Qfix | 440 Church Road |Avondale, Pennsylvania 19311 USA | +1 610-268-0585 | +1 610-268-0588 |www.Qfix.com |2007856_C
II. USING THE OVEN FOR THE FIRST TIME
Verify installation has been performed correctly per instructions indicated in this manual and per local
laws and regulations. Verify all Warnings and Safety Instructions are understood and are carefully
followed prior to operating the oven.
Ensure there are no plastic materials, manuals, or plastic film contained inside or outside of the
oven. All packaging should have been removed, including the protective film applied on the walls of
the oven.
The vents and aeration slits should be open and clear of obstructions.
Verify any parts of the oven dismounted during the installation process have been mounted back into
position.
TESTING
Prior to first usage, test the oven by completing a sample heating cycle. The sample heating cycle
verifies functional operation and indicates the presence of failures. The sample heating cycle must
include the oven racks in position inside the oven.
1. Start the oven by pressing the ON/OFF button.
2. Wait until the Program Indicator (P01) stops flashing.
3. Press the INCREASE button to set the temperature at the highest setting.
4. Press the TIMER button followed by the INCREASE/DECREASE buttons to set the heating time to
15 – 20 minutes.
5. Press the START/STOP button.
6. Preheating will begin and “PrH” will blink on the display.
7. At the end of the preheat cycle, the oven will display PrH READY.
8. Press START/STOP to clear the PrH READY display.
9. Press START/STOP to activate the timer and begin the count down.
The oven racks are coated with an oil residue during the manufacturing process. During the 15 – 20-
minute test-heating cycle, the residue will “burn off”. Minor smoking may be observed during the
“burn off” period.
During the heating cycle, thoroughly verify the conditions listed below:
•Press the LAMP button. The heating chamber light is on. After 60 seconds the heating chamber
light shuts off.
•When the oven door is opened, the timer pauses. The timer resumes when the oven door is closed.
•When the oven door is opened, the oven stops heating and the motor and fans stop. When the
oven door is shut, the oven, motor, and fans resume operation.

English |14
Qfix | 440 Church Road |Avondale, Pennsylvania 19311 USA | +1 610-268-0585 | +1 610-268-0588 |www.Qfix.com |2007856_C
•At the set temperature, the heating temperature thermostat turns off the heating elements.
•The heating chamber fans spin in the same direction.
III. MAINTENANCE
The user is solely responsible for daily maintenance.
CLEANING: GENERAL RULES
Before cleaning, disconnect electrical power from the oven and ensure the oven is completely cool.
WARNING: the oven should never be cleaned with high pressure water sprays.
Appropriate eye, mouth, and hand protection should be used.
The oven should be thoroughly rinsed using a damp cloth. Never leave residue of solvents or
detergents in the oven. Possible danger of corrosion may occur if residues are not thoroughly
removed.
CLEANING OF HEATING CHAMBER
Regular cleaning will maintain a sanitary heating chamber and will prevent deterioration of the steel
components.
Follow your center’s cleaning protocols.
Clean the walls of the heating chamber using soap and hot water and rinse well. Regular cleaning of
the oven heating chamber lining must be conducted with a non-abrasive detergent. Do not use high
pressure water steam lances or steamers for cleaning. Acidic, abrasive, corrosive sand-based or caustic
soda based detergents are prohibited.
It is strictly prohibited to wash the heating chamber in heating temperatures higher than 70°C (158°F),
as it presents a scalding danger.
Use plastic bristles or a sponge soaked in vinegar and warm water to clean dirt crusts.
Only use products recommended by Qfix.
EXTERNAL CLEANING
Use a damp cloth with warm water or products suitable for cleaning stainless steel. Do not use acidic
products or ammonia.

English |15
Qfix | 440 Church Road |Avondale, Pennsylvania 19311 USA | +1 610-268-0585 | +1 610-268-0588 |www.Qfix.com |2007856_C
REPLACING LIGHT LAMPS
WARNING: Strictly adhere to the following procedure to avoid electrocution or bodily injury:
•Disconnect the electrical connection of the oven and allow oven to cool.
•Remove the side grids.
•Remove glass “A”, remove the burned out light lamp “B”, replace with a new light lamp and
reassemble.
•Reassemble the side grids onto the oven.

English |16
Qfix | 440 Church Road |Avondale, Pennsylvania 19311 USA | +1 610-268-0585 | +1 610-268-0588 |www.Qfix.com |2007856_C
IV. TROUBLESHOOTING
If the oven is damaged, disconnect it from the power outlet.
If the problem persists, contact Qfix at +1 484-720-6054 or techsupport@Qfix.com. Provide the
product code “Ref” and the oven Serial Number “Ser. No.”. The product code and serial number
information is provided on the INFORMATION PLATE on the back of the oven.
SPARE PARTS
Use only authorized parts for product repair. Contact Qfix at +1 484-720-6054 or
techsupport@Qfix.com for assistance.
FAILURE
CAUSE
SOLUTION
On START the oven
doesn’t start
The door is open
Check that the door is closed
Microswitch doesn’t
indicate closed door
Contact Qfix. Contact information below.
Oven light OFF
Loose lamp
Correctly fit the lamp into the lamp holder
Blown lamp Replace the lamp (see Maintenance section)
Non-uniform
heating by the
chamber
The fans fail to invert the
direction of rotation
Contact Qfix. Contact information below.
A fan malfunction Contact Qfix. Contact information below.
Failure of one of the
resistors
Contact Qfix. Contact information below.
The oven is OFF
Supply voltage failure Verify power at the power outlet
Incorrect connection to the
power supply
Check connection to the power outlet
Safety thermostat measure Contact Qfix. Contact information below.
The fan stops while
the oven is on
Safety thermostat motor
Turn off the oven and wait for the motor’s thermal
protection to reset itself.
Motor capacitor failure Contact Qfix. Contact information below.
Error message
digital ovens:
ER1 or ER2
Component malfunction Contact Qfix. Contact information below.

English |17
Qfix | 440 Church Road |Avondale, Pennsylvania 19311 USA | +1 610-268-0585 | +1 610-268-0588 |www.Qfix.com |2007856_C
V. DIGITAL OVEN CONTROL PANEL

English |18
Qfix | 440 Church Road |Avondale, Pennsylvania 19311 USA | +1 610-268-0585 | +1 610-268-0588 |www.Qfix.com |2007856_C
VI. INSTRUCTIONS FOR OVEN USE
NOTE: Prior to first use of the oven, the oven must complete a Testing Cycle. Refer to Section II,
USING THE OVEN FOR THE FIRST TIME and follow the directions to complete the Testing Cycle.
Inspect the oven and cables prior to each use.
WARNING: Refer to the applicable Instructions for Use or Product Guide and User Manual for the
specific thermoplastic material in use. Follow all warnings, precautions and instructions for use
contained within the thermoplastic user manual.
Press the ON/OFF button to power on the oven. Choose either the Manual Mode or Program Mode
instructions as indicated below.
Manual Mode
When the Program Indicator (P01, P02, etc.) stops flashing, press the INCREASE or DECREASE button to
set the desired temperature. NOTE: The light will flash next to the TEMPERATURE icon.
Press the TIMER button. The light will flash next to the TIMER icon. Press the INCREASE or DECREASE
button to set desired heating time.
Press START/STOP to begin the preheat cycle. The display will flash “PrH” for PREHEATING. Jump to
“Preheat Cycle” section.
NOTE: Before changing the temperature, verify the light next to the TEMPERATURE icon is flashing.
Before changing the heating time, verify the light next to the TIMER icon is flashing.
Program Mode
Refer to Section VII, PROGRAMMING THE OVEN, for instructions for inputting custom programs into
the oven memory.
While the Program Indicator (P01, P02, etc.) is flashing, press the INCREASE or DECREASE button until
the desired Program is selected.
Press START/STOP to begin the preheat cycle.
NOTE: The display will indicate the last memorized program by flashing P01 (Program 1), P02 (Program
2), etc. If the display stops flashing before the desired program has been selected, press the “P” button
and press the INCREASE or DECREASE button until the desired program has been selected.
Preheat Cycle
At the end of the preheat cycle, the oven will display PrH READY until the door is opened.
Softening Cycle
Once the oven completes the preheat cycle and reaches the preset temperature, the oven is ready to
begin the thermoplastic softening process. Place the thermoplastic mask (or bolus) onto the mesh
liner. Using the mesh liner as a transfer sheet, insert the thermoplastic mask (or bolus) into the oven
by placing the mesh liner onto the oven rack. NOTE: Place the bottom edge of the mask frame towards
the back of the oven. The bottom edge of the mask should align to the back edge of the oven rack. The
head of the mask should align to the front edge of the oven rack in the front of the oven.

English |19
Qfix | 440 Church Road |Avondale, Pennsylvania 19311 USA | +1 610-268-0585 | +1 610-268-0588 |www.Qfix.com |2007856_C
Close the door and press START/STOP. The timer will begin counting down. NOTE: During the softening
cycle you can observe the actual temperature of the chamber by pressing the TEMPERATURE button
once.
If the door is opened during the softening process, the timer will pause. Once the door is closed, the
timer will restart. The timer can be adjusted during the softening cycle by pressing the TIMER button
followed by the INCREASE or DECREASE buttons until desired time is reached.
During the softening cycle, the temperature set point can be adjusted by pressing the INCREASE or
DECREASE buttons until desired temperature set point is reached.
Press the LAMP button to illuminate the oven interior. The light will remain illuminated for 60 seconds.
At the end of the programmed heating duration, the oven will beep three times and then once every
60 seconds until the oven door is opened. After the door is closed, the oven will maintain the selected
temperature.
Once preheated, the oven will maintain the selected temperature for 2 hours following the last
interaction with the oven.
To soften a new thermoplastic mask (or bolus) after the oven is in temperature maintenance mode,
open the door, insert the thermoplastic mask (or bolus), close the door, and press START/STOP to
begin the new heating cycle. Adjust time and temperature as needed. A new preheat cycle will not be
required.
DISPLAY SETTINGS
To customize the display settings, simultaneously press the INCREASE and DECREASE buttons for
several seconds.
Press TEMPERATURE button to select the following categories:
•Language (select English, French, German, Spanish, Italian)
•Escape (exit)
•Display (brightness level: 1–7 = low to high)
•Units (select Fahrenheit or Celsius)
•PrH (do not change from factory preset of 1°C)
Press the LAMP button when the display scrolls to the category of choice to change any parameters.
Use the INCREASE and DECREASE buttons to select the desired value.
To save the new values, press the “P” button.
When changes are complete, scroll to ESCAPE and press the “P” button to exit.

English |20
Qfix | 440 Church Road |Avondale, Pennsylvania 19311 USA | +1 610-268-0585 | +1 610-268-0588 |www.Qfix.com |2007856_C
VII. PROGRAMMING THE OVEN
SWITCHING PROGRAMS BETWEEN HEATING CYCLES
To switch Programs between heating cycles the oven must be powered off prior to choosing the new
program. For example, once Mask A has completed the softening process using Program 01 (P01) and
the oven has returned to heat maintenance mode, the oven must be powered off by pressing the
ON/OFF button. Press the ON/OFF button again, to power on the oven. Follow the Program Mode
instructions as detailed Section VI, INSTRUCTIONS FOR OVEN USE, to select the newly desired
program.
PROGRAMMED HEATING
Ninety-nine (99) programs may be stored in memory.
NOTE: The oven must be powered on but not in the midst of a heating/softening cycle to create new
or update existing programs.
To program a new thermoplastic material softening process:
Verify the oven is powered on. Press the “P” button and the light next to the PROGRAM LIBRARY Icon
will illuminate. Existing programs will indicate a RED LED light next to the PROGRAM LIBRARY icon. Free
space will indicate a GREEN LED light. Using the INCREASE or DECREASE buttons, scroll through the
programs until the green LED light appears. When the program number stops flashing, a new program
can be set with customized parameters.
To set parameters:
1. Temperature
Press the INCREASE/DECREASE button once and the light next to the TEMPERATURE icon will
flash. Continue to press the INCREASE/DECREASE buttons until the desired temperature is
selected. The temperature can only be selected while the green LED light is flashing next to the
TEMPERATURE icon. The temperature range is 60°C–80°C (140°F–176°F).
2. Heating Time
Press the TIMER button. A green LED light will flash next to the TIMER icon. Press the INCREASE
or DECREASE buttons to select the heating time. The time can only be selected while the green
LED light is flashing next to the TIMER icon. Time is measured in minutes ranging from 0 (“N”) to
97 minutes and then onwards through infinity.
3. Program Memorization:
Press the “P” button for 4 seconds. Memorization is confirmed by a beep and the program
number. NEN will appear on the display.
Other manuals for RapidHeat RT-2075-110
1
This manual suits for next models
1
Table of contents
Other qfix Oven manuals