Qualitrol DGALT1-11120 Operation manual

Installation & User Guide
www.qualitrolcorp.com
QualConnex On-Line Transformer
Monitor Installation & User Guide
DGALT1-11120, DGA-LT1
GTW-RF-3311, QGateway, USA
GTW-RF-3311-CA, QGateway, Canada
Version: 2.0: July 2022

Legal
www.qualitrolcorp.com
Information in this document is subject to change without notice. This document is provided to purchasers or users of
Qualitrol products for use in the installation, operation, and servicing of such products. No other use, nor any reproduction,
distribution, or the making of any derivatives of this document is authorized, without the express prior written permission of
Qualitrol Corporation.
Qualitrol endeavors to ensure the accuracy and quality of its published materials; however, no warranty, expressed or
implied, is provided. Qualitrol disclaims any responsibility or liability for any direct or indirect damage resulting from the
use of the information in this manual or products described in it. The mention of any product or brand does not constitute
an endorsement by Qualitrol of that product or brand.
This document was originally composed in English and was subsequently translated into other languages. The fidelity of
subsequent translations cannot be guaranteed. In case of conflict between the English version and another language
version, the English version takes precedence.
© 2022 Qualitrol Corporation. 1385 Fairport Rd, Fairport, NY 14450. All rights reserved. Information subject to change without notice.
QUALITROL, DGA-LT1, QualConnex and QGateway are registered trademarks of Qualitrol Corporation

Contents
Table of Contents
Product Overview..........................................................................................3
DGA-LT1....................................................................................................................3
QGateway..................................................................................................................4
QualConnex®Web Application ...............................................................................4
Symbols.........................................................................................................4
Product Specifications .................................................................................5
Environmental Specifications.................................................................................5
DGA LT1 Specifications...........................................................................................5
QGateway Specifications ........................................................................................5
Site Preparation.............................................................................................6
Verify DGA-LT1 Clearance and Drain size .............................................................6
Transformer Selection .............................................................................................7
Transformer Configuration............................................................................................................... 7
Transformer Distance Evaluation..................................................................................................... 7
Transformer Elevation Evaluation.................................................................................................... 8
Line of Sight –Obstruction Evaluation............................................................................................. 8
Cell Coverage Evaluation ................................................................................................................ 8
QGateway Quantity and Location.................................................................................................... 8
Transformer Details to Prepare for Installation...................................................10
Monitor Installation.....................................................................................11
Items Shipped.........................................................................................................11
Configuration in QualConnex Website.................................................................13
Required Tools for Installation..............................................................................14

Contents
Assembling the QGateway Antenna and Mount..................................................14
Determining the Magnetic Base Mount Angle and Configuration.................................................. 14
Assembling the Magnetic Mount.................................................................................................... 17
Connecting QGateway to Magnetic Base...................................................................................... 19
Attaching LoRa Antenna to QGateway.......................................................................................... 20
Installing the QGateway.........................................................................................22
QGateway Positioning ................................................................................................................... 23
Power on and Confirm QGateway Cell Signal............................................................................... 25
Notes for troubleshooting:.............................................................................................................. 26
Installing DGA-LT1 Monitor...................................................................................26
DGA-LT1 Installation check list...................................................................................................... 26
DGA-LT1 Installation steps............................................................................................................ 27
Bleeding the DGA-LT1 Monitor.............................................................................28
Confirm Communication .......................................................................................29
Removal / Decommissioning of LT1 Monitor............................................29
Regulatory Information............................................................................... 30
United States (FCC)................................................................................................30
FCC RF Exposure Information....................................................................................................... 30
ISED (Innovation, Science and Economic Development Canada) .....................30
ISED RF Exposure Information...................................................................................................... 31
Warranty ......................................................................................................31

Installation & User Guide
Product Overview
The QualConnex platform consists of 3 main parts. The DGA-LT1, QGateway, and QualConnex web
portal.
DGA-LT1
The DGA-LT1 is a transformer oil sensor array reporting oil hydrogen ppm,
moisture, and temperature. The DGA-LT1 sensor is directly mounted to an
existing valve on the transformer and provides a continuous reading of the
transformer oil. The DGA-LT1 is battery powered and wirelessly transmits
encrypted raw signals via RF (Radio Frequency) to the QGateway without the
need for additional power or communications wires, or cables.
The DGA-LT1 is designed to monitor hydrogen gas, with 100% specificity. Since
hydrogen gas is formed under all known thermal fault conditions in oil filled
transformers it is commonly referred to as the universal fault gas. In addition,
Hydrogen is one of the first gases to be generated, making it an excellent early
indicator of a broad range of fault types.
The monitor is designed and constructed to operate in environmental conditions typical of those found at wind
farms, solar farms, non-hazardous industrial sites, power plants, switchyards, and electrical substations. The
DGA-LT1 is designed to be installed and configured by the user. Due to the battery power, wireless
communication, and simple installation, the DGA-LT1 provides a monitoring solution at a low cost, without the
additional material and labor costs reassociated with the installation of power and communication cables to a
wired monitor / sensor.
DGA-LT1
QGateway
RF
QualConnex

Installation & User Guide
QGateway
The QGateway receives and transmits data wirelessly from the DGA-LT1
sensors to a central monitoring platform. The QGateway is battery powered
with solar battery charging. The QGateway receives and transmits encrypted
raw signals via RF frequency to and from the DGA-LT1 sensors. That data is
then transmitted via cellular transmission through TCP/IP to the remote
monitoring system. This data is viewed via Qualitrol’s QualConnex®web portal.
QualConnex®Web Application
Data from the DGA-LT1 can be viewed in the QualConnex web application. QualConnex
provides the user with the ability to track oil hydrogen concentration (ppm), oil moisture
concentration (%RH), and oil temperature (°C) levels over time and compare against
user-defined alarm settings. The web interface displays QGateway reports including
battery level and signal strength.
The QualConnex web interface allows the user to configure the monitor’s alarms and
settings and provides a monthly report of all monitored assets.
Symbols
The following symbols are used throughout this installation guide. Most are defined by the
International Electrotechnical Commission, IEC 878 and IEC 417A or are for information only. It is
important for safety reasons to understand their representation.
Warning
Statements in this guide identify conditions or practices that could
result in unsafe conditions
NOTE
Statements provide additional important information or ways to
prevent damage to the equipment or other property.

Installation & User Guide
Product Specifications
Environmental Specifications
The DGA-LT1 and QGateway units are designed to operate within the following environmental
conditions:
CHARACTERISTIC
VALUE
Altitude Maximum
8,000 ft.
2,500 m
Humidity Range
5% to 95%
Noncondensing
Ambient Temperature Range
-40°F to +150°F
-40°C to +65°C
DGA LT1 Specifications
The DGA-LT1 is designed to operate with the following specifications:
CHARACTERISTIC
VALUE
Measurement Interval
6, 12 or 24 Hours
Hydrogen Measurement Range
250 ppm to 10,000 ppm
Hydrogen Measurement Accuracy
±20% or ±50 ppm
Hydrogen Measurement Repeatability
±5% or ±50 ppm
Oil Temperature Range
-40°F to +220°F (-40oC to 105oC)
Temperature Accuracy
±5% or ±2°C accuracy. (~±4°F)
Moisture Measurement Range
0% to 100% RH, non-condensing
Moisture Measurement Accuracy
±5% RH
NAM RF Center Frequency
915 MHz
Oil Pressure at Installation
Needs to be >0 psig (bar) in the gas space
Oil Pressure (at drain valve)
-5 psig to 20 psig (-0.35 –1.4 bar) with
<6psig (0.4 bar) gas to oil pressure delta
Communications Certifications
IC RSS-210 Issue 8 / FCC Part 15.247
Enclosure Rating
IP67
Power Source
Battery Powered
QGateway Specifications
The QGateway is designed to operate within the following specifications:
CHARACTERISTIC
VALUE
US/Canada RF Center Frequency
915 MHz
US/Canada Cellular
LTE 3G
Operating Mode
Continuous
Power Replenishment
Solar
Power Source
Rechargeable Battery Powered

Installation & User Guide
CHARACTERISTIC
VALUE
Solar charging temp range
-4°C < t < 130°C (-20°C < t < 55°C)
Expected Availability
>90% below 55° latitude
Ambient Temperature Range
-40°F to +150°F (-40oC to 65oC)
RF Range
600m (~2000 ft) at ≥ 1.5m (~5ft) mounting height
1,500m (~5000ft) at > 10m (30ft) mounting height
Communications Certifications
IC RSS-210 Issue 8 / FCC Part 15.247
Enclosure Rating
IP65
Site Preparation
Prior to ordering and receiving your QualConnex system, the following items must be confirmed to ensure the
best performance for your system. These steps will confirm that the DGA-LT1 will fit the equipment to be
monitored and identify the number and placements of the QGateway(s) to cover the selected DGA-LT1
installation base.
Verify DGA-LT1 Clearance and Drain size
Verify the clearance and configuration necessary for the DGA-LT1 on the desired equipment to be monitored
prior to ordering. Refer to Figure 1 for axis orientation
Figure 1: Directional References for DGA-LT1 Installation Clearance
Z axis is the drain valve center line. The x and y axis indicate the horizontal and vertical distance from the front
face of the drain valve.

Installation & User Guide
DGA-LT1 site items to be confirmed:
•Adequate location with proper clearance for mounting the DGA-LT1 monitor has been
identified
oThe system is optimized for transformers that are oil-filled.
oThe recommended installation point for the DGA-LT1 is the transformer oil drain valve
oQualitrol requires a 1” NPT for the transformer oil supply valve. A DGA-LT1
configured with a 2” to 1” reducing adapter is available to order
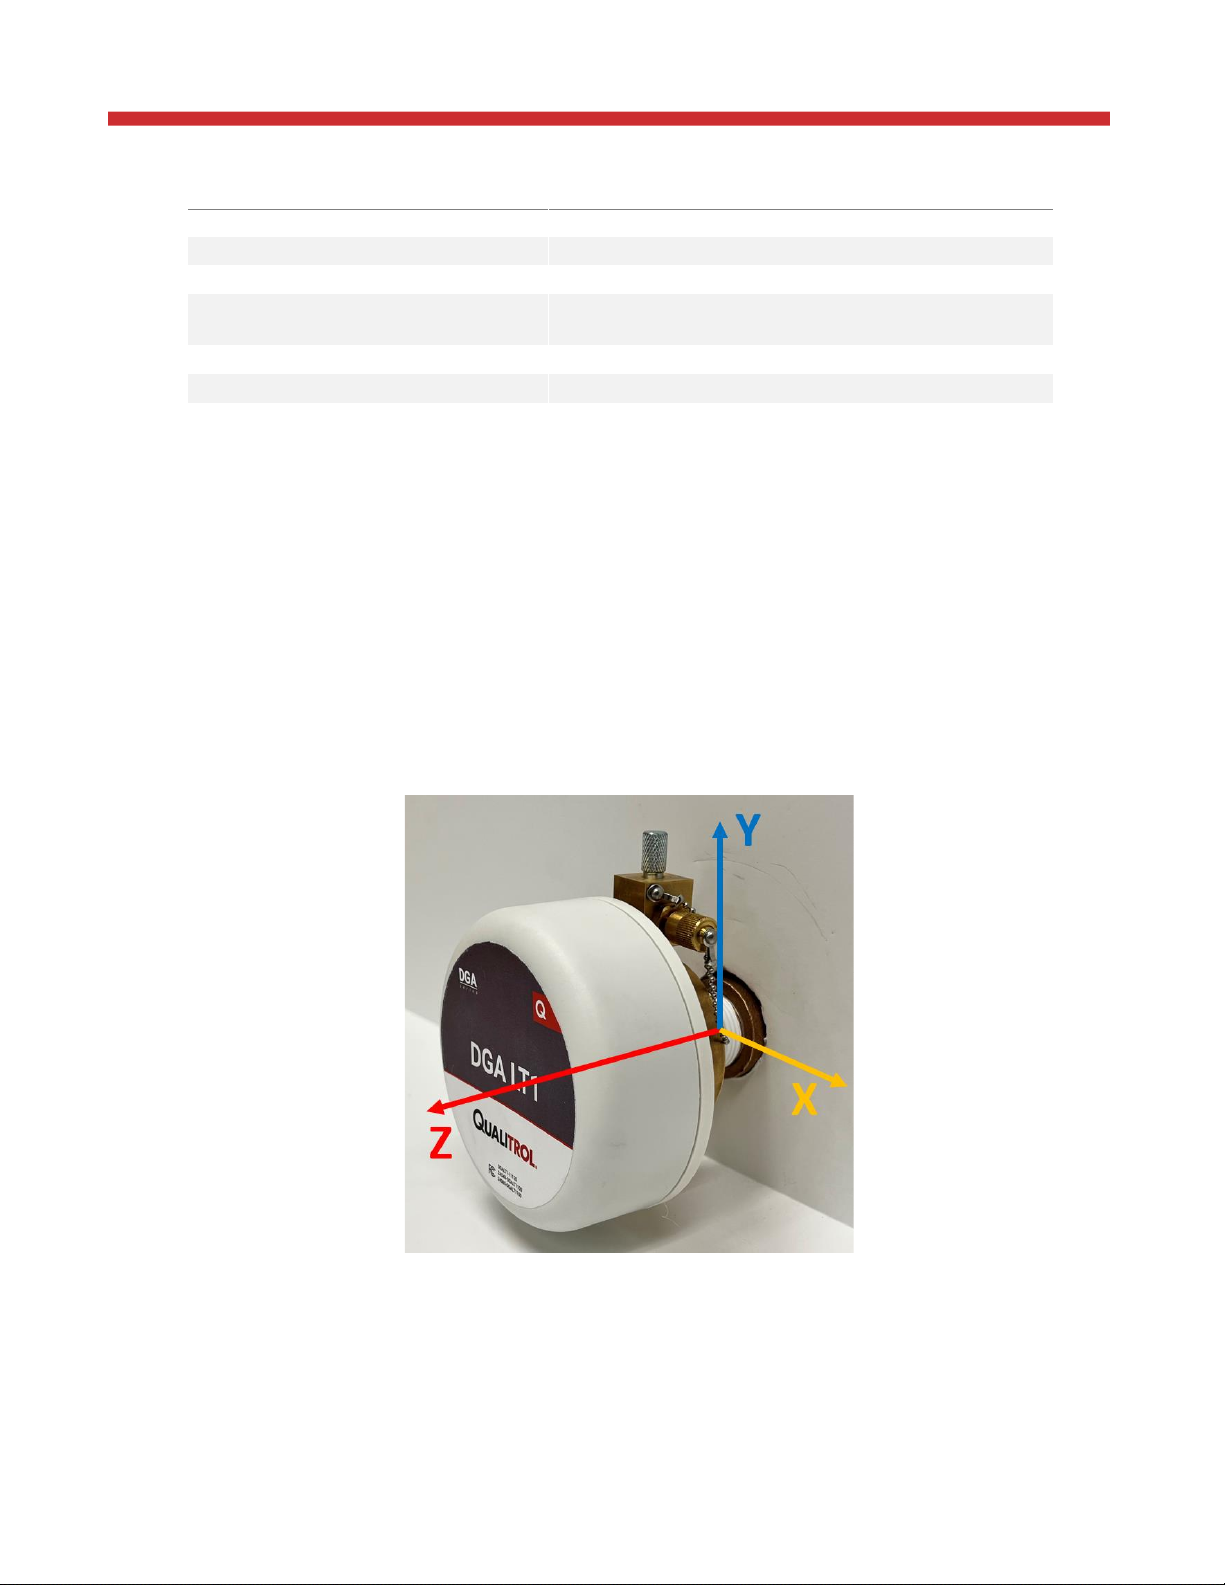
oA 5” (12.7cm) clearance in the z direction is required for adequate spacing. If an
adapter is required, a 6” (15.3 cm) z direction clearance is required.
oA minimum of a 3.5” (8.9 cm) radial (x or y direction) clearance between the valve
centerline and any surrounding structure, including the transformer foundation, is
required for proper installation clearance space. There also must be adequate space
to use a 12” (~30 cm long) wrench to tighten DGALT1 onto the drain valve.
•Qualitrol recommends a Dissolved Gas Analysis sample be taken at or immediately prior to
installation to provide a baseline level for Hydrogen concentration
•To prevent atmospheric air from entering the transformer, the DGA-LT1 requires positive oil
pressure at the drain valve for installation. The DGA-LT1 should not be installed if the
equipment is under vacuum conditions.
Transformer Selection
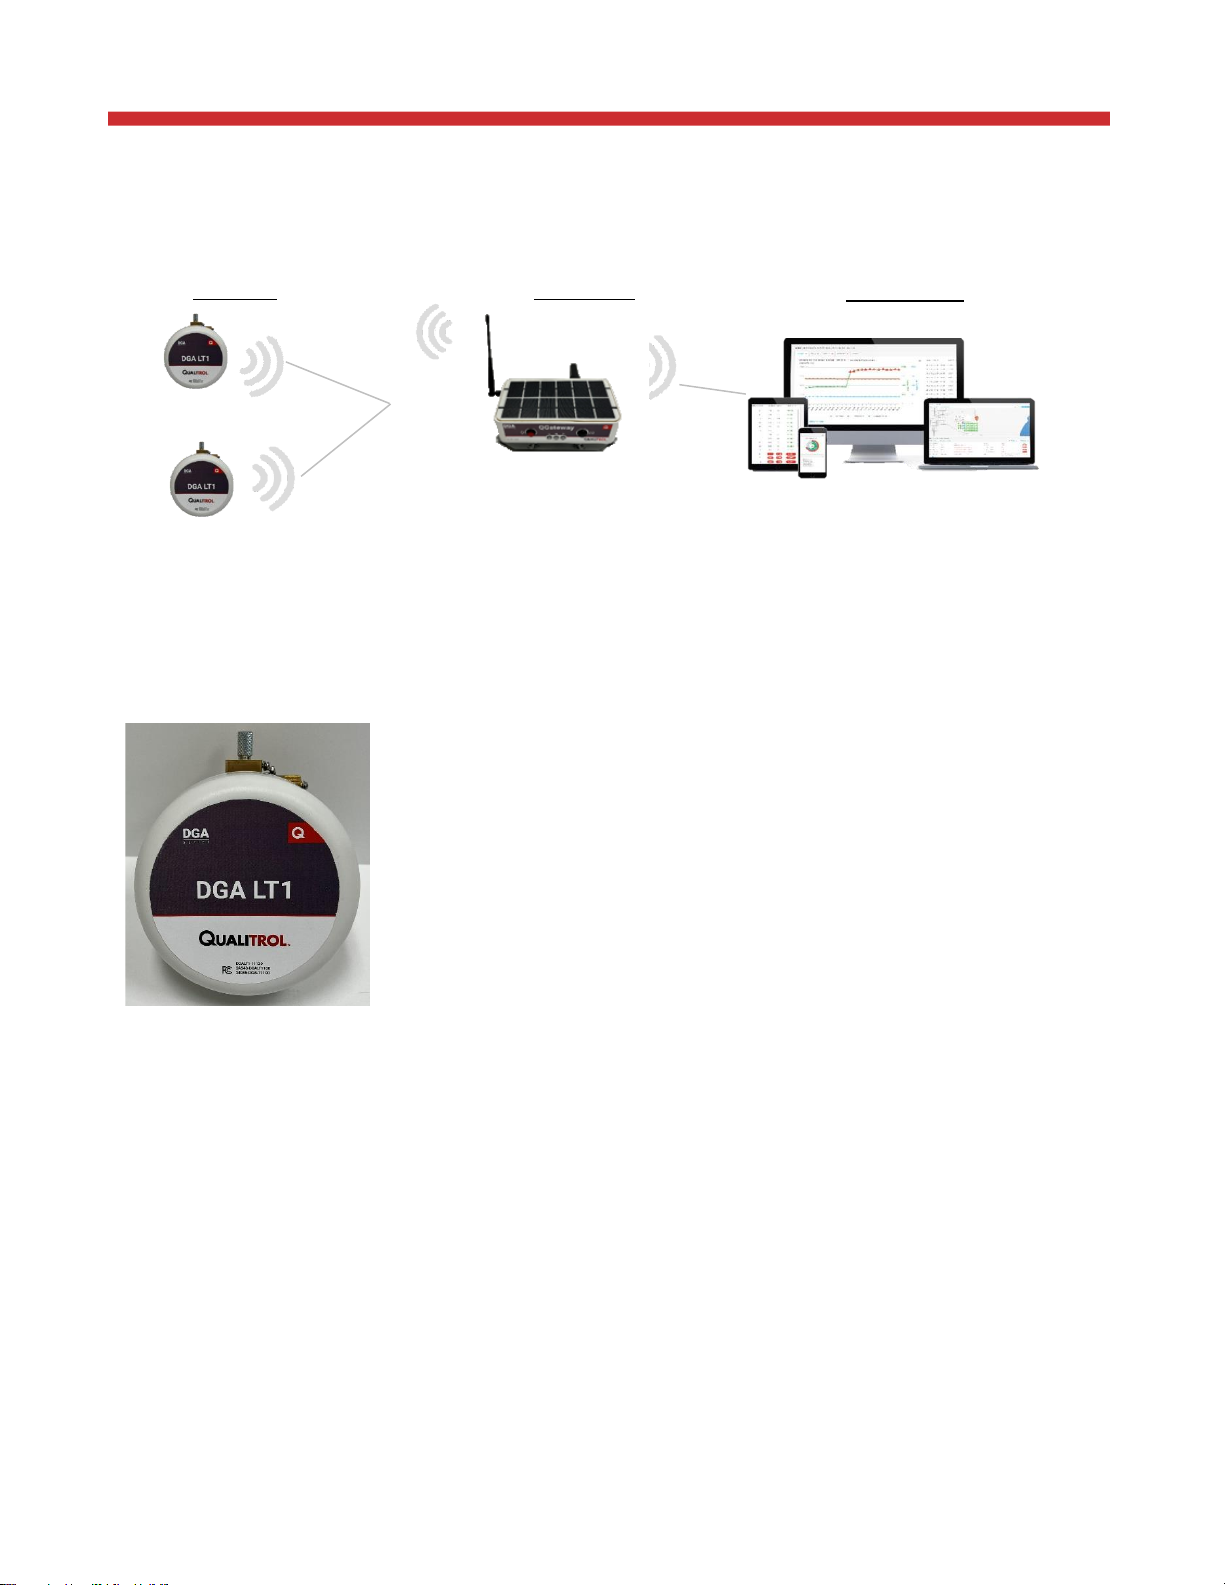
The QualConnex system uses cellular connection to transmit data from the QGateway to the cloud. To achieve
this, there must be adequate cellular signal present where the QGateway is installed to allow for reliable
transmission of data.
Transformer Configuration
The transmission distance from the DGA-LT1 to the QGateway is strongly impacted by obstructions. This
includes whether the DGA-LT1 is to be located in an enclosed transformer cabinet or in the open air when
installed. Take note of the type of transformer and the location of the drain valve (or other approved installation
point for the DGA-LT1 sensor) to properly determine the maximum distance allowed between each DGA-LT1
and QGateway. The location of the drain valve (N, S, E, W, etc.) is also critical to signal range and must be
noted. See the stated Typical RF Range listed in the QGateway Specification section.
Transformer Distance Evaluation
The distance between each identified transformer for evaluation should be known. This will confirm the
QGateway range to DGA-LT1 and scale the number of QGateway to sensors required. This step can be done
using a web-based tool, like Google Earth, to approximate the distance or can be performed with site surveying
or site maps as available. Google Earth, at time of writing, includes a measurement tool that may be used for
distance measurements.

Installation & User Guide
Transformer Elevation Evaluation
Large terrain variations can also lead to reduced signal strength due to earth obstructions. The elevation of
each transformer should be noted with any variations of hills or other land masses between the transformers
noted. This can again be accomplished with a web-based tool like https://en-us.topographic-map.com/, which
provides free topographical maps, or site surveying or site maps as available.
Line of Sight –Obstruction Evaluation
Large vegetation, urban development or other physical structures can lead to reduced signal strength and
range. Note any obstructions that would prevent line of sight and obstructions between transformers.
Cell Coverage Evaluation
For USA (United States Americas) installs, the QGateway uses the Verizon network on band 13. For Canadian
installations, the QGateway uses the Bell network on bands 5, and 13. Using a web-based tool like
www.cellmapper.net can assist in determining the location of nearby tower(s) and the band(s) that those towers
operate.
The direction of the tower to the transformer is also important to note for QGateway placement to optimize
antenna direction and minimize obstructions.
QGateway Quantity and Location.
The QGateway must have solar access when installed to ensure recharging of the system batteries. If there
are areas of heavy shading and vegetation growth, make sure to note these during site survey and avoid these
areas for QGateway installation. It is more favorable to place the QGateway away from interference sources
such as inverters and as high above ground level as possible.
Use the following rules of thumb to help determine quantity of QGateways needed for installation.
Calculate adjusted max range: Adjusted Max Range = QGateway Range X Obstruction Rating
•IF (Closest Distance Between Two Transformers) > (Adjusted Max Range) use a 1:1 QGateway to
DGA-LT1 ratio
•IF (Distance between farthest two transformers) < (Adjusted Max Range) use 1 QGateway for DGA-
LT1 quantities of 1-10, 2 QGateways for DGA-LT1 quantities of 11-20, etc.
•IF (Distance between farthest two transformers) > (Adjusted Max Range):
•Approximate Number of QGateways = 𝑅𝑂𝑈𝑁𝐷 𝑈𝑃 (𝐷𝑖𝑠𝑡𝑎𝑛𝑐𝑒 𝑏𝑒𝑡𝑤𝑒𝑒𝑛 𝑓𝑎𝑟𝑡ℎ𝑒𝑠𝑡 𝑡𝑤𝑜 𝑡𝑟𝑎𝑛𝑠𝑓𝑜𝑟𝑚𝑒𝑟𝑠
𝐴𝑑𝑗𝑢𝑠𝑡𝑒𝑑 𝑀𝑎𝑥 𝑅𝑎𝑛𝑔𝑒 )
Example:
•Distance between the farthest 2 transformers is 600m (about 2,000 ft)
•Adjusted Max Range is 500m (about 1,700 ft)
•Approximate Number of QGateways = ROUND UP (1.2) = 2

Installation & User Guide
Accounting for Elevation Changes
It is always preferred to have the QGateway located at the highest elevation possible to ensure maximum
communication range. Avoid locating the QGateway in low lying areas where hills will obstruct wireless
communications to the surrounding transformers. Accounting for this may increase the number of QGateways
needed depending on location availability.
Based on the above obstructions and distances and calculations, the following table can help record and scale
the required number of QGateways.
Measured Value
Quantity
Notes
Number of Transformers to be
monitored with DGA-LT1s
Closest Distance between 2
transformers
QGateway max range
1500m (5,000 ft, Open air)
600m (2.000 ft enclosure installation)
Distance between the farthest two
Transformers
Max elevation difference between
Transformers
Obstruction rating
0.2 for heavy
0.5 for medium
0.8 for light
1 for none
The above are rules of thumb and Qualitrol does not guarantee adequate performance of the wireless
connection based on these alone. Communications performance must be confirmed at the time of installation.

Installation & User Guide
Transformer Details to Prepare for Installation
Qualitrol recommends collecting the following information during site preparation to enable configuration of the
QualConnex website prior to installation. If this is not possible, the information can be collected during
installation and set up in the field. The required section is the information required for the creation of a
transformer in the QualConnex website (see QualConnex Website Guide for setup details). If the transformer
is not set up prior or during field commissioning, DGA-LT1 sensors cannot be linked, and communication cannot
be verified. This may lead to additional field visits to troubleshoot improper installation. Items in bold are
required, the remaining items can help with tracking and diagnostics. This page can be copied to allow for
information from each transformer.
Required
Company: ________________________________ Site: _______________________________
Transformer name: _____________________________________________________________
DGA LT1 serial: ________________________________________________________________
Transformer information:
Transformer GPS location: _____________________________________ (in Decimal Degrees)
Transformer Manufacturer: ______________________ Model: _________________________
Serial: _______________________________________________________________________
Oil Type (check one): Mineral____ Silicone ____ Natural Ester ____ Synthetic Ester ____
Oil cooling type (check one): ONAN _____ ONAF _____ OFAF _____ OFWF ____
Tank type (check one): Air breather ___ Conservator ___ Nitrogen blanket ___ Sealed ___
Optional
Rated KVA: ___________ Phase: _____________ Frequency: ____________ Vector: _________
HV Amps: ___________LV Amps: __________ No Load: HV _____________ LV _____________
Oil Volume: _________ Top oil rise: __________________ Winding temp rise: _______________
Minimum pressure: _______________________ Maximum pressure: ______________________
QGateway Serial number located on Transformer (if applicable): ________________________

Installation & User Guide
Monitor Installation
Note: Do not attempt to install your DGA-LT1 On-Line Transformer Monitor until you have read and fully
understand the procedures outlined in this document.
Installation of the QualConnex system consists of the following:
•Site Preparation
•All shipped items have been located
•Configuration of website
•Required tools for assembly
•Assembly and mounting the QGateway with mount
•QGateway field installation
•Installing the DGA-LT1
•Bleeding the DGA-LT1 monitor
•Commissioning
Items Shipped
Upon receipt of your transformer monitor, it is important to verify the contents of the shipping carton
with the packing list. After inspection of the contents, please notify Qualitrol via our "contact us" page
at www.qualitrolcorp.com/contact-us/if there are any missing parts or any signs of damage that may
have occurred in transit. If possible, please retain the original shipping container and packing
materials if it becomes necessary to return the monitor.

Installation & User Guide
Part Number
Description
DGALT1-11110
DGA LT1, Wireless Online Dissolved
Gas Analyzer Measuring Hydrogen
Concentration, Moisture Concentration
and Oil Temperature, 1" Connection,
RF
Bleed Tube
Tubing for bleeding air from DGA LT1 after installation
GTW-RF-23310
Qualitrol QGateway, Wireless Sensor Transceiver for RF to Cellular
Communication, Battery Powered with recharging through Solar Power
(LoRa antenna shipped detached)

Installation & User Guide
Part Number
Description
QGateway mount
Qualitrol QGateway adjustable magnetic mount
2” Male to 1” Female NPT
Reducing Bushing
ADP-251-1
(Optional)
Configuration in QualConnex Website
With the DGA-LT1 and QGateway serial numbers confirmed with the shipping list and the transformer details
collected during the site survey (see Transformer Details to Prepare for Installation list), the website should be
configured prior to site installation. This will enable verification of the DGA-LT1 and QGateway while in the field
and will only require verifying the associated DGA-LT1 was installed on the linked transformer (the associated
transformer can be adjusted if units got switched during installation).
See Qualitrol’s separate guide “QualConnex Website Guide” for instructions on how to navigate QualConnex
and how to enter the required details into the website: https://qualconnex.qualitrolcorp.com

Installation & User Guide
Required Tools for Installation
•1 3/8” (33mm) fixed wrench or adjustable wrench of an adequate size for leverage (12-14 inch
/ 30 –35 cm)
•Extra high density Teflon tape (0.0032” or ~0.08 mm thick)
•PTFE pipe-thread sealant
•Bleed tube ¼” (6.5 mm) ID, oil resistant (Tygon)
•Bleed container with ~1 inch (2 cm) of compatible transformer oil in the bottom.
•Absorbent towels and containers to prevent oil spills during installation.
•Brush to clean the transformer threads prior to installation (nylon is recommended due to its
softer nature to prevent damage to the brass threads and compatibility with insulating oil)
•Compass (or phone app) for Solar Panel alignment
•Flat Head screwdriver or socket wrench with ¼ " (6 mm) socket.
•Any tools and keys to unlock drain valve location
•Cell phone or computer with internet access to QualConnex website
Assembling the QGateway Antenna and Mount
The QGateway is shipped without the LoRa antenna installed and not connected to the magnetic mount. This
enables field configuration to optimize performance. The following sections will detail how to determine the
optimal angle for the magnetic base, assemble and connect the QGateway to the mount and install and orient
the LoRa antenna.
Determining the Magnetic Base Mount Angle and Configuration
The magnetic base mounting bracket is shipped flat. The mount is designed to adjust to 3 collection angles to
maximize solar energy collection based on the geographic location of the QGateway and the surface to which
it is mounted –either a 30°, 45° or 60° angle (using at an angle of 60° can help with snow shed).
It is recommended to optimize your QGateway angle based on winter solar incidence angles to ensure proper
charging during darker months. The optimum tilt angle is determined by adding 15° to the latitude at the
installation location. For example, if the QGateway were installed in Rochester, NY, the 15° would be added to
latitude of 43° giving a rounded optimum angle of 60° from horizontal.
The QGateway mount adjusts for both vertical and horizontal mounting. See Table 1 for configurations.

Installation & User Guide
Table 1 - QGateway Mount Configuration
Installation
Surface
Installation Angle
(from horizon)
Picture
Mounting Hardware Configuration
Horizontal
30°
Horizontal
45°
Horizontal
60°

Installation & User Guide
Installation
Surface
Installation Angle
(from horizon)
Picture
Mounting Hardware Configuration
Vertical
30°
Vertical
45°
Vertical
60°

Installation & User Guide
Assembling the Magnetic Mount
The magnetic mount is shipped as shown in Figure 2 below.
1. First open the adjustable magnetic base and attach (2) support struts using (2) flange head screws as
shown in Figure 3.
2. Do not fully tighten the screws.
Figure 2: Magnetic mount components shipped. From left to right: (1) adjustable magnetic base, (2)
support struts, (6) flange head screws
Figure 3: Attaching the support struts
3. Begin to close the adjustable base and ensure support struts sit on the inside of brackets on the
adjustable mount as shown in Figure 4

Installation & User Guide
Figure 4: Support strut orientation
4. Adjust the angle of the adjustable base and align the threaded end of the support strut with the desired
mounting hole per the configuration chosen as shown in Table 1.
5. Secure both support struts using (2) flange head screws as shown in Figure 5.
6. Once the supports are in the desired position, tighten all (6) flange head screws to secure the adjustable
magnet mount in position.
Figure 5: Securing threaded end of the support strut
This manual suits for next models
3
Table of contents
Other Qualitrol Monitor manuals