manuals.online logo
Brands
  1. Home
  2. •
  3. Brands
  4. •
  5. Quick-Garden
  6. •
  7. Outdoor Storage
  8. •
  9. Quick-Garden Benington User manual

Quick-Garden Benington User manual

Popular Outdoor Storage manuals by other brands

LIVING AND HOME 0735940285711 user guide

LIVING AND HOME

LIVING AND HOME 0735940285711 user guide

USP DURAMAX 10 Ft x 8 Ft StoreMax Plus owner's manual

USP

USP DURAMAX 10 Ft x 8 Ft StoreMax Plus owner's manual

rollaway container ARPCA24 manual

rollaway container

rollaway container ARPCA24 manual

Duratuf GL105 Assembly instructions

Duratuf

Duratuf GL105 Assembly instructions

Viking SD5300SS Use & installation guide

Viking

Viking SD5300SS Use & installation guide

USP DURAMAX Apex Pro 10.5 Ft x 8 Ft 40116 owner's manual

USP

USP DURAMAX Apex Pro 10.5 Ft x 8 Ft 40116 owner's manual

ModuLaro Lojo WC202200 manual

ModuLaro

ModuLaro Lojo WC202200 manual

Outdoor Life Products FP2030 F Assembly instructions

Outdoor Life Products

Outdoor Life Products FP2030 F Assembly instructions

Royalcraft Faro 295L Storage Box Assembly instructions

Royalcraft

Royalcraft Faro 295L Storage Box Assembly instructions

TYGO Nyland Building Instruction

TYGO

TYGO Nyland Building Instruction

Riverlea Duratuf KIWI KS3 Assembly instructions

Riverlea

Riverlea Duratuf KIWI KS3 Assembly instructions

Rubbermaid 5L45 manual

Rubbermaid

Rubbermaid 5L45 manual

garofalo TUSCANY EVO user manual

garofalo

garofalo TUSCANY EVO user manual

OLT GS84D-FJ-Plywood Assembly manual

OLT

OLT GS84D-FJ-Plywood Assembly manual

Lifetime 6418 owner's manual

Lifetime

Lifetime 6418 owner's manual

Palram CANOPIA RUBICON 6x10 How to assemble

Palram

Palram CANOPIA RUBICON 6x10 How to assemble

Duratuf Havelock Assembly instructions

Duratuf

Duratuf Havelock Assembly instructions

Keter DUOTECH HIGH-STORE+ user manual

Keter

Keter DUOTECH HIGH-STORE+ user manual

manuals.online logo
manuals.online logoBrands
  • About & Mission
  • Contact us
  • Privacy Policy
  • Terms and Conditions

Copyright 2025 Manuals.Online. All Rights Reserved.

1
PRODUCT NAME
BENINGTON
REFERENCE NUMBER
2
3
IMPORTANT (Read carefully before starting)!
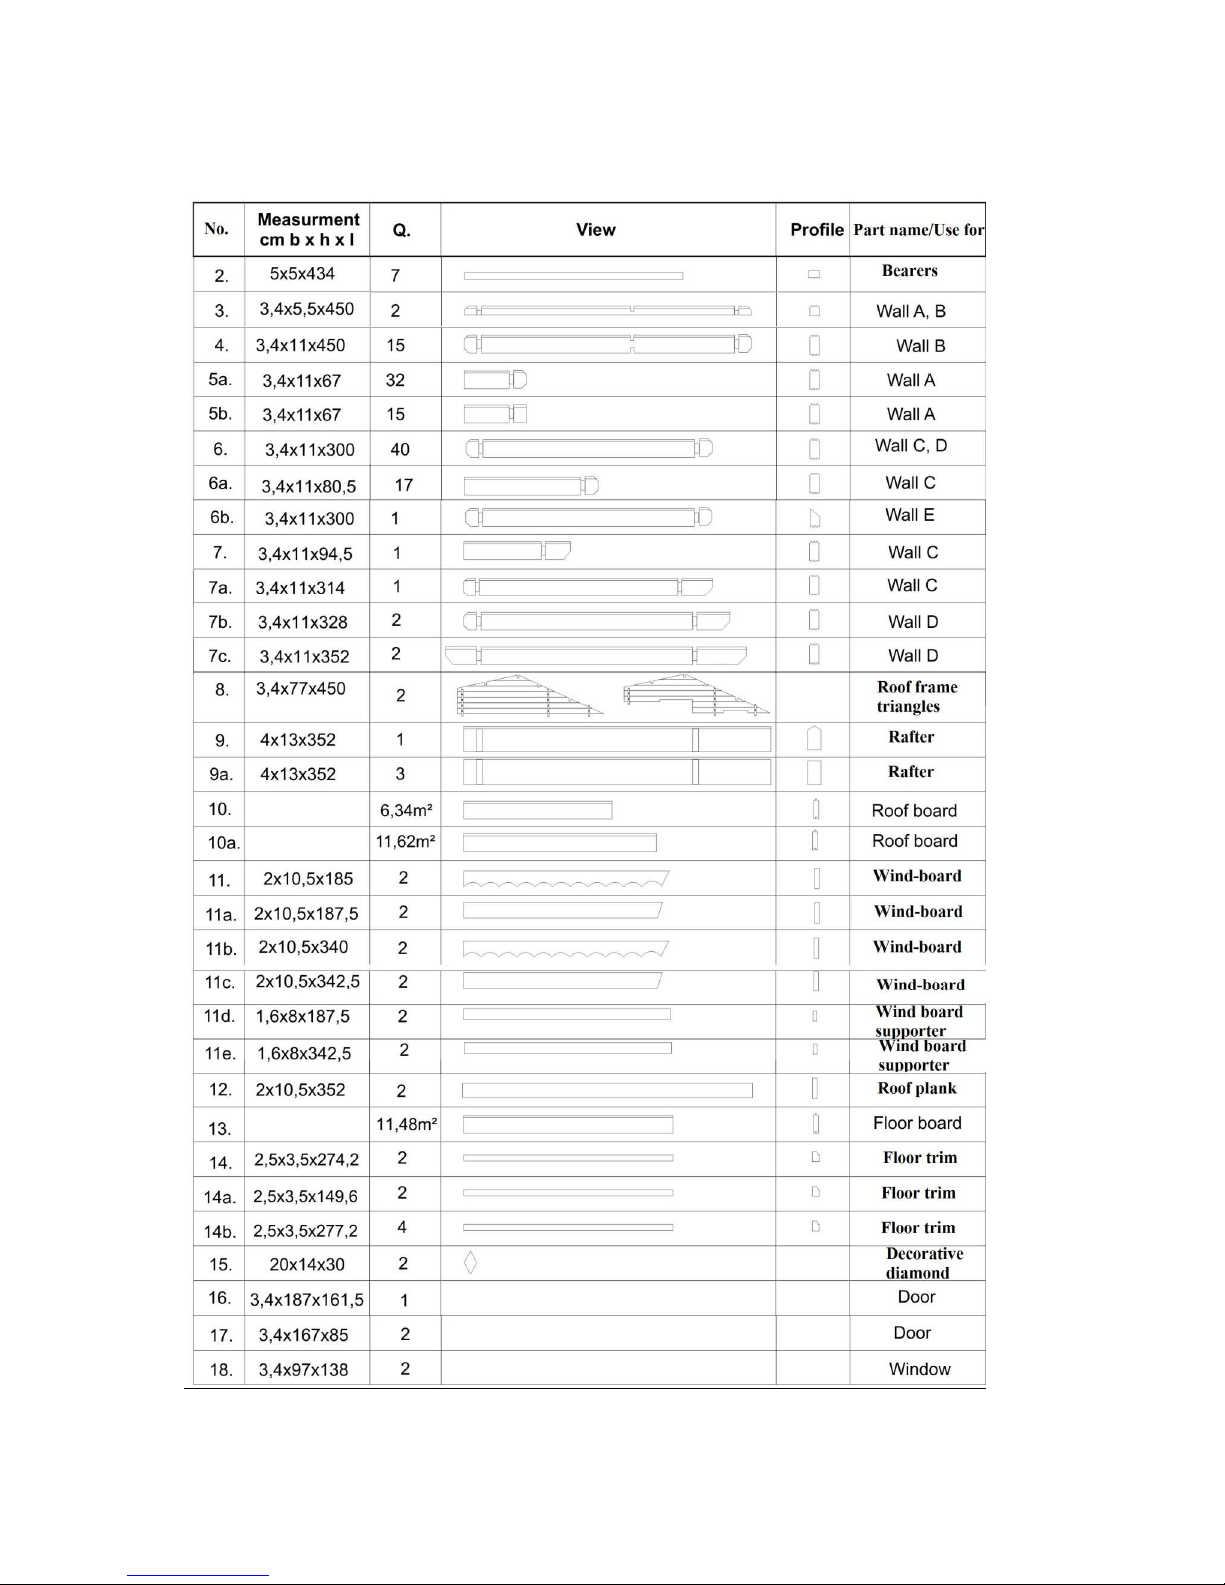
- The following instructions include both ictures (indicating every art by
the digits – see art list above) and illustrations. Please kee in mind that
the illustrations are just a general guide to assembling all our roducts (For
exam le: The illustration on how to assemble a roof a lies to all our roofs).
However s ecific models will vary in the quantity of materials needed. By
closely consulting the art-list, you will know how many arts you need for
each stage of the assembly, while the illustrations will show you how ut
them together.
- If some extra boards are left over after assembling your roduct, do not
worry. We sometimes include extra boards to ensure that the delivery
ackage is erfectly com act and solid.
1. General instructions
Read carefully before starting. First of all, we want to thank you for buying one of our products.
Please read these instructions carefully before unpacking the parts.
2. Storing your roduct rior to assembly.
Your unpacked product must be stored in a dry, ventilated place, where it is protected from the weather
(the package is not waterproof) and direct sunlight. The package and parts should be laid flat on the
ground in order to avoid any damage to them. e strongly recommend assembling the product as soon
as possible after it is delivered, because any complaints regarding missing or damaged parts can only be
made up to 10 days after the date of delivery.
3. Safety.
The wooden parts may cause splinters, so please handle them carefully and wear protective gloves. Make
sure there are no protruding nails, screws or staples in the assembled pieces. Always follow the
instructions carefully and keep to the order of steps.
4
4.Assembly.
Before starting to assemble your structure, we strongly recommend that you watch our video guide on
our website www.quick-garden.co.uk (under the category “Assembly”). During the installation process
constantly check that everything is level and parallel. For all parts that need to be assembled using
screws, it is advisable to pre-drill holes to avoid the risk of splitting the wood during screwing.
4.1. Familiarize yourself with the arts. All parts are numbered, so start by checking that all parts
are present by matching them off against your instruction manual. e recommend you sort the parts into
separate piles. You will need a rubber hammer, electric screw-driver and anchor screws.
4.2. Foundation. Before starting the installation, make sure that the building surface is perfectly flat
and level. Lay the foundation elements (PVC blocks, concrete slabs, etc.) For floorless models, the
foundation should be at least the same size or larger (recommended) than the external dimension of the
structure.
4.3. Bearers. The bearers must be placed according to the picture below (general sample) with gaps of
around 50 cm between each other. Screw the bearers into the foundation with anchor screws.
5
The actual lan of the bearers:
4.4. Assembling the walls: place the wall-boards on the bearers as shown in a sample below:
6
The wall-boards must be placed so that the ends interlock. Now screw the first row of wall-boards into
the bearers. All the following rows of placed wall-boards should interlock not only at the ends, but along
their length as well. Please screw each new row of wall-boards into the former row to ensure a solid
structure.
7
8
9
4.5. Roof frame triangles: After the walls are assembled, mount the roof frame triangles. These
should be mounted as whole structures.
4.6. Rafters: The rafters must be mounted horizontally and inserted in the mounting-spaces found on
the roof frame triangles. The rafters share a common mounting-space in the middle one of the three
triangles. Here are two types of rafter-mounting shown below (picture)
4.7. Roof-boards: The next step is to attach the roof-boards vertically and screw them into the rafters.
Make sure the ends of the roof-boards are perfectly parallel to each other. Then fix the roof plank
boarder under the roof-boards as show below. The roof-plank must be screwed to the roof plank
boarder.
10
4.8. Wind-boards: Place the wind-boards on top of each other to make a 90 degree angle. Now attach
these ones on a roof frame triangle and fix with screws.