Quikread Quiklink User manual

1
Instructions
for use
QuikLink
Instructions for use
Bruksanvisning
132137-6

2
bar code tablet
OK / Accept
Temporary NON-LIS mode
Exit Temporary NON-LIS mode
Cancel / Reject
132138-5 – 4/2013
Orion Diagnostica Oy
Koivu-Mankkaan tie 6 B
P.O.Box 83, FI-02101 Espoo, Finland
Tel. +358 10 4261 • Fax +358 10 426 2794
www.oriondiagnostica.com • www.quikread.com

3
INSTRUCTIONS FOR USE English
INTENDED USE 4
SUMMARY AND EXPLANATION 4
CONTENTS 5
QuikRead®QuikLink consists of two separete products 5
Devices and items required but not supplied 5
OPERATING INSTRUCTIONS 6
Preparations for the use of the QuikRead QuikLink 6
Measurement on QuikLink mode with bar code reader 6
Measurement on Temporary NON-LIS mode 10
Measurement on QuikLink mode without bar code reader 10
TROUBLESHOOTING 12
BRUKSANVISNING Svenska
AVSEDD ANVÄNDNING 14
ÖVERSIKT 14
INNEHÅLL 15
QuikRead®QuikLink består av två separata produkter 15
Tillbehör och artiklar som krävs, men som ej ingår 15
INSTRUKTIONER FÖR DRIFT 16
Förberedelser för användande av QuikRead QuikLink 16
Mätning i QuikLink läge med streckkodsläsare 16
Mätning i tillfälligt NON-LIS läge 20
Mätning i QuikLink läge utan streckkodsläsare 20
FELSÖKNING 22
QuikLink

4
INTENDED USE
Transportation of QuikRead assay results coupled with patient identication
to a remote Laboratory or Hospital Information System (LIS/HIS) using an
ASTM protocol.
Only for the QuikRead 101 Instrument.
SUMMARY AND EXPLANATION
QuikRead QuikLink is a supplementary product for the QuikRead Instrument.
It allows transfer of QuikRead assay results to a remote LIS/HIS using the
ASTM protocol.
These instructions for use describe the use of the QuikRead QuikLink user
interface and include supplementary instructions for the routine measurement
protocol.
Before starting any assay, read and follow the QuikRead Instrument and
QuikRead reagent kit instructions for use for the specic assay procedure
and sample requirements.
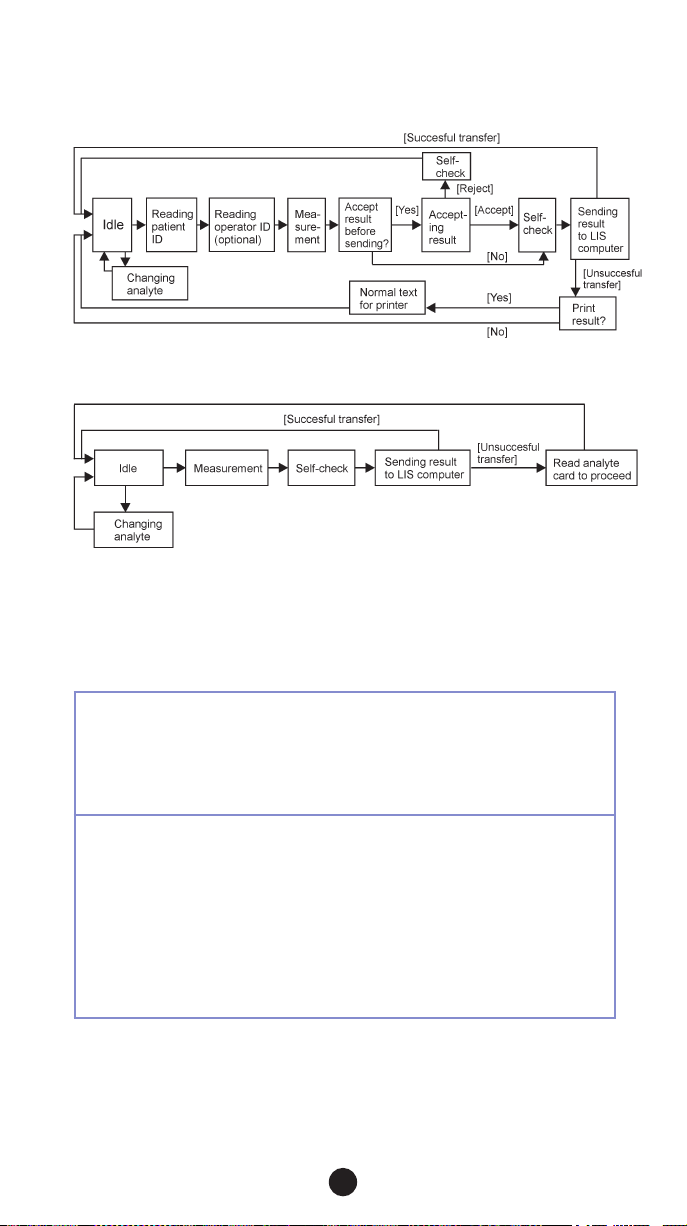
QuikRead QuikLink has two optional protocols (Figure 1). A QuikRead assay
result can be transferred to a remote LIS/HIS computer or a printer either with
patient identication (QuikLink mode with bar code reader) or with consecutive
sample number and time (QuikLink mode without bar code reader). The proto-
col is chosen and congured using the QuikRead QuikLink Setup Wizard.
QuikLink mode with bar code reader /
Temporary NON-LIS mode
If the QuikLink mode with bar code reader is enabled, the QuikRead Instru-
ment starts in the QuikLink mode during start-up. A bar code reader is used to
couple the assay results with patient and, optionally, operator identication (ID).
If the Accept result before sending option is enabled, the accepted results
are sent to the remote LIS/HIS computer or printer after each measurement.
If the Accept result before sending option is disabled, all results are automati-
cally sent to the remote LIS/HIS computer or printer after each measurement
without an acceptance procedure.
If no patient ID is available, for example with emergency patients, the QuikRead
Instrument can be switched to the Temporary NON-LIS mode. In the tempo-
rary NON-LIS mode, patient ID is not requested for and the result is not sent to
the LIS. After one successful temporary NON-LIS measurement, the instrument
automatically returns to the QuikLink mode with bar code reader.
QuikLink mode without bar code reader
If the bar code reader is not in use, the QuikRead Instrument is set into
QuikLink mode without bar code reader. In this mode, results are sent to
the LIS computer automatically after each measurement without any patient
or operator identications or result acceptance. Data is sent coupled with
consecutive sample number and current time. The Temporary NON-LIS mode
is not available in this mode.
QuikLink
English

5
CONTENTS
QuikRead QuikLink consists of two separate products:
QuikRead®QuikLink Cat. No. 06100
•QuikRead QuikLink Setup Wizard CD-ROM.
A PC program that installs the required software for the
QuikRead 101 Instrument and congures the LIS/HIS properties.
•QuikRead QuikLink Setup Wizard Instructions for use
QuikRead®QuikLink bar code reader Cat. No. 06109
(required only for the “QuikLink mode with bar code reader”)
•Bar code reader
•Interface cable.
Connects the bar code reader to the QuikRead Instrument.
•QuikLink bar code tablet
•Bar code reader user manual
•QuikRead QuikLink Instructions for use
Devices and items required but not supplied
• QuikRead 101 Instrument, Cat. No. 06040
•Serial cable (null modem)
•Remote LIS/HIS
•QuikRead driver for the remote LIS/HIS (LIS/HIS dependent)
Mode 2 QuikLink mode without bar code reader
Figure 1 QuikLink modes
Mode 1 QuikLink mode with bar code reader

6
OPERATING INSTRUCTIONS
Preparations for the use of the QuikRead QuikLink
Use the QuikRead QuikLink Setup Wizard to congure the desired QuikLink
settings for your QuikRead Instrument. See the QuikRead QuikLink Setup
Wizard instructions for use.
Note that after servicing the QuikRead Instrument or the bar code reader, the
devices need to be recongured to the customised settings.
Measurement on QuikLink mode with bar code reader
These instructions for use describe the mode in which the assay results are
sent to a remote LIS/HIS computer. The same procedure is also valid in the
mode in which the results are sent to a printer.
START-UP
•Switch on the QuikRead Instrument.
• Check that the LCD displays:
QuikLink mode
Operator ID enabled or QuikLink mode
Operator ID disabled
• Use a magnetic card to set the analyte. The LCD will alternately display:
Ready for use
<test> lot xxxx and Ready for use
Read patient ID
Note that the magnetic card can only be read when the LCD displays
Read the card or Ready for use.
USE OF THE BAR CODE READER
See the supplied bar code reader user manual for detailed instructions for use.
Use the supplied interface cable to connect the bar code reader to the
QuikRead Instrument. The cable is connected to the bar code reader con-
nector located at the back of the QuikRead Instrument. See Figure 2 for the
connections.
To read a bar code, aim the reader at a bar code and pull the trigger in the
handle. Code scanning is performed along the center of the light bar emitted
from the reading window. This bar must cover the entire code horizontally. Do
not aim the light bar direct at your eyes.
The manufacturer’s warranty for the bar code reader covers defects in ma-
terials or workmanship for 5 years from the date of shipment, provided that
the product is operated under normal and proper conditions. In the event of
a reader malfunction, contact your local supplier to receive information of the
authorised service.

7
Figure 2
Cable connection
ASerial cable
BBar code reader connector
CBar code reader interface cable
DPower cord
PROCEDURE
Reading patient ID
1. Place the bar code reader above the bar code in the patient information
sheet or sample tube and press the trigger button in the handle. Wait for
a sound signal.
If the bar code reading fails several times, see Troubleshooting.
2. The LCD will display the patient ID. Make sure that it matches the patient
ID in the patient information sheet.
Ready for use <test>
Patient <xxxxxxxx>
Reading operator ID
(Optional feature. If not in use go to step 6.)
3. If the operator ID is enabled, the LCD will display:
Ready for use <test>
Read operator ID
4. Read the operator ID with the bar code reader. The LCD will display the
operator ID. Make sure that it matches the read operator ID.
Operator ID
<oooooooo>
5. The LCD will then display:
Ready for use <test>
Patient <xxxxxxxx>
Measurement
● with Accept result before sending enabled go to step 6
● with Accept result before sending disabled go to step 14
Measurement with Accept result before sending enabled
6. Make the measurement by following the instructions for use for the
QuikRead Instrument and QuikRead reagent kits and the texts displayed
by the LCD.
7. When the measurement is completed, the LCD will alternately display
the texts:
Patient <xxxxxxxx>
Result <zz> <uuu> and Accept or reject test
where <xxxxxxxx> is the patient ID, <zz> is the result, and <uuu> is the
analyte.
A
B
D
C

8
Accepting or rejecting a result
8. To accept a result, read the bar code OK/ACCEPT on the QuikLink bar
code tablet (bar codes also on page 2). To reject a measurement, read
the bar code CANCEL/REJECT on the QuikLink bar code tablet.
9. When the result is accepted, the LCD will display:
Test accepted
Remove cuvette
If the measurement was rejected, the LCD will display:
Test rejected
Remove cuvette
10. Remove the cuvette and wait for the QuikRead Instrument to perform a
self-check.
Sending a result to the remote LIS/HIS computer
11. After a successful self-check, the accepted result is automatically sent to
the remote LIS/HIS computer. This can take a few seconds. During the
process, the LCD will display:
Sending result...
If the measurement was rejected, the result is not sent to the remote
LIS/HIS computer. If the self-check is unsuccessful, the result is not sent
and an error message is displayed by the LCD. Delete the result.
12. When the result has been successfully transferred, the LCD will dis-
play:
Test result sent
succesfully
13. If the QuikRead Instrument is unable to transfer the result to the remote
LIS/HIS computer, the LCD will alternately display the texts:
Sending failed!
Print result? and Patient <xxxxxxxx>
Result <zz> <uuu>
Results can be recorded manually or sent to a printer. To send the results
to a printer, rst connect the printer to your QuikRead Instrument and
then read the OK/ACCEPT bar code on the QuikLink bar code tablet.
See Troubleshooting.
When recording results manually, the error message must be acknowl-
edged by reading the CANCEL/REJECT bar code on the QuikLink bar
code tablet.
In both cases, the result is removed from the internal memory of the
instrument and QuikRead is ready for the next measurement.

9
Measurement with Accept result before sending disabled
14. Make the measurement by following the instructions for use for the
QuikRead Instrument and QuikRead reagent kits and the text displayed
by the LCD.
15. When the measurement is completed, the LCD will alternately display
the texts:
Patient <xxxxxxxx>
Result <zz> <uuu> and Remove cuvette to
start LIS/HIS sending
where <xxxxxxxx> is the patient ID, <zz> is the result, and <uuu> is the
analyte.
16. Remove the cuvette and wait for the QuikRead Instrument to perform a
self-check.
Sending a result to the remote LIS/HIS computer
17. After a succesful self-check, the QuikRead Instrument automatically sends
the result to the remote LIS/HIS computer. This can take a few seconds.
During the process, the LCD will display:
Sending result...
If the self-check is unsuccesful, the result is not sent to the remote LIS/
HIS computer and an error message is displayed by the LCD. Delete the
result.
18. When the result has been succesfully transferred, the LCD will alternately
display the texts:
Ready for use
<test> lot xxx and Ready for use
Read patient ID
The instrument is ready for the next measurement.
If the QuikRead Instrument is unable to transfer the result to the LIS/HIS
computer, the LCD will alternately display the texts:
Sending failed!
Print result? and Patient <xxxxxxxx>
Result <zz> <uuu>
Results can be recorded manually or sent to a printer. To send the results
to a printer, rst connect the printer to your QuikRead Instrument and
then read the OK/ACCEPT bar code on the QuikLink bar code tablet.
See Section 5 for Troubleshooting.
When recording results manually, the error message must be acknowl-
edged by reading the CANCEL/REJECT bar code on the QuikLink bar
code tablet.
In both cases, the result is removed from the internal memory of the
instrument and QuikRead is ready for the next measurement.
Brief instructions for use of
QuikLink mode with bar code reader
1.
2.
3.
4.
Read patient ID.
Read operator ID (optional).
Make the measurement.
Accept the result (optional).

10
Measurement on Temporary NON-LIS mode
Make sure that the QuikRead Instrument is in the idle state, i.e. the LCD
alternately displays:
Ready for use
<test> lot xxx and Ready for use
Read patient ID
SETTING INSTRUMENT TO TEMPORARY NON-LIS MODE
Read the Enter temporary NON-LIS mode bar code on the QuikLink bar
code tablet. The LCD will alternately display:
Ready for use
<test> lot and Ready for use
NON-LIS mode
To exit Temporary NON-LIS mode without measuring any sample, read the
Exit temporary NON-LIS mode bar code on the QuikLink bar code tablet.
PROCEDURE
1. Make the measurement by following the instrument and reagent kit in-
structions for use and the texts displayed by the LCD.
2. Record the result before the cuvette is removed from the measurement
well.
3. After a successful measurement, the QuikRead Instrument automatically
returns to the QuikLink mode with bar code reader.
If a measurement fails (test cancelled), the QuikRead Instrument returns
to the start of the Temporary NON-LIS mode.
Measurement on QuikLink mode without bar code reader
START-UP
•Switch on the QuikRead Instrument
• Make sure that the LCD displays:
QuikLink mode
Bar code reader disabled
• Use a magnetic card to set the analyte. The LCD will display:
Ready for use
<test> lot xxxx
Note that the magnetic card can only be read when the LCD dis plays
Read the card or Ready for use.

11
PROCEDURE
Measurement
1. Make the measurement by following the instructions for use for the
QuikRead Instrument and QuikRead reagent kits and the texts displayed
by the LCD.
2. When the measurement has been completed, the LCD will alternately
display the texts:
Sample <xx> / <yyyyyy>
Result <zz> <uuu> and Remove cuvette to
start LIS/HIS sending
where <xx> is the consecutive sample number, <yyyyyy> is the current
date, <zz> is the result and <uuu> is the analyte.
3. Remove the cuvette and wait for the QuikRead Instrument to perform a
self-check.
Sending a result to the remote LIS/HIS computer
4. After a successful self-check, the QuikRead Instrument automatically
sends the result to the remote LIS/HIS computer. This can take a few
seconds. During this process, the LCD will display:
Sending result...
If the self-check is unsuccessful, the result is not sent and an error mes-
sage is displayed by the LCD. Delete the result.
5. When the result has been successfully transferred, the LCD will alternately
display the texts:
Previous sending OK and Ready for use
<test> lot xxxx
The instrument is ready for the next measurement.
If the QuikRead Instrument is unable to transfer the result to the LIS
computer, the LCD will alternately display the following texts:
Previous sending
failed! and
Sample <xx> / <yyyyyy>
Result <zz> <uuu> and
Read analyte card
to proceed
The assay result shall be recorded manually. Use the analyte magnetic
card to proceed. The result is removed from the internal memory of the
instrument and the QuikRead Instrument is ready for the next measure-
ment. See Troubleshooting.

12
TROUBLESHOOTING
Error class Error type Error message
Bar code reading Bar code reader
sound signal absent
after triggering.
A sound signal is heard
but no message is
displayed by the LCD.
Error message on the LCD. Error while reading bar
code. Please try again.
Incorrect patient or
operator ID shown
on the LCD.
Data transmission Error message on the
QuikRead Instrument
display.
Sending failed!
Print result?
Data cannot be seen on the
remote LIS/HIS computer.
Wrong data on the remote
LIS/HIS computer.
Possible cause Corrective action
The interface cable connection
is poor.
Make sure that the cable is
properly connected.
The bar code reader is wrongly
congured.
Use the QuikRead QuikLink Setup Wizard
for reconguration.
Unsuitable bar code reader Select right bar code reader model.
Defected bar code reader Contact your local supplier.
Poor bar code quality Use a new label.
Unsuitable bar code type Check that the QuikRead QuikLink
Setup Wizard supports the bar code
families in use.
The QuikRead Instrument
is wrongly congured.
Use the QuikRead QuikLink Setup Wizard
for reconguration.
The interface cable connection
is poor.
Make sure the cable is
properly connected.
The interface cable is defective. Contact your local supplier.
Several causes Read again.
If the message persists, contact your local
supplier.
Unsuccesful bar code reading Aim the reader more carefully at the bar
code. Ensure that the light bar covers the
entire code horizontally.
Bar code reader does not sup-
port the bar code type used for
patient or operator ID and there-
fore the code is read incorrectly.
Check that the QuikRead QuikLink Setup
Wizard supports the bar code families in
use.
The cable to the remote LIS/HIS
computer is disconnected.
Connect the cable.
The cable to the remote LIS/HIS
computer is defective.
Change the cable.
Remote LIS/HIS computer is
not responding.
Check that the
remote computer is OK.
Wrong driver version on the
remote LIS/HIS computer.
Contact your
local administrator.
Other cause
Wrong driver version on the
remote LIS/HIS computer.
Contact your
local administrator.
Other cause
Also see the QuikRead 101 Instrument Instructions for use,
Appendix C: Troubleshooting / Error messages

13
TROUBLESHOOTING
Error class Error type Error message
Bar code reading Bar code reader
sound signal absent
after triggering.
A sound signal is heard
but no message is
displayed by the LCD.
Error message on the LCD. Error while reading bar
code. Please try again.
Incorrect patient or
operator ID shown
on the LCD.
Data transmission Error message on the
QuikRead Instrument
display.
Sending failed!
Print result?
Data cannot be seen on the
remote LIS/HIS computer.
Wrong data on the remote
LIS/HIS computer.
Possible cause Corrective action
The interface cable connection
is poor.
Make sure that the cable is
properly connected.
The bar code reader is wrongly
congured.
Use the QuikRead QuikLink Setup Wizard
for reconguration.
Unsuitable bar code reader Select right bar code reader model.
Defected bar code reader Contact your local supplier.
Poor bar code quality Use a new label.
Unsuitable bar code type Check that the QuikRead QuikLink
Setup Wizard supports the bar code
families in use.
The QuikRead Instrument
is wrongly congured.
Use the QuikRead QuikLink Setup Wizard
for reconguration.
The interface cable connection
is poor.
Make sure the cable is
properly connected.
The interface cable is defective. Contact your local supplier.
Several causes Read again.
If the message persists, contact your local
supplier.
Unsuccesful bar code reading Aim the reader more carefully at the bar
code. Ensure that the light bar covers the
entire code horizontally.
Bar code reader does not sup-
port the bar code type used for
patient or operator ID and there-
fore the code is read incorrectly.
Check that the QuikRead QuikLink Setup
Wizard supports the bar code families in
use.
The cable to the remote LIS/HIS
computer is disconnected.
Connect the cable.
The cable to the remote LIS/HIS
computer is defective.
Change the cable.
Remote LIS/HIS computer is
not responding.
Check that the
remote computer is OK.
Wrong driver version on the
remote LIS/HIS computer.
Contact your
local administrator.
Other cause
Wrong driver version on the
remote LIS/HIS computer.
Contact your
local administrator.
Other cause
Also see the QuikRead 101 Instrument Instructions for use,
Appendix C: Troubleshooting / Error messages

14
AVSEDD ANVÄNDNING
Överföring av analysresultat från QuikRead kopplade med patientidentika-
tion till LIS/HIS (Laboratory or Hospital Information System, Laboratorie- eller
Sjukhusdatasystem) som använder ASTM.
Endast för QuikRead 101 Instrument.
ÖVERSIKT
QuikRead QuikLink är en tilläggsprodukt till QuikRead Instrumentet. Den
gör det möjligt att föra över analysresultat från QuikRead till LIS/HIS som
använder ASTM.
Den här bruksanvisningen beskriver ödet vid användning av QuikRead
QuikLink och en del tilläggsinformation för det rutinmässiga analyserandet.
Läs och följ instruktionerna för QuikRead instrumentet och kitinlagan för den
analyt som ska analyseras innan någon analys utförs.
QuikRead QuikLink har två valbara alternativ (Figur 1). Resultatet från en
QuikRead analys förs över till en LIS/HIS dator eller printer antingen med
patient-ID (QuikLink läge med streckkodsläsare) eller med löpnummer och
tidsangivelse (QuikLink läge utan streckkodsläsare). Alternativen väljs och
kongureras i installationsprogrammet för QuikRead QuikLink.
QuikLink läge med streckkodsläsare /
Tillfälligt NON-LIS läge
Om QuikLink-läge med streckkodsläsaren är inställt, startar QuikRead
Instrumentet i QuikLink-läge. En streckkodsläsare används för att koppla ihop
analysresultatet med patienten och eventuell användaridentikation (ID). Om
funktionen Acceptera resultatet före överföring är innställd, sänds svaren
till en LIS/HIS-dator eller skrivare efter varje mätning, först efter det att ett
accepterande av svaret är gjort. Om funktionen Acceptera resultatet före
överföring ej är inställd, sänds svaren automatiskt till en LIS/HIS-dator eller
skrivare efter varje mätning utan att svaret accepteras.
Om patient-ID inte är tillgängligt, exempelvis vid akuta fall, kan QuikRead
Instrumentet ställas om till Tillfälligt NON-LIS läge. Vid Tillfälligt NON-LIS läge
efterfrågas inte patient-ID och resultaten sänds inte till LIS/HIS datorn. Efter
en lyckad analys i Tillfälligt NON-LIS läge återgår instrumentet automatiskt till
QuikLink läge med streckkodsläsare.
QuikLink läge utan streckkodsläsare
Om QuikLink läge utan streckkodsläsare är inställt, startar instrumentet
i detta läge när det sätts igång. Resultaten sänds då automatiskt till LIS/
HIS datorn efter varje mätning, utan godkännande av användaren, och utan
patient- eller användareidentikation. Data sänds kopplade med löpnummer
och aktuell tid. Tillfälligt NON-LIS läge är inte tillgängligt i detta läge.
QuikLink
Svenska

15
INNEHÅLL
QuikRead QuikLink består av två separata produkter:
QuikRead®QuikLink Artikelnr: 06100-OD
•QuikRead QuikLink Setup Wizard CD-ROM.
Ett PC program som installerar den efterfrågade mjukvaran för QuikRead
101 Instrumentet och kongurerar egenskaperna för LIS/HIS.
•QuikRead QuikLink installationsprogram bruksanvisning
QuikRead®QuikLink streckkodsläsare Artikelnr: 06109-OD
(krävs endast för “QuikLink läge med streckkodsläsare”)
•Streckkodsläsare
•Streckkodsläsarens kabel.
Ansluter streckkodsläsaren till QuikRead Instrumentet.
•“Streckkodstavla” för QuikLink
•Streckkodsläsarens bruksanvisning
•QuikRead QuikLink bruksanvisning
Tillbehör och artiklar som krävs, men som ej ingår
•QuikRead 101 Instrument, artikelnummer 06040-OD
•Seriell kabel (noll modem)
•LIS/HIS
•QuikRead drivrutin för LIS/HIS (Olika beroende på LIS/HIS)
Alternativ 2 QuikLink läge utan streckkodsläsare
Figur 1 QuikLink lägen
Alternativ 1 QuikLink läge med streckkodsläsare

16
INSTRUKTIONER FÖR DRIFT
Förberedelsen för användande av QuikRead QuikLink
Använd installationsprogrammet för QuikRead QuikLink för att kongurera de
inställningar som krävs för ditt QuikRead Instrument. Läs bruksanvisningen
för installationsprogrammet till QuikRead QuikLink.
Notera att efter service på QuikRead Instrumentet eller streckkodsläsaren
behöver en ny kongurering göras för att återfå tidigare inställningar.
Mätning i QuikLink läge med streckkodsläsare
Dessa instruktioner beskriver det läge i vilket mätresultat sänds till en LIS/HIS
dator. Samma procedur gäller också i läget då resultat sänds till en skrivare.
UPPSTART
•Sätt igång QuikRead Instrumentet.
• Kontrollera att displayen visar:
Inställd för QuikLink
användar-ID pa eller Inställd för QuikLink
användar-ID av
•Använd ett magnetkort för att välja analyt. Displayen kommer nu omväx-
lande visa:
Klar att använda
<test> lot xxxx och Klar att använda
Läs patient-ID
Notera att magnetkortet endast kan läsas när displayen visar Läs kortet
eller Klar att använda.
ANVÄNDNING AV STRECKKODSLÄSARE
Läs den medskickade bruksanvisningen för streckkodsläsaren för detalje-
rade användarinstruktioner. Använd streckkodsläsarens kabel för att ansluta
streckkodsläsaren till QuikRead Instrumentet. Kabeln ska anslutas till den
runda kontakten som nns på baksidan av QuikRead Instrumentet. Se Figur
2 för anslutningarna.
För att läsa en streckkod, rikta läsaren över en streckkod och tryck in av-
tryckaren som nns i handtaget. Avläsningen utförs längs mitten av det ljusfält
som avges från avläsningsfönstret. Ljusfältet måste täcka hela streckkoden
horisontellt. Rikta inte ljusfältet direkt mot ögonen.
Tillverkargarantin för streckkodsläsaren täcker material och tillverkningsfel i
5 år från leveransdatum, förutsatt att produkten används på ett riktigt sätt under
normala förhållanden. I händelse av att streckkodsläsaren inte skulle fungera
kontakta din lokala återförsäljare för information om auktoriserad service.

17
Figur 2
Anslutning av streckkodsläsare
ASeriell kabel
BKontakt till streckkodsläsaren
CStreckkodsläsarens anslutningskabel
DStrömadapter
MÄTNINGSPROCEDUR
Att läsa patient-ID
1. Placera streckkodsläsaren över streckkoden på remissen eller provröret
och tryck in knappen i handtaget. Vänta på en ljudsignal.
Om avläsningen av streckkoden misslyckas upprepade gånger, se Fel-
sökning.
2. Displayen visar patient-ID. Försäkra dig om att det överensstämmer med
patient-ID på remissen.
Klar att använda <test>
Patient <xxxxxxxx>
Läs användar-ID
(Valbar inställning. Om den inte är påslagen gå till steg 6.)
3. Om användar-ID är påslaget visar displayen:
Klar att använda <test>
Läs användar-ID
4. Läs användar-ID med streckkodsläsaren. Displayen visar användar-ID.
Försäkra dig om att det överensstämmer med läst användar-ID.
Användar-ID
<oooooooo>
5. Displayen visar sen:
Klar att använda <test>
Patient <xxxxxxxx>
Mätning
● Med inställningen Godkänn analyssvar innan sändning aktiverad
gå vidare till steg 6
● Med inställningen Godkänn analyssvar innan sändning avaktiverad
gå vidare till steg 14
Mätning med inställningen Godkänn analyssvar innan sänd-
ning aktiverad
6. Utför mätningen genom att följa användarinstruktionerna för QuikRead
Instrumentet, kitinlagan och texten i diplayen.
7. När mätningen är slutförd visar displayen texten:
Patient <xxxxxxxx>
Resultat <zz> <uuu> och Acceptera eller
förkasta resultat
där <xxxxxxxx>är patient-ID, <zz> är resultatet, och <uuu> är analyten.
A
B
D
C

18
Acceptera eller förkasta resultat
8. För att acceptera ett resultat, läs streckkoden OK/ACCEPT på streck-
kodstavlan för QuikLink (streckkoderna nns också på sidan 2).
För att förkasta en mätning, läs streckkoden CANCEL/REJECT på
streckkodstavlan för QuikLink.
9. När resultatet accepteras visar displayen:
Analys godkänd
Ta bort kyvett
Om resultatet förkastas visar displayen:
Analys ej godkänd
Ta bort kyvett
10. Lyft upp kyvetten och invänta att QuikRead Instrumentet utför en själv-
kontroll.
Sändning av resultat till LIS/HIS dator
11. Efter en lyckad självkontroll sänds automatiskt det accepterade resul-
tatet till LIS/HIS datorn. Detta kan ta några sekunder. Under tiden visar
displayen:
Sänder resultat...
Om resultatet förkastats sänds det inte till LIS/HIS datorn. Om självkon-
trollen misslyckas sänds inte resultatet och ett felmeddelande visas i
displayen. Radera resultatet.
12. När överföringen av resultatet lyckats visar displayen:
Lyckar sändning av
analysresultat
13. Om QuikRead Instrumentet inte kan överföra resultatet till LIS/HIS datorn
visar displayen texten:
Misslyckar sändning!
Skriv ut svaret? och Patient <xxxxxxxx>
Resultat <zz> <uuu>
Resultatet kan dokumenteras manuellt eller sändas till en skrivare. För att
sända resultatet till en skrivare ska skrivaren först anslutas till QuikRead
Instrumentet och OK/ACCEPT läsas på QuikLink streckstreckkodstavlan.
Se Felsökning.
Om resultatet dokumenteras manuellt, måste felmeddelandet erkännas
genom att CANCEL/REJECT läses på QuikLink streckkodstavla.
I båda fallen raderas resultatet från instrumentets interna minne och
QuikRead är klar för nästa mätning.

19
Mätning med inställningen Godkänn analyssvar innan sänd-
ning avaktiverad
14. Utför mätningen genom att följa användarinstruktionerna för QuikRead
Instrumentet, kitinlagan och texten i diplayen.
15. När mätningen är avslutad visar displayen omväxlande:
Patient <xxxxxxxx>
Resultat <zz> <uuu> och Ta bort kyvetten för att
starta LIS/HIS sändning
där <xx> är löpnummer, <yyyyyy> är aktuellt datum, <zz> är resultatet
och <uuu> är analyten.
16. Ta upp kyvetten och invänta att QuikRead Instrumentet utför en själv-
kontroll.
Sändning av resultat till LIS/HIS dator
17. Efter en lyckad självkontroll sänds automatiskt det accepterade resul-
tatet till LIS/HIS datorn. Detta kan ta några sekunder. Under tiden visar
displayen:
Sänder resultat...
Om resultatet förkastats sänds det inte till LIS/HIS datorn. Om själv-
kontrollen misslyckas sänds inte resultatet och ett felmeddelande visas
i displayen. Radera resultatet.
18. När överföringen av resultatet lyckats visar displayen omväxlande:
Klar att använda
<test> lot xxx och Klar att använda
Läs patient-ID
Instrumentet är klart för nästä mätning.
Om QuikRead Instrumentet inte kan överföra resultat till LIS/HIS datorn
visar displayen omväxlande texten:
Misslyckad sändning!
Skriv ut svaret? och Patient <xxxxxxxx>
Resultat <zz> <uuu>
Resultatet kan dokumenteras manuellt eller sändas till en skrivare. För att
sända resultatet till en skrivare ska skrivaren först anslutas till QuikRead
Instrumentet och OK/ACCEPT läsas på QuikLink streckstreckkodstavlan.
Se Felsökning.
Om resultatet dokumenteras manuellt, måste felmeddelandet erkännas
genom att CANCEL/REJECT läses på QuikLink streckkodstavla.
I båda fallen raderas resultatet från instrumentets interna minne och
QuikRead är klar för nästa mätning.
Kort instruktion för användning av
QuikLink läge med streckkodsläsare
1.
2.
3.
4.
Läs patient-ID.
Läs användar-ID (valbart).
Utför mätningen.
Acceptera resultatet (valbart).

20
Mätning i tillfälligt NON-LIS läge
Försäkra dig om att QuikRead Instrumentet är i inaktivt läge, dvs att displayen
omväxlande visar:
Klar att använda
<test> lot xxx och Klar att använda
Läs patient-ID
INSTÄLLNING AV INSTRUMENTET
FÖR TILLFÄLLIGT NON-LIS LÄGE
Läs Temporary NON-LIS mode streckkoden på QuikLink streckkodstavla.
Displayen visar omväxlande:
Klar att använda
<test> lot och Klar att använda
Ej inställd för LIS
För att avsluta Tillfälligt NON-LIS läge utan att analysera något prov, läs
Exit temporary NON-LIS mode streckkoden på QuikLink streckkodstavla.
MÄTNING
1. Utför mätningen genom att följa instruktionerna för instrumentet, kitinlagan
och texten i displayen.
2. Dokumentera resultatet innan kyvetten tas upp från mätbrunnen.
3. Efter en lyckad analys återvänder QuikRead Instrumentet automatiskt till
QuikLink läge med streckkodsläsare. Om en analys misslyckas (test
återkallat), återvänder QuikRead Instrumentet till början av Tillfälligt
NON-LIS läge.
Mätning i QuikLink läge utan streckkodsläsare
UPPSTART
•Sätt igång QuikRead Instrumentet.
• Försäkra dig om att displayen visar:
Inställd för QuikLink
streckkodsavläsare av
• Använd ett magnetkort för att välja analyt. Displayen visar:
Klar att använda
<test> lot xxxx
Notera att magnetkortet bara kan läsas när displayen visar Läs kortet
eller Klar att använda.
Table of contents
Languages: