manuals.online logo
Brands
  1. Home
  2. •
  3. Brands
  4. •
  5. R/Evolution
  6. •
  7. Transducer
  8. •
  9. R/Evolution Multiducer SSP6 User manual

R/Evolution Multiducer SSP6 User manual

SSP6
Multiducer
®
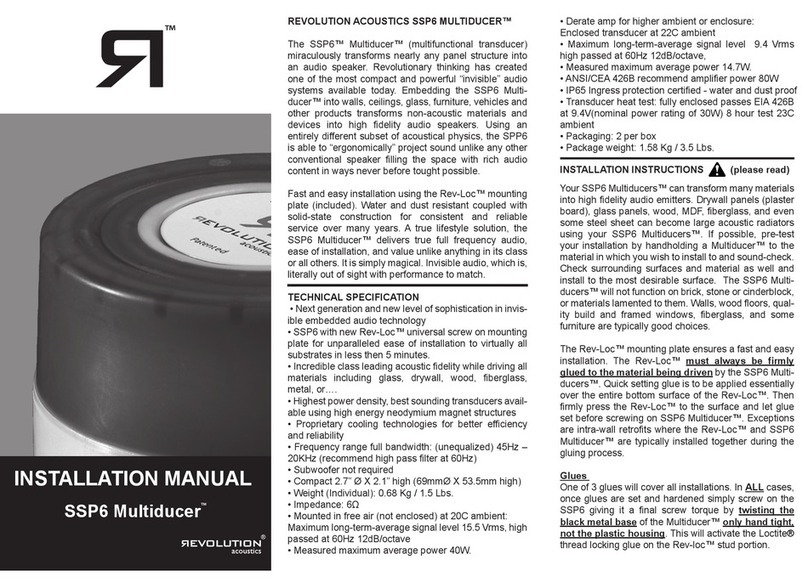
REVOLUTION ACOUSTICS SSP6 MULTIDUCER™
The SSP6 Multiducer™ (multifunctional transducer)
miraculously transforms nearly any panel structure into an
audio speaker. Revolutionary thinking has created one of
the most compact and powerful “invisible” audio systems
available today. Embedding the SSP6 Multiducer™ into
walls, ceilings, glass, furniture, vehicles and other
products transforms non-acoustic materials and devices
into high fidelity audio speakers. Using an entirely different
subset of acoustical physics, the SPP6 is able to “ergo-
nomically” project sound unlike any other conventional
speaker filling the space with rich audio content in ways
never before tought possible.
Fast and easy installation using the RevLoc™ mounting
plate (included). Water and dust resistant coupled with
solid-state construction for consistent and reliable service
over many years. A true lifestyle solution, the SSP6 Multi-
ducer™ delivers true full frequency audio, ease of installa-
tion, and value unlike anything in its class or all others. It is
simply magical. Invisible audio, which is, literally out of
sight with performance to match.
TECHNICAL SPECIFICATION
• Next generation and new level of sophistication patented
invisible embedded audio technology.
• SSP6 with new RevLoc™ universal screw on mounting
plate for unparalleled ease of installation to virtually all
substrates in less then 3 minutes.
• Incredible class leading acoustic fidelity while driving
materials including glass, drywall, wood, fiberglass, metal,
or….
• Highest power density, best sounding transducers avail-
able using high energy magnet structures.
• Proprietary cooling technologies for better efficiency and
reliability.
• Frequency range full bandwidth: (unequalized) 45Hz –
20KHz.
• 70V compatible with Revolution Acoustics RA-T1 multi-
tap transformer.
• Revolution Acoustics part RA-HPL to be used with SSP6
if third party amplifiers are used greater than 150W/ch.
• Subwoofer not required for general purpose audio but
recommended for home theatre installations.
• Power handling up to 400W (instantaneous peak).
• Compact Ø2.7” X 2.29” high - RevLoc™ included
(Ø69mm X 58.1mm high).
• RevLoc™ Mounting Plate Ø4.0” (Ø102mm).
• Weight (Individual): 0.72 Kg / 1.6 Lbs.
• Impedance: 6Ω.
• Recommended amplifier per channel wattage: 60W -
150W.
• Max. Continuous Thermal Power: 15W totally
enclosed, 24W unenclosed.
• Transducer Accelerated Life test: fully enclosed passes
EIA 426B at 9.4V (recommended amplifier power rating
of 30W) 8 hour test 23C ambient.
• Transducer Accelerated Life test: unenclosed passes
EIA 426B at 12.0V (recommended amplifier power rating
of 48W) 8 hour test 23C ambient.
• UL 2043 fire and smoke certified for return air plenums.
• IP65 Ingress protection certified - water and dust proof.
• Packaging: 2 per box.
• Package weight: 1.65 Kg / 3.65 Lbs.
INSTALLATION INSTRUCTIONS (please read)
Your SSP6 Multiducers™ can transform many materials
into high fidelity audio emitters. Drywall panels (plaster
board), glass panels, wood, MDF, fiberglass, and even
some steel sheet can become large acoustic radiators
using your SSP6 Multiducers™. If possible, pre-test
your installation by handholding a Multiducer™ to the
material in which you wish to install to and sound-check.
Check surrounding surfaces and material as well and
install to the most desirable surface.
The SSP6 Multiducers™ will not function on brick, stone
or cinderblock, or materials lamented to them. Walls,
wood floors, quality build and framed windows,
fiberglass, and some furniture are typically good
choices.
The RevLoc™ mounting plate ensures a fast and easy
installation. The RevLoc™ must always be firmly
glued to the material being driven by the SSP6 Multi-
ducers™. Quick setting glue is to be applied essentially
over the entire bottom surface of the RevLoc™. Then
firmly press the RevLoc™ to the surface and let glue set
before screwing on SSP6 Multiducer™. Exceptions are
intra-wall retrofits where the RevLoc™ and SSP6 Multi-
ducer™ are typically installed together during the gluing
process.
Adhesives
One of 3 glues will cover all installations. In ALL cases,
once glues are set and hardened simply screw on the
SSP6 giving it a final screw torque by twisting the black
metal base of the Multiducer™ only hand tight, not
the plastic housing. This will activate the Loctite®
thread locking glue on the Revoc™ stud portion.
INSTALLATION GUIDE
Please Read
GLASS OR OTHER SMOOTH NON-
POROUS SURFACES
UHB Tape (ultra high bond): Make sure the
RevLoc™ is clean and dry. A1) Clean with alcohol,
A2) Apply UHB tape in the middle of he RevLoc™
and B) burnish it onto the RevLoc™ from the center
out so as not to entrap any air bubbles. Ensure
window surface is clean. Rubbing alcohol is a good
cleaning agent prior to installation. C) Screw
RevLoc™ onto the SSP6 noting cable down orien-
tation (make small pencil mark to top of RevLoc™),
so as to ensure the speaker wire faces down, and
then unscrew SSP6 Multiducer™. Peel tape back-
ing off and firmly press RevLoc™ onto glass with
the pencil mark up as contact pressure activates
the adhesive. Allow glue to cure ½ hour if able and
then screw on the SSP6 Multiducer™ as stated in
“Glues” on the previous page. d) Space the SSP6
Multiducer™ at lease 8” (20cm) from the glass
frame.
ROUGH SURFACES
5 Minute Epoxy glue or Methacrylate. Fiberglass
and rougher finished wood and the like surfaces
should be clean, dry and dust free. Clean RevLoc™
with alcohol (supplied). If applying to rough fiber-
glass, sand high points down slightly. Apply glue to
entire bottom surface of RevLoc™ mounting plate as
well as the surface to be glued to in a thin layer.
Apply to surface and twist back and forth very slightly
to squeeze out excess glue and seat the RevLoc™
well. Tape in place, let glue set and then apply the
SSP6 Multiducer™ as stated in “Glues” on the previ-
ous page.
Speaker
Cable
Mark
A
B
C
D
8” (20cm) min
8” (20cm) min
PATENTED and numerous patents pending
© REVOLUTION ACOUSTICS LTD. All rights reserved
Revolution Acoustics®, SSP6™, Multiducer™ as well as all
graphical trademarks herein are property of Revolution
Acoustics Limited.
Additonnal information, including warranty see:
revolutionacoustics.com
®
Centered
Plaster drywall
cavity
DRYWALL (PLASTERBOARD)
Super Glue (cyanoacrylate). Choose a quality
brand cyanoacrylate (super glue) which is a liquid
formulation and not a gel formulation. Larger bottles
of glue will allow a few plates to be bonded. If insert-
ing the SSP6 into an opening in a wall or ceiling
cavity where access is difficult, first screw the SSP6
multiducer to the RevLoc™ mounting plate as stated
in “Glues” on the previous page (please read), then
apply the superglue in a tight zigzag pattern no
further than 1⁄4” (6mm) spacing covering the entire
surface of the base of the RevLoc™ plate. Position,
and immediately press the RevLoc™ firmly on to a
dust free clean and dry surface inner paper surface
of the drywall. Hold for at least 30 seconds until glue
starts to set. If there is direct access to the mounting
plate, then the plate may be bonded first and then
the SSP6 transducer can be applied.
Conforms to UL STD 2043
2
1
2)Apply glue
to entire
surface
1)Clean with
alcohol

Other R/Evolution Transducer manuals

R/Evolution RV16 User manual

R/Evolution

R/Evolution RV16 User manual

R/Evolution Multiducer SSP6 User manual

R/Evolution

R/Evolution Multiducer SSP6 User manual

Popular Transducer manuals by other brands

FuehlerSysteme FS3060 operating manual

FuehlerSysteme

FuehlerSysteme FS3060 operating manual

S+S Regeltechnik THERMASGARD ALTM Operating Instructions, Mounting & Installation

S+S Regeltechnik

S+S Regeltechnik THERMASGARD ALTM Operating Instructions, Mounting & Installation

MKS 107B manual

MKS

MKS 107B manual

Balluff BTL7-A501 Series Condensed guide

Balluff

Balluff BTL7-A501 Series Condensed guide

Panametrics C-ET installation guide

Panametrics

Panametrics C-ET installation guide

LEI accessories PD-N installation manual

LEI accessories

LEI accessories PD-N installation manual

MKS 901P Operation and installation manual

MKS

MKS 901P Operation and installation manual

Balluff BTL7-V50T-M-P-C003 Series user guide

Balluff

Balluff BTL7-V50T-M-P-C003 Series user guide

Raymarine RV-100 RealVision 3D installation instructions

Raymarine

Raymarine RV-100 RealVision 3D installation instructions

Automationdirect.com AcuAMP ACT Series installation instructions

Automationdirect.com

Automationdirect.com AcuAMP ACT Series installation instructions

Lumel P11P Service manual

Lumel

Lumel P11P Service manual

Airmar B45 Owner's guide & installation instructions

Airmar

Airmar B45 Owner's guide & installation instructions

HBM U15 Series Mounting instructions

HBM

HBM U15 Series Mounting instructions

Setra Systems 209 installation guide

Setra Systems

Setra Systems 209 installation guide

Milltronics XPS-10 instruction manual

Milltronics

Milltronics XPS-10 instruction manual

American Printing House for the Blind Braille Plus 18 user guide

American Printing House for the Blind

American Printing House for the Blind Braille Plus 18 user guide

Axiometrix Solutions imc WFT-Cx manual

Axiometrix Solutions

Axiometrix Solutions imc WFT-Cx manual

Balluff BTL5-H1 M Series Configuration manual

Balluff

Balluff BTL5-H1 M Series Configuration manual

manuals.online logo
manuals.online logoBrands
  • About & Mission
  • Contact us
  • Privacy Policy
  • Terms and Conditions

Copyright 2025 Manuals.Online. All Rights Reserved.