RAK CREATOR pro User manual

Development Environment for MAC OS
1
CREATOR pro Development Environment for MAC OS
1. Required Materials
CREATOR pro board
Micro USB cable
2. Introduction
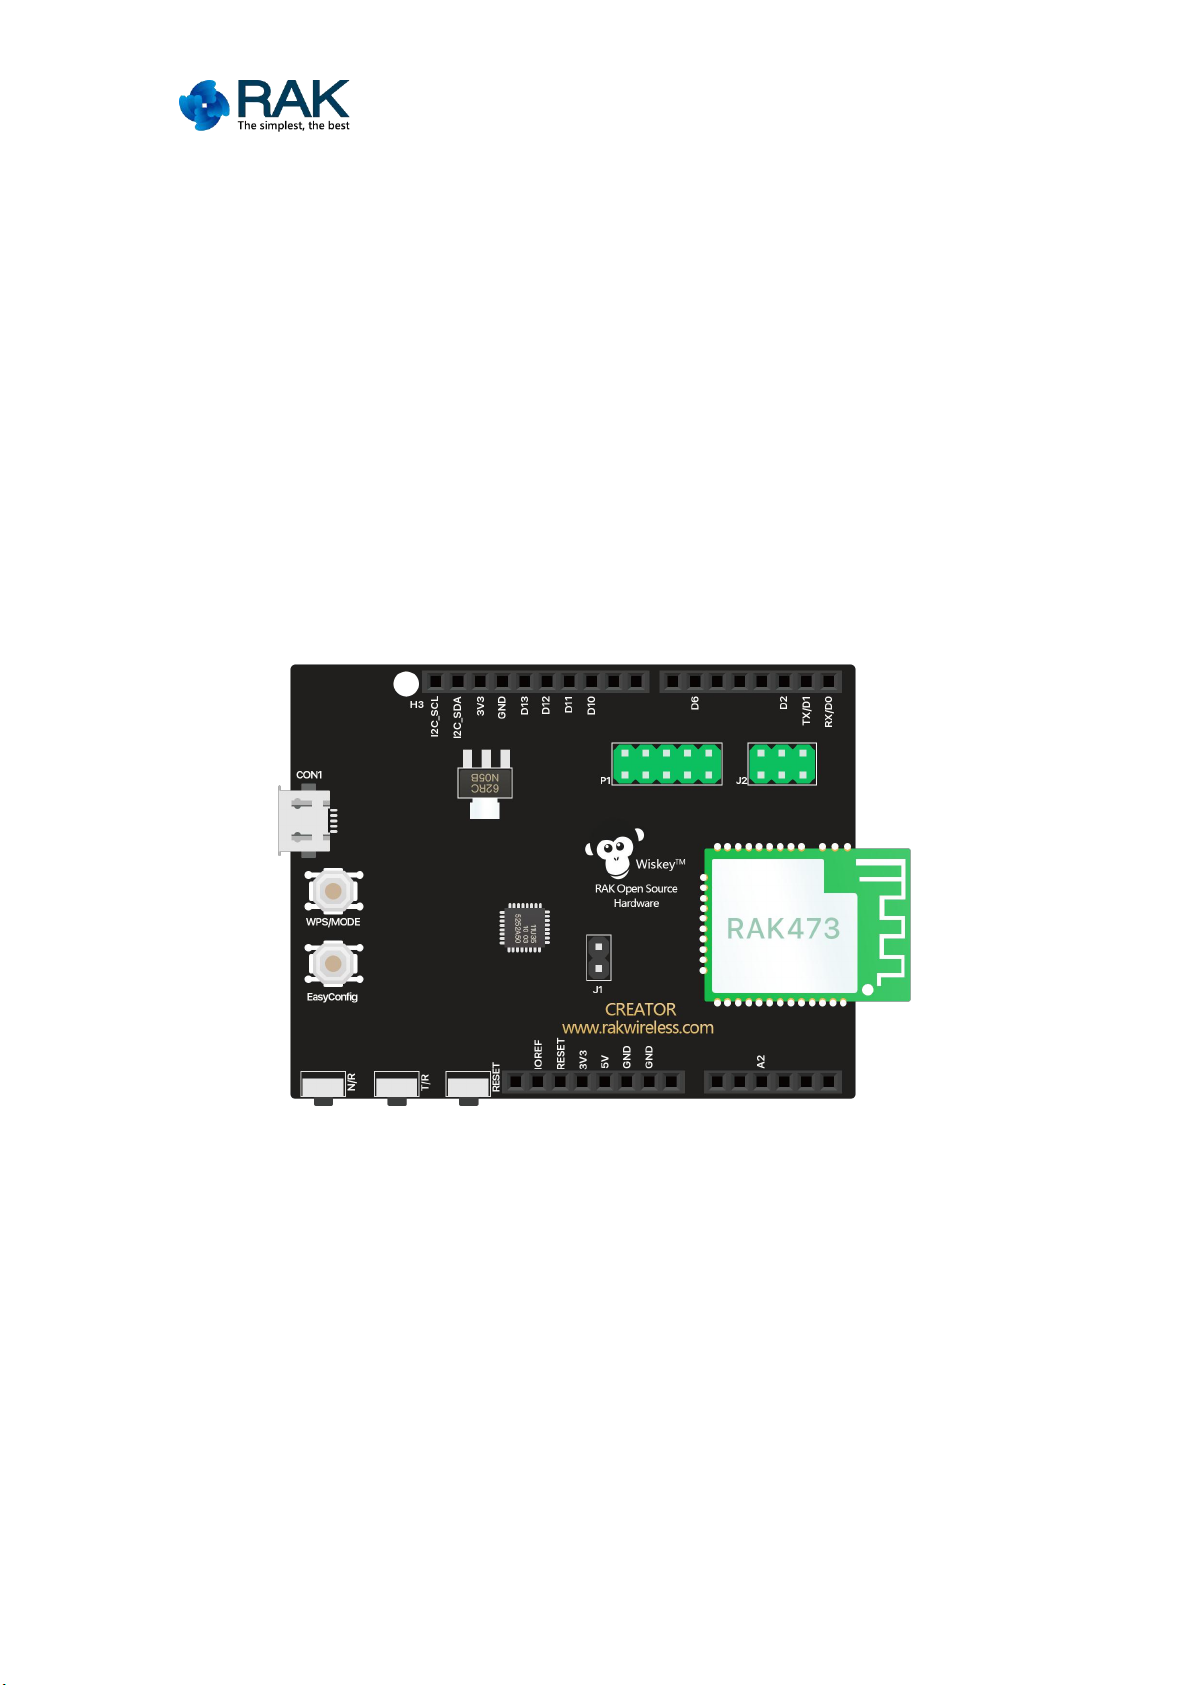
CREATOR pro is a programmable platform for developing all kind of IoT
applications. CREATOR pro is equipped with various peripheral interfaces, including
Wi-Fi, GPIO, I2C, UART, PWM and ADC. With these interfaces, CREATOR pro can
connect with electronic components such as LED, switches, manometer, hygrometer,
PM2.5 dust sensors and etc. The collected data can be uploaded via Wi-Fi, and be
utilized by applications on mobile devices to realize IoT implementation.
CREATOR pro and Arduino Uno have similar size, and the pins on CREATOR pro
are compatible with Arduino Uno. CREATOR pro uses micro USB connector to supply
power, which is common in many smart devices. CREATOR pro currently supports
Windows XP/7/8/8.1/10 32 and 64 bits and MAC OS operating systems. In this
example, please use Arduino IDE with version 1.6.7 or later.
If you are using a Windows system, please refer to the CREATOR pro Development environment
documentation to start your development.

Development Environment for MAC OS
2
3.Development environment
3.1. Set up Arduino IDE
From the version 1.6.5, Arduino IDE supports third-party hardware. Therefore, we
can use Arduino IDE to develop applications on CREATOR pro, and many examples of
Arduino can run on CREATOR pro too. Arduino IDE can be downloaded in the Arduino
website: https://www.arduino.cc/en/Main/Software
When the installation is finished, run the Arduino IDE. To set up RAK CREATOR in
Arduino IDE, select the "Arduino" > "Preferences"

Development Environment for MAC OS
3
Paste the following URL into "Additional Boards Manager URLs" field:
https://github.com/RAKWireless/CREATOR-Arduino-SDK/raw/master/release/package_rakwireless.com_creator_index.json
Next, go to "Tools" > "Board" > "Boards Manager"

Development Environment for MAC OS
4
The "Boards Manager" requires about 10~20 seconds to refresh all hardware files
(if the network is in poor condition, it may take longer). Every time the new hardware
is connected, we need to reopen the Board Manager. So, we close the Boards
Manager, and then open it again. Type "RAK CREATOR Boards" in the filter, click
"Install", then the Arduino IDE starts to download required files for CREATOR pro.
Finally, select "Tools" -> "Board" -> "CREATOR RTL8711A”
(NOTE:RTL8195 and RTL8711 are compatible)

Development Environment for MAC OS
5
3.2. Serial Driver Installation
After installing the Arduino IDE, the serial port driver is automatically installed. If
your Arduino IDE tool does not recognize the serial port, please search Arduino
environment MAC serial port installation, there will be a solution on the network.
Connect CREATOR pro to the computer with micro USB cable and check the power
LED(red) is on, LED7 & LED8 alternately flash.
Execute the Arduino IDE and select the corresponding serial port. Ex)
/dev/cu.usbmodem1412

Development Environment for MAC OS
6
4. First Example
4.1. Compile & Upload
Arduino IDE provides many built-in examples, which can be compiled, uploaded
and run directly on the boards. Here, we take the "Blink" example as the first try.
Open "File" -> "Examples" -> "01.Basics" -> "Blink"
Arduino IDE opens a new window with the complete sample code. Next, we
compile the sample code directly, click "Sketch" -> "Verify/Compile"

Development Environment for MAC OS
7
Afterwards, we will upload the compiled code to CREATOR pro board. Please make
sure CREATOR pro is connected to your computer, then click "Sketch" -> "Upload".
Again, during the uploading procedure the IDE prints messages. Uploading
procedure requires respectively longer time (about 30 seconds to 1 minute). When
upload completed, the "Done uploading" message is displayed.

Development Environment for MAC OS
8
If you are in the process of uploading the program firmware, you may encounter
the prompt "Disk Not Ejected Properly". In this case, press the N/R button on the
development board, and then re-upload the firmware once. Remember to press the
N/R button each time you upload the firmware.
4.2. Run the Blink example
In each example, Arduino not only provides sample code, but also detailed
documentation, including wiring diagram, sample code explanation and technical
details. These examples can be directly used on CREATOR pro. For more information,
refer to this. https://www.arduino.cc/en/Tutorial/Blink
In short, this example makes LED blinks, and it uses GPIO pin 13. Below is the pin
diagram of CREATOR pro board.

Development Environment for MAC OS
9
Connect the LED and resistance as the following figure:
NOTE: In an LED, the longer pin is the positive pole, and shorter pin is the negative
pole. So we connect the longer pin to D13, and connect the shorter pin to GND.
Finally, press the reset button, and you can see the LED blinking.
* If you encounter any problem, Please visit technical forum http://support.rakwireless.com/
* To test Wi-Fi related examples, select one of sketch under “File ->Examples->AmebaWiFi”

Development Environment for MAC OS
10
5.Version
Version
Author
Date
Content modification
V1.0
Chace.cao
2017/06/15
Create document
V1.1
Chace.cao
2017/08/17
Update the library
Other manuals for CREATOR pro
1
Table of contents
Other RAK Motherboard manuals