Ralph Christian VX9J User manual

WATCH USER INSTRUCTIONS
&
WARRANTY

THREEHANDS
HOURHAND
SECONDHAND
MINUTE HAND
SETTING THE TIME
Pull out crown to first position. Rotate the crown to adjust. Once set, push the
crown back to the starting position.
CROWN - FIRST POSITION
WATCH MOVEMENT: THREE HANDS
FEATURES
Hour, minute and second hands, date
SETTING THE TIME
Pull the crown out to position 2. Rotate the crown to adjust the time. Once set,
push the crown back to starting position.
SETTING THE DATE
Pull the crown out to position 1. Rotate the crown clockwise to change the date.
Once set, push the crown back to starting position.
WATCH MOVEMENT: THREE HANDS WITH DATE
12
HOUR HAND
SECOND HAND
MINUTE HAND
7
DATE WHEEL
1 2

FEATURES
Hour, minute and second hands, Day, date and 24-hour indicators
SETTING THE TIME
Pull out crown to first position. Rotate the crown to adjust. Once set, push the
crown back to the starting position.
SETTING THE DATE
Pull out crown to first position. Press button “A” to advance the day. Press button
“B” to advance the date.
WATCH MOVEMENT: VX9J
ADVANCED SETTING TECHNIQUE
1. The 24-hour hand moves correspondingly with the hour hand.
2. When setting the hour hand, check that the 24-hour hand is correctly set.
3. When setting the minute hand, advance it 4 to 5 minutes ahead of the desired
time and then turn it back to the exact time.
NOTES
1. Do not set the date and the day hands between 9:00 p.m. and 4:00 a.m.
Otherwise, they may not move properly.
2. While setting the date and the day hands, check that they move properly in
one-day increments.
3. It is necessary to adjust the date on the first day after a 30-day month and
February.
12
24
24HR HAND
DAY HAND
31
10
SUN
WED
THU
20
DATE HAND
BUTTON A
BUTTON B
1
3 4

FEATURES:
Hour, minute and second hands, Date, 24HR regulator, 30MIN / 60SEC stopwatch
WATCH MOVEMENT: VD37 ADJUSTING THE DUAL TIME OF 24 HOUR REGULATOR,
DUAL TIME OF 12 HOUR REGULATOR AND
DUAL TIME OF 60 MINUTE REGULATOR HANDS POSITION
Before setting the time, check that the dual time of 24 hour regulator, dual time of 12
hour regulator and dual time of 60 minute regulator hands are in the "0"(12o'clock)
position. If either of the dual time of 24 hour regulator, dual time of 12 hour regulator or
dual time of 60 minute regulator hands are not in the "0" position, reset them following
the procedure below.
TIME SETTING
1.Pull out the crown to the second position when the second hand is at the 12 o’clock
position.
2.Turn the crown to set the hour and minute hands (check that AM/PM is set correctly).
3.Push the crown back normal position.
Note: The moment the date changes is midnight.
TIME SETTING... DUAL TIME OF 24 HOUR REGULATOR,
DUAL TIME OF 12 HOUR REGULATOR, AND DUAL TIME OF 60 MINUTE
REGULATOR HANDS
1.Pull out the crown to the second position when the second hand is at the 12 o’clock
position.
2.To adjust the time by pressing the buttons “A” or “B”. By pressing button “A” the dual
time of 24 hour regulator, dual time of 12 hour regulator, and dual time of 60 minute
regulator hands move counter clockwise. By pressing button B the dual time of 24 hour
regulator, dual time of 12 hour regulator, and dual time of 60 minute regulator hands
move clockwise. Press and hold the button, possible to fast-forward modification.
3.Push the crown back in to the normal position.
7
12
24
60
30
DUAL TIME 24-HOUR HAND
3
6
DUAL TIME 60 MINUTE HAND
9
12
1 2
BUTTON A
BUTTON B
DATE WHEEL
5 6

SETTING THE TIME
1. Pull the crown out to the first click position.
2. Turn the crown to set hour and minute hands.
3. After the time has been set, push the crown back to the normal position.
SETTING THE DATE
1. Press button A to advance the date until the desired date is set.
WATCH MOVEMENT: ISA 9238 1970
SETTING THE DAY
1. Pull the crown out to the first click position.
2. Turn the crown clockwise and advance the hands through 24 hours. The day will
advance once 04:30AM is reached
3. After the date has been set, push the crown back to the normal position.
SETTING THE SECOND TIME ZONE
1. Press button “B” to advance the hour hand until the desired hour is set
12
24
DAY HAND
1
DATE HAND
31
10
SUN
WED
THU
20
DUAL TIME HAND
BUTTON A
BUTTON B
7 8

SETTING THE TIME
1. Pull the crown out to the 2nd click position.
2. Turn the crown to set hour and minute hands.
3. After the time has been set, push the crown back to the normal position.
SETTING THE DATE
1. Pull the crown out to the 1st click position.
2. Turn the crown clockwise to set the date.
3. After the date has been set, push the crown back to the normal position.
* If the date is set between the hours of around 9:00 PM and 1:00 AM, the date may not change
on the following day.
WATCH MOVEMENT: JS15
USING THE STOPWATCH
This stopwatch is able to measure and display time up to maximum of 30 minutes.
The stopwatch will stop automatically after running continuously for 30 minutes.
1. Press button “A” to start the stopwatch.
2. The stop watch can be started and stopped each time button “A” is pressed.
3. Pressing button “B” resets the stopwatch, and stopwatch minute and second
hands return to their zero positions.
STOPWATCH RESET (INCL. AFTER REPLACING BATTERY)
This procedure should be performed when the stopwatch second & minute hand
does not return to the zero position.
1. Pull the crown out to the 2nd click position.
2. Press the button “A” to set the stopwatch second hand forward. Press the
button “B” to set the stopwatch second hand back.
* The stopwatch minute hand is synchronized with stopwatch second hand.
* The stopwatch second hand can be advanced rapidly by continuously pressing
button “A” or “B”
3. Once the both hands been zeroed, reset the time and return the crown to its
normal position.
30
10
20
60
30
15
45
12
24
7
STOPWATCH MINUTES
STOPWATCH SECONDS
24 HOUR DIAL
1 2
BUTTON A
BUTTON B
9 10

FEATURES
Hour, minute and second hands, date, 24HR regulator, 30MIN/ 60SECS stopwatch
SETTING THE TIME
1. Pull the crown out to the 2nd click position.
2. Turn the crown to set hour and minute hands.
3. After the time has been set, push the crown back to the normal position.
SETTING THE DATE
1. Pull the crown out to the 1st click position.
2. Turn the crown clockwise to set the date.
3. After the date has been set, push the crown back to the normal position.
* If the date is set between the hours of around 9:00 PM and 1:00 AM, the date may not change
on the following day.
WATCH MOVEMENT: JS25
USING THE STOPWATCH
This stopwatch is able to measure and display time up to maximum of 30 minutes.
The stopwatch will stop automatically after running continuously for 30 minutes.
1. Press button "A" to start the stopwatch.
2. The stop watch can be started and stopped each time button "A" is pressed.
3. Pressing button "B" resets the stopwatch, and stopwatch minute and second
hands return to their zero positions.
STOPWATCH RESET (INCL. AFTER REPLACING BATTERY)
This procedure should be performed when the stopwatch second & minute hand
does not return to the zero position.
1. Pull the crown out to the 2nd click position.
2. Press the button “A” to set the stopwatch second hand forward.
Press the button “B” to set the stopwatch second hand back.
* The stopwatch minute hand is synchronized with stopwatch second hand.
* The stopwatch second hand can be advanced rapidly by continuously pressing
button “A” or “B”.
3. Once the both hands been zeroed, reset the time and return the crown to its
normal position.
7
12
24
60
30
15
45
2
DATE WHEEL
30
10
20
BUTTON A
BUTTON B
1
24 HOUR DIAL
STOPWATCH MINUTES
STOPWATCH SECONDS
11 12

FEATURES
Hour, Minute and Second hands, Date, Chronograph minutes / hour / split second
SETTING THE DATE:
Pull the crown out to the first ‘click’ position.
Turn the crown clockwise until the previous days date appears.We will set the
correct date in steps 3 and 4
Note: Do not set the date between 9pm and 10am because the date may not
change properly.
WATCH MOVEMENT: YM92
SETTING THE TIME:
Pull the crown out to the 2nd ‘click’ position when the second hand is at the 12
o’clock position.
Note: When the stopwatch is or has been measuring or is stopped, if the crown
is pulled out to the 2nd ‘click’ position, it will automatically reset the stopwatch
hands to “0“
Turn to set the hour and minute hands.
Turn clockwise to advance the hour and minute hands past 12:00am
Doing so will advance the date to the current date.
Then set the hour and minute hands to the desired time taking AM or PM into
consideration.
RECOMMENDED
When setting the minute hand, advance it 5 minutes ahead of the desired time
and then turn it back to the exact minute.
30
60
12
6
3
9
00
7
REGULAR SECOND HAND
1 2
BUTTON A
BUTTON B
STOPWATCH SECOND HAND
DATE WHEEL
SPLIT SECOND STOPWATCH HAND
STOPWATCH MINUTES & HOURS HANDS
13 14

USING THE STOPWATCH
This stopwatch is able to measure and display time up to maximum of 30 minutes.
The stopwatch will stop automatically after running continuously for 30 minutes.
1. Press button “A” to start the stopwatch.
2. The stop watch can be started and stopped each time button “A” is pressed.
3. Pressing button “B” resets the stopwatch, and stopwatch minute and second
hands return to their zero positions.
STOPWATCH RESET (INCL. AFTER REPLACING BATTERY)
This procedure should be performed when the stopwatch second & minute hand
does not return to the zero position.
1. Pull the crown out to the 2nd click position.
2. Press the button “A” to set the stopwatch second hand forward.
Press the button “B” to set the stopwatch second hand back.
* The stopwatch minute hand is synchronized with stopwatch second hand.
* The stopwatch second hand can be advanced rapidly by continuously pressing
button “A” or “B”.
3. Once the both hands been zeroed, reset the time and return the crown to its
normal position.
BATTERY LIFE INDICATOR
When the battery nears its end, the small second hand moves at two-second
intervals instead of normal one-second intervals.
When this happens, have the battery replaced with a new one as soon as possible.
Note: The watch remains accurate while the small second hand is moving at
two-second intervals.
15 16

INDICATOR
TURN ANTI CLOCKWISE
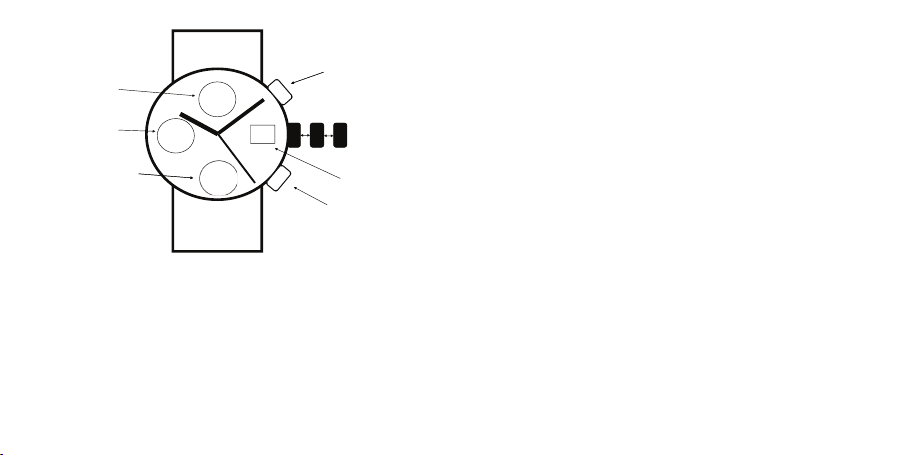
HOW TO USE A ROTATING BEZEL
To use a rotation bezel turn counter-clockwise until the pointer is aligned with the
minute hand, allowing the elapsed time to be read from the bezel. Bezel WILL NOT
turn clockwise as this is a safety feature of the watch.
17
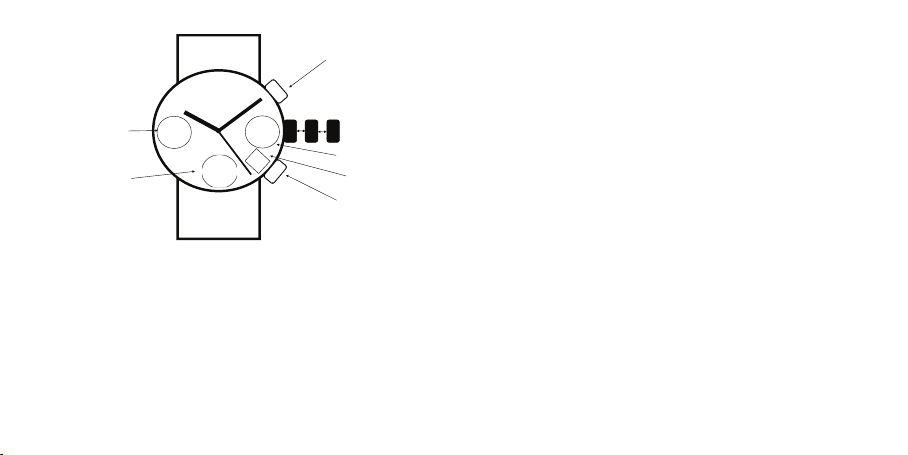
HOW TO USE A TACHYMETER
MEASURING SPEED
To use a tachymeter-equipped watch for measuring speed, start the chronograph at a starting
marker of a known distance. At the next marker, the point on the scale adjacent to the second hand
indicates the speed (in distance between markers per hour) of travel between the two. The typical
tachymeter scale on a watch converts between the number of seconds it takes for an event to
happen and the number of times that event will occur in one hour. The formula used to create this
type of tachymeter scale is:
T = 3600/t
Where T is the tachymeter scale value; t is the time in seconds that it takes for the event to occur;
and 3600 is the number of seconds in an hour.
As a sample calculation, if it takes 35 seconds to travel one mile, then the average speed is 103
miles/hour. On the watch, 35 seconds gives scale value 103. Similarly, if one kilometre takes 35
seconds then the average speed would be 103 km/hour.
Note that the tachymeter scale only calculates the average speed. As a second example, if it takes
20 seconds to travel one unit of distance, then the average speed on the watch used for the
purpose of the picture only is 180 units of distance per hour.
For events that happen either very quickly or slowly, one can adjust the sixty-second tachymeter
scale commonly found on watches. Smaller fractional units can be used for slower objects, like
runners, turtles and snails, but the same X/hour function remains constant. The scale on a watch
is only valid for things that happen in 60 seconds or fewer, and the scale is also difficult to resolve
for events that take fewer than 10 seconds or so to occur. As an example, if it takes 100 seconds to
eat an apple, cutting that number in half allows one to say that it takes 50 seconds to eat half an
apple. Using the tachymeter scale one can calculate that 72 half apples (36 whole apples) could be
eaten in one hour. Some watches, not common, have ‘wraparound’ or ‘scroll’ scales, which extend
the readings to lower speeds, typically 45 units.
18

MEASURING DISTANCE
A tachymeter-equipped watch can be used to measure distance by timing the travel over the
distance while the speed is held constant. The tachymeter scale is rotated to align with the second
hand at the start of the length to be measured. When the second hand reaches the point on the
scale where the speed indicated equals the speed of the vehicle, one unit of distance (miles if
speed is miles per hour, kilometres if kilometres per hour, etc.) has been covered. For example, if
you travel at a constant 80 mph (or at 80 km/h), then the distance travelled while the second hand
sweeps to “80” (45 seconds) will be exactly 1 mile (or 1 kilometre at 80 km/h).
ROTATING SCALE
Some tachymeter scales are on a rotating, indexed bezel.This allows two additional modes of use:
The tachymeter bezel can be aligned with a free running second hand, and, more subtly, can be
used to find the average speed over longer times/distances. Set the rotary bezel index to the po-
sition of the minute hand, note the current mileage/distance. Glance at the position of the minute
hand on the tachymeter scale 60 units of distance later, and average speed will be indicated. A
little mental math allows interim averages, easiest at 1/4 (15 unit) and other integer values. Alter-
natively, instead of using minute hand, align index bezel to the second hand and observe passing
one unit of distance when position of the second hand will then indicate average speed.
19
The deployment buckle is opened by pulling the joined ends of the buckle out-
ward, away from each other, like a butterfly spreading its wings.The deployment
buckle can then be fastened around the wrist.
To adjust for the size of your wrist, there is a hinged clasp must be pulled open,
away from the edge at the end of the watch, to expose the pin which fits into the
holes on the band.
Slide the band through the now open hinged clasp. Once you find the proper
hole on the watch band and push the pin through the hole, you press the top and
bottom portions of the hinged clasp back together. The hinged clasp will snap
firmly into place.
DEPLOYMENT BUCKLE
20

In the hidden butterfly clasp the straps fold over and meet in the middle to close,
therefore the clasp is hidden underneath the bracelet.
To open this clasp, reach under the bracelet band and lift upwards. The band
extends to allow for easy removal. It is usually easiest to open one side of the
band at a time while holding the other side of the bracelet.
HIDDEN CLASP
21
A fold over clasp simply folds out to put the watch on and then folds back in to close the watch
onto your wrist.
It locks with a latch underneath the clasp and is released by a small button(s) that you push in and
the fold over opens up.
FOLD OVER CLASP WITH DOUBLE PUSH BUTTONS
22

A fold over clasp simply folds out to put the watch on and then folds back in to close the watch
onto your wrist.
Once the fold over is closed there is a small safety catch that sits over the closing of the fold over
clasp for extra security when the watch is on your wrist.
FOLD OVER CLASP WITH DOUBLE PUSH BUTTON AND SAFETY
23
MESH STRAP SLIDING CLASP
On the reverse of the strap you should see a succession of ridges. You will also
notice a corresponding ridge on the clasp. Once you have decided where the clasp
should reside on the strap, you need to align these two ridges.
Use a small screwdriver like the ones used to adjust eyeglasses. Gently slide it
under the rotating adjustment plate and lift up. Once the adjustment plate has
been raised, you can slide the clasp up and down the mash band until the proper
fit has been obtained.
Lift up
Back Side
Slide the clasp to the
desired slot to adjust the
length of the band
Push back down to
secure the clasp
ADJUSTING YOUR WATCH BAND
24

ADJUSTING YOUR WATCH BAND
If your watch band is made up of individual links, you can make the band longer or
shorter, by adding or removing links. The links are held in place by pins, and simply
need to be knocked out in order to remove them.The links that can be removed
will have a small, discreet arrow on the back of them.This arrow shows the
direction that the pin needs to be knocked out in order to remove the link.
25
THE RALPH CHRISTIAN 24 MONTH WATCH WARRANTY
WATER TIGHTNESS AND SHOCK RESISTANCE
This watch is protected against shocks when in normal use. However it should not be
subjected to extremely heavy shocks as will occur when it falls on to a hard ground, for
instance.This can damage the watch movement.
The designation ‘3, 5 or 10 ATM Water Resistant’ on the watch means that this watch may
be worn while showering, swimming or washing your car. However, the watch is not for
use when driving.
This watch is covered for 24 months from the date that you receive your watch.
This warranty covers the watch movement against manufacturers’ defects for
24 months from the date of purchase.
Within that period your watch will be repaired free. We cannot accept responsibility for
damage or loss caused in transit.
26

We recommend that any adjustments are made by a reputable jeweler.
Any repairs must be completed by our workshops or your warranty is invalidated
IMPORTANT.
NOT COVERED BY WARRANTY:
Case, glass and band.
Damage cause through accident, misuse, neglect or inexpert repairs.
Any discoloration or wear.
Any loss or damage whilst the watch is not in our possession including transit by any means.
Batteries.
This warranty does not affect your statutory rights.
Validate your warranty at www.ralphchristian.com
www.ralphchristian.com
#ralphchristian
This manual suits for next models
7
Table of contents