Rampage Rampage 6.0 Inch Operating instructions

128-6825
1 of 10
INSTALLATION/
OWNERS
MANUAL
6.0 Inch
TWO-WAY SPEAKERS
Release 6-10-03.

128-6825
2 of 10
REKAEPS
retemaiDlanimoN"6
noitpircseDyaW-2
ecnadepmIsmhO4
esnopseR.qerF )zH( 00081-001
)Bd(ytivitisneS09
gnildnaHrewoPsttaW021
thgieWtengaM.zo7
reteewT"4/31
eziSrefooW"6
noitallatsnI
htpeDgnitnuoM"4/32
SPECIFICATIONS
-2-

128-6825
3 of 10
PRE-INSTALLATION TIPS
Before beginning your installation, read the following tips on proper
placement of speakers and how to obtain the best sound from the
speakers you have selected.
No. 1:
Always try to have the speakers aimed at the listener. Never install
speakersinamannerthatwoulddirectsoundtowardthefloorofthe
car. The only exception to not aiming a speaker would be the rear
deck(packageshelf behind rear seat). The natural curve of the rear
window,combinedwiththewide-dispersion tendencyofbass sounds,
allows woofers to perform exceptionally well in this location. This is
not true for high-frequency sounds which will be absorbed by the
roof liner long before they reach your ears.
No. 2:
High and mid-frequency sounds are very directional (the higher the
frequency,themore directionalitis). Thissimplymeans thatatweeter
or mid-range speaker pointing toward the floor (or roof) will only be
clearlyheardinthe direction at which it is pointed. For this reason, it
is critical that tweeters and mid-range speakers always be installed
so they aim in toward the passenger area and as high in the car as
possible (on top of dash or high up in door panels). Never install
tweeters low in the car.
No. 3:
Select
solid
mounting panels! Always make certain the selected
panel is solid and securely attached to the car. Clipped-in plastic
or fire panels make poor mounting surfaces and tend to vibrate
when used. This is far more critical when installing large power pro-
ducing woofers. Mount your speakers securely! If the speaker
has four mounting holes, use all of them.
No. 4:
Woofersneed“breathing”room! Foraspeakerto perform efficiently,
it must move large amounts of air. If you restrict this airflow (try to fit
alargespeaker in asmallspace or ifyouundercutthe recommended
mountinghole size), youwon’thavean efficientspeaker.Conversely,
the enclosure you mount them in should be somewhat sealed. In
other words, if you mount speakers in door panels, don’t cut any
extra holes in the door.
No. 5:
Tweeters can go in places other speakers can’t. They don’t need
“breathing” room or reinforced mounting panels. All they require is
directional placement. (See tip No. 2.)
No. 6:
Neverletanypartofthe speaker (except the mounting flange) touch
any part of the car. You’ll be amazed what noises a speaker (and
your car) can produce when one touches the other.
No. 7:
Don’tskimponthe quality of the speaker wiring. All Audiovoxspeak-
ers include wiring rated to properly transmit the normal power load
the speaker is designed for.
-3-

128-6825
4 of 10
-4-
INSTALLATION INSTRUCTIONS
CAUTION: Do not mount the speakers in
the following locations:
-
Where the door window glass comes in contact with the
speaker.
- Where the window crank handles or gear assemblies come in
contact with the speaker when rotated.
- Where the speakers come in contact with the trunk springs,
shock towers, or trunk lid.
- Wherethespeakerscome in contact with gas tanks orfuellines.
- Wherethespeakers come in contact withtherearwindowglass,
car wall, etc.
We strongly recommend that you read these instructions first be-
fore you commence speaker installation. If the instructions appear
to be too difficult, or if you lack any of the equipment necessary to
finishthejob, perhaps it would be more prudent to refer the installa-
tion to a qualified, car stereo professional.
Ease of Installation -
Thecarmanufacturer providesat leasttwo,
and possibly four, pre-cut openings in all cars. When only two are
provided,oneis usuallyinthereardeckandtheother isinthefront
dash. Provisions for four speakers usually include two rear deck
openings and two door or dash openings. A car manufacturer picks
speaker locations that simplify installation andfitavailable spaces.
They are not always the best places for sound reproduction.
Using Factory Openings -
Theoneadvantagetousingthefactory
openingsis you avoid having cut sheet metal, asthe holes are pre-
punched. You normally have only to cut away thin plastic or fiber
panels that conceal the openings. Openings near the floor should
be avoided if at all possible.
Be Innovative -
Ifyou’remechanicallyinclined,remove door pan-
els, dash, side panels, etc., and really get into the basic construc-
tion of the car. You’ll be amazed at the vast amount of good-to-
excellent speaker locations a car can conceal.
If You Don’t Wish to Cut Holes -
Consider the hang-on or sur-
face-mounttype of speakers. Just pick a reasonablyflat panel, drill
a few holes, fasten a few screws, and you’re listening to stereo.
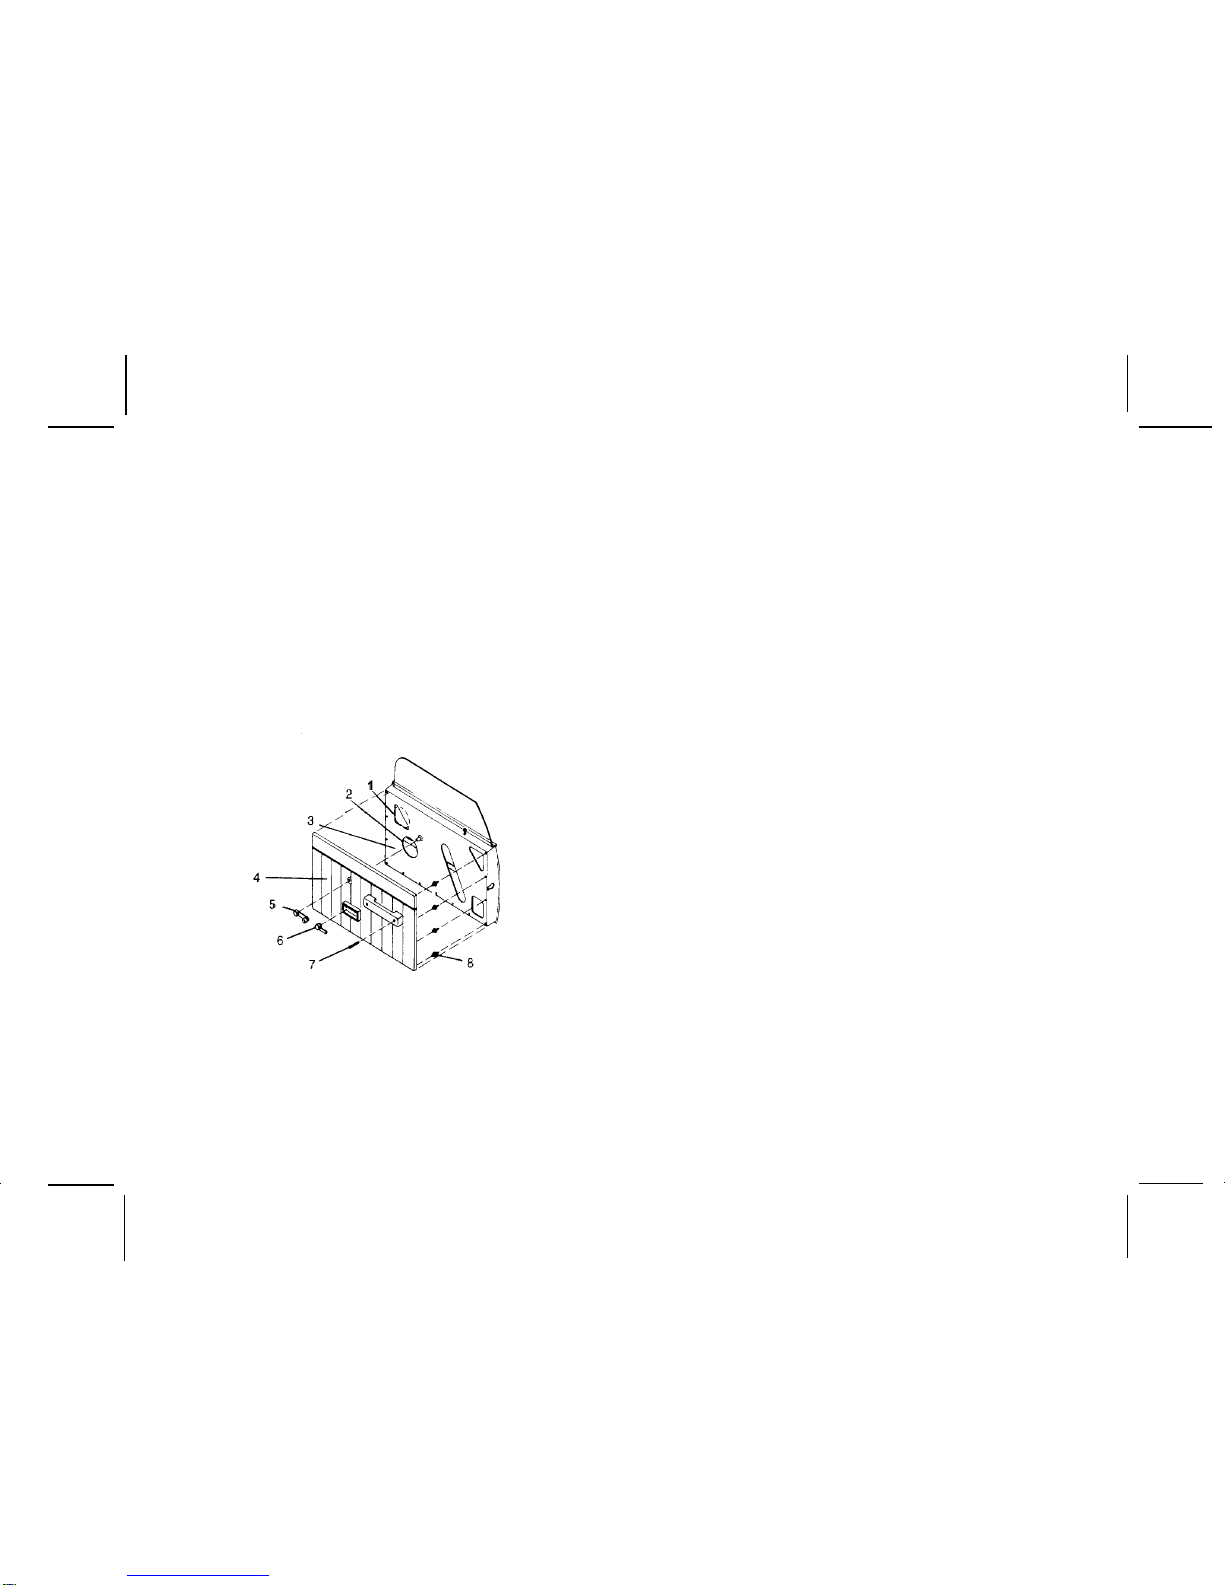
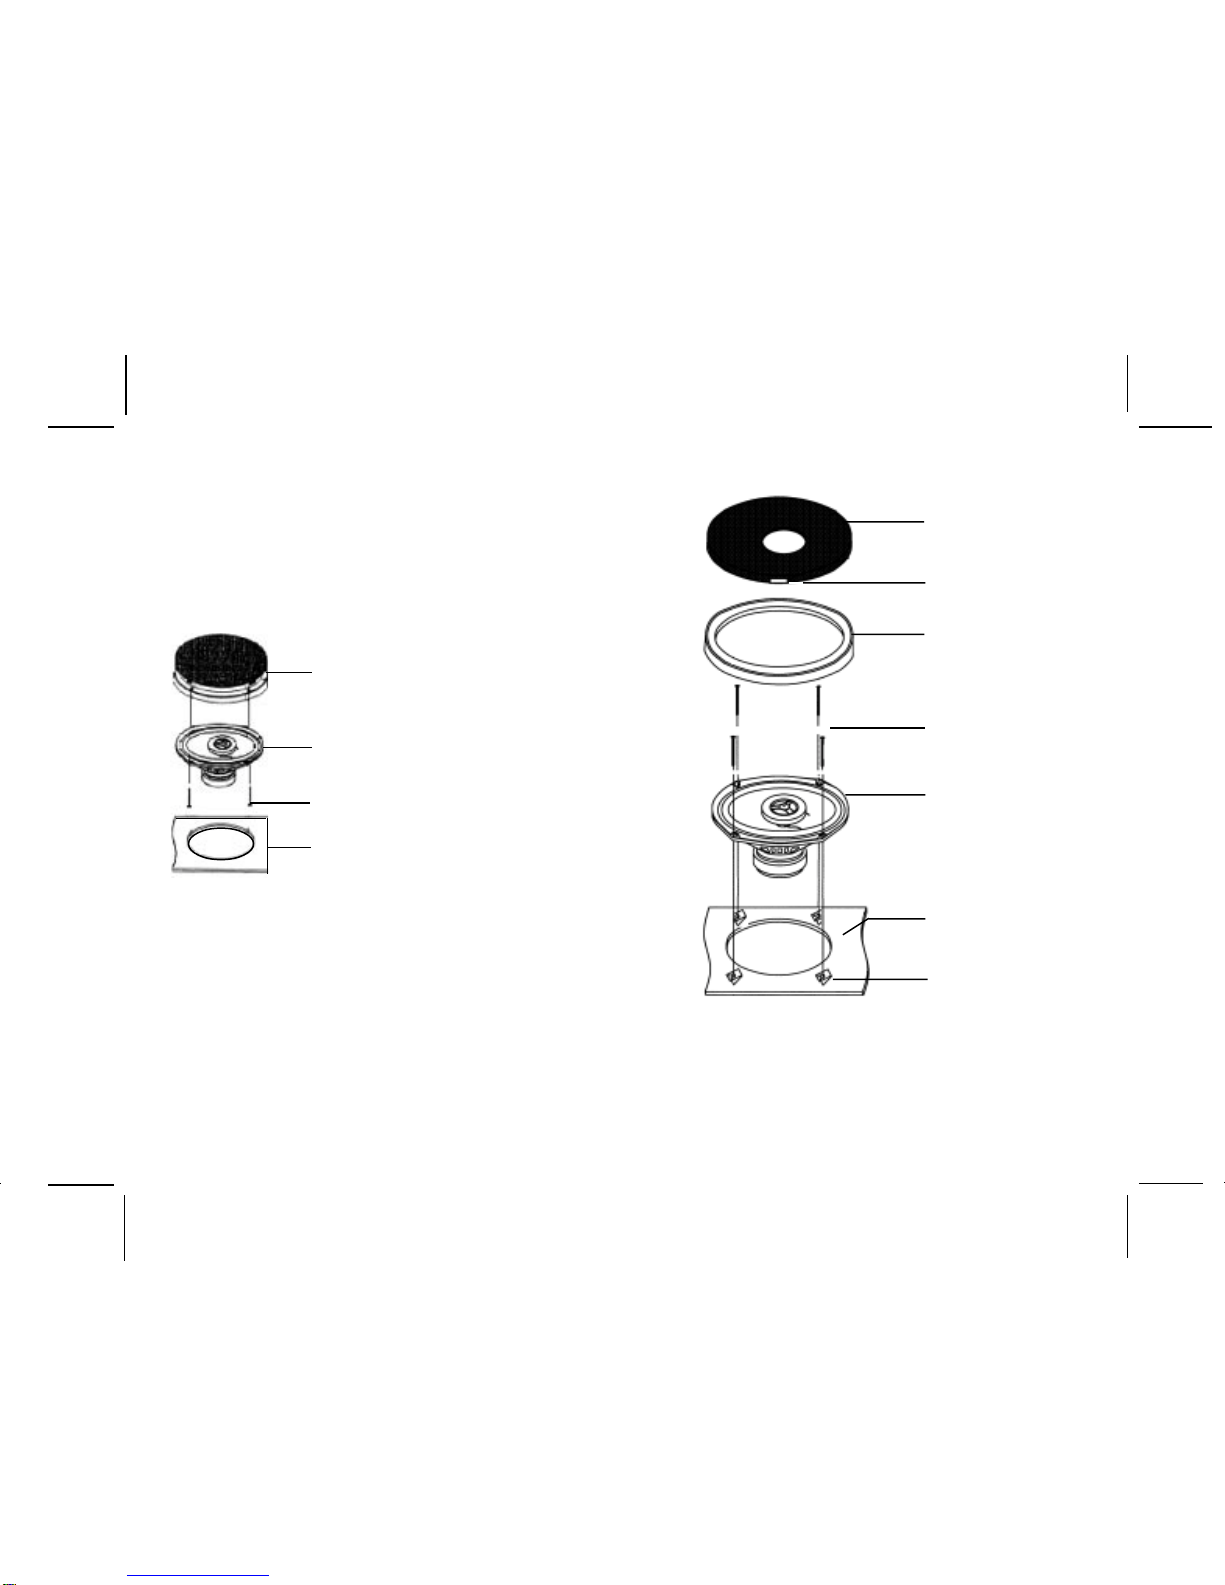
INSTALLING ROUND SPEAKERS IN DOORS OR
FLAT SURFACES
Mostcarsare factory-equipped withroundspeakeropenings in door
panels, kick panels and occasionally, rear deck panels.
If you decided on a door location for mountingspeakers,thefollow-
ing procedure should be followed:
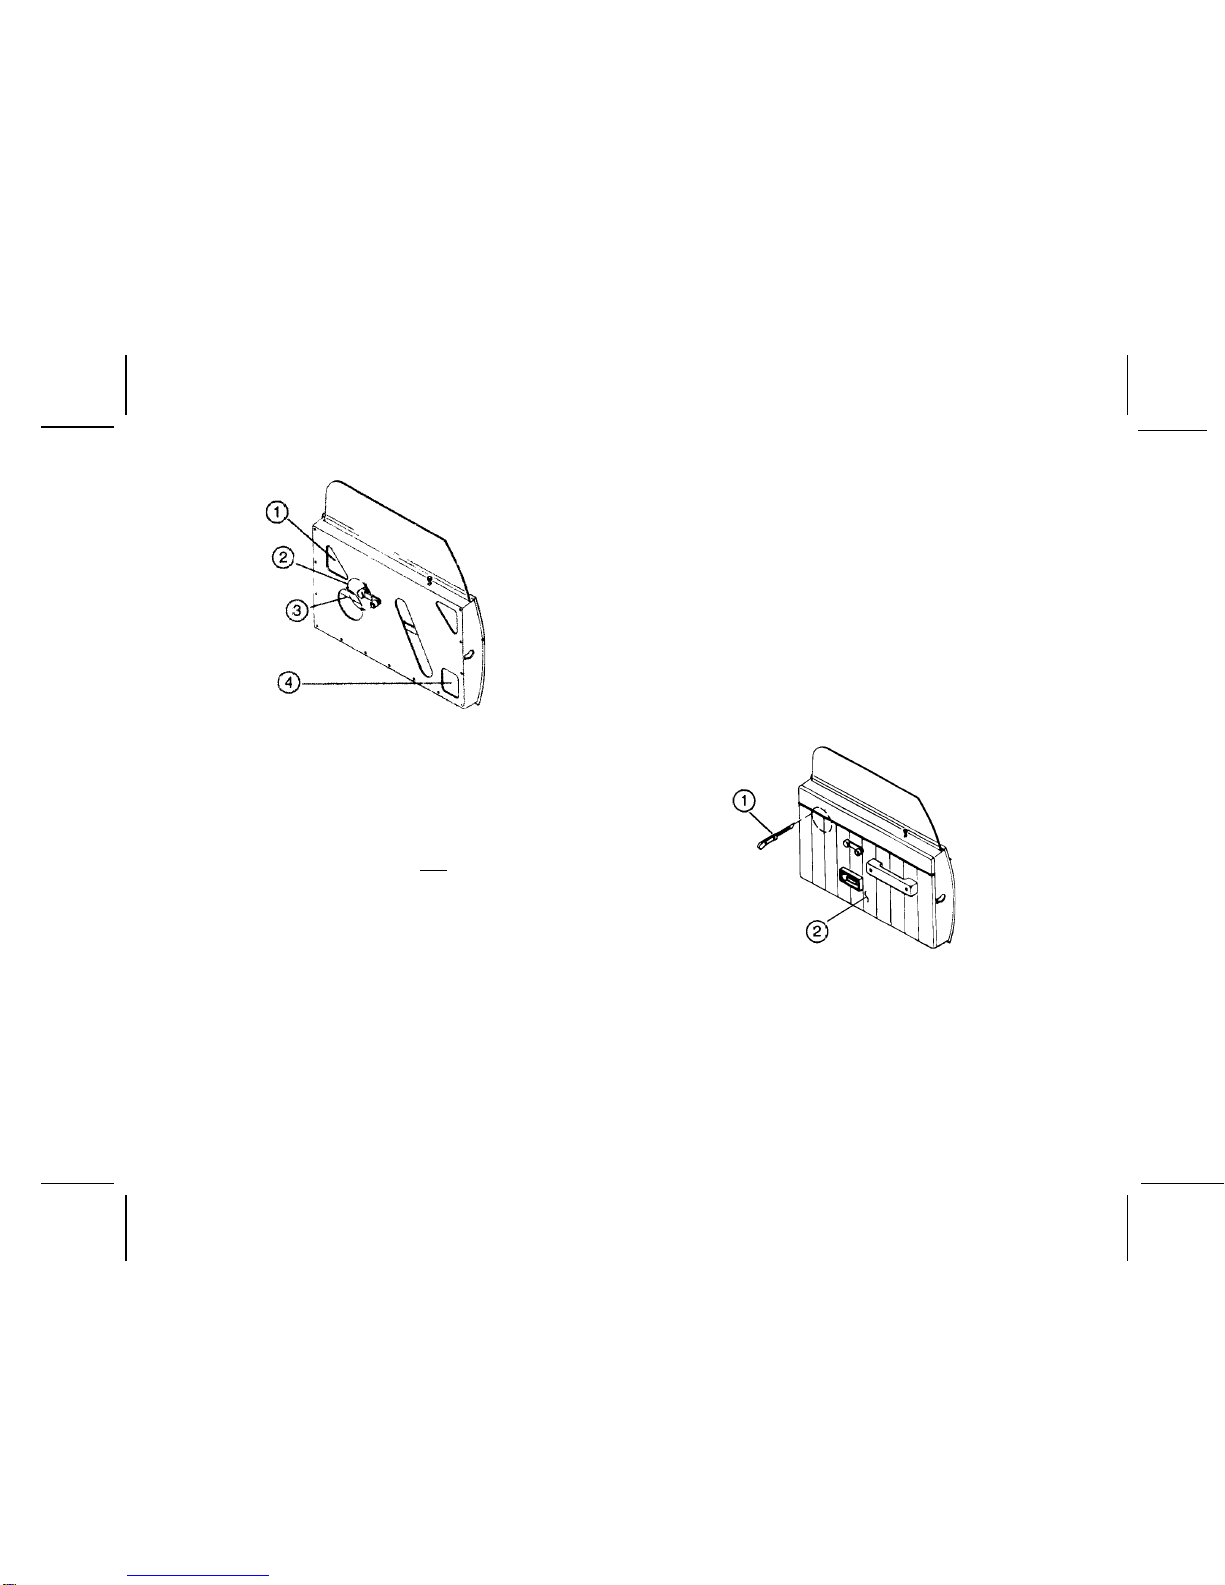
1.Examine the door panel thoroughly. Observe movement of
window crank (nopower windows),door latches, etc. Obviously,
you don’t want to install a speaker where the arc of a moving
window crank (or electric window frame) would interfere with
the speaker grille.Avoid all areas that might cause interference
with the normal functions of the door assembly.
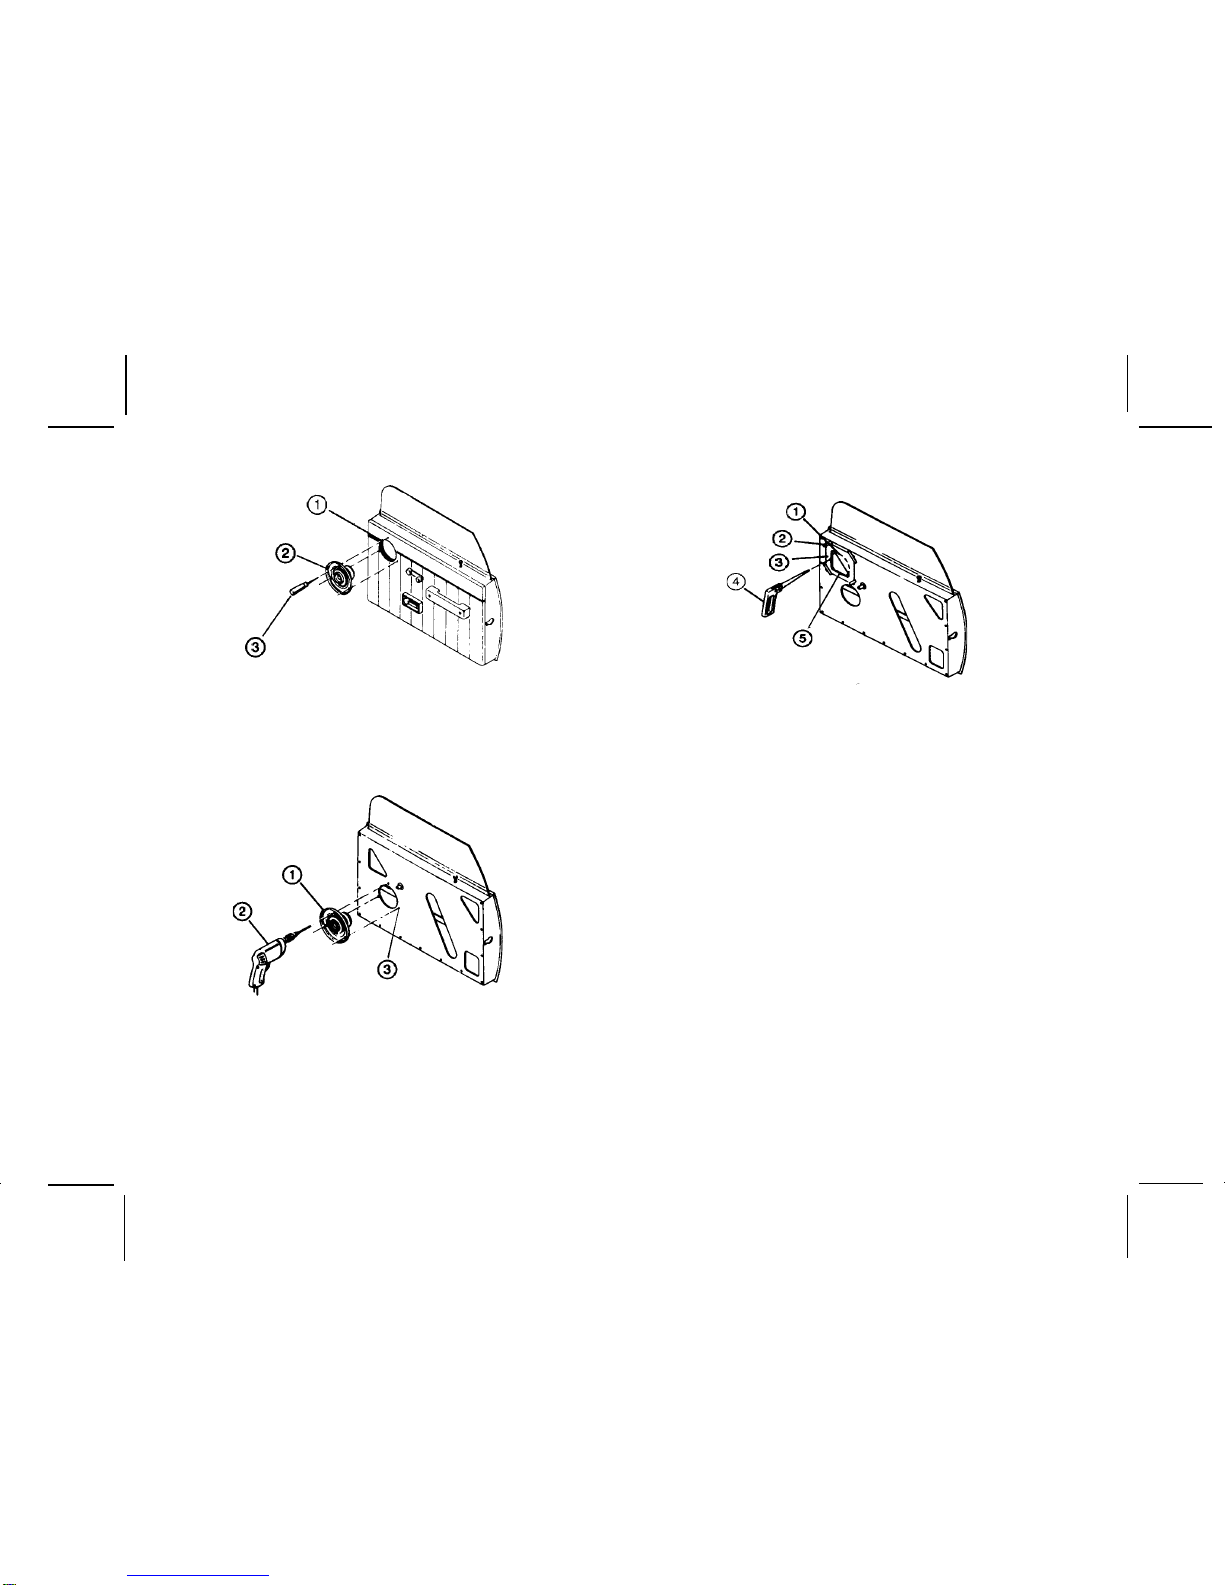
CAUTION: By removing the door upholstery panel, you may find
severalalternate locations higheruponthe door. Watch
outfor windowmechanisms;even professionalinstallers
havemounted aspeakerandthenfound out it interfered
with some moving part.
2.It is highly recommended that the padded door panel be re-
moved. This can be accomplished by removing the window
crank (usually held by a screw or “C” clip found behind the
crank), unless the car is equipped with power windows.

128-6825
5 of 10
Removing the Door Panel
1. This opening would have to be enlarged
per dotted line
2. Possible speaker opening
3. Remove paper liner
4. Padded door panel
5. Window crank
Selecting Speaker Location
After removing thedoorpanel,you are ready to select a location
for the speaker. Make this selection as follows:
1. When the steel sub-door panel is exposed, you may find
the panel completely or partially covered by brown or black
paper secured with a sticky-black, tar-like adhesive. Do not
tear this paper off. It is there to insulate the door, to trap
moisture, and to reduce wind noise.
2. Carefully unpeel the paper. (Do not do this if speaker
openings are exposed.) You should now be able to see all
the varied size openings available in the sub-steel door. The
reason for exposing all the existing holes is to avoid cutting
metal unless it is absolutely necessary.
3. Now determine which existing holes will accommodate your
speakers. Temporarily install the window crank; place the
speaker into the opening and, while holding the speaker
in place, fully raise and lower the window. Check that no
moving part touches the speaker while opening or closing
the window. Then open and close the door and inspect for
speaker interference.
4. If you are satisfied with the selected location, you can begin
the installation process. But first, visually check the padded
door panel to verify that nothing on it will interfere with
installing the speaker grille (an armrest, for example).
5. If the selected location is acceptable, proceed to Speaker
Mounting, step 2; if the location needs to be changed,
continue with Speaker Mounting, step 1.
-5-
6. Door latch
7. Screws
8. Clip pins
If necessary, remove the door opening handle any accessory.
Unless screws are holding the door panel to the door frame,
which is very rare, you will find that most door panels are se-
cured by spring clips.
3. Using a broad flat tool between door and door panel, un-
fastenspringclips. If a few clips are bent when removing them,
apairof plierswilleasily re-formthem.Onceallclipsareunfas-
tened, lift off door panel.
NOTE:On cars equipped with power windows, seats, etc., it may
benecessary to freethepower switch plate,usuallymounted
to the driver’s side arm rest, in order to fully separate the
door panel from the frame.
This manual suits for next models
2
Table of contents