RANCORE RBP99A User manual

EN: Blood Presure Monitor | Instruction Manual
BG: Aпарат за измерване на кръвно налягане | Упътване за употреба
RO: Tensiometru automat pentru antebra | Instructiuni de folosire
GR: Αυτόατη συσκευή έτρηση αρτηριακή πίεση πράτσου | γχειρίδιο λειτουργιών
EN: The symbol means that the product should not be disposed of with household waste in order to avoid environ-
mental contamination and human injury. Take the appliance to a specialist recycling center for electrical appliances.
/ BG: Този символ означава, че продукта не трябва да се изхвърля заедно с останалите битови отпадъци, за
да се избегне замърсяване на околната среда и нараняване на хора. Отнесете уреда в специализиран пункт
за рециклиране на електроуреди. / RO: Acest simbol indică faptul, că produsul nu trebuie aruncat împreună cu
deșeuriile menajere pentru a evitată poluarea mediului și afectarea sănătății umane. Duceți aparatul la un centru
specializat de colectare a aparatelor electrocasnice pentru a predate spre reciclare. / GR: Αυτό το σύμβολο σημαίνει
ότι το προϊόν δεν θα πρέπει να απορρίπτεται μαζί με άλλα οικιακά απορρίμματα για να αποφευχθεί η μόλυνση του
περιβάλλοντος και ο τραυματισμός ανθρώπων. Πηγαίνετε τη συσκευή σε ειδικό κέντρο ανακύκλωσης ηλεκτρικών
συσκευών.
Working voltage: DC 3 V, 4 x AA battery (Included)
ARM DIGITAL BLOOD
Pressure Monitor

Use methods and precautions
2
Make sure
the cuff is at
heart level.
Make sure the air
plug is securely inserted
in the main unit.
1
MR
2
Remove tight-fitting
clothing from your
upper arm.
2
Make sure
it is not
too tight.
Fasten the cuff on the palm side.
1Left Arm 1 inch (2 - 3 cm)
Arrow Air Tube

3
EN: AUTOMATIC ARM STYLE BLOOD PRESSURE MONITOR | Instruction Manual
• Clinically Proven Accuracy
• One Touch Operation
• Large LCD Display
• 2x99 Memories
• 2 Users
• Pressure Rating Indicator
• Voice Broadcast(option)
• Time & Date Display
• BP & Pulse Measurement
Product Description
Taking a measurement
Introduction
What you should know
about blood pressure
Blood Pressure Standard
Precautions to Ensure Safe, Reliable Operation
Inserting Batteries
Setting
Positioning the Pressure Cu
Position for Blood Pressure Measurement
Measuring Your Blood Pressure
Memory Function
Care and Maintenance
Calibration
Error Message
Troubleshooting
Specications
MR

4
EN: AUTOMATIC ARM STYLE BLOOD PRESSURE MONITOR | Instruction Manual
MAIN BODY
BATTERIES
• Alkaline batteries (LR6 SIZE AA) can be used for approximately 250 measurements
(approximately 3 months, 3 times a day), at an ambient temperature of 23°C(73.4°F) at
170mmHg for an upper arm circumference of 22-32 cm.
• (The batteries included are not guaranteed for the full life of brand new alkaline
batteries as specied.)
• Battery life may be shortened if the ambient temperature is low.
• The number of measurements that can be taken with a set of batteries will be
drastically reduced if batteries other than alkaline batteries are used. Use only alkaline
batteries.
• Please replace the batteries at the same time and ensure that they are of the same
type and make.
TAKING A MEASUREMENT
1. Fasten the cu on the palm side. Make sure it is not too tight. The cu's lower edge
should be approximately one inch from the crook of the arm.
2. Make sure the cu is at heart level.
1 inch (2~3 cm)
LCD
CUFF
MEMORY button POWER button
SET button

5
EN: AUTOMATIC ARM STYLE BLOOD PRESSURE MONITOR | Instruction Manual
3. Press the USER button (or the SET button) to choose the user number for memory
storage(the default setting is Number l)(option).
4. At the end of the measurement, a beep sounds and the reading is displayed:
Upper (systolic) value
Lower (diastolic) value
Pulse
Caution
1. Consult your physician to verify your blood pressure range before obtaining them
at home with this unit.
2. If the cu causes any discomfort during mesasurement, press the ON/OFF button
to turn o the unit immediately.
3. Take o the arm cu if the pressure is over 300mmHg and the cu does not
deate automatically.
To be able to utilize all advantages of the blood pressure monitor to the fullest, please
carefully read these instructions before using the device.
INTRODUCTION
Thank you for purchasing the Upper Arm Digital Blood Pressure Monitor. B01 is a
blood pressure monitor that has been developed for easy and accurate blood pressure
measurements for the upper arm. The measuring accuracy of B01 was tested at the time
of manufacture and was proven by clinical research in accordance with AAMI/ANSI-SP10.
Blood pressure measurements obtained with this unit are equivalent to those
obtained by a trained person using the cu/stethoscope auscultation method, within
the limits prescribed by the American National Standard,electronic,or automated
sphygmomanometers.
Measuring your own blood pressure is an important way of monitoring your health. High
blood pressure (hypertension) is a major health problem which can be treated eectively
once detected. Measuring your blood pressure between doctor visits on a regular basis
in the comfort of your home, and keeping a record of the measurements, will help you
monitor any signicant changes in your blood pressure. Keeping an accurate record of
your blood pressure will help your doctor diagnose and possibly prevent any health
problems in the future.
INTRODUCTION
Blood pressure constantly changes throughout the day. It rises sharply in the early

6
EN: AUTOMATIC ARM STYLE BLOOD PRESSURE MONITOR | Instruction Manual
morning and declines during the late morning. Blood pressure rises again in the
afternoon and nally drops to a low level at night. Also, it may vary in a short period of
time. Therefore, readings from successive measurements can uctuate.
Blood pressure readings from a healthy 31-year old male, measured at 5-minute
intervals.
Blood pressure measured in a doctor's oce only provides a momentary value. Repeated
measurements at home better reect one's actual blood pressure values under everyday
conditions. Moreover, many people have a dierent blood pressure when they measure
at home, because they tend to be more relaxed than when in the doctor's oce. Regular
blood pressure measurements taken at home can provide your doctor with valuable
information on your normal blood pressure values under actual "everyday" conditions.
BLOOD PRESSURE STANDARD
The World Health Organization ( WHO ) has set up the following standard blood pressure
values when measured at resting pulse:
Blood Pressure
(mmHg)
Normal
Values
Mild Hypertension Severe Hypertension
SYS = systole
= upper value
up to 140 140-180 over 180
DIA = diastole
= lower value
up to 90 90-110 over 110
CAUTIONS:
• Keep product and batteries away from children.
• People suering form cardiac arrhythmia, vascular constriction,
arteriosclerosis in extremities, diabetes or users of cardiac pacemakers should
consult their doctor before measuring their blood pressure themselves, since deviations
in blood pressure values may occur in such cases.
• If you are under medical treatment or taking any medication, please consult your
doctor rst.
• The use of this blood pressure monitor is not intended as a substitute for
consultation with your doctor.
6 12 18 6 5 h
140
120
100
80
60
SYS
mmHg
DIA
mmHg

7
EN: AUTOMATIC ARM STYLE BLOOD PRESSURE MONITOR | Instruction Manual
PRECAUTIONS TO ENSURE SAFE, RELIABLE OPERATION
• Avoid eating, smoking as well as all forms of exertion directly before the
measurement. All these factors inuence the measure -ment result.
• Try and nd time to relax by sitting in an armchair in a quiet atmosphere for at least 5
minutes before the measurement.
• Remove any garment that ts closely to your wrist.
• Measure always on the same arm (normally left).
• Attempt to carry out the measurements regularly at the same time of day, since
the blood-pressure changes during the course of the day. The ideal time to measure
your blood pressure is in the morning immediately after waking up, while you are still
relatively calm. If this is not possible, try to take your blood pressure prior to breakfast,
before you become active.
INSERTING BATTERIES
Pull the battery cover from the unit as the gure shows.
Insert batteries into the battery compartment matching correct polarities " + "and " - ".
Put the battery cover back into place on the main body until it clicks into place.
Note:
Change the batteries when the battery symbol is displayed on the top left corner of the
display or when no data is displayed even the ON/OFF button is pressed. Do not mix old and
new batteries.
Caution:
Do not throw batteries into a re. Doing so may result in an accident or explosion.
SETTING
Having inserted the batteries, set the time and date so that any future stored
measurements are saved in the memory with the correct time and date. You may also
take measurements without fast setting the time and date.
1. Set user
Press the USER button (B01) or press the SET button a few seconds (B01), a displayed
will ash on and o. Press the MEMORY button to adjust or . The default user is .
2. Set the year
Press the SET button, a displayed year will ash on and o. Press the MEMORY button to

8
EN: AUTOMATIC ARM STYLE BLOOD PRESSURE MONITOR | Instruction Manual
adjust year. Pressing this button for long, the digit will increase quickly.
3. Set date & hour
Then press the SET button again, the month digits will appear and ash. Again, repeat
pressing MEMORY button to adjust the month. With pressing the SET button, the date,
hour and minute digits will ash, repeat adjusting them by pushing the MEMORY button.
4. When you nish the setting you can press the SET button to exit the setting and turn
o the device as well.
POSITIONING THE PRESSURE CUFF
CAUTION:
Do not use the unit for any purpose other than measuring blood pressure. Also,
do not use the unit in conjunction with other devices. Improper use may cause a
malfunction or personal injury
1. Fasten the cu on your left upper arm. It will be best to use a bare arm.
2. Make sure the cu is not too tight. The cu's lower edge should be approximately
one inch from the crook of the arm.
3. The unit can be used on either the left or the right wrist. When taking blood pressure
measurements using the right hand position the cu as it shows.
20 12 1 1/1 1/12 00 12 00
1 inch (2~3 cm)
1 inch (2~3 cm)

9
EN: AUTOMATIC ARM STYLE BLOOD PRESSURE MONITOR | Instruction Manual
However, as it is said that there can be a dierence of up to 10mmHg between the
left and the right arms, please ensure that you always use the same arm. Always
rest for about 3 to 5 minutes before taking measurements. Press ON/OFF button to
start a measurement. The cu will inate automatically and then deate when the
measurement is completed.
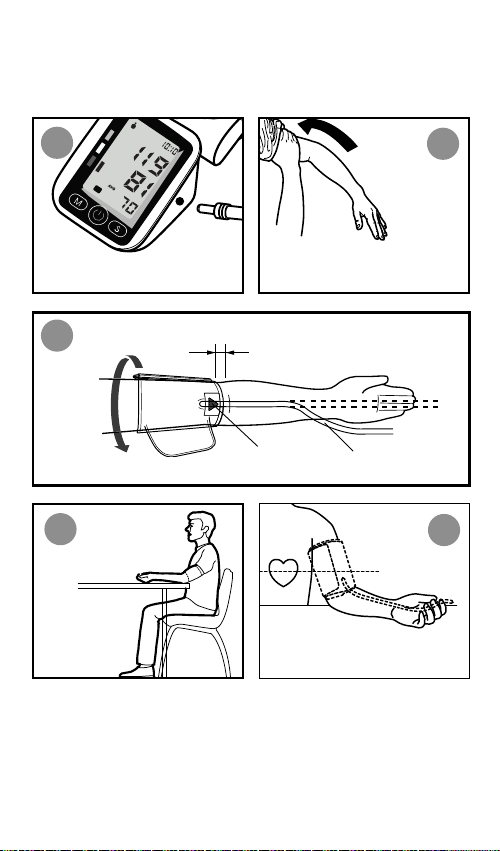
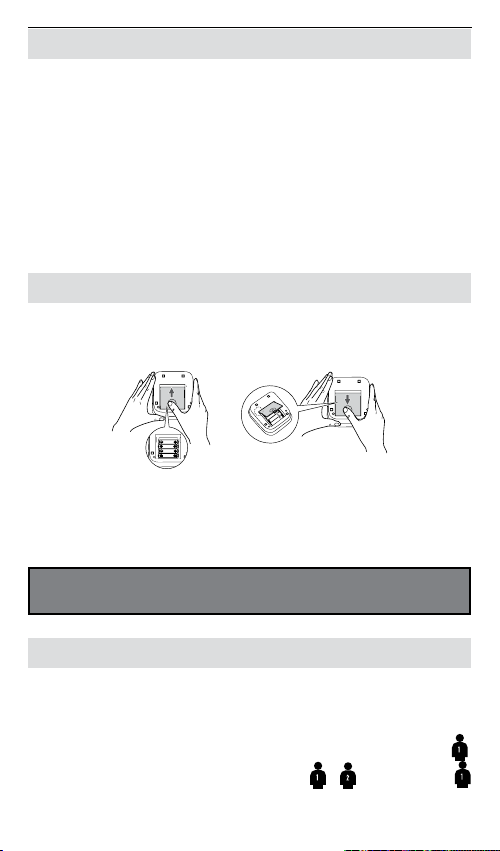
POSITION FOR BLOOD PRESSURE MEASUREMENT
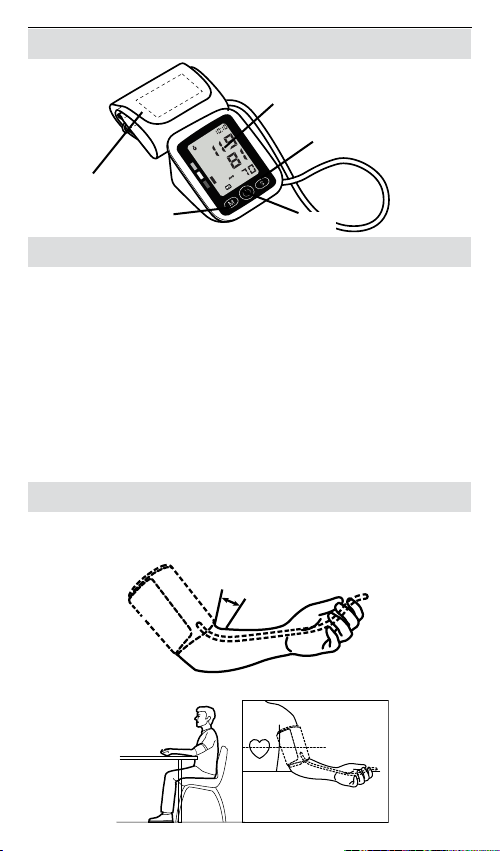
When measuring your blood pressure at your arm, the pressure cu must be at heart
level to ensure consistent, accurate readings.
Taking measurements while sitting down.
CAUTION:
Do not use close to cellular phones or other devices which emit electromagnetic
waves. Doing so may result in malfunction.
Do not move your body, your arm, or your ngers while taking measurements.
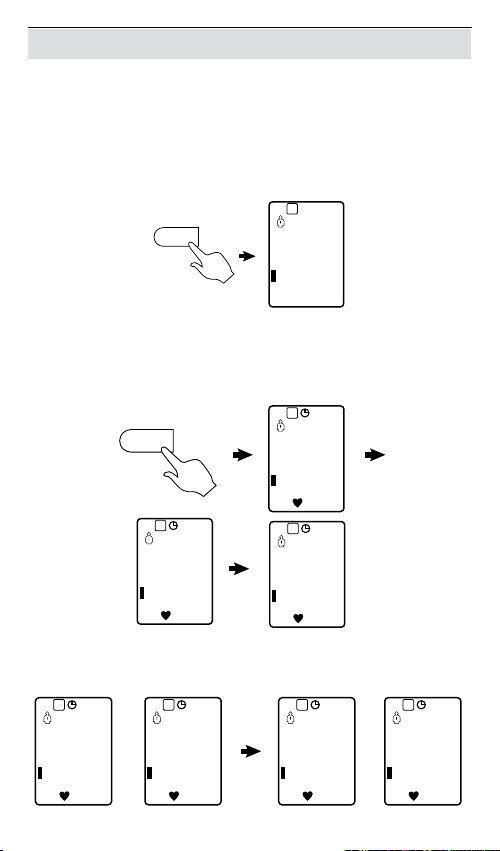
MEASURING YOUR BLOOD PRESSURE
Relax during measurement.
1. Fasten the cu.
2. Press the ON/OFF button.
• Everything on the display will be shown for approx. 1 second.
• The cu will begin to inate automatically.
• Ination stops automatically and the measurement is started.
• Once your pulse rate is detected, the mark will ash on the display
with sounds.
3. Blood pressure values together with pulse rate are displayed when the
measurement is completed with sound.
• The air in the pressure cu is released automatically.
• The displayed pulse rate indicates the number of heartbeats per minute as
calculated from the number of heartbeats recorded during the measurement.
4. Press the ON/OFF button to switch o the unit.
If you forget to switch the unit o, it will do so automatically after approx. 2x99
seconds.
ON/OFF
ON/OFF
67
mmHg
mmHg
14:30
100
mmHg
mmHg
14:30
70
80
120
mmHg
mmHg
14:30

10
EN: AUTOMATIC ARM STYLE BLOOD PRESSURE MONITOR | Instruction Manual
MEMORY FUNCTION
The blood pressure monitor can store 99 readings for each user (2 users).Once the
memory is full, the oldest values will be overwritten. The B01 model features also an
average function to display the average data of the latest three readings.
View of Average Readings (AVG)
The monitor can store the average values (AVG) of the latest three readings. Under
power-o mode or after you nish a measurement, press the MEMORY button, the AVG
reading is displayed.
Recalling Stored Readings
1. Press the MEMORY button the AVG reading will be displayed rstly.
2. Continue to press the MEMORY button, the most recent stored reading will be
displayed ( eg. the rst memory). The date and time will alternate to be displayed.
3. Repeatedly pressing the MEMORY button will call up all stored readings one by one.
Continuously pressing the MEMORY button will scroll through all stored readings.
M
AVG
03 70
60
120
mmHg
mmHg
MEMORY
MEMORY
M
AVG
03
70
80
120
mmHg
mmHg
14:30
M
03
70
80
120
mmHg
mmHg
4/1 M
01
70
80
120
mmHg
mmHg
14:30
M
02
70
80
120
mmHg
mmHg
14:30 M
03
70
80
120
mmHg
mmHg
14:30
M
02
70
80
120
mmHg
mmHg
4/1 M
03
70
80
120
mmHg
mmHg
4/1

11
EN: AUTOMATIC ARM STYLE BLOOD PRESSURE MONITOR | Instruction Manual
Note: The memory can not be cleared unless you cut the power o.
CARE AND MAINTENANCE
• Do not expose the BP monitor to extreme temperature, moisture, dust or direct
sunlight.
• The cu contains a sensitive airtight bulb. Treat it with care and avoid any stress by
torsion or kinking.
• Clean the BP monitor with a soft cloth. Do not use fuel, thinner or other solvent.
Remove specks on the cu carefully with a wet cloth and soap water
• Do not wash the cu.
• Do not drop the BP monitor or treat it with force.
• Do not try to open the BP monitor . This will make the factory calibration invalid.
• If the unit has been stored at temperatures below 0°C(32°F), leave it in a warm place
for about 15 minutes before using it. Otherwise, the cu may not inate properly.
• Do not attempt to disassemble the unit.
• Do not crush the cu.
• When the unit will not be used for a long time (30 days or more), be sure to remove
the batteries.
CALIBRATION
This product has been calibrated at the time of manufacture. If used according to the
use instructions, periodic recalibration is not required. If at any time, you question the
measuing accuracy, please contact an authorized Service Center.
ERROR MESSAGE
Message Correction
The pressure measured was lower than 20mmHg. Please measure
again.
The pressure can not be measured due to signal noise. Please measure
again.
The pressure measured was higher than 300mmHg. Please measure
again.
Pumping error. Please check cu and try again.
The pumping pressure is higher than 300mmHg. Please measure again.
or not
display
Low battery. Please check and replace the 4 batteries if necessary.
Er
1
Er
2
Er
3
Er
p
H1

12
EN: AUTOMATIC ARM STYLE BLOOD PRESSURE MONITOR | Instruction Manual
TROUBLESHOOTING
Problem Reason Solution
Readings
from repeated
measurements
dier
signicantly.
Blood pressure is a uctuating
value. For healthy adults,
deviations of 10 to 20 mmHg
are possible.
none
Cu is not properly tted.
Ensure that the cu is tted
as follows:
- on the palm side of your arm.
- approximately one inch from
the crook of the arm.
Talking, coughing, laughing,
moving etc. when measuring
will inuence the reading
While measuring, relax, keep
still, do not move or speak.
The systolic
pressurevalue or
diastolic pressure
value is high
or low.
You moved your hand or
body or you spoke during the
measurement.
Do not move or speak.
SPECIFICATIONS
Model RBP99A
Display System Liquid Crystal Display
Measuring Method Oscillometric method
Measuring Range Blood Pressure: 20~299mmHg
Pulse Rate: 40~200 pulse/minute
Accuracy Pressure: within ±3 mmHg
Pulse Rate: within ±5% of readings
Auto Power-O After 60 seconds inactivity
Battery Life Around 250 operations
Operating Environment Temperature: 10~40°C (50~104°F )
Relative Humidity: 15%RH ~ 90%RH

13
EN: AUTOMATIC ARM STYLE BLOOD PRESSURE MONITOR | Instruction Manual
Storage Environment Temperature: -20~60°C (-4~140°F)
Relative Humidity: 10%RH ~ 95%RH
Arm Circumference
Measurement Range
Approx. 22 to 32 cm
Power Source DC6V; "AA" type battery x4(LR6)
Dimensions 125*147*61mm
Weight Around 450g (not including batteries)
Clinical Accuracy According to AAMI-SP10
<5 mmHg systematic oset
<8 mmHg standard deviation
Specications are subject to change for improvement without notice.
If device is not used within specied temperature and humidity ranges the technical
accuracy can not be ensured.
Guarantee
We grant 2 years guarantee on the product commencing on the date of purchase. Within
the guarantee period we will eliminate, free of charge, any defects in the appliance
resulting from faults in materials or workmanship, either by repairing or replacing the
complete appliance as we may choose.
Disposal note
The disposal of batteries is regulated. Spent batteries are collected at collection points
provided by battery dealers and the communities. Disposal of the blood pressure
monitor as prescribed, i.e., at a collection point for electrical scrap.

14
BG:АВТОМАТИЧЕН АПАРАТ ЗА ИЗМЕРВАНЕ НА КРЪВНО НАЛЯГАНЕ ЗА ПРЕДМИШНИЦА | Упътване за употреба
• Клинично доказана точност
• Опериране с едно докосване
• Голям LED дисплей
• Памет за 2 х 99 резултата
• 2 потребителя
• Индикатор за максимално допустимо налягане
• Звуково възпроизвеждате (опция)
• Дисплей за час и дата
• Измерване на кръвно налягане и пулс
Описание на продукта
Измерване
Въведение
Какво трябва да знаете
за кръвното налягане
Стандартно кръвно налягане
Предпазни мерки за безопасна и надеждна работа
Поставяне на батерии
Настройка
Разполагане на маншета
Позиция за измерване на кръвното налягане
Измерване на кръвното налягане
Функция Памет
Почистване и грижи
Калибриране
Съобщение за грешка
Отстраняване на неизправности
Спецификации
MR

15
BG: АВТОМАТИЧЕН АПАРАТ ЗА ИЗМЕРВАНЕ НА КРЪВНО НАЛЯГАНЕ ЗА ПРЕДМИШНИЦА | Упътване за употреба
• Алкалните батерии (LR6 тип АА) могат да се използва за приблизително 250
измервания (приблизително 3 месеца, 3 пъти на ден) при температура на околната
среда 23°C, атмосферно налягане 170mmHg и обиколка на предмишницата 22–32
cm.
• (Няма гаранция, че батериите – нови алкални батерии– ще издържат посочения
брой измервания.)
• Животът на батерията може да се съкрати, ако температурата на околната среда
е ниска.
• Броят на измерванията, които могат да се направят с един комплект батерии,
драстично ще се намали, ако се използват различни от алкални батерии.
Използвайте само алкални батерии.
• Сменяйте батериите едновременно и се погрижете те да бъдат от един и същ
тип и марка.
1. Закопчейте маншета от страната на дланта си. Уверете се, че не е твърде стегнат.
Долният край на маншета трябва да бъде приблизително три сантиметра над
лакътя.
LCD
Маншет
Бутон за памет Бутон за включване/
изключване
Бутон за
настройка
1 inch (2~3 cm)

16
BG:АВТОМАТИЧЕН АПАРАТ ЗА ИЗМЕРВАНЕ НА КРЪВНО НАЛЯГАНЕ ЗА ПРЕДМИШНИЦА | Упътване за употреба
2. Уверете се, че маншетът е на нивото на сърцето.
3. Натиснете бутон USER (или бутона за настройка), за да изберете номера на
потребителя за съхраняване в паметта (настройката по подразбиране е номер 1)
(опция).
4. В края на измерването прозвучава кратък звуков сигнал и се показва резултата:
Горна (систолична) стойност
Долна (диастолна) стойност
Пулс
,
, .
,
/, .
, 300 mmHg.
.
За да можете да се възползвате от всички предимства на апарата за измерване
на кръвно налягане, внимателно пречете тези инструкции, преди да използвате
устройството.
Благодарим ви за закупуването на апарата за измерване на кръвно налягане за
предмишница. В01 е апарат за измерване на кръвно налягане, който е разработен
за лесно и точно измерване на кръвното налягане с маншет, който се поставя на
предмишншцата. Точността на измерванията на В01 е изпитана при производството
и е доказана чрез клинично изследване в съответствие с AAMI/ANSI-SP10.
Измерванията на кръвното налягане, получени с този апарат са еквивалентни на
тези, получени от обучено лице, което използва апарат за измерване по метода с

17
BG: АВТОМАТИЧЕН АПАРАТ ЗА ИЗМЕРВАНЕ НА КРЪВНО НАЛЯГАНЕ ЗА ПРЕДМИШНИЦА | Упътване за употреба
аускулация със стетоскоп и маншет и са в границите, предписани от Американския
национален стандарт – Електронни или автоматизирани сфигмоманометри.
Измерването на кръвното налягане е важен способ за проследяване на
здравословното ви състояние. Високото кръвно налягане (хипертония) е голям
здравословен проблем, който може да се лекува ефективно, когато бъде установен.
Редовното измерване на кръвното ви налягане между посещенията при лекар
в удобството на дома и записването на измерванията ще ви помогне да следите
за значителни промени в кръвното ви налягане. Поддържането на точни записи
на стойностите на кръвното ви налягане ще бъде от помощ на лекаря при
диагностицирането, както и за предотвратяване на здравословни проблеми в
бъдеще.
Кръвното налягане се променя постоянно в рамките на деня. То рязко се повишава
рано сутрин и пада по-късно сутрин. Кръвното налягане отново се повишава
следобед и накрая пада до ниско ниво през нощта. То може да варира също и в
кратък период от време. Поради това резултатите от успешни измервания може да
се колебаят.
Стойности на кръвното налягане при здрав 31-годишен мъж, измерени на
5-минутни интервали.
Кръвното налягане, измерено в лекарски кабинет, предоставя моментна стойност.
Повторните измервания у дома по-добре отразяват действителните стойности
на кръвното налягане при условията на ежедневния начин на живот. Освен това
много хора имат различно кръвно налягане, когато го измерват у дома, тъй като
се отпускат по-добре, отколкото в лекарския кабинет. Редовното измерване на
кръвното налягане у дома може да предостави на лекаря ценна информация
за нормалните стойности на вашето кръвно налягане при реални условия на
ежедневието ви.
Световната здравна организация (СЗО) е установила следните стандартни
стойности за кръвното налягане при измерване при пулс в покой:
6 12 18 6 5 h
140
120
100
80
60
SYS
mmHg
DIA
mmHg

18
BG:АВТОМАТИЧЕН АПАРАТ ЗА ИЗМЕРВАНЕ НА КРЪВНО НАЛЯГАНЕ ЗА ПРЕДМИШНИЦА | Упътване за употреба
Кръвно налягане
(mmHg) Нормални
стойности Лека хипертония Тежка хипертония
SYS = систолно
= горна
стойност
до 140 140–180 над 180
DIA = диастолно
= долна
стойност
до 90 90-110 над 110
:
• Пазете продукта и батериите от деца.
• Хора, страдащи от сърдечна аритмия, съдови спазми,
артериосклероза на крайниците, диабет или използващи пейсмейкъри,
трябва да се консултират с лекаря си, преди да мерят самостоятелно кръвното си
налягане, тъй като в тези случаи може да възникнат отклонения в стойностите на
кръвното налягане.
• Ако сте на лечение или приемате някакви медикаменти, първо се консултирайте
с лекаря си.
• Употребата на апарата за измерване на кръвно налягане не замества
консултацията с лекар.
• Избягвайте да се храните, да пушите, както и всякакви форми на натоварване
точно преди измерването. Всички тези фактори влияят на резултата от измерването.
• Опитайте да си осигурите време да се отпуснете, като седнете във фотьойл, в
тиха среда поне 5 минути преди да направите измерването.
• Отстранете всякакви предмети, които са обхващат плътно китката ви.
• Правете измерванията винаги на една и съща ръка (обикновено на лявата).
• Опитайте да правите измерванията редовно в един и същ час от деня, тъй като
кръвното налягане се променя в течение на деня. Идеалното време за измерване на
кръвното налягане е сутрин, непосредствено след събуждане, докато сте все още
относително спокойни. Ако това не е възможно, опитайте да измерите кръвното
налягане преди закуска, преди започване на активната част от деня.
1. Дръпнете капачето на батериите от апарата, както е показано на фигурата.
2. Поставете батериите в отделението така, че полюсите“+”и “-” на батериите да
отговарят на маркировката в отделението.
3. Върнете капачето обратно на мястото му и го затворете с щракване.

19
BG: АВТОМАТИЧЕН АПАРАТ ЗА ИЗМЕРВАНЕ НА КРЪВНО НАЛЯГАНЕ ЗА ПРЕДМИШНИЦА | Упътване за употреба
4.
:
Сменяйте батериите, когато в горния ляв ъгъл на дисплея се покаже символа за бате
рии , или когато на дисплея не се извеждат данни дори и при натискане
на бутона за включване/изключване. Не използвайте стари и нови батерии заедно.
:
.
.
След като сте поставили батерии, настройте часа и датата, така че бъдещите
измервания да се запазват в паметта с правилната дата и час, когато са направени.
Можете също да направите измерване и без настройка на часа и датата.
1. Задаване на потребител
Натиснете бутона USER (B01) или натиснете бутона за настройка за няколко секунди
(В01), ще се покаже мигащ символ . Натиснете бутона за памет, за да изберете
или . Потребителят по подразбиране е .
2. Задаване на годината
Натиснете бутона за настройка, на дисплея ще се изведе премигващо число за
годината. Натиснете бутона за памет, за да изберете годината. Натиснете бутона
продължително, за да се увеличава числото по-бързо.
3. Задаване на дата и час
20 12 1 1/1 1/12 00 12 00

20
BG:АВТОМАТИЧЕН АПАРАТ ЗА ИЗМЕРВАНЕ НА КРЪВНО НАЛЯГАНЕ ЗА ПРЕДМИШНИЦА | Упътване за употреба
След това натиснете отново бутона за настройка, ще се появят цифри за месеца,
които ще мигат. Отново натиснете неколкократно бутона за памет, за да настроите
месеца. С натискането на бутона за настройка цифрите за дата, час и минути ще
премигват. Настройте ги повторно чрез натискане на бутона за памет.
4. Когато завършите настройката, можете да натиснете бутона за настройка, за да
излезете от режима за настройка и да изключите апарата.
:
,
. .
1. Стягайте маншета на лявата си предмешница. По-добре ще е маншетът да се
поставя на гола ръка.
2. Уверете се, че маншетът не е твърде стегнат. Долният край на маншета трябва да
бъде приблизително три сантиметра над лакътя.
3. Апаратът може да се използва също и на лявата или дясната китка. Когато
измервате кръвно налягане на дясната си ръка, разполагайте маншета, както е
показано.
Но, както казахме, може да има разлика в от до 10 mmHg между стойностите,
измерени на лява и дясна ръка, затова винаги правете измерванията на една и
1 inch (2~3 cm)
1 inch (2~3 cm)
Table of contents
Languages: