Gima 32803 User manual

Gima S.p.A.
Via Marconi, 1 - 20060 Gessate (MI) Italy
gima@gimaitaly.com - export@gimaitaly.com
www.gimaitaly.com
SFIGMOMANOMETRO DIGITALE DOMINO
DIGITAL SPHYGMOMANOMETER DOMINO
TENSIOMÈTRE NUMÉRIQUE DOMINO
DIGITAL-BLUTDRUCKMESSGERÄT DOMINO
ESFIGMOMANÓMETRO DIGITAL DOMINO
ESFIGMOMANOMETRO DIGITAL DOMINO
ΨΗΦΙΑΚΌ ΠΙΕΣΌΜΕΤΡΌ DOMINO
DOMINO
M32803-M-Rev.1-01.19
PROFESSIONAL MEDICAL PRODUCTS
Gima S.p.A.
Via Marconi, 1
20060 Gessate (MI) Italy
Made in China
ATTENZIONE: Gli operatori devono leggere
e capire completamente questo manuale
prima di utilizzare il prodotto.
ATTENTION: The operators must carefully
read and completely understand the present
manual before using the product.
AVIS: Les opérateurs doivent lire et bien
comprendre ce manuel avant d’utiliser le produit.
ACHTUNG: Die Bediener müssen vorher dieses Handbuch
gelesen und verstanden haben, bevor sie das Produkt benutzen.
ATENCIÓN: Los operadores tienen que leer y entender
completamente este manual antes de utilizar el producto.
ATENÇÃO: Os operadores devem ler e entender
completamente este manual antes de usar o produto.
ΠΡΟΣΟΧΗ: Οι χειριστές αυτού του προϊόντος πρέπει να διαβάσουν και να
καταλάβουν πλήρως τις οδηγίες του εγχειριδίου πριν από την χρήση του.
32803 - 32804 0476
Manuale d’uso - User manual
Manuel de l’utilisateur - Gebrauchsanweisung
Guía de Uso - Guia para utilização
Οδηγίες χρήσης -

2
1. Struttura principale
2. Display
3. Connettore aria
4. Spina tubo
5. Tubo dell’aria
6. Bracciale
7. Anello D-ring
8. Pulsante “F”
9. Pulsante “M1”
10. Pulsante “M2”
11. Pulsante “START”
12. Custodia
13. 4 Batterie AA
14. Adattatore AC
1. Main Body
2. Display
3. Air Connector
4. Tube Plug
5. Air Hose
6. Cuff
7. D-ring
8. Button ‘F’
9. Button ‘M1’
10. Button ‘M2’
11. Button ‘START’
12. Storage Case
13. 4xAA Batteries
14. AC Adapter
1. Corps principal
2. Écran
3. Connecteur de l’air
4. Fiche tuyau
5. Tuyau de l’air
6. Brassard
7. Anneau D-ring
8. Bouton « F »
9. Bouton « M1 »
10. Bouton « M2 »
11. Bouton « START »
12. Étui
13. 4 piles AA
14. Adaptateur AC
1. Hauptstruktur
2. Display
3.
Luftanschlussbuchse
4. Schlauchstecker
5. Luftschlauch
6. Armmanschette
7. D-Ring
8. Taste “F”
9. Taste “M1”
10. Taste “M2”
11. Taste “START”
12. Gehäuse
13. 4 AA-Batterien
14. AC-Netzteil
1. Estructura principal
2. Display
3. Conector aire
4. Clavija tubo
5. Tubo del aire
6. Manguito
7. Anillo D-ring
8. Botón “F”
9. Botón “M1”
10. Botón “M2”
11. Botón “START”
12. Estuche
13. 4 Pilas AA
14. Adaptador AC
1. Estrutura principal
2. Visor
3. Conector ar
4. Espinha tubo
5. Tubo do ar
6. Braçadeira
7. Anel D-ring
8. Botão “F”
9. Botão “M1”
10. Botão “M2”
11. Botão “START”
12. Estôjo
13. 4 Pilhas AA
14. Adaptador AC
1. Βασική σύνθεση
2. Οθόνη
3. Συνδετήρας αέρα
4. Βύσμα σωλήνα
5. Σωλήνας αέρα
6. Περιβραχιόνιο
7. Δαχτύλιος D-ring
8. Πλήκτρο “F”
9. Πλήκτρο “Μ1”
10. Πλήκτρο “Μ2”
11. Πλήκτρο “START’
12. Θήκη
13. 4 Μπαταρίες ΑΑ
14.
Προσαρμογέας ΑΟ

3ITALIANO
PRINCIPIO OPERATIVO
Questo dispositivo è basato sulla tecnologia oscillometrica con Algoritmo Fuzzy che misura la pressione
arteriosa e la frequenza del polso. Il bracciale viene avvolto intorno al braccio e gonato automatica-
mente mediante la pompa dell’aria. Il sensore del dispositivo rileva le piccole uttuazioni della pressione
esercitata nel bracciale dalla dilatazione e dalla contrazione dell’arteria del braccio in risposta a ciascun
battito del cuore. L’apparecchio misura quindi l’ampiezza di ciascuna onda di pressione, la converte in
millimetri di mercurio e la visualizza sul display sotto forma di valore digitale.
Nota: il presente dispositivo non può garantire una precisione ragionevole se utilizzato o con-
servato a temperature o livelli di umidità al di fuori della gamma indicata nella sezione <CA-
RATTERISTICHE TECNICHE> del presente manuale.
CONSIGLI SULLA MISURAZIONE DELLA PRESSIONE SANGUIGNA
1. In generale la pressione arteriosa è più bassa in estate e più in alta in inverno. La pressione arteriosa
cambia con la pressione atmosferica ed è inuenzata considerevolmente da molti fattori, ad esempio:
carichi sici, fattori emotivi, stress, pasti, ecc. Le medicine, il consumo di alcolici, il fumo inuiscono
notevolmente sul livello della pressione arteriosa. La pressione sanguigna si alza a bassa tempera-
tura, quindi è preferibile eseguire la misurazione della pressione arteriosa a temperatura ambiente
(circa 20°C). Se questo dispositivo è stato conservato a bassa temperatura, è necessario lasciarlo
a temperatura ambiente per almeno 1 ora, altrimenti la misurazione può essere inaccurata. La pres-
sione sanguigna varia a seconda dell’età e dell’individuo, si consiglia di annotare quotidianamente le
misurazioni rilevate e vericare con il proprio medico qual è il valore ottimale della “pressione sangui-
gna” per il paziente.
L’illustrazione è tratta dalla British Hypertension Society
2. Prendere le misure sotto le istruzioni del medico per i pazienti con malattie cardio-vascolari. In nes-
suna circostanza dovresti modicare i dosaggi dei farmaci prescritti dal medico!
3. La misurazione accurata della pressione arteriosa può essere difcile in pazienti con condizioni di
arteriosclerosi grave, polso debole o in pazienti con evidente uttuazione del ritmo di contrazione
cardiaca. Consultare un medico qualicato per interpretare le letture della pressione sanguigna.
4. La misurazione dovrebbe essere condotta in un ambiente silenzioso. Non mangiare o fumare prima
di una misurazione. Questo dispositivo è fornito con il bracciale standard che è adatto per un braccio
di dimensioni 22-32 cm. I bambini e gli adulti con un braccio che non rientra nell’intervallo 22-32 cm
dovrebbero selezionare bracciali delle dimensioni speciali. Contatta il rivenditore per ottenere questi
bracciali di dimensioni speciali.
ATTENZIONE: non utilizzare bracciali non originali.
5. Si raccomandano misurazioni ripetute con intervallo di 3 minuti, se è possibile calcolare la media per
ottenere una misurazione più accurata. I pazienti con aterosclerosi richiedono un intervallo più lungo
(10-15 minuti) poiché l’elasticità dei vasi sanguigni dei pazienti diminuisce signicativamente in pre-
senza di queste malattie. Anche l’intervallo di 10-15 minuti è applicabile a pazienti affetti da diabete.
INSERIMENTO DELLE BATTERIE
1. Aprire il coperchio dello scomparto batterie, quindi aprire il coperchio della batteria a bottone, inserire
la batteria a bottone “CR2025” nel relativo scomparto;
2. Chiudere il coperchio dello scomparto della batteria a bottone;
3. Per installare le batterie di tipo “AA”, tenere presente la polarità indicata;
4. Chiudere il coperchio dello scomparto batterie.

4
ITALIANO
- La batteria a bottone incorporata serve per mantenere inalterata la visualizzazione della data e dell’o-
ra durante la sostituzione delle batterie (4 batterie AA). Se dopo aver inserito le nuove batterie, sul
display LCD compare l’icona data “01/01” e ora “00:00”, signica che è necessario inserire una nuova
batteria a bottone.
- Sostituire le batterie quando sul display compare il simbolo della batteria ‘ ’ o
non appare nulla dopo che è stato premuto il tasto START;
- Le batterie utilizzate in questo kit hanno lo scopo di gestire la capacità operativa
del dispositivo e la loro durata può essere inferiore a quanto indicato;
- Sostituire tutte le batterie contemporaneamente e non utilizzare batterie ricarica-
bili;
- Rimuovere le batterie, se l’apparecchio non viene usato per un lungo periodo di
tempo;
- Non lasciare le batterie scariche inserite nel dispositivo;
- Se, durante la misurazione, sul display LCD lampeggia il simbolo di batteria sca-
rica ‘ ’ , l’utente dovrà ricordarsi di sostituire tutte le batterie, ma può ultimare
la misurazione. Se sul display LCD compare il simbolo di batteria scarica ‘ ’ e
contemporaneamente una segnalazione acustica continuata per 4 volte, l’utente
dovrà immediatamente sostituire tutte le batterie.
UTILIZZO DEL DISPOSITIVO CON ADATTATORE DI CORRENTE AC
Oltre alle batterie, è possibile utilizzare un adattatore di corrente AC come alimenta-
tore. L’adattatore di corrente AC è in vendita come optional. Il connettore dell’adat-
tatore di corrente AC è ubicato sul lato destro del dispositivo.
Utilizzare solo un adattatore di corrente AC con le seguenti caratteristiche tecniche:
Tensione d’uscita: 6V±5%
Max. corrente d’uscita: 600 mA
Polarità spina di uscita: <-> interna
Diametro esterno: 5.5±0.1 mm
Diametro interno: 2.1± 0.1 mm
Lunghezza: 10± 0.3 mm
CORRETTA POSTURA PER LA MISURAZIONE
1. Sedersi e appoggiare il braccio sul piano del tavolo durante la misurazione. As-
sicurarsi che il bracciale avvolto intorno alla parte superiore del braccio sia ap-
prossimativamente allo stesso livello del cuore, stendere l’avambraccio in modo
naturale sul tavolo;
2. È possibile anche eseguire la misurazione stando sdraiati sulla schiena.
Guardare verso l’alto, restare calmi e non muovere il collo o il corpo durante la
misurazione. Assicurarsi che il bracciale avvolto intorno alla parte superiore del
braccio sia approssimativamente allo stesso livello del cuore.
ASSEMBLAGGIO DEL BRACCIALE
1. Inserire circa 5 cm della parte nale del bracciale nell’anello D-ring posto
all’inizio dello stesso, come illustrato nella gura.
2. Inlare il bracciale sul braccio sinistro con il tubo rivolto in direzione del
palmo della mano. Se la misurazione sul braccio sinistro risulta difcile,
utilizzare il braccio destro. In questo caso, è necessario sapere che le
letture possono divergere di 5-10 mmHg tra il braccio sinistro e il braccio
destro.
3. Avvolgere il bracciale intorno al braccio e fermarlo con la chiusura a strap-
po. Il margine del bracciale deve essere circa 2-3 cm sopra la giuntura
del gomito.
L’indicazione <ARTERY> deve trovarsi sopra l’arteria del braccio.

5ITALIANO
4. Il bracciale deve aderire attorno al braccio. Non deve essere né troppo
stretto, né troppo allentato. Si deve lasciare spazio per inserire due dita
tra il bracciale e il braccio.
5. Se la scritta <INDEX> sul bracciale si trova all’interno della zona <NOR-
MAL> (22-32 cm), signica che la circonferenza del bracciale è corretta.
Diversamente è necessario un bracciale con circonferenza diversa (rivol-
gersi al rivenditore).
6. Talvolta è difcile che il bracciale aderisca perfettamente alla forma del
braccio.
In tal caso è accettabile anche che il bracciale assuma una forma a cono.
7. Non avvolgere le maniche sopra il braccio altrimenti il usso del sangue
sarà ostacolato e ciò non consentirà di ottenere una misurazione accura-
ta.
Eventualmente togliere gli indumenti.
ASSEMBLAGGIO DELLA CUSTODIA
1. I tre ganci della custodia si incastrano nelle cavità presenti sul dispositivo;
2. Spingere verso l’alto la custodia;
3. Chiudere ermeticamente.
REGOLAZIONE DI DATA E ORA
Questa funzione garantisce la corretta misurazione del tempo per ogni misurazione. Per avere una data
e un’ora precise, l’utente deve preimpostare la data e l’ora correttamente prima di utilizzare il dispositivo
per la prima volta.
La procedura per la preimpostazione di Data/Ora è la seguente:
1. Collegando per la prima volta il dispositivo alla presa di corrente, il display visualizzerà quanto indica-
to nella Fig. 1;
2. Premere il pulsante “F”, il valore relativo all’anno lampeggerà;
3. Premere il pulsante “M1” o “M2” per aumentare o diminuire il valore e premere il pulsante “START”
per confermare;
4. Dopo aver impostato l’anno, il valore relativo al mese inizia automaticamente a lampeggiare (Fig. 3).
Per impostare mese, data e ora seguire le istruzioni sopra riportate;
5. Premere il pulsante “START” per confermare l’impostazione. Per modicare la data e l’ora, ripetere
i punti 2, 3, 4.

6
FUNZIONE PROMEMORIA
Impostazione di promemoria
Il monitor è dotato di 3 allarmi promemoria. È possibile impostare 3 diversi allarmi promemoria nell’arco
di 24 ore.
1. Con il dispositivo in standby, premere il pulsante “F” due volte per entrare nella mo-
dalità di allarme 01 (Fig. 4);
2. Premere il pulsante “M1” o “M2”. Il display apparirà come nella Fig. 5 e contempo-
raneamente lampeggerà l’ora;
3. Premere di nuovo il pulsante “M1” o “M2” per aumentare o diminuire il numero e
“START” per confermare.
4. Dopo aver impostato l’ora, il valore relativo ai minuti lampeggerà automaticamente.
Per impostare i minuti, seguire la stessa procedura sopra indicata;
5. Premere “START” per confermare.
6. Con il dispositivo in standby, premere il pulsante “F” tre o quattro volte per entrare rispettivamente
nella modalità di allarme 02 e 03. Ripetere la stessa procedura, se è necessario inserire un secondo
o un terzo allarme.
Nota: quando l’allarme è attivato e il dispositivo è in standby, l’icona ‘ ’ lampeggia sul display LCD e si
udirà una segnalazione acustica per 1 minuto. Premere “START” per disattivare l’allarme.
Se l’allarme è attivato durante la misurazione, l’icona ’ lampeggia sul display LCD per 1 minuto senza
alcuna segnalazione acustica. Premendo “START”, l’icona ‘ ’ lampeggiante scomparirà e la misura-
zione verrà terminata
Cancellazione dei promemoria
1. Con il dispositivo in standby, premere il pulsante “F” due volte per entrare nella modalità di allarme
01, quindi premere “M1” per almeno 5 secondi. Il display apparirà come illustrato nella Fig. 7, indi-
cando che l’allarme 01 è stato rimosso.
2. Con il dispositivo in standby, premere il pulsante “F” tre o quattro volte per entrare rispettivamente
nella modalità di allarme 02 e 03. Ripetere la procedura sopra indicata per rimuovere l’allarme 02 e
l’allarme 03.
DISPLAY TEMPERATURA AMBIENTE E REGOLAZIONE
Questo display visualizza la temperatura ambiente. È possibile impostare l’unità di misura °C e °F. Per
impostazione predenita il display LCD visualizza la modalità °C.
1. Con il dispositivo in standby, premere “F” cinque volte per entrare nella modalità di regolazione della
temperatura, quindi premere “M1” per passare alla modalità °F, premere “START” per confermare.
2. Premere “M2” per passare dalla modalità °F a °C.
Nota: nella modalità di reset, se non viene eseguita alcuna operazione per 1 minuto, il dispositivo torna
automaticamente nella modalità standby.
ESECUZIONE DI UNA MISURAZIONE
1. Inserire la spina del tubo nel connettore dell’aria.
Prima di eseguire la misurazione, respirare a fondo 3~5 volte e rilassarsi. Non parlare o muovere il
braccio;
ITALIANO

7
2. Premere il tasto “START”. Sul display, solo per pochi secondi, si accendono tutti i simboli (Fig. 9).
Si avrà l’emissione di due brevi segnali acustici e “0” comparirà sullo schermo. Il bracciale inizierà a
gonarsi e il display visualizzerà i valori di pressione. Generalmente la pressione arriva a 190mmHg
(Fig. 10);
3. La pompa smetterà di gonare il bracciale e la pressione diminuirà gradualmente. Contemporanea-
mente si avrà la misurazione della pressione e delle pulsazioni (Fig. 11);
4. Un segnale acustico prolungato indicherà l’avvenuta misurazione. Il bracciale si sgonerà rapidamen-
te e sul display appariranno i valori di misurazione della pressione e delle pulsazioni. Verrà inoltre
visualizzato in un altro schermo il tempo di misurazione. Contemporaneamente, l’icona ‘ ’ lampeg-
gerà per ricordare all’utente di registrare il valore misurato (Fig.12);
5. Premere “M1” o “M2” per registrare il valore misurato nella corrispondente memoria. Ad es.: pre-
mendo “M2”, il display sarà come indicato nella Fig. 13. Se l’utente non preme il tasto, il valore
misurato non sarà registrato;
6. Premere “START” per tornare nella modalità standby. Prima di eseguire un’altra misurazione, atten-
dere almeno 3 minuti. Se il dispositivo rimane inutilizzato per 3 minuti, tornerà nella modalità standby.
Ripressurizzazione automatica
Questo dispositivo dispone di 4 livelli di pressurizzazione predeniti: 190mmHg, 230mmHg, 270mmHg
e 300mmHg. Se la pressione di 190mmHg non è sufciente o in caso di movimento del braccio, il di-
spositivo eseguirà nuovamente il gonaggio ad un livello di pressione adeguato a garantire una corretta
misurazione.
Ciò non indica un guasto.
Sgonaggio rapido durante la misurazione
Se non vi sentite bene durante la misurazione o desiderate interromperla, premere START. Il dispositivo
sgonerà rapidamente il bracciale e tornerà nella modalità standby.
L’indicatore visualizza un segmento, basato sui dati correnti, corrispondente alla classicazione OMS.
Ad esempio, se la pressione sanguigna è di 145mmHg (pressione sistolica), 88mmHg (pressione dia-
stolica), in base alla classicazione dell’Organizzazione Mondiale della Sanità, il livello della pressione
indica una leggera ipertensione.
ITALIANO

8
Nota: Se la pressione sistolica e la pressione diastolica rientrano in categorie diverse, per la classica-
zione è ritenuto valido il valore più elevato.
FUNZIONE MEMORIA
Richiamo memoria
1. Domino può memorizzare 60 misurazioni in ‘ ’ e ‘ ’, e calcolare automaticamente la media delle
ultime 3 misurazioni per “M1” e “M2”, rispettivamente. Quando la memoria è piena (60 misurazioni
memorizzate), i dati più vecchi saranno sostituiti dai più recenti. Anche in caso di mancanza di cor-
rente, la memoria non viene cancellata;
2. Al termine di una misurazione o quando il dispositivo è in standby, premere “M1” o “M2” per richia-
mare la memoria. Premendo “M1” o “M2”, il display visualizzerà la media delle ultime tre misurazioni
(Fig. 14);
3. Premendo ancora, il display visualizzerà “01”, vale a dire l’ultima misurazione registrata, quindi passa
ad un’altra schermata per visualizzare i valori misurati e il tempo di misurazione (Fig. 15);
4. Premendo ancora, il display visualizzerà “02”, vale a dire la penultima misurazione registrata
Cancellazione dati memorizzati
Al termine di una misurazione o quando il dispositivo è in standby, tenere premuto “M1”
o “M2” per almeno 5 secondi, il display visualizzerà “CLR” ad indicare che il valore
memorizzato per “M1” o “M2” è stato cancellato.
RILEVATORE DI BATTITO IRREGOLARE
Lo sgmomanometro digitale Modello Domino garantisce la misurazione della pres-
sione sanguigna e delle pulsazioni, anche in presenza di battito irregolare. Quando il
dispositivo rileva un battito irregolare o un eccessivo movimento del corpo durante la
misurazione, l’icona “IHB” viene visualizzata sul display LCD. È importante rilassarsi,
rimanere fermi e non camminare durante la misurazione.
Nota: si consiglia di consultare il proprio medico di famiglia, se l’indicatore “IHB” com-
pare frequentemente
ERRORI E BATTERIA SCARICA
INDICAZIONE POSSIBILE CAUSA AZIONI CORRETTIVE
Il bracciale è indossato in modo sbaglia-
to o la spina del tubo è inserita in modo
lasco.
Assicurarsi che il bracciale sia indossa-
to correttamente e la spina del tubo sia
inserita saldamente, quindi ripetere la
misurazione.
Movimento del braccio/mano o il pazien-
te cammina durante la misurazione. Ripetere la misurazione seguendo le
istruzioni contenute nel manuale.
Il bracciale non si gona alla pressione
necessaria. Ripetere la misurazione gonando il
bracciale 30-40 mmHg sopra la pressio-
ne sistolica prevista.
Le batterie sono scariche. Sostituire tutte e 4 le batterie.
ITALIANO

9
CURA, CONSERVAZIONE, RIPARAZIONE E RICICLAGGIO
1. È necessario proteggere il dispositivo dall’eccessiva umidità, dalla luce diretta del sole, dagli urti, dai
solventi, dall’alcool e dalla benzina.
2. Rimuovere le batterie prima di riporre il dispositivo per lungo tempo. Tenere le batterie fuori dalla
portata dei bambini.
3. Mantenere il bracciale lontano da oggetti taglienti, non tirarlo e non torcerlo.
4. Utilizzare un panno morbido e asciutto per pulire il dispositivo.
5. I bracciali sono sensibili e devono essere maneggiati con cura. Pulire il bracciale con un panno umi-
do.
ATTENZIONE: non lavare mai la guaina interna!
6. Una volta l’anno far controllare il dispositivo da un tecnico, per vericarne le condizioni tecniche.
Rivolgersi al rivenditore di ducia per maggiori informazioni.
7. Il dispositivo e le batterie non devono essere gettati nella spazzatura domestica. Seguire le regole di
riciclaggio locali in vigore e portare il dispositivo e le batterie nei punti di raccolta appropriati.
SOLUZIONE DEI PROBLEMI
SINTOMO PUNTO DI CONTROLLO RIMEDIO
Non si ha alcuna visua-
lizzazione quando viene
premuto il tasto START.
Le batterie sono scariche.
La polarità delle batterie è sbaglia-
ta.
Il contatto dello scomparto batterie
è sporco.
Sostituire tutte le batterie.
Inserire correttamente le batterie.
Pulire i terminali delle batterie con
un panno asciutto.
Il gonaggio si arresta e
riprende in un secondo
tempo.
Ripressurizzazione automatica che
garantisce la corretta misurazione.
Avete camminato o mosso il brac-
cio (o la mano) durante la misura-
zione?
Vedere <RIPRESSURIZZAZIONE
AUTOMATICA>.
Stare tranquilli e in silenzio durante
la misurazione.
Il valore misurato è trop-
po alto o troppo basso. Il bracciale è allo stesso livello del
cuore?
Il bracciale è avvolto correttamen-
te?
Avete sforzato il braccio durante la
misurazione?
Avete camminato o mosso il brac-
cio (o la mano) durante la misura-
zione?
Assicurarsi che la postura sia corret-
ta.
Avvolgere il bracciale in modo cor-
retto.
Rilassarsi durante la misurazione.
Stare tranquilli e in silenzio durante
la misurazione.
Il valore delle pulsazioni
è troppo alto o troppo
basso.
Avete camminato o mosso il brac-
cio (o la mano) durante la misura-
zione?
Avete effettuato la misurazione
subito dopo aver fatto movimento?
Stare tranquilli e in silenzio durante
la misurazione.
Eseguire di nuovo la misurazione
dopo aver riposato per 5 minuti.
Le batterie si sono sca-
ricate subito. Sono state usate batterie difettose. Utilizzare batterie alcaline di marca
conosciuta.
ITALIANO

10
ITALIANO
CARATTERISTICHE TECNICHE
Modello: Domino
Dimensioni: 158 (L) x 120 (L) x 127 (H) mm
Peso: Ca. 490 gr. senza batterie
Metodo di misurazione: Oscillometria
Gamma di misurazione: Da 40 a 260 mmHg (pressione del sangue)
Da 40 a 160 battiti/minuto (pulsazioni)
Precisione di misurazione: ± 3 mmHg per pressione sistolica e diastolica ± 5% del valore delle pul-
sazioni
Gonaggio: Automatico con pompa
Sgonfaggio rapido: Valvola elettronica autom.
Batterie: 4”AA”× 1 .5V
Adattatore: Optional, 6V, 600 mA
Memoria: 2x60 set di memorie
Temperatura d’esercizio e umidità: Da +10°C a + 40°C, 85% e inferiore
Temperatura di stoccaggio e umidità: Da -20°C a + 50°C, 85% e inferiore
Dimensioni bracciale: In base al braccio 22-32 cm
Kit completo: Struttura principale, custodia, bracciale, 4 batterie AA (Optional), batteria a bottone
1xCR2025, adattatore (optional), manuale d’uso.
Smaltimento: Il prodotto non deve essere smaltito assieme agli altri riuti domestici. Gli utenti
devono provvedere allo smaltimento delle apparecchiature da rottamare portandole al luogo
di raccolta indicato per il riciclaggio delle apparecchiature elettriche ed elettroniche. Per ulte-
riori informazioni sui luoghi di raccolta, contattare il proprio comune di residenza, il servizio di
smaltimento dei riuti locale o il negozio presso il quale è stato acquistato il prodotto. In caso di
smaltimento errato potrebbero venire applicate delle penali, in base alle leggi nazionali.
CONDIZIONI DI GARANZIA GIMA
Ci congratuliamo con Voi per aver acquistato un nostro prodotto.
Questo prodotto risponde a standard qualitativi elevati sia nel materiale che nella fabbricazione. La
garanzia è valida per il tempo di 12 mesi dalla data di fornitura GIMA. Durante il periodo di validità della
garanzia si provvederà alla riparazione e/o sostituzione gratuita di tutte le parti difettose per cause di
fabbricazione ben accertate, con esclusione delle spese di mano d’opera o eventuali trasferte, trasporti
e imballaggi. Sono esclusi dalla garanzia tutti i componenti soggetti ad usura. La sostituzione o ripara-
zione effettuata durante il periodo di garanzia non hanno l’effetto di prolungare la durata della garanzia.
La garanzia non è valida in caso di: riparazione effettuata da personale non autorizzato o con pezzi di
ricambio non originali, avarie o vizi causati da negligenza, urti o uso improprio. GIMA non risponde di
malfunzionamenti su apparecchiature elettroniche o software derivati da agenti esterni quali: sbalzi di
tensione, campi elettromagnetici, interferenze radio, ecc. La garanzia decade se non viene rispettato
quanto sopra e se il numero di matricola (se presente) risulti asportato, cancellato o alterato. I prodotti
ritenuti difettosi devono essere resi solo e soltanto al rivenditore presso il quale è avvenuto l’acquisto.
Spedizioni inviate direttamente a GIMA verranno respinte.
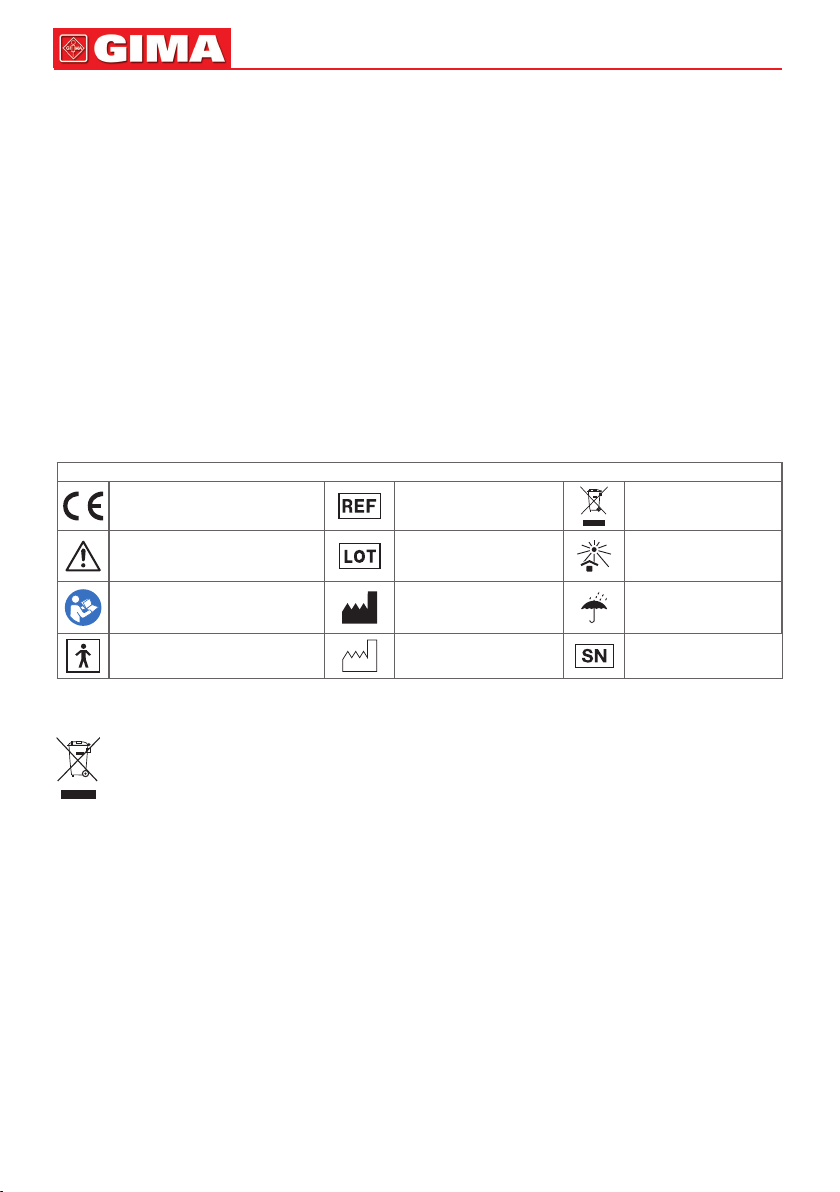
Simboli
Dispositivo medico conforme
alla Direttiva 93/42/CEE Codice prodotto Smaltimento RAEE
Attenzione: Leggere e seguire
attentamente le istruzioni
(avvertenze) per l’uso
Numero di lotto Conservare al riparo
dalla luce solare
Seguire le istruzioni per l’uso Fabbricante Conservare in luogo
fresco ed asciutto
Parte applicata di tipo BF Data di fabbricazione Numero di serie

11
PRINCIPLE OF OPERATION
This device adopts the oscillometric technology with Fuzzy Algorithm measuring the arterial blood pres-
sure and pulse rate. The cuff is wrapped around the arm and automatically inated by the air pump. The
sensor of the device catches weak uctuation of the pressure in the cuff produced by extension and
contraction of the artery of the arm in response to each heartbeat. The amplitude of the pressure waves
is measured, converted in millimeters of the mercury column, and is displayed by digital value.
Annotation: This device can not provide reasonable accuracy if used or stored in the temper-
ature or humidity beyond the range stated in the section <SPECIFICATIONS> of this manual.
TIPS UN TAKING BLOOD PRESSURE MEASUREMENT
1. Generally arterial blood pressure is lower in summer and higher in winter. Arterial blood pressure
changes with atmosphere pressure and is affected considerably by many factors, e.g. physical loads,
emotional excitability. stress, meals, etc. Medicines, drinking, smoking affects greatly the level of
individual blood pressure. Blood pressure will raise in low temperature, so it is better to take blood
pressure measurement in room temperature (approximately 20°C). If this device was stored in low
temperature, it is necessary to leave it in room temperature for at least 1 hour, otherwise the meas-
urement can be inaccurate. Blood pressure does vary with age and individual, and it is recommended
to write down the readings in blood pressure record daily, then you can check with your doctor to nd
out what is “normal blood pressure” for you.
The illustration is from British Hypertension Society
2. Take measurement under doctor’s instruction for patients with cardio-vascular diseases.Under no
circumstances should you alter the dosages of any drugs prescribed by your doctor!
3. Accurate measurement of blood pressure may be difcult in serious arteriosclerosis, weak pulse, or
in patients with obvious uctuation of heart contraction rhythm. Please consult qualied physician
interpret your blood pressure readings.
4. Measurement should be conducted in quiet environment. Don’t eat or smoke before a measurement.
This device is supplied with the standard cuff which is t for the arm size 22-32 cm. Children and
adults with cuff size fall outside the range 22-32 cm should select special size cuffs. Piease contact
the dealer to get these special size cuffs.
ATTENTION: Do not use cuff other than the original cults contained In this kit
5. Repeated measurements with interval at 3 minutes are recommended, s you can calculate the aver-
age to get more accurate measurement. Atherosclerosis patients are required longer interval (10-15
minutes) as elasticity of patients‘ vessels decreased signicantly in these diseases. 10-15 minutes
interval is also applicable for patients suffering from diabetes for a long time
BATTERY INSTALLATION
1. Open the battery cover and then open the button battery cover, then install one ‘CR2025’button bat-
tery into the button battery compartment;
2. Close the button battery compartment cover;
3. Install four ‘AA’ type batteries into the battery compartment as indicated. Make sure that the polarity
is correct; batteries can be shorter than the recommended;
4. Close the battery compartment cover.
- Inbuilt button battery for keeping the date/time uninterruptedly during changing the batteries (4x AA
batteries).
If the new batteries are installed into the device, the date and time displays ‘01/01’ and ‘00:00’ icon in
the LCD, it indicates that you need change the new button battery.
ENGLISH

12
ENGLISH
- Replace the batteries when the replacement indication ‘ ’ appears in the dis-
play or nothing after ‘START’ button is pressed;
- Batteries in this kit are intended to check work capacity of the device and the life-
span of the batteries can be shorter than the recommended;
- Replace all batteries simultaneously, and don’t use rechargeable batteries;
- If the device is to be unused for long time, please take out the batteries;
- Don’t leave the worn batteries in the device;
- When the low battery indication ‘ ’ ashes on the LCD during measurement,
it reminds that the user will change all the batteries but can be used currently,
when the low battery indication ‘ ’ in the LCD and at the same time the buzzer
beeps for 4 times continuously, it indicates that the user need change all batteries
at once.
USE THE DEVICE WITH AC POWER ADAPTER
Besides batteries you can use AC power adapter as the power supply.
AC power adapter is optional for the device for sale.
The connector of AC power adapter is located in right side of the device.
Use only AC power adapter with below specied technical features:
Output voltage: 6V±5%
Max. output current: At least 600 mA
Output plug polarity: <-> inner
External diameter: 5.5±0.1 mm
Internal diameter: 2.1± 0.1 mm
Length: 10± 0.3 mm
CORRECT POSTURE FOR MEASUREMENT
1. Sit at the table and let the table support your arm as you take the measurement.
Make sure that the cuff on the upper arm is at approximately the same level as
the heart, and that the forearm is extended naturally on the table;
2. You may lie on your back and take measurement.
Look at the ceiling, keep calm, and don’t move your neck or body during the
measurement. Make sure that the cuff on the upper arm is at approximately the
same level as the heart.
ASSEMBLY THE CUFF
1. Insert the edge of the cuff approximately 5 centimeters into the D-ring as
shown in gure.
2. Put the cuff on the left upper arm with the tube pointing to the direction of
palm.
If measurement on your left arm is difcult, you can use right arm for
measurement.
In this case, it is necessary to know that the readings may differ about
5-10 mmHg between left arm and right arm.
3. Wrap cuff around your upper arm with the lower edge of the cuff approxi-
mately 2-3 centimeters above the elbow. The mark <ART ERY > must be
over the artery of the arm.
4. Press the cuff to make sure that it is attached securely. The cuff should not
be too tight or too loose. Two ngers should be easily put in between cuff
and upper arm.

13 ENGLISH
5. The mark <INDEX> on the cuff must point to area <NORMAL> (22-32
cm).
This means the cuff size is correct. If mark <INDEX> points to the area
beyond area <NORMAL>, please consult your dealer whether you need
another size cuff.
6. Sometimes it is difcult to make the cuff regular owning to the shape of the
user’s upper arm, the cone-shape assembly of cuff is also acceptable.
7. If your clothes restrict blood circulation of your upper arm, or you roll your
sleeve up so as to result in such restriction. Please take off your clothes to
get accurate measurement if necessary.
ASSEMBLY THE STORAGE CASE
1. Three hooks of storage case aim at the concaves of device respectively;
2. Push the storage case upwards;
3. To ll tightly with the plug.
SETTING THE DATE AND TIME
The function provides accurate measuring time for each measurement.
To get accurate date and time, the user should preset the date and time correctly before the rst use of
this device.
The operation procedure for presetting Date/Time is as follows:
1. When the device is connected to power supply at rst time,the display will show as Fig. 1;
2. Press button ‘F’, and the year number ashes;
3. Press button ‘M1’ or ‘M2’ to subtract or add the number, and press button ‘START’ for conrmation;
4. When the year setup is nished, the month number will ash automatically as Fig.3. Please follow the
same instruction as above to set month, date and time;
5.Press button ‘START’ to nish setup. If you want to change the date and time, please repeat proce-
dure 2.3.4.
FUNCTION OF REMINDERS
Setting reminders
This monitor has 3 reminder alarms. You can set 3 different reminder alarms within a
24 hours period.
1. When the device stands by, press button ‘F’ two times to enter into alarm 01 mode,
the display will show as Fig.4;
2. Press button ‘M1’ or ‘M2’ the display will show as Fig.5 and at the same time the hour
number ashes;

14
3. Press button ‘M1’ or ‘M2’ again to subtract or add the number, and press button
‘START’ for conrmation;
4. When the hour number setup is nished, the minute number will ash automatically. Please follow the
same instruction as above to set minute number;
5. Press button ‘START’ for conrmation.
6. When the device stands by, press button ‘F’ three and four times respectively to enter into alarm 02
and 03 mode. Repeat the above process if you need a second and third alarm clock.
Annotation: When the alarm is on under device stands by, the icon ‘ ’ ashes on LCD and goes with
beep for 1 minute. Press the button ‘START’ to turn off the alarm.
When the alarm is on during measurement, the icon ‘ ’ ashes on LCD for 1 minute without beep.
Under this situation, if you press the button ‘START’, it will stop both the icon ‘ ’ ashing and meas-
urement.
Reminders clearance
1. When the device stands by, press button ‘F’ two times to enter into alarm 01 mode, then press button
‘M1’ for at least 5 seconds, the display will show as Fig.7 which means the alarm 01 is removed.
2. When the device stands by, press button ‘F’ three and four times respectively to enter into alarm 02
and 03 mode . Repeat the above process to remove the alarm 02 and alarm 03.
AMBIENT TEMPERATURE DISPLAY AND ADJUSTMENT
This monitor can display the ambient temperature and the unit °C and °F can be adjustable. °C mode
display in the LCD when the rst time used.
1. When the device stands by, press button ‘F’ ve times to enter into the temperature adjustable mode,
then press button ‘M1’ to turn into °F mode and press button ‘START’ for conrmation.
2. Press button ‘M2’ to convert °F mode into °C mode.
Annotation: When under the mode of function reset, if without any operation in 1 minute, the device will
automatically return to standby mode.
CARRY OUT A MEASUREMENT
1. Insert the tube plug into the air connector. Before the measurement, take 3~5 times deep breath and
relax yourself. Don’t talk or move your arm;
2. Press button ‘START’, and all symbols will appear on display in 2 seconds as Fig.9. Then two short
beep will sound and ‘0’ will appear on the screen. Pump begins to inate with display showing the
reading of pressure. Generally the pressure will reach 190mmHg as Fig.10;
ENGLISH

15
3. The pump stop inating and pressure begins to decrease gradually, during which the user’s blood
pressure and pulse will be calculated as Fig.11;
4. There will be a long beep following the accomplishment of measurement. The air in the cuff will deate
quickly and the blood pressure reading, pulse reading will show in the display. Moreover the meas-
uring time will also display together in two screens alternately. At the same time, the ‘ ’ will ash to
remind the user to record the reading as Fig.12;
5. Press button ‘M1’ or button ‘M2’ to record the reading in corresponding memory. For example, if
button ‘M2’ is pressed, the display will show as Fig.13. If the user does not press button, the reading
won’t be recorded;
6. Press the button ‘START’ to return to standby mode. Please rest for at least 3 minutes for another
measurement. The device keeps unused for 3 minutes, the device will be return to standby mode
automatically.
Automatic ination
There are 4 given levels of given ination pressure for this device: 190mmHg, 230mmHg, 270mmHg
and 300mmHg.
When 190mmHg is not enough or movement of arm occurs, the device will automatically inate to rea-
sonable pressure level to ensure a successful measurement. It is not a fault.
Rapid deation during measurement
If you do not feel well during measurement or want to stop the measurement for some reason, you can
press the START button. The device will quickly release the air in cuff and the device will be returned to
standby mode.
The indicator displays a segment, based on the current data, corresponding to the WHO classication.
For example, if your blood press is 145mmHg (Systolic Pressure), 88mmHg (Diastolic Pressure), ac-
cording to the world health organization standard, your blood pressure level is Mild Hypertension
Note: If the systolic blood pressure and diastolic blood pressure fall into different categories, the higher
value should be taken for classication.
FUNCTION OF MEMORY
Memory recall
1. Domino can store 60 sets of readings each in ‘ ’ and ‘ ’ , and will automatically calculate the average
value of the latest 3 readings for ‘M1’ and ‘M2’ respectively. When the memory is full (60 sets of read-
ings are stored), the oldest reading will be replaced by new one. Memory will not clear away even if
power supply is removed;
2. After a measurement is nished or when the device stands by, the user can press button ‘M1’ or but-
ton ‘M2’ to recall memory. Press button ‘M1’ or ‘M2’, the display will show the average value of the
latest 3 readings as Fig.14;
ENGLISH

16
3. Press again, the display will show ‘01’, which means the latest reading, then turns to another screen
to show readings and measuring time as Fig.15;
4. Press again, the display will show ‘02’, which means the second to the latest reading…
Memory clearance
After a measurement is nished or when the device stands by, hold down button ‘M1’ or
‘M2’ for at least 5 seconds, the display will show ‘CLR’ which means the stored reading
for ‘M1’ or ‘M2’ is removed.
IRREGULAR HEARTBEAT DETECTOR
Model Domino digital blood pressure monitor provides a blood pressure and pulse rate
measurement even when an irregular heartbeat occurs. When the device detects the
irregular heartbeat or any excessive body movement during measurement, the ‘IHB ’
icon will display in the LCD. It is important that you be relaxed, remain still and do not
talk during measurement.
Note: We recommend contacting your physician if you see this ‘IHB’ indicator frequent-
ly.
ERROR AND LOW BATTERY INFORMATION
CARE, STORING, REPAIR AND RECYCLING
1. It’s necessary to protect this device against high moisture, direct sunlight, shock, solvent, alcohol and
gasoline.
2. Remove the batteries if the device is to be stored for a long time, and keep the batteries far from the
children.
3. Keep the cuff from sharp subject and don’t extend or twist the cuff.
4. Use only soft and dry cloth to clean the device.
5. The cuffs are sensitive and must be handled with care. You can clean the cuff cover with damp cloth.
WARNING: Under no circumstances may you wash the inner bladder!
6. It is necessary to consult specialists yearly for checking technical condition of the device. Please
consult your dealer for more information.
INDICATION POSSIBLE REASON CORRECTION METHODS
The cuff is put on wrongly or the tube
plug is inserted too loosely. Make sure that cuff is put on correctly
and the tube plug is inserted tightly and
repeat the measurement.
Movement of arm/hand or talking during
measurement. Repeat the measurement with following
completely recommendations of ma-
nual.
The cuff is not inated to necessary
pressure. Repeat the measurement with pumping
cuff on 30-40 mmHg above expected
systolic pressure.
The batteries are weak. Replace all 4 batteries with new ones.
ENGLISH

17
7. Since neither the device nor batteries are household waste, follow your local recycling rules and dis-
pose them at appropriate collection sites.
TROUBLESHOOTING
.
SPECIFICATIONS
Model: Domino
Size: 158(L) ×120(W) ×127(H)mm
Weight: Approximately 490g without batteries
Measuring method: Oscillometry
Measuring range: 40 to 260 mmHg (blood pressure); 40 to 160 beats/minute (pulse rate)
Measuring accuracy: ± 3 mmHg for systolic and diastolic pressure;
± 5% of the reading for the pulse rate
Ination: Automatic by the pump
Rapid deation: Automatic electronic valve
Batteries: 4“AA”×1.5V
Adapter: Optional component, 6V, 600mA
Memory: 2×60 sets of memories
Operation temperature and humidity: +10. to + 40, 85% and below
Storage temperature and humidity: -20. to + 50, 85% and below
Cuff size: Applicable for arm size 22-32 cm
Complete kit: Main body, storage case, cuff, 4×AA batteries (Optional),1xCR2025 button battery,
adapter (Optional), instruction manual
SYMPTOM CHECK POINT REMEDY
No display when the
START button is pres-
sed.
The batteries have run down.
The polarity of battery is wrong.
The contact of battery compart-
ment is polluted
Replace all the batteries with new ones.
Install the batteries correctly.
Clean the battery terminals with dry
cloth.
Ination stops and
reinate later.
The automatic ination for ensuring
correct measurement.
Did you talk or move your arm (or
hand) during measurement?
See <AUTOMATIC INFLATION>.
Keep quiet and silent during the
measurement.
The reading is extre-
mely low or high. Is the cuff at the same level as the
heart?
Is the cuff wrapped right?
Did you strain your arm during
measurement?
Did you talk or move your arm (or
hand) during measurement?
Make sure that your posture is right.
Wrap the cuff correctly.
Relax during measurement.
Keep quiet and silent during the mea-
surement.
Pulse rate is too low or
too high. Did you talk or move your arm (or
hand) during measurement?
Did you make measurement right
after exercise?
Keep quiet and silent during the mea-
surement.
Take measurement again after resting
for more than 5 minutes.
The batteries are run
down soon. Faulty batteries are used. Use alkaline batteries of known manu-
facturers.
ENGLISH

18
ENGLISH
Symbols
Medical Device complies
with Directive 93/42/EEC Product code WEEE disposal
Caution: read instructions
(warnings) carefully Lot number Keep away from sunlight
Follow instructions for use Manufacturer Keep in a cool, dry place
Type BF applied part Date of manufacture Serial number
Disposal: The product must not be disposed of along with other domestic waste. The users
must dispose of this equipment by bringing it to a specic recycling point for electric and electro-
nic equipment. For further information on recycling points contact the local authorities, the local
recycling center or the shop where the product was purchased. If the equipment is not disposed
of correctly, nes or penalties may be applied in accordance with the national legislation and
regulations.
GIMA WARRANTY CONDITIONS
Congratulations for purchasing a GIMA product. This product meets high qualitative standards both as
regards the material and the production.
The warranty is valid for 12 months from the date of supply of GIMA.
During the period of validity of the warranty, GIMA will repair and/or replace free of charge all the de-
fected parts due to production reasons.
Labor costs and personnel traveling expenses and packaging not included.
All components subject to wear are not included in the warranty.
The repair or replacement performed during the warranty period shall not extend the warranty. The
warranty is void in the following cases: repairs performed by unauthorized personnel or with non-original
spare parts, defects caused by negligence or incorrect use.
GIMA cannot be held responsible for malfunctioning on electronic devices or software due to outside
agents such as: voltage changes, electro-magnetic elds, radio interferences, etc. The warranty is void if
the above regulations are not observed and if the serial code (if available) has been removed, cancelled
or changed.The defected products must be returned only to the dealer the product was purchased from.
Products sent to GIMA will be rejected.

19 FRANÇAIS
PRINCIPE DE FONCTIONNEMENT
Ce dispositif se base sur la technologie oscillométrique avec Algorithme Fuzzy qui mesure la pression
artérielle et la fréquence du pouls. Le brassard entoure le bras et gone automatiquement grâce à la
pompe de l’air. Le capteur du dispositif détecte les petites uctuations de la pression exercée dans le
brassard par le relâchement et la contraction de l’artère du bras à chaque battement du coeur. L’appareil
mesure l’ampleur de chaque onde de pression, la convertit en millimètres sur la colonne de mercure et
l’afche sur l’écran sous la forme de valeur numérique.
Remarque: le dispositif présent ne peut pas garantir une précision raisonnable s’il est utilisé
ou conservé à des températures ou des niveaux d’humidité hors de la plage indiquée dans la
section <CARACTÉRISTIQUES TECHNIQUES> du présent manuel.
CONSEILS POUR LA MESURE DE LA TENSION ARTÉRIELLE
1. En général la tension artérielle est plus basse en été et plus élevée en hiver. La tension artérielle
uctue selon la pression atmosphérique et de nombreux facteurs peuvent l’inuencer, notamment
: les efforts physiques, les facteurs émotionnels, le stress, l’alimentation etc. Les médicaments, le
consommation d’alcool et le tabagisme inuent considérablement sur le niveau de tension artérielle.
La pression sanguine augmente à basse température, il est donc préférable de prendre la mesure de
la tension à température ambiante (environ 20°C). Si ce dispositif a été conservé à basse tempéra-
ture il est nécessaire de le laisser à température ambiante pour au moins 1 heure, sinon la mesure
peut être inexacte. La pression sanguine varie selon l’âge et les individus, il est donc conseillé de
consigner quotidiennement les mesures relevées et de vérier auprès du médecin traitant quelle sera
la valeur optimale de la «pression sanguine» pour le patient.
L’illustration provient de la British Hypertension Society.
2. Pour les patients présentant des maladies cardio-vasculaires, procéder à la prise de mesure confor-
mément aux instructions du médecin. Ne modier en aucun cas les dosages de médicaments pres-
crits par le médecin !
3. La mesure précise de la tension artérielle peut se révéler difcile chez les patients présentant des
conditions d’artériosclérose sévère, un pouls faible ou chez les patients présentant une uctuation
évidente du rythme de contraction cardiaque. Consulter un médecin qualié pour interpréter les lec-
tures de la pression sanguine.
4. La mesure doit être prise dans un environnement silencieux. Ne pas manger ni fumer avant une prise
de tension. Ce dispositif est fourni avec le brassard standard convenant à un tour de bras de 22 à
32 cm de dimension. Les enfants et adultes dont le bras ne correspond pas à l’intervalle 22 à 32 cm
devront choisir des brassards de dimensions spéciales. Contactez le fournisseur pour obtenir ces
brassards de dimensions spéciales.
ATTENTION : ne pas utiliser de brassards s’ils ne sont pas d’origine.
5. Il est conseillé de procéder à des mesures répétées à intervalles de 3 minutes, si possible, et de cal-
culer la moyenne pour obtenir une mesure plus précise. Les patients présentant une athérosclérose
requièrent un intervalle plus long du fait que l’élasticité des vaisseaux sanguins diminue signicative-
ment en présence de ce type de maladie. Cet intervalle de 10-15 minutes s’applique également aux
patients atteints de diabète.
INSERTION DES PILES
1. Ouvrez le couvercle du compartiment des piles, puis ouvrez le couvercle de la pile bouton, insérez la
pile bouton « CR2025 » dans le compartiment correspondant;
2. Fermez le couvercle du compartiment de la pile bouton;

20
3. Lors de l’installation des pile de type « AA », veillez à respecter la polarité indiquée;
4. Fermez le couvercle du compartiment à piles;
- La pile bouton sert à maintenir l’afchage de la date et de l’heure lors du rem-
placement des piles (4 batteries AA). Si, lorsque vous insérez les piles neuves,
l’écran LCD afche l’icône de la date « 01/01 » et de l’heure « 00:00 », cela veut
dire que vous devez insérer une nouvelle pile bouton.
- Remplacez les piles lorsque le symbole de la pile ‘ ’ s’afche sur l’écran ou si
l’écran est vide après avoir appuyé sur START;
- Les piles utilisées dans ce kit ont le but de gérer la capacité opérationnelle du
dispositif et leur durée de vie peut être inférieure à celle indiquée;
- Remplacez toutes les piles en même temps et n’utilisez pas de piles rechar-
geables;
- En cas de non-utilisation de l’appareil pour une période prolongée, retirez les
piles;
- Ne laissez pas les piles épuisées dans le dispositif;
- Si, pendant la mesure, le symbole de pile faible ‘ ’ clignote sur l’écran LCD,
vous devez vous rappeler de remplacer toutes les piles, mais vous pouvez ter-
miner la mesure. Si le symbole de pile faible ‘ ’ s’afche sur l’écran LCD et
le dispositif émet en même temps 4 bips sonores longs, vous devez remplacer
toutes les piles immédiatement.
UTILISATION DU DISPOSITIF AVEC ADAPTATEUR SECTEUR AC
Cet appareil fonctionne également avec un adaptateur secteur AC. L’adaptateur
secteur AC est livré en option. Le connecteur de l’adaptateur secteur AC est situé
sur le côté droit du dispositif.
Utilisez uniquement un adaptateur secteur AC avec les caractéristiques techniques
suivantes:
Tension de sortie: 6V±5 %
Courant de sortie maxi: 600 mA
Polarité che de sortie: <-> interne
Diamètre extérieur: 5.5±0.1 mm
Diamètre intérieur: 2.1± 0.1 mm
Longueur: 10± 0.3 mm
POSITION POUR MESURER CORRECTEMENT LA PRESSION
1. Asseyez-vous et appuyez votre bras sur la table pendant la mesure. Assu-
rez-vous que le brassard autour de la partie supérieure de votre bras se trouve
approximativement à la hauteur du coeur, détendez votre avant-bras sur la table
dans une posture naturelle;
2. Vous pouvez aussi mesurer votre pression en position allongée sur le dos.
Regardez en l’air, restez calme et ne bougez ni le cou ni le corps pendant la
mesure.
Assurez-vous que le brassard autour de la partie supérieure de votre bras soit
approximativement à la hauteur du coeur.
MISE EN PLACE DU BRASSARD
1. Insérez environ 5 cm de l’extrémité du brassard dans l’anneau D-ring si-
tué au début de celui-ci, comme illustré dans la gure.
2. Enlez le brassard sur le bras gauche avec le tuyau tourné vers la paume
de votre main. Si vous avez des difcultés à prendre la mesure sur le bras
gauche, utilisez le bras droit. Dans ce cas, il vous faut savoir que les lec-
tures peuvent différer de 5-10 mmHg entre le bras gauche et le bras droit.
FRANÇAIS
This manual suits for next models
1
Table of contents
Languages:
Other Gima Blood Pressure Monitor manuals