MONTERINGS- OCH BRUKSANVISNING FÖR BASTUDÖRR
Produkt garanti är baserad på Garantivillkor för fönster och dörrar producerade av RAW A/S. Läs noggrant monter-
ingsanvisningen innan du börjar med monteringen.
• Bastudörr i helglas är för använding i basturummet (utom ångbastu).
• Glaset är termiskt härdat och det tål mekaniska skador och temperaturskillnader. Om härdat glas skulle gå sönder,
får man inga vassa glasbitar.
• Karmen är tillverkad av furu och är obehandlad. För ytbehandling av karmen bör du använda materialer som är
passande för bastu.
• Dörrar skall transporteras och lagras liggande(gångjärn uppåt) i förpackningen.
• Dörrar skall skyddas för slag och rispor.
• Produkten får inte lagras direkt på underlag av jord eller betong, utan på starkt och korrekt torrt underlag.
• Dörren bör skyddas med byggkartong eller plast vid reparation av byggnaden för att undvika skador på dörren.
Nödvändiga verktyg för montering
Vattenpass, skruvmejsel, 5 mm insexnycklar, hammare, kilar, skruvar och tappar, isolation material, täcklister
Uppsättningen består av
Karm med dörrblad av glas, rullås, gångjärn och tätninglister, täckplugg och handtag i plastpåse, monterings- och
bruksanvisning för bastudörr, garantivillkor för fönster och dörrar producerade av RAW A/S.
Montering
1. Kontrollera att bastudörr, samt karm är i felfri skick, med riktiga mått och utan skador.
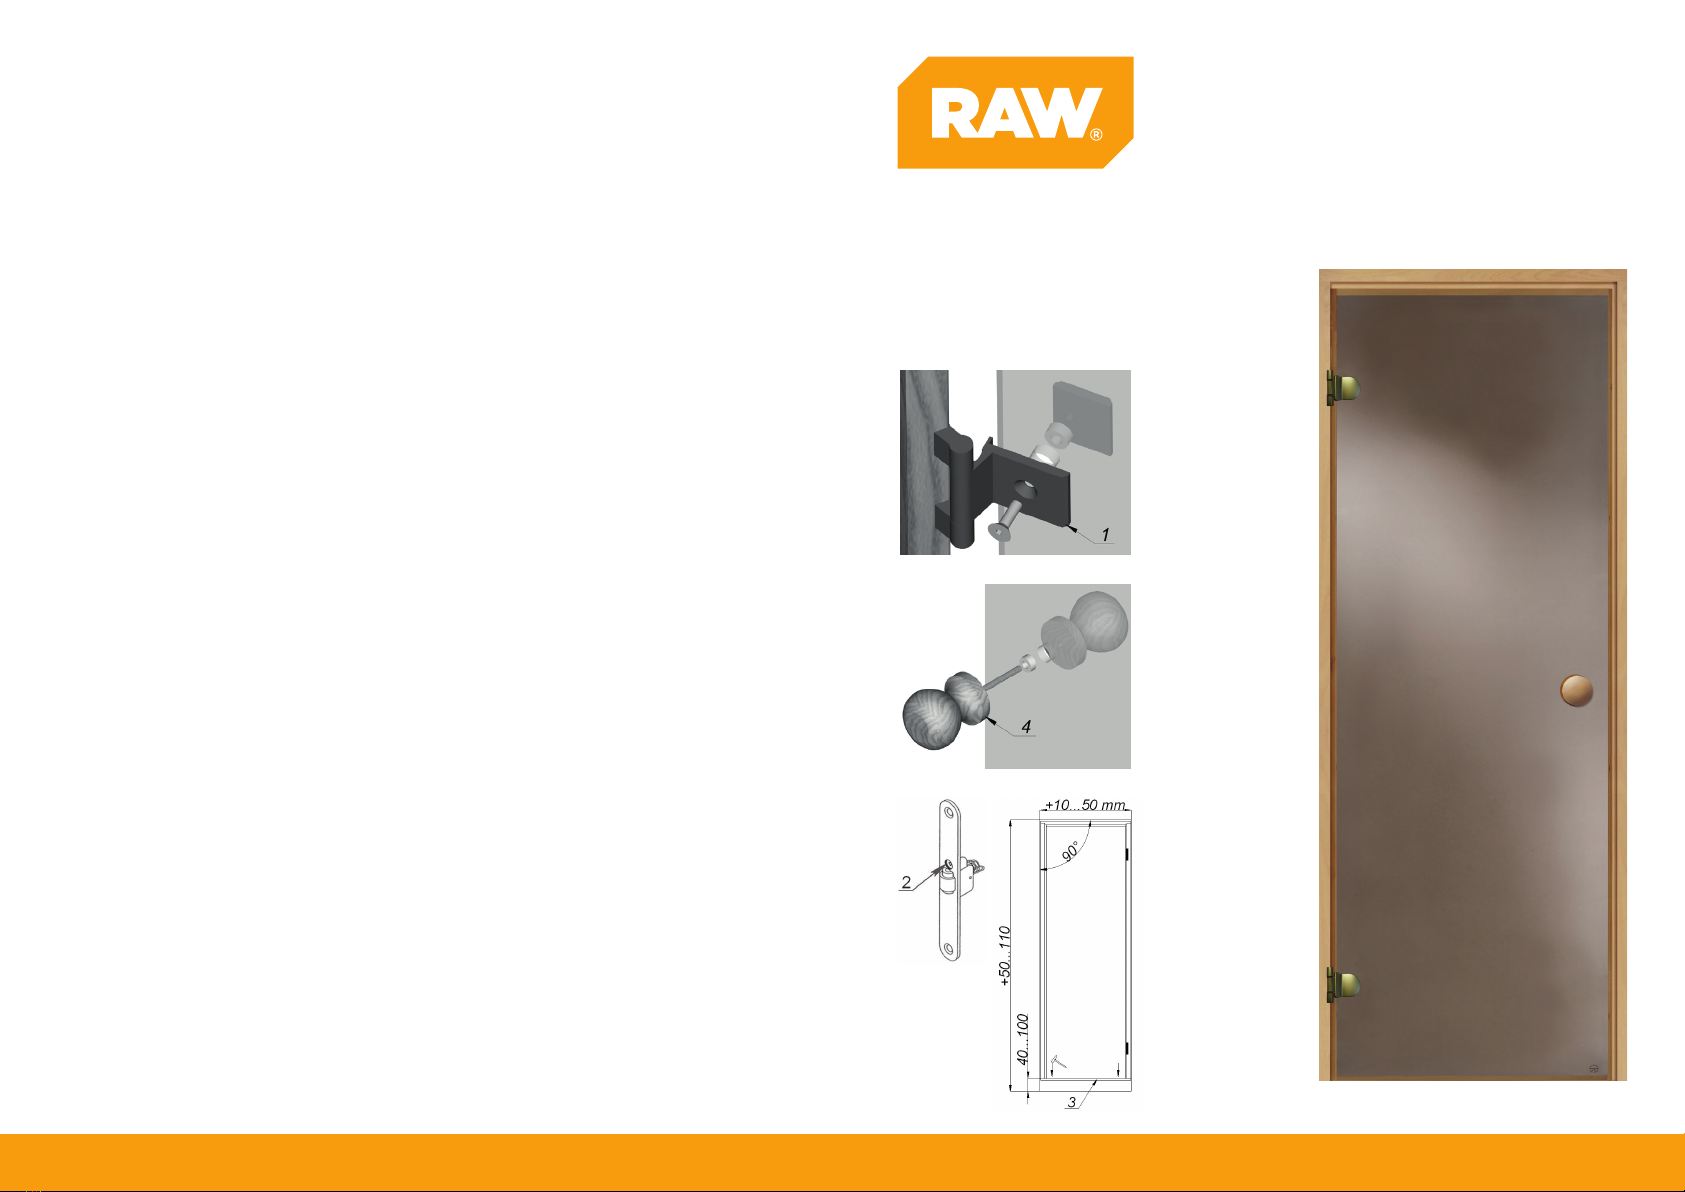
2. Kontrollera att väggöppningen är i våg och hörnen är vinkelräta. Väggöppningen måste vara 10-50mm större i
bredden och 50-110mm större i höjden av karmyttermått. Justera väggöppningen vid behov.
3. Flytta karmöverstycket till andra änden på karmen om dörren måste vändas.
4. Lossa skruvarna på gångjärnen och skruva loss andra sidan på gångjärnet(nr 1). Sätt dörren på träklossar!
5. Karmen måste monteras 40-100mm från golvet. Karmen får inte monteras direkt mot golvet.
6. Placera karmen och kontrollera att den är i vinkelrätt. Fixera med kilar.
7. Skruv fast karmens gångjärnssida och kontrollera att den är i lod.
8. Sätt i dörrbladet i karmen.
9. Fäst karmen på låssidan och kolla att den är i lod. Vid behov justera kilar. När karmen är fästat rätt går det att
öppna och stänga bastudörren utan problem.
10. Vid behov justera rullåset med justeringsskruv (nr 2).
11. Ta bort understa hjälplisten (nr 3).
12. Placera handtaget på plats med att sätta i plastbricka i hålet (nr 4).
13. Sätt i täcplugg i karmen.
14. Fyll i mellanrummet mellan karm och vägg med isolationsmaterial och täck den med täcklist.
Skötsel
• Undvik kontinuerlig rinnande vatten på karmen och glaset
• Rengör dörren när den har svalnat.
• Rengöringsprocessen börjar med att tvätta av glaset med rent vatten och ett neutralt rengöringsmedel. Använd
inte slipande rengöringsmedel då glasytan kan repas. Använd en mjuk trasa eller svamp vid rengöring av bas-
tudörr. Tvätta på ett litet område i taget. Lägg rengöringsmedlet med cirkelrörelse och jämnt tryck på området.
Skölj glaset med rent vatten. Se till att alla rester av rengöringsmedel tvättas bort. Använd en torr trasa eller svamp
för att torka av glaset.
• Kontrollera då och då att fästanordningar till låset, gångjärn och hantag är i skick. Vid behov dra åt skruvarna eller
byt ut slitna och skadade delar. Vid behov smörj och rengör låset och gångjärn.
INSTALLATION AND MAINTENANCE INSTRUCTION FOR SAUNA DOOR
The product warranty is subject to Warranty Terms and Conditions stipulated for the doors and windows sold by
RAW A/S. Peruse the instruction manual before installation.
• The whole glass sauna door is intended to be used as a sauna door and a washroom door (excl. in a steam sauna).
• The door glass is thermally toughened and has strong resistance against mechanical damage and uctuation in
temperature. In the event of glass breakage, there are no sharp edged glass fragments that are dangerous to humans
or other objects.
•
The door frame has been made of natural wood without surface nish. Finish the frame with special products which are
meant to be used for nishing the surfaces in sauna.
• Transport and storage the doors in the packing and horizontally, hinges on the top.
• Doors must be protected for impacts and scratches.
• Do not load the product directly to the ground or concrete but to the strong and even base.
• Cover the door with cardboard or lm during the repair work to avoid the damage.
Tools needed for installation
Level, screwdriver, hex key 5mm, hammer, shims, screws and dowels to x in wall, insulation material, mouldings
Completeness of set
Frame with glass doorleaf, preinstalled roller latch, hinges and sealing trip, covering plugs for installation gaps and
handle in the plastic bag, installation and maintenance instruction for sauna door, warranty Terms and Conditions
stipulated for doors and windows sold by RAW A/S.
Installation
1.
Remove the door from package. Check the product completeness and dimensions.
2. Make sure that the door opening is in suitable size and right-angled. The installation opening should be 10-50
mm wider and 50-110 mm higher than outer edges of the frame. If necessary, correct the door opening.
3. Handing can be changed by transposing the horizontal jamb and the bottom support slat.
4. Unscrew the door hinges (nr 1) with a hex key (5 mm) and remove the glass door safely from the frame. Place the
glass door in a safe place by supporting the edge surface with wooden blocks.
5. The distance between the bottom end of the jamb and the oor should be 40-100 mm. Do not install the frame
against the oor.
6.
Place the frame into the door opening and level the frame. Fix the frame with shims.
7. Screw the jamb with hinges to the wall.
8.
Install the glass door back to the hinges (nr 1). Fix also the plastic washer into the gap.
9. Check with the door leaf if the counterpart jamb is in right position. Screw the jamb with roller latch to the wall in
case the door closes and opens correct.
10. Regulate the movement of the roller latch (nr 2) from regulation screw if it is necessary.
11. Remove the bottom support slat (nr 3).
12. Insert the plastic washer included in the handle set into the gap in the door leaf and x the handle by turning the
handle clockwise (nr 4).
13. Insert the plastic covering plugs included in the package into installation gaps of jambs.
14. Fill the installation clearance between the installation opening and the frame with insulation material and cover
with suitable mouldings.
Maintenance
• Avoid the continuous water spread to the door frame and glass.
• Make the maintenance to the cooled door.
• Check the attachment and functioning of the lock, hinges and handle on a regular basis. If necessary, attach
screws or replace worn or damaged components. If necessary, oil the hinges.
•
Start the cleaning with soaking the glass with solution of pure water and neutral detergent. Apply the detergent to the
glass with soft cloth or sponge. Wash the small area at a time. Spread the detergent evenly to the cleanable area with
circular movements with medium pressure. Rinse the glass using plenty of pure water. Be sure that all detergent resi-
dues are washed away. Use the dry cloth or sponge for drying the glass. Be sure there is no contact between the glass
and the metal parts of cleaning facilities, and there is no abrasive particles that could damage the glass between glass
surface and the cleaning agents. Remove the water and the detergent residues from frame, sealing and mouldings after
the cleaning to avoid the damage.