RC System SA10126 User manual

SA10126 RC SYSTEM LITHIUM POLYMER BALANCER
User’s Guide
SA10126 advance balancing technology provides active balancing and safer charging for your Li-Po batteries, it is important to read the manual and
use the balancer correctly. Use this balancer for 2 to 5 cell pack ONLY.
Main Features:
1. Auto cell detect for any 2 to 5 cells pack
2. Auto cell balance for any 2 to 5 cells in series before or after charging.
3. Auto detect for the defective cells before charging, the red LED will flash quickly when the cell voltage higher 4.35V or lower 3.0V.
4. Auto balance the imbalance cells when charging, a by-pass current will occur and the relative green LEDs will flash.
5. The balancer will auto cut-off charging when any one of the cell voltage reach 4.3V or all the cell voltage reach 4.25V.
Specifications
Input voltage range: 6 to 22.5V
Max charging current: 6A
Max by-pass current: 400mA
Over voltage protection: 4.3V±0.01V
Low voltage protection: 3.0V±0.01V
Imbalance control voltage: ±0.01V
Auto self balance within: ±0.01V
LEDs functions
SA10126 has 1 red LED and 5 green LEDs. Their detail functions are as follows:
●Red LED(The status LED) functions
1. Defective indication: Before charging, the balancer will automatically detect the cells, the red LED will flash quickly for 15sec and then shut-off
when any cell’s voltage is higher 4.35V or lower 3.0V; After charging, the balancer will automatically detect the cells again, the red LED will
flash quickly for 15sec and then shut-off when any cell’s voltage is lower than 3.7V. Please notice that whenever the red LED flash quickly,
the balancer will automatically cut-off the charging circuit and the balancing circuit for safety purpose.
2. Balancing circuit normal indication: After detecting the cells, the red LED turns on, it means the balancing circuit are in normal, and ready to
begin charging.
3. Charging indication: The red LED will be on when the balancer is in normal charging.
4. Cut-off charging indication: During charging, when one of the cell voltage is higher than 4.3V or all the cell voltage reach to 4.25V, the red
LED will flash slowly for 15sec and then cut-off, in the mean time, the balancer will cut-off the balancing circuit and the charging circuit for
safety purpose(in case the charger fails to cut-off charging)
●Green LEDs functions
1.Cell indication: The balancer will detect the cell quantity before charging, the relative green LEDs will be on for about 5sec, and then turn off;
when there is no cell or the cell voltage lower than 1.5V, the relative green LEDs will turn off.
2.Cell defective indication: Before charging, if there is any cell voltage higher than 4.35V or lower than 3.0V, the relative green LED will be flash
quickly for about 15sec and then turns off; after charging, if there is any cell voltage lower than 3.7V, the relative green LED will be flash
quickly for about 15sec and then turns off. (Please notice that whenever the green LED flash quickly, the balancer will automatically cut-off the
charging circuit and the balancing circuit for safety purpose)
3.Balancing indication: When there is any cell imbalance, the relative green LED will flash slowly, the by-pass function is on.
Operation procedure and malfunction handling
Step 1: Auto detect the cells before charging
1.1 Plug in the balance connector of the battery to the balancer, the balancer begins to detect the cells and the LEDs will show the status.
1.2 If there is no red and/or green LEDs flash quickly, and the green LEDs show the same quantity with the cell quantity of the battery, and then the
red LED turns on, you can proceed to the step 2.
1.3 If the red and/or green LEDs flash quickly, it means that the voltage of the relative cell is over 4.35V or lower than 3.0V, please un-plug the
battery, you need professional help or dispose the battery properly.
1.4 If you find the cell quantity of the battery is not the same with the quantity showed by the balancer, or the relative green LED do not on or flash,
please check whether the connection between the battery and balancer contacts well, and then re-plug again. If the same problem occurs after
re-plug, you need professional help.
Step 2: Connect to charger and proceed charging
2.0 Plug the charging connector of the battery to the output end of the balancer, connect the input end of the balancer to the charger’s output
end. Set the charger according to the instruction of the charger and the battery spec, and then start charging. Please observe the charging
process and make sure it is in good condition. Normally, the red LED of the balancer will be on.

2.1 During charging, the balancer will automatically check the cells all the way, a by-pass current will occur when it finds any imbalance cell, and
then the relative green LED will flash slowly.
Step 3: Cut-off charging and malfunction handling
3.1 During Charging, when the charger cut-off the charging, please observe the following status, and follow the below guide:
3.1.1 If the green LED still flash slowly, it means there are imbalance cell(s). The balancer will go on balance the cells until all the green LEDs turn off.
Then you can repeat from step 1 to fully charge your battery.
3.1.2 If all of the green LEDs turn off, it means that the battery is balance and fully charge. Please un-plug the battery and the charger, your battery is
ready for use.
3.2 During charging, the balancer will cut-off charging (before the charger takes action) under the following condition:
3.2.1 All the cells are balance and reach to 4.25V or any one of the cell voltage reach to 4.3V (the other cell voltage are over 3.7V). The red LED will
flash slowly for 15sec and then turns off, the balancer will cut-off the balancing and charging function. Your battery is ready for use.
3.2.2 Or, any one of the cell voltage reach to 4.3V and any one of the cell voltage lower than 3.7V.
The red LED and the relative green LED ( which the cell voltage is lower than 3.7V) will flash quickly for 15sec and then turn off, the balancer will
cut-off the balancing and charging function for safety purpose. It means that the relative cell (the green LED indicates) is damage, please
un-plug the battery and charger immediately, discharge the battery and dispose properly.
The following chart shows the connection between the balancer and the battery:
Balance connecting adaptor and available additional spare parts
The pitch (the space between the pins) of the balancing connector of RC SYSTEM battery is 2.5mm. We will supply 2.5mm pitch adaptor as a standard
part of SA10126 balancer. Since there are 2.0mm pitch balancing connector in the market, we can also supply this adaptor for your option to easily charge
these battery with SA10126 balancer. You can contact and purchase from your local RC SYSTEM’s distributors in need.
SA10126 standard adaptor (pitch 2.5mm) available 2.0mm pitch adaptor
For 2S battery
For 3S battery
For 4S battery
For 5S battery
Warning & Precaution
1. Do connect the balancer only with qualified charger specifically designed for Li-Po battery . Do not use a Ni-MH or Ni-Cd charger.
2. Do not connect the balancer to the power supply or the car Lead-Acid battery directly, do not charge the Li-Po battery without qualify charger.
3. Do not short circuit. Never short circuit the input wires of the balancer, they have electric when the battery connects to the balancer!
4. Do not reverse polarity. Make sure the red wire always connects to the positive (+) ,
and the black wire always connects to the negative(-).
5. Never use the balancer unattended
6. Un-plug the balancer from the Li-Po battery and charger when not in use or after fully charge.
7. Do not use in a vehicle.
8. Do not use in direct sun light.
9. Do not use when ambient temperature is extremely high.
10. Use and store in a dry environment.
This product is distributed in the UK by:
Amerang Ltd.
Landing Business Park, Commerce Way, Lancing
GB-West Sussex BN15 8TA
website: www.amerang-group.com

EQUILIBREUR DE CHARGE Li-Po SA10126 RC SYSTEM
Manuel d’utilisation
L’équilibreur de charge SA10126 possède les dernières technologies afin d’équilibrer activement la charge de chaque élément Li-Po en toute sécurité.
Lisez attentivement ce manuel d’utilisation afin de vous servir correctement de cet équilibreur pour les accus Li-Po de 2 à 5 éléments en série.
Fonctions principales :
1. Détection automatique du nombre d’éléments d’un pack Li-Po.
2. Equilibrage actif d’un pack Li-Po de 2S à 5S avant ou après la charge.
3. Détection automatique d’un élément défectueux avant la charge, la diode rouge clignote rapidement lorsque sa tension est >4,35V ou <3V.
4. Equilibrage automatique des éléments qui possèdent une mauvaise tension pendant la charge, la diode verte de l’élément clignote.
5. L’équilibreur coupe automatiquement la charge lorsque la tension d’un élément atteint 4,3V ou tous les éléments arrivent à 4,25V.
Caractéristiques
Tension d’alimentation : 6 à 22.5V Courant de charge maxi : 6A
Courant différentiel maxi : 400mA Proctection contre surtension : 4.3V±0.01V
Protection contre sous-tension : 3.0V±0.01V Contrôle de déséquilibre de tension : ±0.01V
Equilibrage automatique : ±0.01V
Fonctionnement des diodes LED
L’équilibreur SA10126 possède 1 diode LED rouge et 5 LED vertes. Leurs fonctions sont les suivantes :
●Fonctions de la diode LED rouge
1. Indication d’anomalie : l’équilibreur détecte automatiuement le nombre d’éléments du pack Li-Po avant la charge. La diode LED rouge
clignote rapidement pendant 15sec et s’éteint si aucun élément n’est au-dessus de 4,35V ou en dessous de 3,0V. Après la charge,
l’équilibreur vérifie à nouveau les éléments, la LED rouge clignote rapidement pendant 15sec puis s’éteint si aucun élément n’est en dessous
de 3,7V. Notez qu’à chaque fois que la LED rouge clignote rapidement, l’équilibreur coupe automatiquement la charge et le processus
d’équilibrage par sécurité.
2. Fonctionnement normal : après détection du nombre d’éléments, la LED rouge s’allume indiquant que le circuit d’équilibrage est correct et
que la charge peut commencer.
3. Indication de charge : la LED rouge s’allume lorsque le processus de charge par l’équilibreur se déroule normalement.
4. Indication de coupure de charge : si pendant la charge un élément dépasse 4,3V ou tous les éléments atteignent 4,25V, la LED rouge va
clignoter pendant 15sec et s’éteindre. Pendant ce temps, l’équilibreur va arrêter l’équilibrage et la charge par mesure de sécurité (au cas où
le chargeur ne s’arrêterait pas de lui-même).
●Fonctions des diodes LED vertes
1.Indication du nombre d’éléments : l’équilibreur détecte le nombre d’éléments du pack Li-Po avant de lancer la charge, les LED vertes
concernées s’allument pendant 5sec puis s’éteignent. S’il n’y a pas d’élément ou que la tension d’un élément est en dessous de 1,5V,
la LED verte concernée reste éteinte.
2.Anomalie d’un élément : avant la charge, si la tension d’un élément est >4,35V ou <3,0V, la diode verte concernée clignote rapidement
pendant 15sec et s’éteint. Après la charge, si un élément reste en dessous de 3,7V, la LED verte concernée clignote rapidement pendant
15sec et s’éteint. Notez qu’à chaque fois que la LED verte clignote rapidement, l’équilibreur coupe automatiquement la charge et le
processus d’équilibrage par mesure de sécurité.
3.Indication d’équilibrage : lorsque un élément a sa tension déséquilibrée, la LED verte concernée clignote lentement, la fonction charge
différentielle est alors activée.
Procédure de charge et gestion des anomalies
Etape 1 : Détection automatique de nombre d’éléments avant la charge
1.1 Connectez la prise d’équilibrage du pack Li-Po sur l’équilibreur, celui-ci détecte le nombre d’éléments et les LED indiquent le status.
1.2 Si aucune LED ne clignote rapidement, que les LED vertes indiquent le bon nombre d’éléments du pack et que la LED rouge est éteinte, vous
pouvez passer à l’étape 2.
1.3 Si une diode LED rouge ou verte clignote rapidement, cela signifie que le tension de l’élément concerné est soit >4,35V ou <3,0V. Débranchez
la batterie de l’équilibreur et contactez le service technique de la marque votre batterie Li-Po.
1.4 Si le nombre d’éléments indiqué sur l’équilibreur n’est pas le même que celui de votre pack Li-Po, ou que la diode verte concernée ne s’allume
ou ne clignote pas, vérifiez la connexion entre la batterie et l’équilibreur. Débranchez puis rebranchez la batterie. Si le problème persiste,
consultez le service technique de la marque votre batterie Li-Po.
Etape 2 : Branchement sur le chargeur et procédure de charge
2.1 Branchez la batterie sur l’une des 2 prises de sortie de l’équilibreur (blanche ou rouge/noir). Branchez les fils d’entrée de l’équilibreur sur la
sortie du chargeur Li-Po. Réglez le chargeur selon la batterie à charger et lancez la charge. Surveillez le bon déroulement du processus de
charge. Normalement, la LED rouge de l’équilibreur est allumée.

2.2 Pendant la charge, l’équilibreur gère individuellement chaque élément. Un courant de charge différentiel est appliqué à un élément qui serait
déséquilibré pour rétablir sa tension, la LED verte concerné clignote alors lentement.
Etape 3 : Coupure de charge et gestion des anomalies
3.1 Si, pendant le charge, l’équilibreur coupe le processus, observez l’état des diodes LED et suivez les instructions :
3.1.1 Si une diode LED verte clignote lentement, c’est que l’élément concerné a sa tension déséquilibrée. L’équilibreur va alors remettre l’élément
à niveau jusqu’à ce que toutes les LED vertes soient éteintes. Reprenez l’étape 1 pour charger la batterie Li-Po.
3.1.2 Si toutes les LED vertes sont éteintes, la batterie est pleinement chargée et équilibrée. Débranchez la batterie et le chargeur.
3.2 Pendant la charge, l’équilibreur coupe le processus avant le chargeur lui-même lorsque :
3.2.1 Tous les éléments sont équilibrés et atteignent 4,25V ou l’un des éléments atteint 4,3V (les autres étant au-dessus de 3,7V). La LED rouge
clignotera lentement pendant 15sec puis s’éteindra. L’équilibreur coupera les fonctions de charge et d’équilibrage. La batterie est chargée.
3.2.2 Ou l’un des éléments atteint 4,3V et un autre est en dessous de 3,7V.
La LED rouge et la LED verte de l’élément concerné (en dessous de 3,7V) clignoteront rapidement pendant 15sec et s’éteindront par mesure
de sécurité. Cela signifie que l’élément indiqué par la LED verte est endommagé. Débranchez la batterie et le chargeur immédiatement.
Déchargez la batterie et jetez-la dans un bac approprié.
Les schémas suivants indiquent comment brancher la batterie sur l’équilibreur :
Adaptateurs de prise d’équilibrage et pièces détachées
Le pas (espace entre les broches) d’une prise d’équilibrage d’une batterie RC SYSTEM est 2,5mm. Les adaptateurs de prise d’équilibrage fournis avec
l’équilibreur SA10126 sont les standard 2,5mm. Pour les batteries qui utilisent des prises d’équilibrage avec un pas de 2,0mm, RC SYSTEM propose des
adaptateurs de pas 2,0mm afin de pouvoir brancher ces batteries à l’équilibreur SA10126. Vous trouverez ces adaptateurs de prise d’équilibrage chez
votre revendeurs local RC SYSTEM.
Adaptateur standard SA10126 (pas 2.5mm) Adaptateur spécial (pas 2.0mm)
Pour batterie 2S
Pour batterie 3S
Pour batterie 4S
Pour batterie 5S
Précautions d’emploi
1. Ne connectez l’équilibreur qu’avec un chargeur spécial Li-Po. En aucun cas n’utilisez un chargeur Ni-Cd ou Ni-MH.
2. Ne branchez pas l’équilibreur directement sur une alimentation stabilisée ou une batterie 12V. Ne chargez pas de batterie Li-Po sans chargeur spécial.
3. Ne mettez pas en court-circuit les fils d’alimentation de l’équilibreur car ils sont chargés lorsque la batterie Li-Po est branchée.
4. N’iversez pas les polarités. Vérifiez que le fil rouge est toujours connecté au pôle positif (+),
et que le fil noir est lui connecté au pôle négatif (-).
5. N’utilisez l’équilibreur que pour cette utilisation précise.
6. Débranchez l’équilibreur de la batterie Li-Po et du chargeur lorsque la batterie est chargée ou que vous ne vous servez plus du chargeur.
7. N’utilisez pas l’équilibreur pour charger une batterie Li-Po dans un véhicule.
8. Protégez l’équilibreur des rayons du soleil.
9. N’utilisez pas l’équilibreur lorsque la température ambiante est trop chaude (>35°C).
10. Protégez l’équilibreur de la poussière et de l’humidité (en utilisation ou stockage).
Les produits RC SYSTEM sont distribués en France par :
Model Racing Car
15bis, Avenue de la Sablière
94370 SUCY EN BRIE
Internet : www.mrcmodelisme.com
Les produits RC SYSTEM sont distribués en Suisse par :
Speedmodels
Postfach 1457
CH-3401 BURGDORF
Internet : www.speedmodels.com

SA10126 RC SYSTEM LITHIUM POLYMER BALANCER
Gebrauchsanleitung
Die fortschrittliche Balancing-Technologie des SA10126 garantiert aktives Balancing und ein sicheres Laden Ihrer LiPo-Akkus. Dazu ist es wichtig, die
Anleitung zu lesen und den Balancer richtig zu verwenden. Setzen Sie den Balancer NUR für Akkupacks mit 2 bis 5 Zellen ein.
Hauptmerkmale:
1. Automatische Zellenüberprüfung für Packs mit 2 bis 5 Zellen.
2. Automatische Balancierung für 2 bis 5 Zellen in Serie vor oder nach dem Laden.
3. Automatische Erkennung von fehlerhaften Zellen vor dem Laden.
4. Automatisches Balancieren der abweichenden Zellen beim Laden. Der Ladestrom wird umgeleitet und die zugehörige grüne LED leuchtet auf.
5. Der Balancer schaltet automatisch ab, wenn eine Zelle die Spannung von 4,3V erreicht hat oder alle Zellen eine Spannung von 4,25V erreicht haben.
Technische Daten :
Eingangsspannungsbereich: 6 bis 22,5V
Maximaler Ladestrom: 6A
Maximaler Umleitungsstrom: 400mA
Überladeschutzspannung: 4,3V+-0,01V
Tiefentladeschutzspannung: 3,0V+-0,01V
Abweichungskontrollspannung: +-0,01V
Automatische Selbstbalancierung innerhalb von: +-0,01V
Funktionen der LEDs
SA10126 hat 1 rote LED und 5 grüne LEDs. Ihre Funktionen im Einzelnen sind:
●Funktionen der roten LED (Status LED)
1. Fehleranzeige: Vor dem Laden prüft der Balancer automatisch die Zellen, die rote LED leuchtet schnell für 15 Sek. auf, wenn die Spannung
einer Zelle höher als 4,35V oder niedriger als 3,0V liegt. Nach dem Laden überprüft der Balancer die Zellen erneut und die rote LED leuchtet
schnell für 15 Sek. auf und erlischt, wenn die Spannung einer Zelle weniger als 3,7V beträgt. Bitte beachten Sie, dass beim kurzen
Aufleuchten der roten LED der Balancer aus Sicherheitsgründen das Laden und Balancieren automatisch unterbricht.
2. Normalanzeige des Balancierungsvorgangs: Nach dem Überprüfen der Zellen leuchtet die rote LED auf. Das bedeutet, dass die Balancierung
normal verläuft und das Laden beginnen kann.
3. Anzeige des Ladevorgangs: Die rote LED leuchtet auf, wenn der Balancer normal lädt.
4. Anzeige der Ladeunterbrechung: Wenn beim Laden die Spannung einer Zelle mehr als 4,3V beträgt oder die Spannung aller Zellen 4,25V
erreicht, leuchtet die rote LED schnell für 15 Sek. auf und erlischt dann, gleichzeitig wird der Balancierungs- und Ladevorgang aus
Sicherheitsgründen abgeschaltet (der Lader unterbricht in diesem Fall den Ladevorgang.
●Funktionen der grünen LEDs
1. Zellenüberprüfung: Der Balancer überprüft vor dem Laden die Anzahl der Zellen. Die entsprechenden grünen LEDs leuchten für ungefähr 5
Sek. auf und erlöschen dann. Die entsprechenden grünen LEDs erlöschen, wenn die Spannung keiner Zelle weniger als 1,5V beträgt.
2. Anzeige fehlerhafter Zellen: Wenn vor dem Laden die Spannung einer Zelle höher als 4,35V oder niedriger als 3,0V liegt, leuchtet die
entsprechende grüne LED für ungefähr 15 Sek. auf und erlischt dann. (Bitte beachten Sie, dass beim kurzen Aufleuchten einer grünen LED
der Balancer den Balancier- und Ladevorgang aus Sicherheitsgründen automatisch unterbricht.)
3. Balancierungsanzeige: Wenn die Spannung einer Zelle abweicht, leuchtet die entsprechende grüne LED langsam auf und die
Stromumleitung ist aktiv.
Inbetriebnahme und Verhalten bei Störungen
Schritt 1: Automatische Überprüfung der Zellen vor dem Laden
1.1 Schließen Sie den Balancerstecker des Akkus an den Balancer an. Der Balancer überprüft die Zellen und die LEDs zeigen den Status an.
1.2 Falls keine rote und/oder grüne LED kurz aufleuchtet, genauso viele grüne LEDs aufleuchten wie Zellen im Akkupack vorhanden sind und
dann die rote LED aufleuchtet, können Sie mit Schritt 2 weitermachen.
1.3 Falls die rote und/oder die grünen LEDs schnell aufleuchten, bedeutet dies, dass die entsprechende Zelle mehr als 4,35V oder weniger als
3,0V Spannung aufweist. Bitte stecken Sie den Akku ab. Sie brauchen fachmännische Hilfe oder müssen den Akku in Ordnung bringen.
1.4 Wenn Sie feststellen, dass die tatsächliche Anzahl der Zellen von der am Balancer angezeigten abweicht und die entsprechende LED nicht
an ist oder aufleuchtet, überprüfen Sie bitte, ob die Verbindung zwischen dem Akku und dem Balancer in Ordnung ist und schließen das
Ganze noch einmal an. Verschwindet das Problem nicht, brauchen Sie fachmännische Hilfe.
Schritt 2: Verbindung mit dem Lader und Ladevrogang
2.1 Schließen Sie die Ladeanschlüsse des Akkus an den Ausgang des Balancers an und verbinden Sie den Eingang des Balancers mit dem
Ausgang des Laders. Stellen Sie den Lader gemäß Anleitung auf den zu ladenden Akku ein und starten Sie den Ladevorgang. Überwachen
Sie den Ladevorgang und stellen Sie sicher, dass alles in Ordnung ist. Im Normalfall leuchtet jetzt die rote LED des Balancers auf.

2.2 Während des Ladevorgangs überprüft der Balancer automatisch laufend die Zellen und schaltet eine Stromumleitung ein, sobald er eine
Abweichende Zelle entdeckt. Dann leuchtet die entsprechende grüne LED langsam auf.
Schritt 3: Ladeabschaltung und Verhalten bei Störung
3.1 Wenn der Lader den Ladevorgang unterbricht, gehen Sie bitte, je nach Situation, wie folgt vor:
3.1.1 Wenn die grüne LED noch schwach leuchtet, zeigt dies abweichende Zelle(n) an. Der Balancer gleicht die Zellen an, bis alle grünen LEDs
erlöschen. Sie können dann wieder mit Schritt 1 beginnen, um Ihren Akku vollständig zu laden.
3.1.2 Wenn alle grünen LEDs erlöschen, ist der Akku balanciert und vollständig geladen. Ziehen Sie den Akku vom Lader ab, er ist jetzt
einsatzbereit.
3.2 Der Balancer unterbricht während des Ladens den Ladevorgang (noch bevor die Ladefunktion beginnt) unter folgenden Bedingungen:
3.2.1 Alle Zellen sind balanciert und haben eine Spannung von 4,25V oder die Spannung einer Zelle erreicht 4,3V (die Spannung der anderen
Zellen liegt über 3,7V). Die rote LED leuchtet für 15 Sek. auf und erlischt dann, der Balancer unterbricht das Balancieren und die
Ladefunktion. Ihr Akku ist einsatzbereit.
3.2.2 Oder die Spannung einer der Zellen erreicht 4,3V und die Spannung einer Zelle beträgt weniger als 3,7V.
Die rote LED und die entsprechende grüne LED (die deren Zellenspannung geringer als 3,7V ist) leuchtet für 15 Sek. auf und erlischt dann.
Der Balancer unterbricht aus Sicherheitsgründen die Balancier- und Ladefunktion. Dann ist die entsprechende Zelle (die die grüne LED
anzeigt) defekt. Bitte trennen Sie sofort Akku und Lader, entladen Sie den Akku und bringen Sie ihn in Ordnung.
Die nachstehende Zeichnung zeigt die Verbindung zwischen Balancer und Akku:
Anschlussadapter für den Balancer und erhältliche Ersatzteile
Der Pitch (der Abstand zwischen den Pins) des Balancinganschlusses der RCsystemakkus beträgt 2,5mm. Wir liefern den SA10126 Balancer
standardmäßig mit einem 2,5mm Pitchadapter. Da es auf dem Markt auch 2,0mm Pitchadapter gibt, liefern wir auf Wunsch auch diese Adapter, um auch
solche Akkus einfach mit dem SA10126 Balancer laden zu können. Kontaktieren Sie in einem solchen Fall Ihren örtlichen RC System Händler.
Balancer Stecker, 2,5mm Pitch, mit Kabel Balancer Stecker, 2mm Pitch, mit Kabel
Für 2S Li-Po
Für 3S Li-Po
Für 4S Li-Po
Für 5S Li-Po
Warnhinweise & Vorsichtsmaßnahmen
1. Schließen Sie den Balancer an für LiPo-Akkus geeignete Ladegeräte an. Verwenden Sie keine NiMH- oder NiCd-Ladegeräte.
2. Schließen Sie den Balancer nicht direkt an eine Stromquelle oder Autobatterie an. Laden Sie den LiPo-Akku nicht ohne ein geeignetes Ladegerät.
3. Verursachen Sie keinen Kurzschluss. Schließen Sie niemals die Eingangsanschlüsse des Balancers kurz. Sie führen Strom, wenn der Akku mit dem
Balancer verbunden ist!
4. Vertauschen Sie nicht die Polarität. Achten Sie darauf, dass das rote Kabel immer am Pluspol, das schwarze immer am Minuzspol angeschlossen ist.
5. Lassen Sie den Balancer nie unbeaufsichtigt.
6. Trennen Sie den Balancer vom LiPo-Akku und vom Ladegerät nach dem Laden und wenn er nicht benutzt wird.
7. Verwenden Sie das Gerät nicht in einem Fahrzeug.
8. Verwenden Sie es auch nicht bei direkter Sonneneinstrahlung.
9. Verwenden Sie es nicht, wenn die Umgebungstemperatur extrem hoch ist.
10. Verwenden und bewahren Sie es nur in einer trockenen Umgebung auf.
Vertrieb für die Schweiz:
Speedmodels
Postfach 1457
CH-3401 BURGDORF
Website : www.speedmodels.com
Vertrieb für Deutschland:
Kavan GmbH
Daimlerstr. 61
D-90441 Nuernberg
Website : www.kavanrc.com

SA10126 RC SYSTEM BILANCIATORE LiPo
Guida dell’utente
La tecnologia di bilanciamento avanzata dell’SA10126 fornisce un bilanciamento attivo e un caricamento sicuro per le vostre batterie LiPo, è
importante che leggiate il manuale e usiate il bilanciatore correttamente. Usate questo bilanciatore SOLO per pacchetti da 2 a 5 celle.
Caratteristiche Principali:
1. Rileva automaticamente le celle per ogni tipo di pacchetto da 2 a 5 celle.
2. Bilancia automaticamente e celle da 2 a 5 celle in serie prima o dopo il caricamento.
3. Rileva automaticamente le celle difettose prima del caricamento, il LED rosso lampeggerà velocemente quando il voltaggio delle celle è
superiore a 4,35V o inferiore a 3,0V.
4. Bilancia automaticamente lo sbilanciamento delle celle durante la carica, passerà una corrente di by-pass e il relativo LED verde lampeggerà.
5. Il bilanciatore automaticamente taglierà il caricamento quando ognuna delle celle raggiungerà 4,3V o tutto il voltaggio delle celle sarà di 4,25V.
Specifiche:
Range di voltaggio in entrata: da 6 a 22,5V Massima corrente di by-pass: 400mA
Protezione da basso voltaggio: 3,0V +/- 0,01V Auto bilanciamento entro: +/- 0,01V
Massima corrente di carica: 6° Protezione da sovra voltaggio: 4,3V +/- 0,01V
Voltaggio di controllo sbilanciamento: +/- 0,01V
Funzionamento dei LED
SA10126 ha 1 LED rosso e 5 LED verdi. Segue il loro funzionamento dettagliato:
●funzionamento LED Rosso (LED di status)
1. indicazione di difetto: prima di caricare, il bilanciatore rileverà automaticamente le celle, il LED rosso lampeggerà velocemente per 15
secondi e si spegnerà quando il voltaggio di ogni cella sarà più alto di 4,35V o più basso 3,0V; dopo la carica, il bilanciatore automaticamente
rileverà di nuovo le celle, il LED rosso lampeggerà velocemente per 15 secondi e si spegnerà quando il voltaggio di ogni cella sarà più basso
di 3,7V. Si prega di notare che quando il LED rosso lampeggia velocemente il bilanciatore taglierà automaticamente il circuito di carica e il
circuito di bilanciamento per sicurezza.
2. indicazione di circuito di bilanciamento in situazione normale: dopo aver rilevato le celle, il LED rosso si accende e significa che il circuito di
bilanciamento si trova in situazione normale e è pronto per iniziare il caricamento.
3. indicazione di carica: il LED rosso sarà acceso quando il bilanciatore si troverà in situazione di carica normale
4. indicazione di taglio del caricamento: durante la carica, quando il voltaggio di una delle celle è più alto di 4,3V o quando tutte le celle
raggiungono i 4,25V, il LED rosso lampeggerà lentamente per 15 secondi e poi taglierà e, nel preciso istante, il bilanciatore taglierà il circuito
di bilanciamento e quello di carica per sicurezza (nel caso in cui il caricatore sbagli il taglio della carica).
●funzionamento dei LED verdi
1.Cell indication: The balancer will detect the cell quantity before charging, the relative green LEDs will be on for about 5sec, and then turn off;
when there is no cell or the cell voltage lower than 1.5V, the relative green LEDs will turn off.
2. Cell defective indication: Before charging, if there is any cell voltage higher than 4.35V or lower than 3.0V, the relative green LED will be flash
quickly for about 15sec and then turns off; after charging, if there is any cell voltage lower than 3.7V, the relative green LED will be flash
quickly for about 15sec and then turns off. (Please notice that whenever the green LED flash quickly, the balancer will automatically cut-off the
charging circuit and the balancing circuit for safety purpose)
3. Balancing indication: When there is any cell imbalance, the relative green LED will flash slowly, the by-pass function is on.
Procedura di funzionamento e gestione di malfunzionamento
Passo 1: rilevamento automatico delle celle prima del caricamento
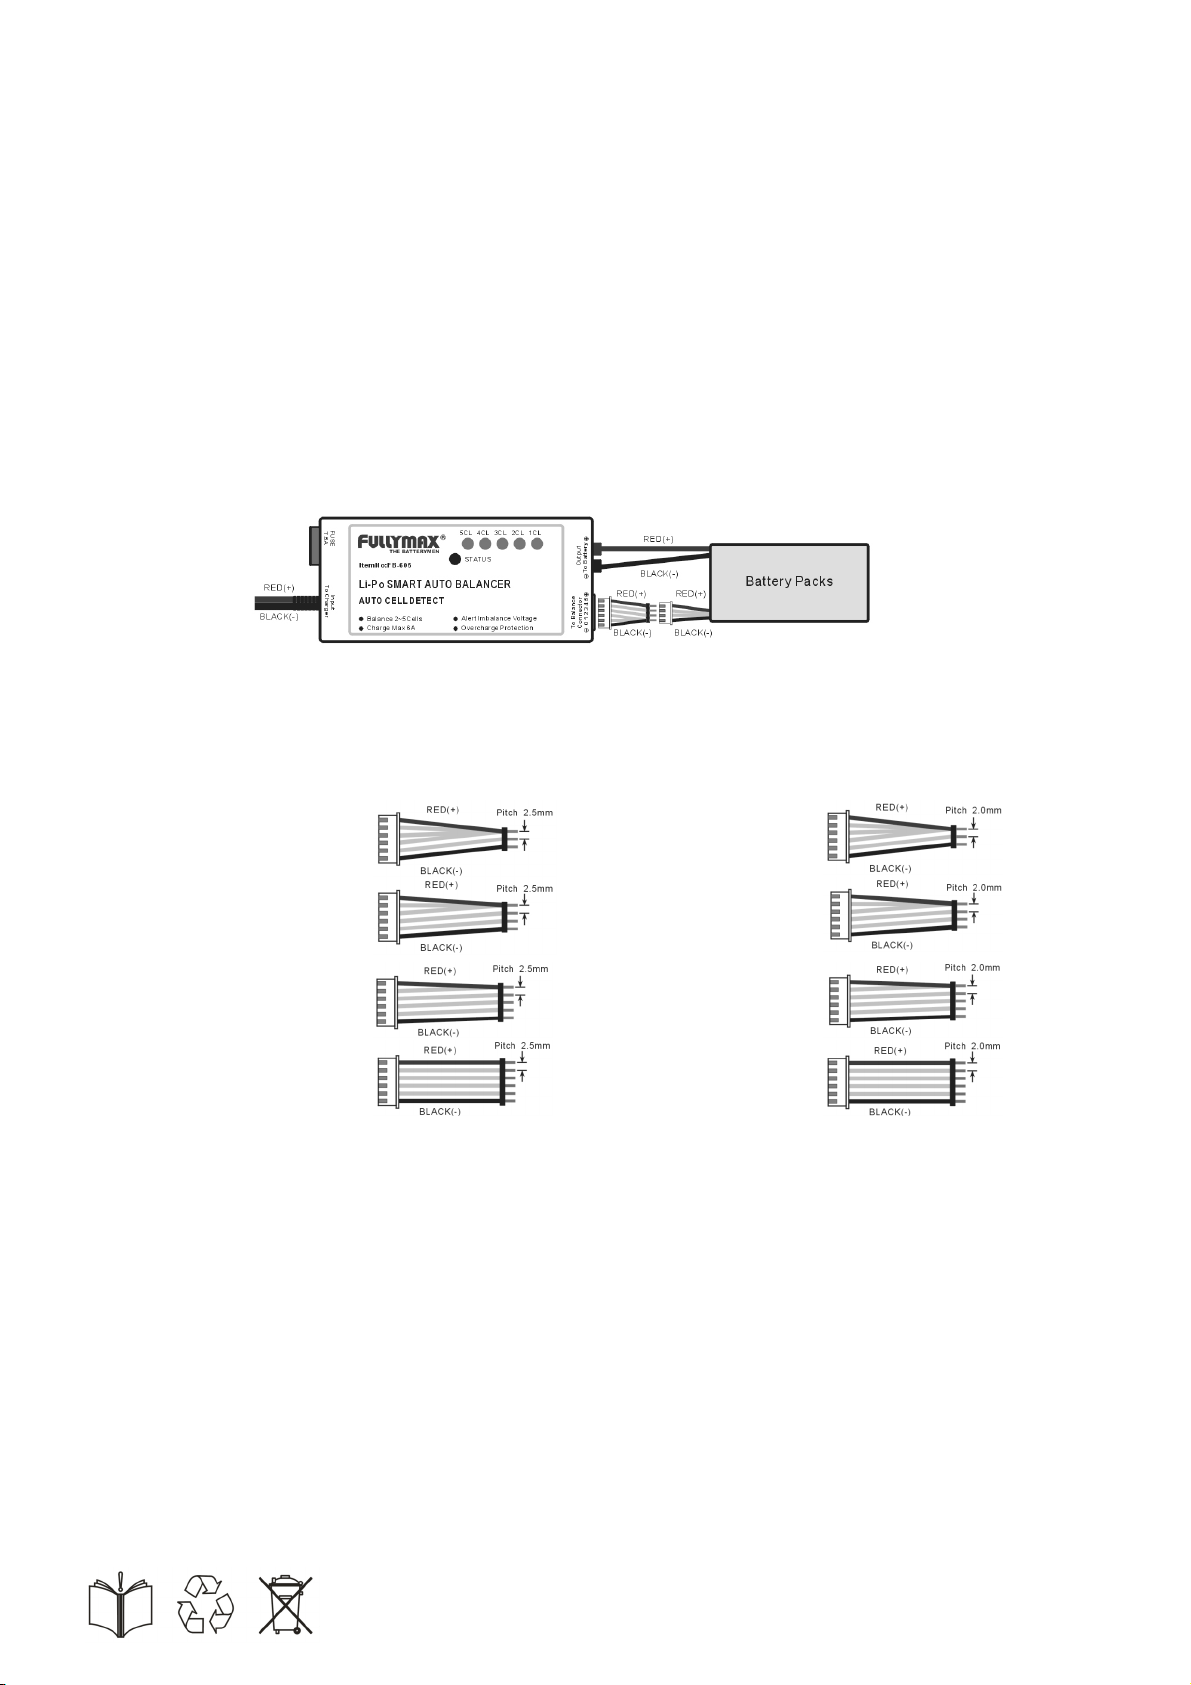
1.1 connettere il connettore del bilanciatore della batteria al bilanciatore, il bilanciatore comincia a rilevare le celle e i LED mostreranno lo status.
1.2 Se il LED rosso e/o quelli verdi non lampeggiano velocemente e i LED verdi mostrano la stessa quantità di celle della batteria, e
successivamente il LED rosso s’accenda, potrete procedere al passo 2.
1.3 Se il LED rosso e/o quelli verdi lampeggiano velocemente significa che il voltaggio della relativa cella è superiore a 4,35V o inferiore a 3,0V,
scollegate la batteria, avrete bisogno di un ausilio professionale o di disporre correttamente la batteria.
1.4 Se trovaste che la quantità di celle non è la stessa mostrata dal bilanciatore, o che il relativo LED verde non s’accende o non lampeggia,
controllare se il collegamento tra la batteria e il bilanciatore sia corretto, e ricollegate nuovamente. Se il problema dovesse persistere dopo il
ri-collegamento avrete bisogno di un ausilio professionale.
Passo 2: collegare il caricatore e procedere con la carica
2.1 inserire il connettore della batteria all’uscita del bilanciatore, collegare l’entrata del bilanciatore all’uscita del caricatore. Impostare il caricatore
seguendo le istruzioni e le specifiche delle batterie, e avviare la carica. Si prega di controllare il processo di carica e assicurarsi che sia in
buone condizioni. Normalmente il LED rosso del bilanciatore sarà acceso.

2.2 durante la carica il bilanciatore controllerà automaticamente e interamente le celle, un corrente di by-pass verrà fornita nel caso trovi uno
sbilanciamento di celle, e successivamente il relativo LED verde lampeggerà lentamente.
Passo3: gestione cut-off e malfunzionamenti
3.1 Durante la carica, quando il carica batterie interrompe la carica, prestare attenzione ai seguenti stati e seguire la guida sottostante:
3.1.1 Se il LED verde continua a lampeggiare lentamente, significa che sono presenti delle celle sbilanciate. Il bilanciatore continuerà a bilanciare
fino a che i led verdi non smettono di lampeggiare. Dopo di che potrete ripetere la carica dal passo1
3.1.2 Se tutti i Led verdi sono spenti, significa che la batteria è completamente bilanciata e carica. Scollegare la batteria dal caricabatteria e
utilizzarla.
3.2 Durante la carica, il bilanciatore interromperà la carica se si verificheranno le seguenti condizioni:
3.2.1 Tutte le celle sono bilanciate e hanno raggiunto i 4,25V, oppure una delle celle ha raggiunto 4,3V e le altre celle hanno tutte un voltaggio
superiore a 3,7V. Il Led rosso lampeggerà lentamente per 15 secondi poi si spegnerà, il bilanciatore interromperà il processo di
bilanciamento e di carica. La batteria è pronta all’uso
3.2.2 Una cella raggiunge un voltaggio di 4,3V a qualsiasi altra cella ha un voltaggio inferiore a 3,7V. Il Led rosso e il relativo LEd verde (quello
legato alla cella con voltaggio inferiore a 3,7V) lampeggeranno velocemente per 15 secondi poi si spegneranno, il bilanciatore interromperà il
processo di bilanciamento e di carica per sicurezza. Questo significa che la relativa cella (indicata dal led verde) è danneggiata, scollegare la
batteria dal caricabatteria immediatamente, e provvedere alla sostituzione del pacco o della cella.
Il Seguente schema mostra i corretti collegamenti tra caricabatteria, bilanciatore e batteria.
Adattatori per il bilanciamento forniti e opzionali
Il passo (distanza tra i vari pin) del connettore di bilanciamento montato sulle batterie RCSystem è 2,5mm. Vi forniamo tutti gli adattatori necessari per
questo tipo di passo. Nel caso siano necessari degli adattatori per cavi di bilanciamento con passo 2,0mm sono disponibili come optional. Contattate il
distributore RCSystem della vostra zona.
SA10126 adattatori standard (passo 2.5mm) Adattatori Opzionali (passo 2.0mm)
Per batterie 2S
Per batterie 3S
Per batterie 4S
Per batterie 5S
Avvertenze & precauzioni
1. Collegare il bilanciatore solo con caricatori specificamente progettati per batterie LiPo. NON usare caricatori NiMH o NiCd.
2. NON collegare il bilanciatore direttamente alla fornitura elettrica o alla batteria Pb-Acido dell’automobile, NON collegare la batteria LiPo senza
un caricatore di qualità.
3. NON corto-circuitare. Non corto-circuitare MAI i cavi d’entrata del bilanciatore, sono attraversati da elettricità quando la batteria è collegata al
bilanciatore!
4. NON invertire la polarità. Assicurarsi che il cavo rosso si colleghi sempre al positivo (+), e il cavo nero si colleghi sempre al negativo (-).
5. NON usare MAI il bilanciatore incustodito.
6. scollegare il bilanciatore dalla batteria LiPo e dal caricatore quando non in uso o dopo il caricamento completo.
7. NON usare in un veicolo.
8. NON usare sotto la luce diretta del sole.
9. NON usare quando la temperatura ambientale sia eccessivamente elevata.
10. Usare e riporre in ambiente secco.
I prodotti RC SYSTEM sono ditribuiti in Italia da:
SAFALERO s.r.l.
Via dell’Artigiano, 41
IT-40065 Pianoro (BO)
website: www.safalero.it
I prodotti RC SYSTEM sono ditribuiti in Svizzera da:
Speedmodels
Postfach 1457
CH-3401 BURGDORF
Website : www.speedmodels.com
Table of contents
Languages:
Other RC System Power Supply manuals
Popular Power Supply manuals by other brands

Rockwell Automation
Rockwell Automation Allen-Bradley 1606-XLE240EDRZ SER B installation instructions

Matrix
Matrix MB xxx-3U series specification

SIGLENT
SIGLENT SPD3000 Series user manual

Pulsar
Pulsar HPSB 10A24D manual

Allen-Bradley
Allen-Bradley 1606-XLS240F Reference manual

Altinex
Altinex V-MATRIX VM2218PS user guide