RCA CHU6 User manual

INSTRUCTION MANUAL
Six Unit Multi Charger
PROFESSIONAL TWO-WAY RADIO CHARGER
Model: CHU6
Communications Systems
Intended Use
This universal rapid charger can charge a wide
range of two-way radio rechargeable batteries. The
charger works with the following:
A. Lithium-ion, Lithium Polymer, Ni-CD, Ni-MH
batteries
B. Battery capacities between 700mAh and
4000mAh.
Important Safety Instructions
• Please read and follow the safety instructions and
keep the instructions where they can be easily
referenced.
• To reduce the risk of fire or electrical shock, keep
the charger completely dry and never use it near
water. Avoid exposing it to rain or humidity.
• Clean only with a dry cloth.
• Keep all vents clear and clean. Install in accordance
with the manufacturer’s instruction.
• Do not use or store near heat sources such as
radiators, heat registers, stoves, amplifiers, or
other objects that produce heat.
• If the provided plug is defective or does not fit into
your outlet, contact your RCA Communications
Systems Center for replacement.
• Avoid holding the charger by its cord, and keep
the cord from being crushed or pinched.
• Only use attachments or accessories specified by
the manufacturer.
• Unplug the charger during lightning storms and
when storing it for an extended period of time.
• Use a certified RCA dealer only to service the
charger.
• Do not modify the charger in any way.
• Do not replace the battery adapter or power
supply with unauthorized parts, as the charger
may be damaged and your warranty will be
voided.
• Never attempt to charge alkaline or dry cell
batteries as they may burst and cause serious
injury.
• Never allow metal, wire, etc. to touch any internal
part of the charger.
• Keep the battery and the charger contacts clean, in
order to obtain a full charge on the battery.
• Never put batteries in a fire as they may explode
and cause serious injury.
• Keep the charger away from televisions and radios
to prevent interference.
• In order to avoid overcharging, promptly remove
battery from the charger after its been fully
charged. Batteries/radios must not be left in the
charger for more than 15 hours.
• If a battery won’t operate after being fully
charged, completely discharge it and try charging
it again. If the battery still will not retain a charge,
replace the battery with a new one.
• Replace old batteries with the exact type of
battery or an explosion may occur.
• Do not expose the charger or batteries to direct
sunlight for a prolonged period of time.
• To unplug the power cable, first turn off the Main
Power Switch.
CHU6 Specifications
This tri-chemistry charger works with Li-Ion (Lithium-
Ion), LiPo (Lithium Polymer), Ni-CD (Nickel-Cadmium)
and Ni-MH (Nickel-Metal Hydride) batteries.
Dimensions: 20” x 6.8” x 3.2” (510 x 172 x 80mm)
Weight: 5.5 lb. charger only (2.5 kg)
Operating Temp: 59° - 86°F (15° - 30°C)
Storage Temp: 32° - 149°F (0° - 65°C)
Power Supply: Input - 110 - 240V / Output - 15V 4.8A
Approval: FCC Approval
A
C
B
D
E
F
G
H
I
J
K
L
3.
Accessories (Comes assembled)
A. Charging Cup
B. Individual LED Indicators
C. Charger Base
D. ON / OFF Switch
E. 110 - 240V Power Supply
F. Power Cord
G. Aluminum Bottom Cover
H. Rubber Foot w/ Screw

Charging Procedure
1. Connect the AC adapter to the charger jack at the
rear of the unit.
2. Plug the AC adapter into an electrical outlet.
3. The 6 LED indicators on the unit will be orange
for a few seconds during the unit diagnosis and
will turn off when the unit is ready for operation.
(Note: The LED’s will remain orange if the charger
is not functioning properly.)
4. Slide a battery pack or a transceiver with a battery
pack into an individual charger pod.
5. The charger pod’s LED indicator will initially be
orange during battery diagnosis which could last
up to a minute.
6. The LED indicator will be red during charging
cycle.
7. The LED indicator will blink green when the
battery is at least 80% charged.
8. The LED indicator will be solid green when the
battery is fully charged.
9. The battery may be removed when the LED
indicator is flashing green or solid green.
PLEASE NOTE: Be sure ALL radios are turned off
prior to placing them into the battery charger as
internal parts can overheat during charging.
LED Indicator:
When the LED flashes red, a fault condition exists.
There are three different flash patterns, each
indicating a specific type of issue. The flash patterns
and fault conditions are as follows:
One Flash - Indicates charging complete, but
battery is under charged. Battery voltage is
below minimum level required. This warning
happens after charging is complete.
Two Flashes - Indicates battery contact is “open”
and current is not passing through the (+)
and (-) contacts on the battery. This warning
is provided after the initial diagnostic stage
is complete. Check charging pod to confirm
compatibility with battery or contact your RCA
dealer.
Three Flashes - Indicates over-current condition
caused by battery short circuit. Have the battery
checked by an RCA technician. Do not attempt
to charge the battery if a short circuit exists.
IMPORTANT
1. After a charged battery is removed, the LED
indicator may remain on for a few seconds. Please
wait for the LED to turn off, before putting
another battery/radio into the charging slot.
2. Using the charger outside the specified
temperature range (59° - 86°F/15° - 30°C) may
lead to erratic operation, and batteries can be
under-charged.
WARRANTY STATEMENT
RCA Communications Systems warrants each new
product it supplies to be free from defects in
material and workmanship under normal use and
service for the time period listed below, provided
that the user has complied with the requirements
stated herein.
The warranty period begins on the date of purchase
from an Authorized RCA Communications Systems
Sales and Service Center. This warranty is offered
to the original end user and is not assignable or
transferable. RCA Communications Systems is not
responsible for any ancillary equipment which
is attached to or used in conjunction with RCA
Communications Systems products.
RCA Communications Systems offers to the original
end user a One (1) Year Limited Warranty on
the RCA CHU1 Single Unit Charger. During this
period, if the product fails to function under
normal use because of manufacturing defect(s)
or workmanship, it should be returned to the
Authorized RCA Communications Systems Sales and
Service Center from which it was purchased. The
Sales and Service Center will repair the product to
full operating specifications or replace the product
with a new product of the same make and model.
The user is responsible for all charges incurred
in returning the product to the Authorized RCA
Communications Systems Sales and Service Center.
RCA Communications Systems will be responsible for
all charges in returning the product to the end user
via standard ground shipping service.
RCA Communications Systems shall have no
obligation to repair or replace the product, if
there is damage as a result of normal wear and
tear or if the damage is caused in whole or in part
by catastrophe, fault or negligence of the user,
improper or unauthorized alterations or repairs to
the product, incorrect wiring, use of the product
in a manner for which it was not designed, or by
causes external to the product. The warranty does
not cover physical or liquid damage, which includes,
but is not limited to, liquid damage, deep scratches,
bent or broken body or frame, and/or damaged
charging or accessory ports. This warranty is void
if the product serial number is altered, defaced or
removed.
THE EXPRESS WARRANTIES CONTAINED HEREIN
ARE IN LIEU OF ALL OTHER WARRANTIES, EITHER
EXPRESSED OR IMPLIED OR STATUTORY, INCLUDING,
WITHOUT LIMITATION, ANY WARRANTY OF
MERCHANTABILITY OR FITNESS FOR A PARTICULAR
PURPOSE.
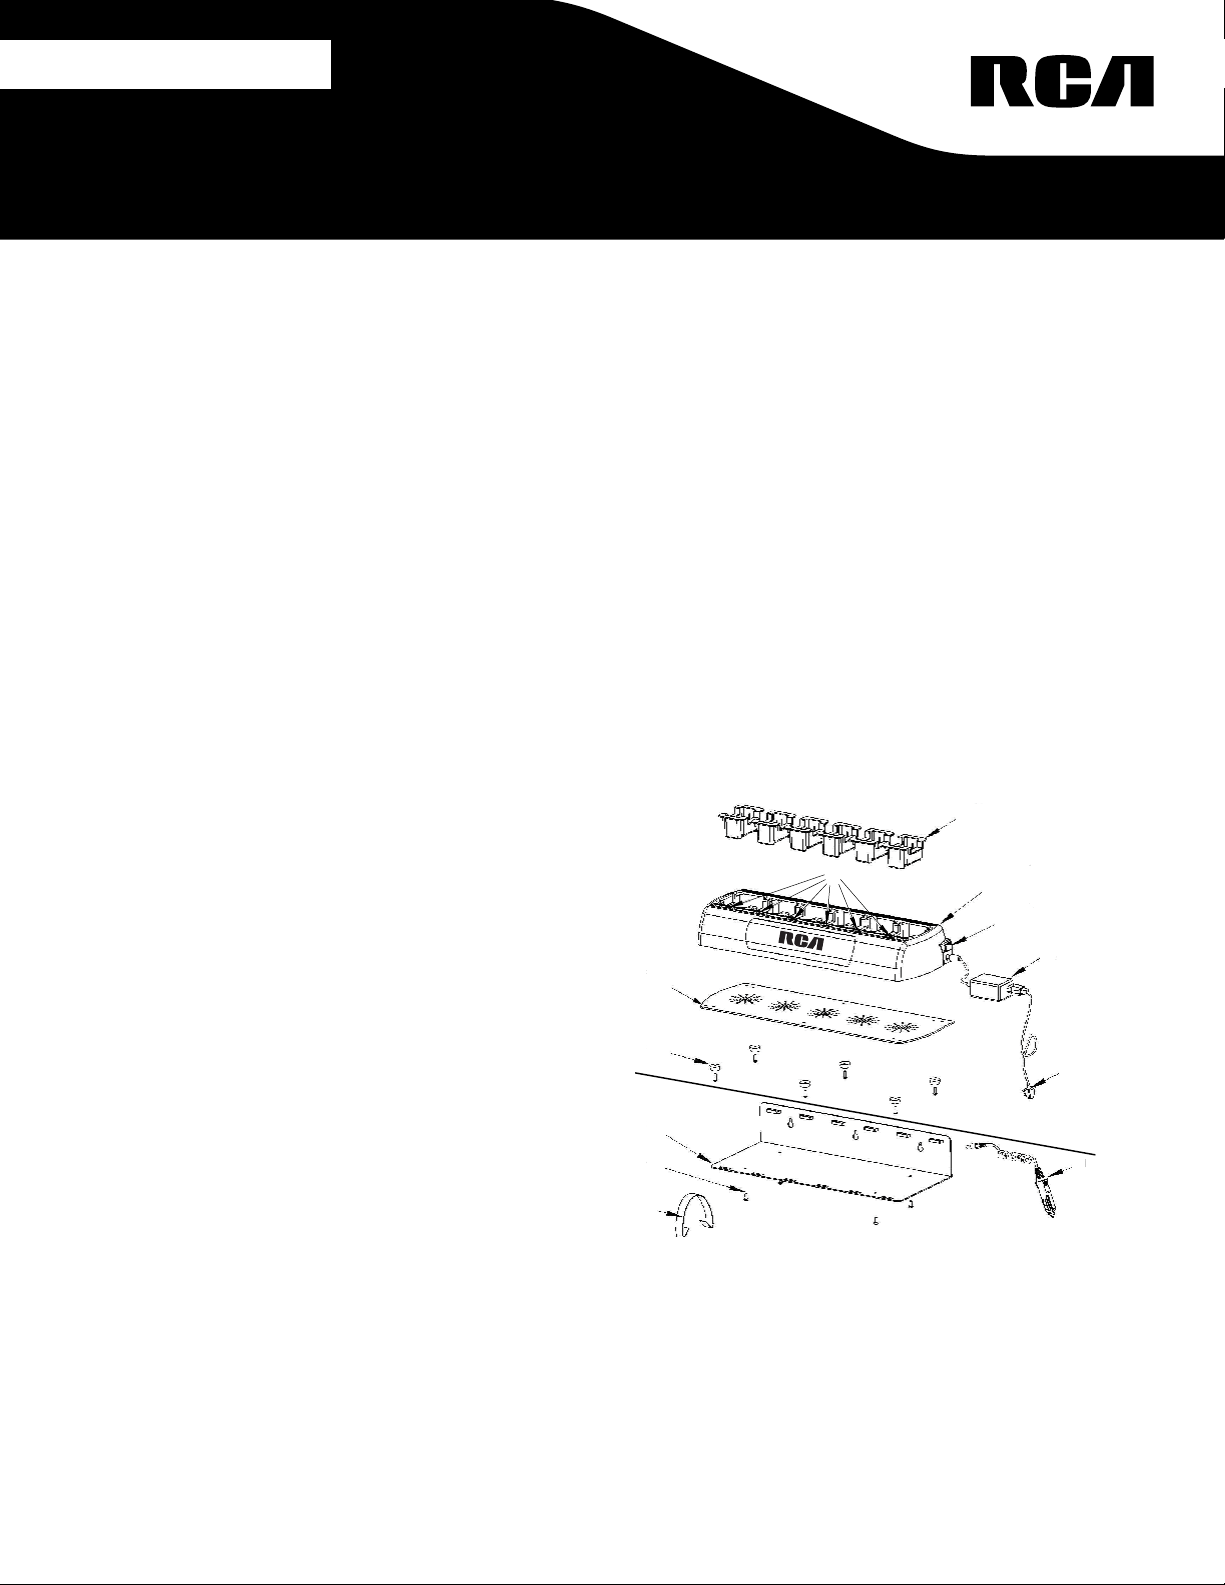
Vehicle Accessories (Optional)
I. Side Mount Metal Bracket
J. Locking Screw to the Aluminum Bottom
K. Tie Down Strap
L. Vehicle Power Adapter
*To purchase the optional Vehicle Charger Accessories,
please contact your RCA Communications System Center.

FOR ANY PRODUCT WHICH DOES NOT COMPLY
WITH THE WARRANTY SPECIFIED, THE SOLE REMEDY
WILL BE REPAIR OR REPLACEMENT. IN NO EVENT
WILL RCA COMMUNICATIONS SYSTEMS BE LIABLE
TO THE BUYER OR ITS CUSTOMERS FOR ANY
DAMAGES, INCLUDING ANY SPECIAL, INCIDENTAL,
INDIRECT OR CONSEQUENTIAL DAMAGES, OR
THE LOSS OF PROFIT, REVENUE OR DATA ARISING
OUT OF THE USE OR THE INABILITY TO USE THE
PRODUCT.
RCA Communications Systems endeavors to achieve
the accuracy and completeness of this manual, but
is not liable for any possible omission and printing
mistakes or provides no warranty of accuracy or
reliability.
All the reproduction and translation of this manual
without authorization is prohibited.
All the above specifications and design are subject
to change without notice due to continuous
development.
No part of this manual may be copied, reproduced,
translated, stored in a retrieval system, distributed,
or transmitted in any form or by any means,
electronic or mechanical, for any purpose without
the expressed, written permission from RCA
Communications Systems.
The end-user is solely responsible for obtaining
any license or other authorizations required by
the Federal Communications Commission (FCC).
For further information visit www.fcc.gov or call
1-888-CALL-FCC (1-888-225-5322).
© 2015 RCA Communications Systems.
All rights reserved.
www.RCACommunicationsSystems.com
Communications Systems
For Sales, Warranty and Customer Support please contact:
Discount Two-Way Radio Corporation – North American Distributor
1430 240th Street
Harbor City, CA 90710
Phone: 310-224-5100 / Fax: 310-224-5101
www.DiscountTwo-WayRadio.com
Replacing A Charging Pod
The charging pod is made from quality materials and
designed to provide years of service when properly
used. In most cases, the charging pod will only be
replaced when you want to use the charger with a
different battery.
Follow these steps to change the charging pod:
1. Obtain a charging pod made specifically for the
CHU1. Confirm that the charging pod is compatible
with the battery you want to charge.
2. Unplug the power supply from the CHU1.
3. Turn the locking screw on the bottom of the
charging pod counter-clockwise several rotations.
Lift the charging pod from the charging base.
4. Insert the replacement charging pod into the
charging base and secure with the locking screw.
Do not over tighten the screw.
5. Inspect the charging contacts to ensure they are
clean and unobstructed.
6. Connect the power supply to the CHU1. You are
now ready to charge a battery compatible with the
charging pod.
Other RCA Batteries Charger manuals