manuals.online logo
Brands
  1. Home
  2. •
  3. Brands
  4. •
  5. RCA
  6. •
  7. Oven
  8. •
  9. RCA L2J345GEL User manual

RCA L2J345GEL User manual

Other RCA Oven manuals

RCA L3K335GL Installation instructions

RCA

RCA L3K335GL Installation instructions

Popular Oven manuals by other brands

Brandt FC 222 user manual

Brandt

Brandt FC 222 user manual

aumate TOA20M04N-1E instruction manual

aumate

aumate TOA20M04N-1E instruction manual

Maytag CWE4100AC - 24" Single Electric Wall Oven Dimension Guide

Maytag

Maytag CWE4100AC - 24" Single Electric Wall Oven Dimension Guide

Kernau KBO 1076 S PT B instruction manual

Kernau

Kernau KBO 1076 S PT B instruction manual

Bosch HB 37 N Series User manual and installation instructions

Bosch

Bosch HB 37 N Series User manual and installation instructions

Electrolux EOD5420AA user manual

Electrolux

Electrolux EOD5420AA user manual

Mx Onda MX-HC2183 instruction manual

Mx Onda

Mx Onda MX-HC2183 instruction manual

Daewoo F6EV19SM2 Service manual

Daewoo

Daewoo F6EV19SM2 Service manual

Blodgett MT3870 Specifications

Blodgett

Blodgett MT3870 Specifications

GE ZET2F owner's manual

GE

GE ZET2F owner's manual

GE JK3000DF3WW owner's manual

GE

GE JK3000DF3WW owner's manual

eka EKF 523 NT Operating and instruction manual

eka

eka EKF 523 NT Operating and instruction manual

AEG Electrolux E3191-5 user manual

AEG Electrolux

AEG Electrolux E3191-5 user manual

Pratica Rocket Express quick start guide

Pratica

Pratica Rocket Express quick start guide

Viking Professional VGSO260T user guide

Viking

Viking Professional VGSO260T user guide

FM RX203 instruction manual

FM

FM RX203 instruction manual

Bosch HBN331 9B Series instruction manual

Bosch

Bosch HBN331 9B Series instruction manual

NEFF B95M42N0MK Instructions for use

NEFF

NEFF B95M42N0MK Instructions for use

manuals.online logo
manuals.online logoBrands
  • About & Mission
  • Contact us
  • Privacy Policy
  • Terms and Conditions

Copyright 2025 Manuals.Online. All Rights Reserved.

Readthis book carefully.
His intendedto help you operate and
maintain your new oven properly
Keep it handy for arxwmr$ to your
questions.
If you don’t understand something or
need more help, write (include your
phonenumber):
ConsumerAffairs
RCA
Appliance pa~
Louisville,KY 40225
Write down the model and
serial numbers.
You’llfind them on a labelonthe front
of the oven behind the oven or broiler
door.
Write these numbers into the space
below. Alsowritethe numbersintothe
spaceon the warranty cardthat came
with your oven before you send the
card in.
ModelNumber
serial Number
Usethese numbers in any correspon-
denceor servicecallsconcerning your
oven.
Hyou received
adamagedoven...
Immediately contact the dealer (or
builder)that sold youthe oven.
Savetime and money.
Beforeyou request
service...
Check the Problem Solver. It lists
causes of minor operating problems
that you can correct yourself.
2
,.
-.
I#- =%
Hyx! W“mMgas:
1.OperIwindows
2Don’ttouch electricalswitches.
3. Extinguishany open fkme.
4. Immediatelycallyourgassupplier
A
~~
Donotstoreor usegasolineorother
flammable vapors and liquids in the
vicinitycdthisoranyotherappliance.
b/
#sm.
—.
-USE=
IJ?
TheadjustmentsintheInstallationSectionmustbe
madebeforeyoutryto useyourown.
lfyou are using Gas(bottled
gas)allM? adjustmentsintheinstallationSection
mustbe madebeforeuse.
Hyowoven isnotproperlyadjusted,flamesmaybe
toohigh,ortheown mayusetoomuchfuel,release
toxicfumesorcookpoorly.
3GNcmN3
LK3T’
1.
2.
3*
4.
5.
6.
7.
8.
9.
10.
~/8°drill bit
Electricor handdrill
Flat bladed screwdriver
No. ~or No. 2Phillipsscrewdriver
Pencil
Rulerand straight edge
Hand saw or saber saw
pipe wrench
5/8” wrench and 1/2”wrench or adjustablewrench
3/16“ hex socket driver
Cabinetspace must be providedto completely enclosethe
recessedpartofyourbuilt-inovenexceptfortheventthimble
on outside vented units. See Figure 1for all necessary
dimensions. Acutout 22’’wide by38” high mustbe madein
the cabinet front. It is best to make atemplate to insure
accuratecutting.
Placethe bottom of the template on a levelbase line, 22”to
28” above the floor. This will position the open oven 36” to
42” above the floor.
i
I
I
I
,/-- ‘-----
/“ -.
INT030(342559)
l=’
~\ti’
@“
Ifyou are replacingandolderoventhat had a cutout hei
of morethan 38”, see page 6.
II is important that the oven be installed at or above the
minimum height specified. The unii has been tested and
approved, in accordance with safety standard% at this
height. The vent area may get hot when the oven is in
use. Followingthese installation instruc~bnswill movethe
ventarea outof arangewhere itwould likely be touched by
smallchildren.
Thecabinet mustha~ea~~~idbo~om. ThesoiidbottQm~maY
either be at the floor or level with the bottom edge of Ihe
cutoutopenir~g.Hthe solid bottom isto be at the floor, two
runners,centeredwithinthe cabinet, 11”apart maybe used
to supportthe oven.
Besurethe oven support is solid enoughto holdthe weight
of the unit –about 130 pounds. Also, be sure the oven
support is ievel and straight.
Drafts inside the oven cabinet may affect safe use of your
oven. Anyopenings aroundgas and electric sewice outlets —
must be sealed at the time of installation to prevent drafts. -ww–
WALLOR/“”
CABINET
3/8” —*
MiN. I
2FHJNNERSON
I-f“CENTERS *Should be adjusted to suit both standard cabinet~ and
desired oven working height.
I
Checkwithyourlocalutilitiesforelectricaicodeswhichapplyinyour
area. if there are no kxal codes,the Nafional Electrical Code,
~a- ANS1/NFPANo.70-1987mustbefollowecf.Youcangetacopyby
—.—.,.——
.-...s-
““-“ National Fire ProtectionAssociation
5attetymarch Park
C?uincy,IvIA02269
An adequateelectrical supply andoutlet mustbe usedto operate
the electrical parts of your oven, The oven cord has three prong
plugand mustbe usedwith aproperlygroundedthree holeoutlet
with astandard 120volt, 60 cycleAC householdcurrent.
Instalitheelec!ricaloutlet belowtheovenontherightside. Itshould
be easily reached through cabinet doors below the oven, See
Figure5.
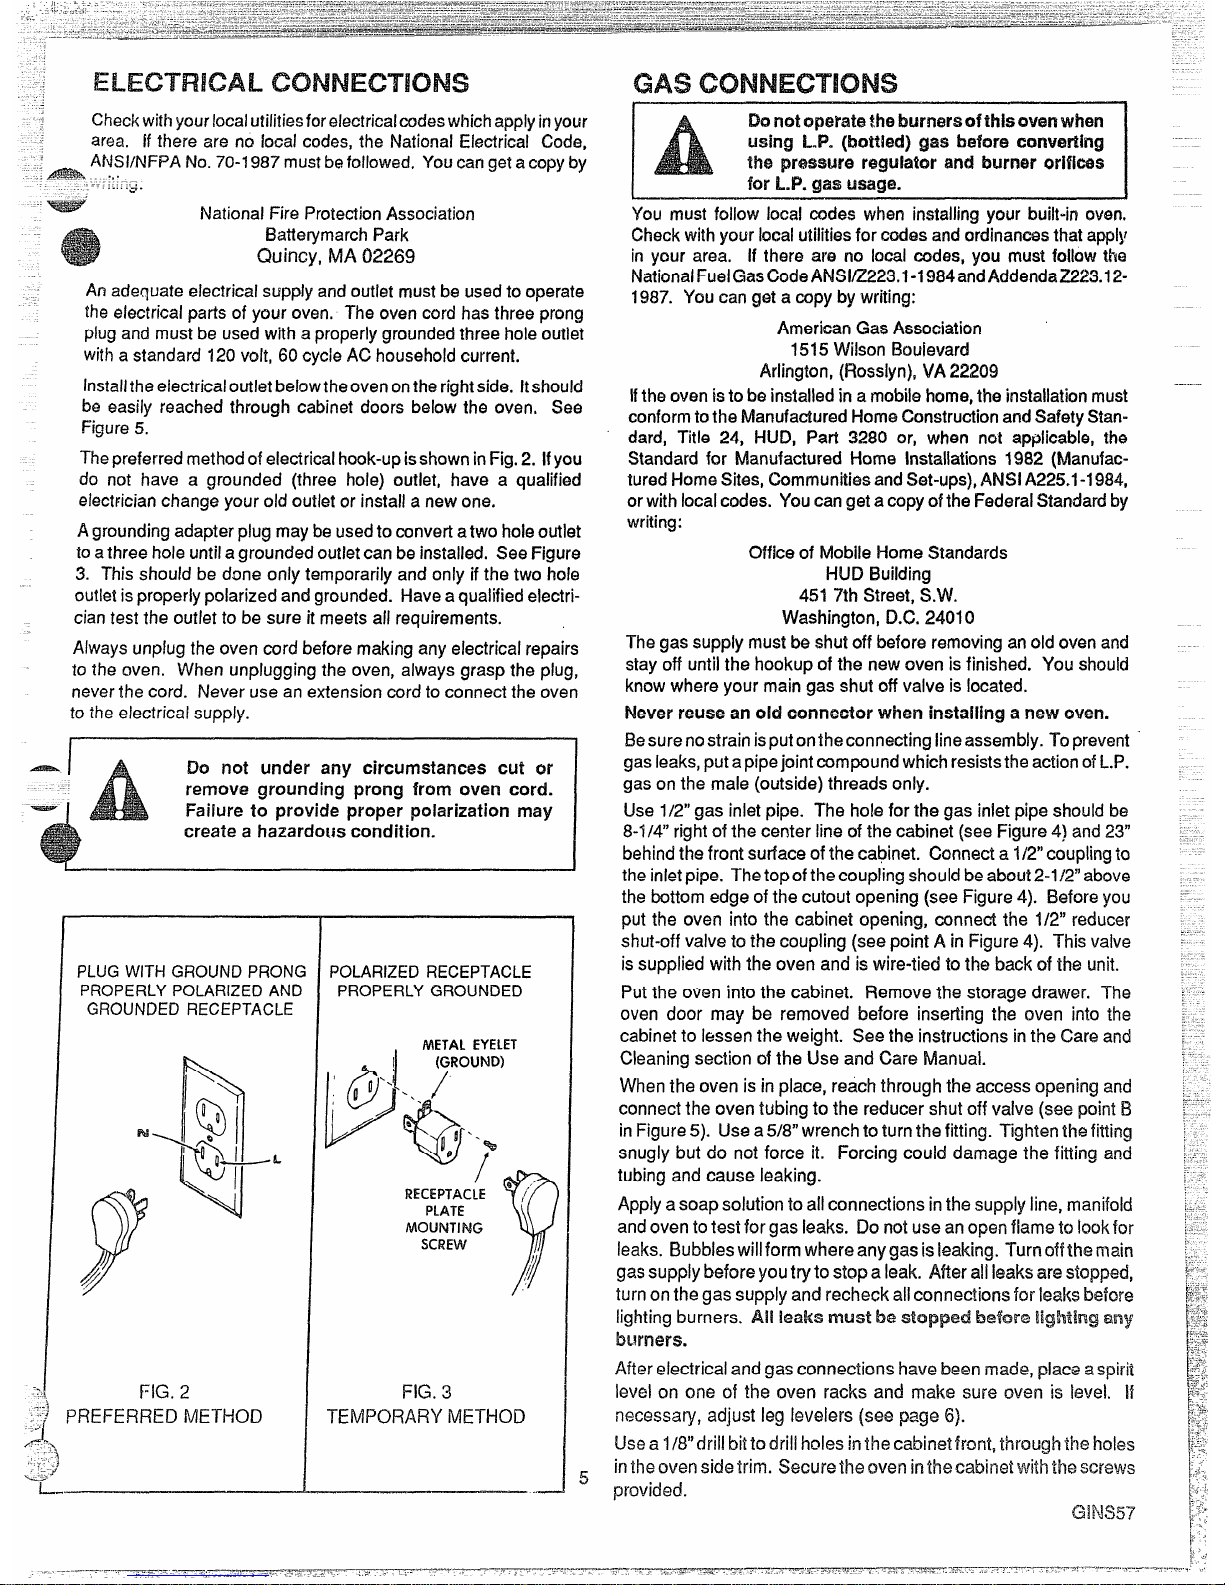
Thepreferredmethodof electricalhook-upisshowninFig.2. Ifyou
do not have agrounded (three hole) outlet, have aqualifi~d
eiect~icianchange your old outlet or install anewone,
Agroundingadapterplug maybe usedto convertatwo holeoutlet
to athree hole untilagrounded outletcan be installed. SeeFigure
3. This should be done only temporarily and only if the two hole
outletisproperlypolarized andgrounded. Haveaqualified electri-
cian test the outlet to be sure it meets all requirements.
Always unplugthe oven cord before making any electrical repairs
to the oven. When unplugging the oven, always grasp the plug,
neverthe cord. Never use an extensioncord to connect the oven
to the electrical supply.
L
\
PLUGWITHGROUNDPRONG
PROPERLYPOLARIZEDAND
GROUNDEDRECEPTACLE
FIG. 2
PREFERREDMETHOD
POLARIZEDRECEPTACLE
PROPERLYGROUNDED
METALEYELET
(GROUND)
@,
P@
0 0“‘..
a11,~“%7
/
v
RECEPTACLE‘ /
PLATE
MOUNTING
SCREW
FIG. 3
TEMPORARYMETHOD
5
!.%3
notoperatethebwmwsofthlscwm when
wing fW. @ottkdJ gas imfom mnvmting
the prwmm rfaguiakwand burner orifices
for L.P. gas usage.
You must foilow kmai codes when installing your built-in oven.
Checkwith your local utilitiesfor codesandordinancesthat appiy
in your area. If there are no local codes, you must foilow the
NationalFuelGasCodeANSi/Z225.l -1W?4andAddendaZ223.12-
1987. YOUcan get acapy by writing:
American Gas Association
1515Wilson Boulevard
Arlington, (Flossiyn),VA 22209
Ifthe ovenisto ba installedin amobilehome,the installationmust
conformtothe l’vianufactur~dHomeConstructionandSafetyStan-
dard, Title 24, HUD, Part 3280 or, when not applicable, the
Standard for Manufactured Home installations 19$2 (Manufac-
tured HomeSites,CommunitiesandSet-ups),ANSi A225.I -1984,
or with localcodes. Youcangetacopyof the FederalStandardby
writing:
Office of Mobile HomeStandards
HUD Building
451 7th Street, S.W.
Washington, D.C. 24010
Thegas supply must be shutoff before removinganold ovenand
stay off until the hookupof the new oven is finished. You should
knowwhere your main gas shut off valve is located.
iVeverreuse an oid connector when installing anew oven.
Besurenostrain isputonthe connectingiineassembly. Toprevent
gasleaks,put apipejoint compoundwhich resiststhe actionofLP.
gas on the male (outside) threads only.
Use 1/2”gas inlet pipe. The hole for the gas inlet pipe should be
8-1/4” right of the center iine of the cabinet (see Figure4) and.23”
behindthe front surfac.eof the cabinet. Connectal/2’’ couplingto
the inletpipe. Thetopof the coupling shouldbeabout2-1/2’’above
the bottom edge of the cutout opening (see Figure4). Beforeyou
put the oven into the cabinet opening, connect the 1/2”reducer
shut-offvalvetothecoupling(seepointAinFigure4). This valve
is supplied with the oven and is wire-tied to the back of the unit.
Put the oven into the cabinet. Remove the storage drawer. The
oven door may be removed before inserting the oven into the
cabinetto lessenthe weight. Seethe instructions inthe Care and
Cleaning section of the Use and Care Manual.
Whenthe oven is in place, reachthrough the accessopwiing and
connect the oven tubing to the reducer shut off valve (see point B
inFigure5). Use a5/8”wrench to turn the fitting. Tighten the fitting
snugly but do not force it. Forcing could damage the fitting and
tubing and cause leaking.
Applyasoap solution to allconnections inthe supply line, manifold
andovento test for gas leaks. Do notuse anopenflame to !ookfcx
leaks. Bubbleswill form where anygasisleaking. Turn offthemain
gassupplybefore youtryto stopa leak. Mterali Ieaksare stopped,
turn onthe gas supply and recheck allconnections for leaksbefore
lighting burners. Ni leaks must be before any
!oWmm3.
After electrical and gasconnections havebeen made, p!acwaspirit
level cmone of the oven racks and make sure oven is level. If
necessary, adjust leg levelers (see page 6).
Usea1/8”drill bitto drill hcdesinthe cabinet frcmt,through the holes
intheoven sidetrim. %curethe oven inthe cabirwt with the screvvs
provided. GNX?7
F!(3.4
h-
2-1/,
22
-1-o
2?”
L.
SHUTOFFVALVEHEREIF
RECWIREDBY LOCALREGULAT~Q~~
B
FIG. 5
Hyou are repiacing an older unit that had acutout height
of more than WY’ (39” to 39-3/8” are normal, aHernat@
standaf’d~) Wow steps below:
1, Measure by how much your cutout height exceeds 38”.
2. Relocateand raise yourgas inlet pipeifnecessary. See
figure 4. The 2-1/2” dimension (showninfigure 4) need
only change ifyourcutout height is morethan 38-1/2”. If
your cutout height is morethan 38-1/2”, increasethe 2-
1/2” dimension shown in figure 4by amount measured
instep 1,above.
3. Removethe storagedrawer (see Care and Cleaning
sectionof UseandCareManual).
4. Extend the leg levelers (using a3/16” hex socket driver
or afIatbladed screwdriver)bytheamountmeasuredin
step1,above.
3/16””
h
&
SLOTTED
HEX HEAD ; , /
I/
/II
ILEG LEVELER
s, Insertthe oven inthe cutoutand adjustleglevelersso
thatovenracksareIevei(checkwithspiritlevelonoven
rack)andthetopofthecontrolpaneloverlapsthetopof
Ihe cutout.
6. Makeelectricaland gas connectionsanddrivescrevvs
throughsidetrim as explainedon previOUSpage.
7. TwolowertrimpiecesarePr@Jided”lfyouhave@~tended
the leg levelers 3/4”or more, usethetal!ertrim. Attach
to the unitwith the 3screwssuppliedandtothecabinet
belowwith the 2wood screws supplied.
It leg levelers are extended less Iban 3/4”, use tkc-
Shorter trim. Attach to the unit With the ~SGJEW~- .
supplied. IL.!%
To adjust your oven for use with L.P. gas, follow the steps
below.
Step ~: Adjust Pressure F?egulaUJr
NOTEI:The pressure regulator issetfornat~ra~ gas. To
use L.P. gas, the regulator must be adjustedm
Locatethe pressureregulator(~ee Fig.5). UnscreWthecaP
andrernovethe springretainer,Fig.6. T+urntheretainer@Jer
andput it backintothe cap so L.P. isshowingonthe bottom
end of the retainer. Replacethe cap.
Step 2: MjuSt Burner OrificeS
CXWW3N: The fdowing adjustment must be made
before t~rnhlg on lhe burners. Failure tO dQSOc~u~~
result in serious injury due to high fkimes and toxic
fumes. AFzm.
Usea~/2JJOpenendoradjustabie vurenc!l totumbothc~fil:=:-. ‘-- .-
hoods in the L.P. direction, about 1-1/2turns or until snug.-”—
See next page. Do not overtighten or you may distofl t
orifice hoods and needles.
~- ------
*Gregu’a
nIl-m II
~—+ I-IL–-I
&qualto or less tban 1/2 psig.
:
Ail?
SHUTT
used in most areas. But, sincethe gas in some areas may SCREW
va~~,y~uShOUIdcheck alladjustmentsdescribedbelow. if
youare using t_.P.gas, all the adjustments must be made.
~~e~ 1: Air Shutter
Turnthe burnerfuilon andchecktheflames. Eh.wnerflames
shouldnotf!utterorb!ow awayfrom theburner. Theyshould
beblue incolor with notrace of yellow. Foreignparticlesin
thegas fine maycause an orangeflame at first, but this will
soondisappear.
If theflames are yellow or flutter, open the air shutter more.
Ifthey blowawayfrom the burner,closethe airshuttermore.
TO i3~Jus~ air shutter:
Useascrewdriverto loosenthe airshutterscrew. Adjustthe
airshutter and retighten the air shutter screw.
Step2: orifice Hood
Checkthe inner cone of the flame. It should be about 1/2”
-’~=tgforthe oven broiler burner (see below). Ifthe iength of
=-. =::innerconeoftheflame isnotcorrect,usea 1/2’’open end
renchor adjustable joint pliers to adjust the orifice hood.
shorten the cones, tighten the orifice hood by turning in
the L.P. direction.
To lengthen the cones, loosenthe orifice hood
the Nat. direction.
INNERCONE
/OF FLAME
1/2”
H
/(. \~’BuRNER
by
WARNING: !f yOL! atkWIPt to
measure the inner cone of the
flame, please use caution. Bums
--.
.-y
-: could result.
,.3’
./’
#-
-3
“/-
<4. 7G!NS59
Keep this book for later use.
I&3sure your oven is installed and gmunciecl pmp-
edy 13yaqualified technician.
keep the oven area clear and free from
thifigsthat willburn,gasoline and otherflammable
vapors and liquids.
change oven rack positions while oven is
cool.
ARer broiling,alwaystakethe broilerpanoutofthe
ovenandcleanit. Leftovergrease inthe broilerpan
can catch on fire next time you usethe pan.
Always use dry pot holders when removing pans
from Me oven. MoM or damp potholders can
cause steam burns.
Always usecarewhen openingovendoor. Lethot
air and steam out before moving food.
follow cleaning instructions in this book.
Teachchildren nottoplaywithovencontrols orany
other part of the oven.
Never tryto repair or replaceany part ofthe ovem
unlessinstructionsaregiveninthisbook. All Oiii&l-
work should be done by askilledtechnician.
Never heat unopenedfood containers, Pressu
build up may make container burst and cause
injury.
INeverleavejars or cans of fat or drippings near
theoven. Neverletgrease build upon yourovem
You can keep grease fires from starting if you
clean up grease and spills after each oven use.
Never use aluminum foil to line oven bottoms.
Improper use of foil could start afire and cause
incomplete combustion.
Never block the flow pf combustion and ventila-
tion air through oven vents.
Never try to move a pan of hot fat, especially a
deep fat fryer. Wait until the fat has cooled.
Never leave children alone br unattended where
an oven is in use.
Never use your oven for warming or heating a-
room. Such use can be dangerous and could —- -
damage oven parts. ..
.-
~
Never wear loose fitting or hanging clothes whe
using your oven. Such clothes could catch fir
and cause serious injury.
Never use atowel or other bulky cloth as apot
holder. Such cloths could catch fire on a burner.
Never’ store things in an own.
Never use wateron a greasetire—-itwill CM’Ny 1. CIcxx?oven Ckmrand turn off.
spread the flames. 2. if ‘fire fcxmtirws,thnwv soda cmthe
OVEN FIRE fireor useadry foamor type
D(?nottrytomove m?pan.
TheCaliforniaSafeDrinkingWaterandToxicEnforcement andsoot,causedprimarilybytheincompletecombustionof
Actrequiresthe Governorof Californiato publishalistof naturalgasorL.P.fuels.Properlyadjustedranges,indicated
substancesknowntothestatetocausecancerandrequires by abluishratherthan ayellowflame,will minimizeinccm-
businessestowarncustomersofpotentialexposure10such plete combustion.ExposurebUwse subskmcescan be :
substances.Gasappliancescan causeminorexposureto T
minimizedfur!herbyvenlhg with anopen~~~~~~or
us~fl(g:~~$~
threeof thesesubstances,namelybenzene,forrnakiehyck? aventilationfanorhood. -..
.--2>
-=>&
@’2?l,
.~-.---.:-
)
(d
~.,-----
.,.>-7
%&_..#
8GSAFCM-I
The model 1. Oven l_ightSwitch
and serial number of your 2. Oven Vent (area may get hot during oven
oven is found orI atag, x
—behindthe u~perovendoor, II e
—?
2
we; DO NOT b!ockvent)
HecWmic Oven Gontrol
Oven Broil Burner
Oven Light
Broil pan and (Zirid
Q<
4
5
‘lopy the numbers into the I61
ace on page 2 of this
manual. ---- 1/ II 7. Removable Oven E30tlom
. . ... ... .abie Oven Doorwith
9. Removable Sforage Drawer
0. DoorGasket
7“%
w
IIi RF?6?rYlm/
1c
.*
FI(“3)
u--i~m?%dl-
\\ \Y/-- II
IIH
---=-..$-..
.--— ------
It 1
Whenyou turn the Oven Controlon, the glow bar igniter
belowtheovenbottonibeginsto heat. Whenthe igniteris
hotenough,inabout1minute,thegasf!owsintotheburner
andis ignited.
Theigniterglowsbrightorangewhenhot. Itcyclesonandoff
withthethermostatandwillglowwhenevertheburnerison.
1A
.s-
.=-,
., -. DLmng a
---- 1
414kk!li
be lit ‘and ycw SMwbl MMtryto‘do so.
.. . -,: I
I
Window
Whentheoven ken, heatedairrncwesfhroughawmt below
thecontrolpanel. Thishotair maymakecontrolpanelarea
hot.
Thevent is necessaryfor properaircirculationinthe oven
andgoodbakingresults. DOI
may CaLlse fm’.$!’e,fireor %0theRangQ=
—
(3--
1
YNKXL
1. OVEN CANCEL-BUTIWN -Cancels everything
2.
3.
4.
5.
6.
except the clock andtimer. Push this button to
turn the oven off orto clear everything if you’ve
made amistake in programming.
DISPLAY UW31CATORS-Light up to tell you
what is being shown in the TIME DISPL/4Y
WlfNDOW.
WVl~ DISPLAY WHWXIW -Shows the time of
dayorthetimesyousetforthetimeror auto-
matic oven operation.
OVEN TEMPERATURE AND BROIL DISPLAY
WINDOW -Shows the oven temperature or broil
settingyouhaveselected.
FUNCTIONINDICATORS -Light up to show
whether oven is baking,broilingor self-cleaning.
SETKNOB-Turnto settimesandtempera-
turesafterpushingafunctionbutton.
7-13 B!.rr’nxw
7. BAKE-Pushbeforesettingbaketemperature.
8. E3FKNL-Push before selecting BROIL setting.
9.
10.
11.
12.
13.
10
COOK TIME -Push before setting lengthof
cook time for automatic oven operations.
CLEAN -Pushto use self-clean cycle.
STOP TME -Push before selecting the time :e---
when you want the oven to turn off for aAI-fiiik _‘.
oven operations.
CLOCK uPush before setting clock or to bring
time of day into the TIME DISPLAY WINDOW.
TIMER -Push before setting amount of time.
TO