RCA L3K335GL Installation instructions

(
)’
_--—
Appliance Registration 2
Broiling 10
Care and Cleaning 13-16
Electronic Oven Control 7
Clock 7
Qven/Timer Controls 8
Self-Clean Cycle Controls 14
Features
Installation
Electrical Supply
Location
Light Bulb Replacement
Model and Serial Number
Oven Cooking
Problem Solver
Recipes
Repair Service
Safety Instructions
Themostat Adjustment
Warranty
6
3,4
4.
3
16
2
8,9
17,18
11,12
19
5
18
Back Cover
I
I

immediately conlact the dealer (or
builder)that sold youthe oven:
Savetime and money.
Beforeyou request
service...
Check the Problem Solver. It lists
causes of minor operating problems
that you can correctyourself.
—
Help us
help YOU...
Readthisbook carefully.
It is intendedto help youoperate and
maintain your new oven properly.
Keep it handy for answers to your
questions.
If you cfon’tunderstand something or
need more help, write (include your
phone number):
ConsumerAffairs
RCA
Appliance Park
Louisville,KY 40225
Write down the model and
serial numbers.
You’llfind them on a Iabeion the front
of the oven behind the ovenor broiler
door.
Write these numbers into the space
below. Alsowritethe numbersintothe
spaceon ~hewarranty cardthat came
with your oven before you send the
card in.
@
YOUreceived
damagedoven... @
.
ModelNumber
SerialNumber
Usethese numbers in any correspon-
denceorservicecallsconcerning your
oven.
2
—————
———————————
CNOT03

—
INSTALLATION
IMPORTANT Save these insfructiOnsfor the Iacal electrical insDectOr’suse.
#
TOOL LIST
Thefolfowingtoois areneededto installyour newoven.
1. 1/8”drill bit
2. Electricor handdrill
3. Flatbladedand Philipsscrewdrivers
4. Pencil
5. Ruleror tape measureand straightedge
6. Handsawor sabersaw
LOCATION
Cabinet space must be providedto enclosethe recessed
part of your built-in oven. See Figure 1for all necessary
dimensions. Acutout 24-3/4”wide by 27-13/16“highmust
bemadeinthecabinetfront. It isbestto makeatemplateto
insureaccuratecutting.
Placethe bottomof the templateon a levelbaseline,
34-1/8”abovethe floor. Thiswill positionthe openoven
doorabout37” abovethefloor.
It is importantthat the oven be installed at or abovethe
minimumheightspecified. The unit has been tested and
approved,inaccordancewithsafetystandards,atthisF]eight.
Theventarearnaygethotwhentheovenisinuse. Following
theseinstallationinstructionswill moveIhe ventareaoutof
arangewhereitwould likelybe touchedby smallchildren.
Theovenmaybe suppofiedby eitherasolidbottomor two
runners,on 14” centers. The solid bottomor two runners
shouldbe34-1/8”abovethefloor, levelwiththebottomedge
of the cutoutopening,
Be sure the oven support is solid enough to support 150
pounds. Also,besuretheovensupportislevelandstraight.
Thereis noway to levelthe oven after installation.
L
4“
T
24”/
~MIN.
1
--
JUNCTION
BOX
!1
I
2RtiNNERS
OVEN AND CUTOUT
DIMENSIONS
\~7$,
MIN.,
\
*24-314’;
,
I
ON 14”CENTERS
/&_-
/“
/0
/“
7
27-13116”
+
,
34-1/8” MIN.
J
Fig. I
‘1
~26-3i4°

Werecommendthatyouhavethe electricalhookupofyour
oven done by aqualifiedelectrician, Havefhe electrician
showyouwhereyourmainovendisconnectis located.
Call your ElectricCompanyand askwhich codesapplyin
your area. If there are no codes, you must follow the
NATlONALELECTRICALCODE,ANS1/NFPANO.70-1987.
Youcanget acopyby writing:
NationalFireProtectionAssociation
Batterymarch Park
Quincy,MA 02269
If youfail to wire your oven in accordancewilh governing
codes,you may create ahazardouscondition.
Youmustuseathree-wire,single-phaseAC 120/240Voltor
208Y/120Volt, 60 Hertz electrical systemto operateyour
oven. If you connect ~o aluminum wiring, properly
installedconnectionslistedfor usewithaluminumand
copperwiring must be used.
Use#12 copperwire and20Ampfuseorcircuitbreakerfor
120/240Volt and 208Y/120Volt systems.
Before installingthe oven or moving it to anotherlocation,
havethe electrician verify:
DThat your home is provided with adequate electrical
service.
oThattheadditionoftheovenwi!lnotoverloadthehousehold
circuiton which it isused.
The electrical power to the oven supply line must be
shutoffwhile lineconnectionsarebeingmade. Failure
to do so could result in serious injuryor death.
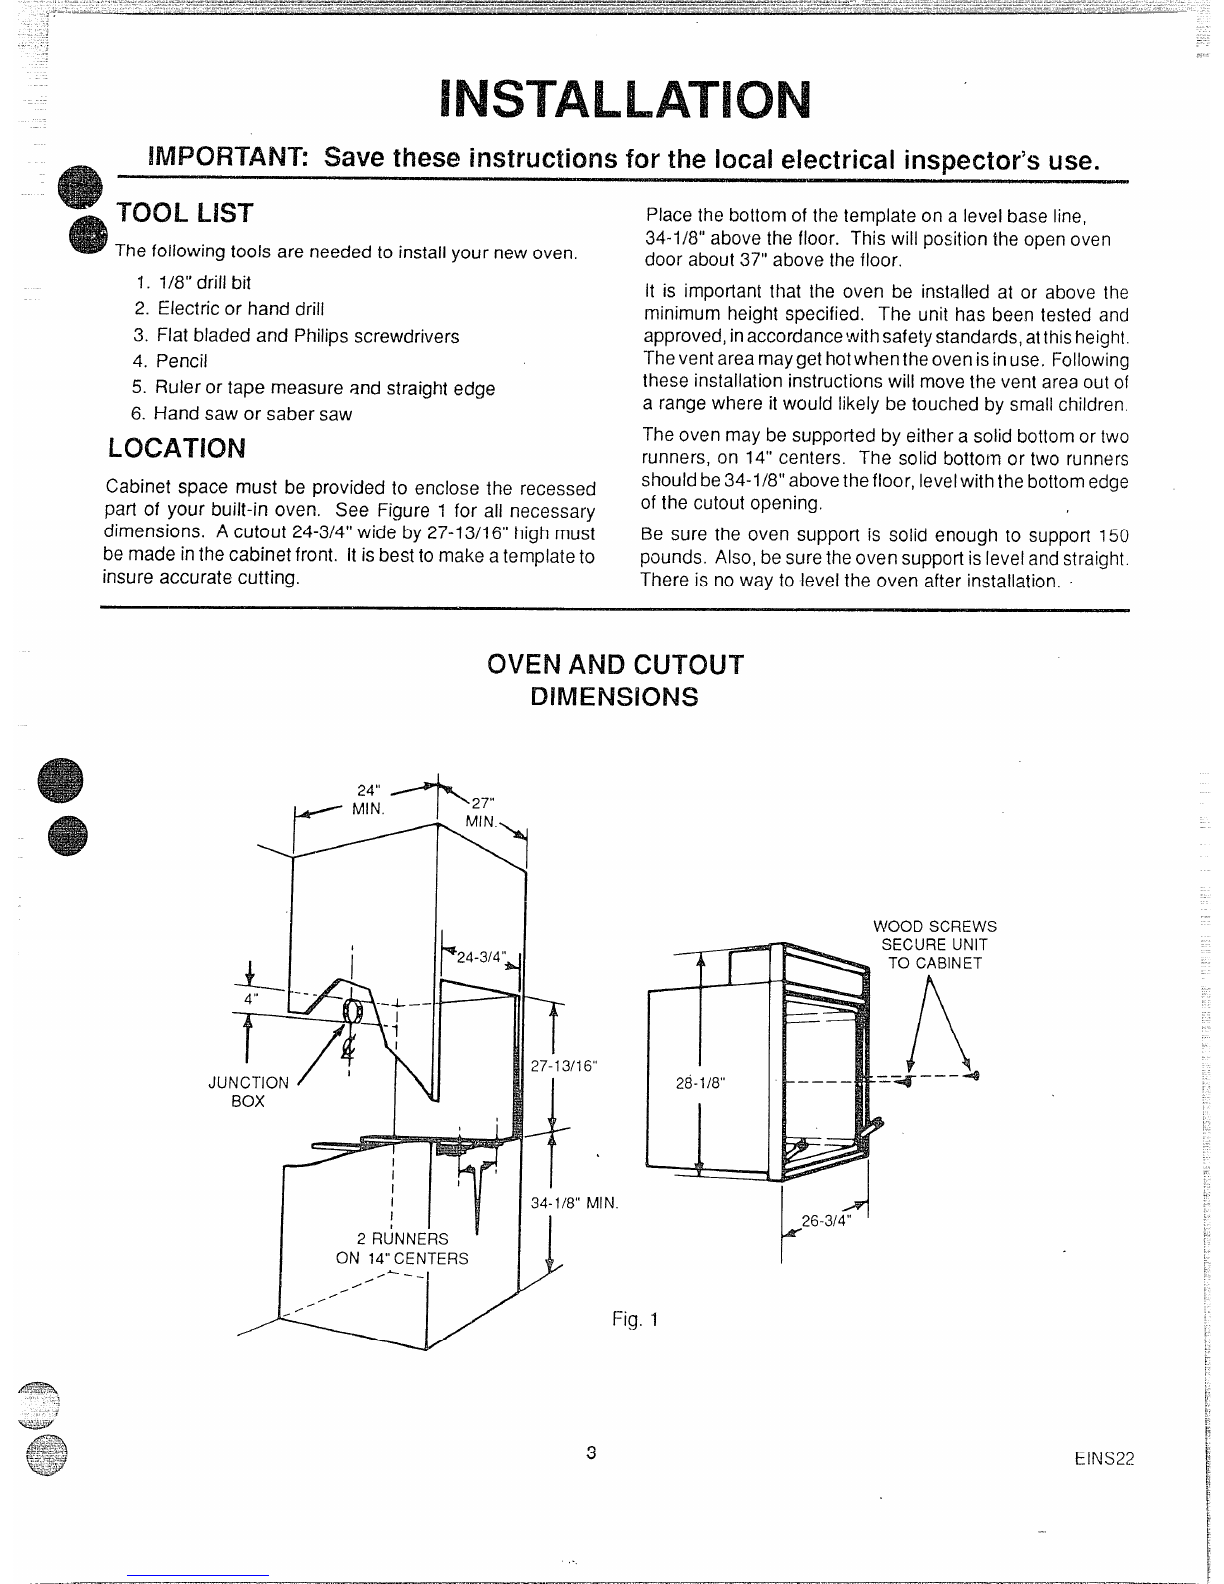
Instailanapprovedjunctionbox inthe upper4“of thecutout
(see Fig. 1).
Whenmakingthe wire connections,usethe entirelengthof
conduit provided (4 feet). The conduit must notbe cut.
The neutralof the unit is groundedto the frame throughthe
bare groundwire.
UNITS WITH NEUTRAL WIRE: Frame
grounded by connection of grounding
lead to neutral lead. If used in amobile
home or if local codes do not permit
groundingthrough neutral,openconnec-
tion and use groundingleadto ground
unit inaccordance with localcodes. Con-
nect neutral leadto branchcircuit neutral
conductor in usual manner.
ALL UNITS: Whenapplyingsetscrewtype
connectors care should be taken not to
damage conduit.
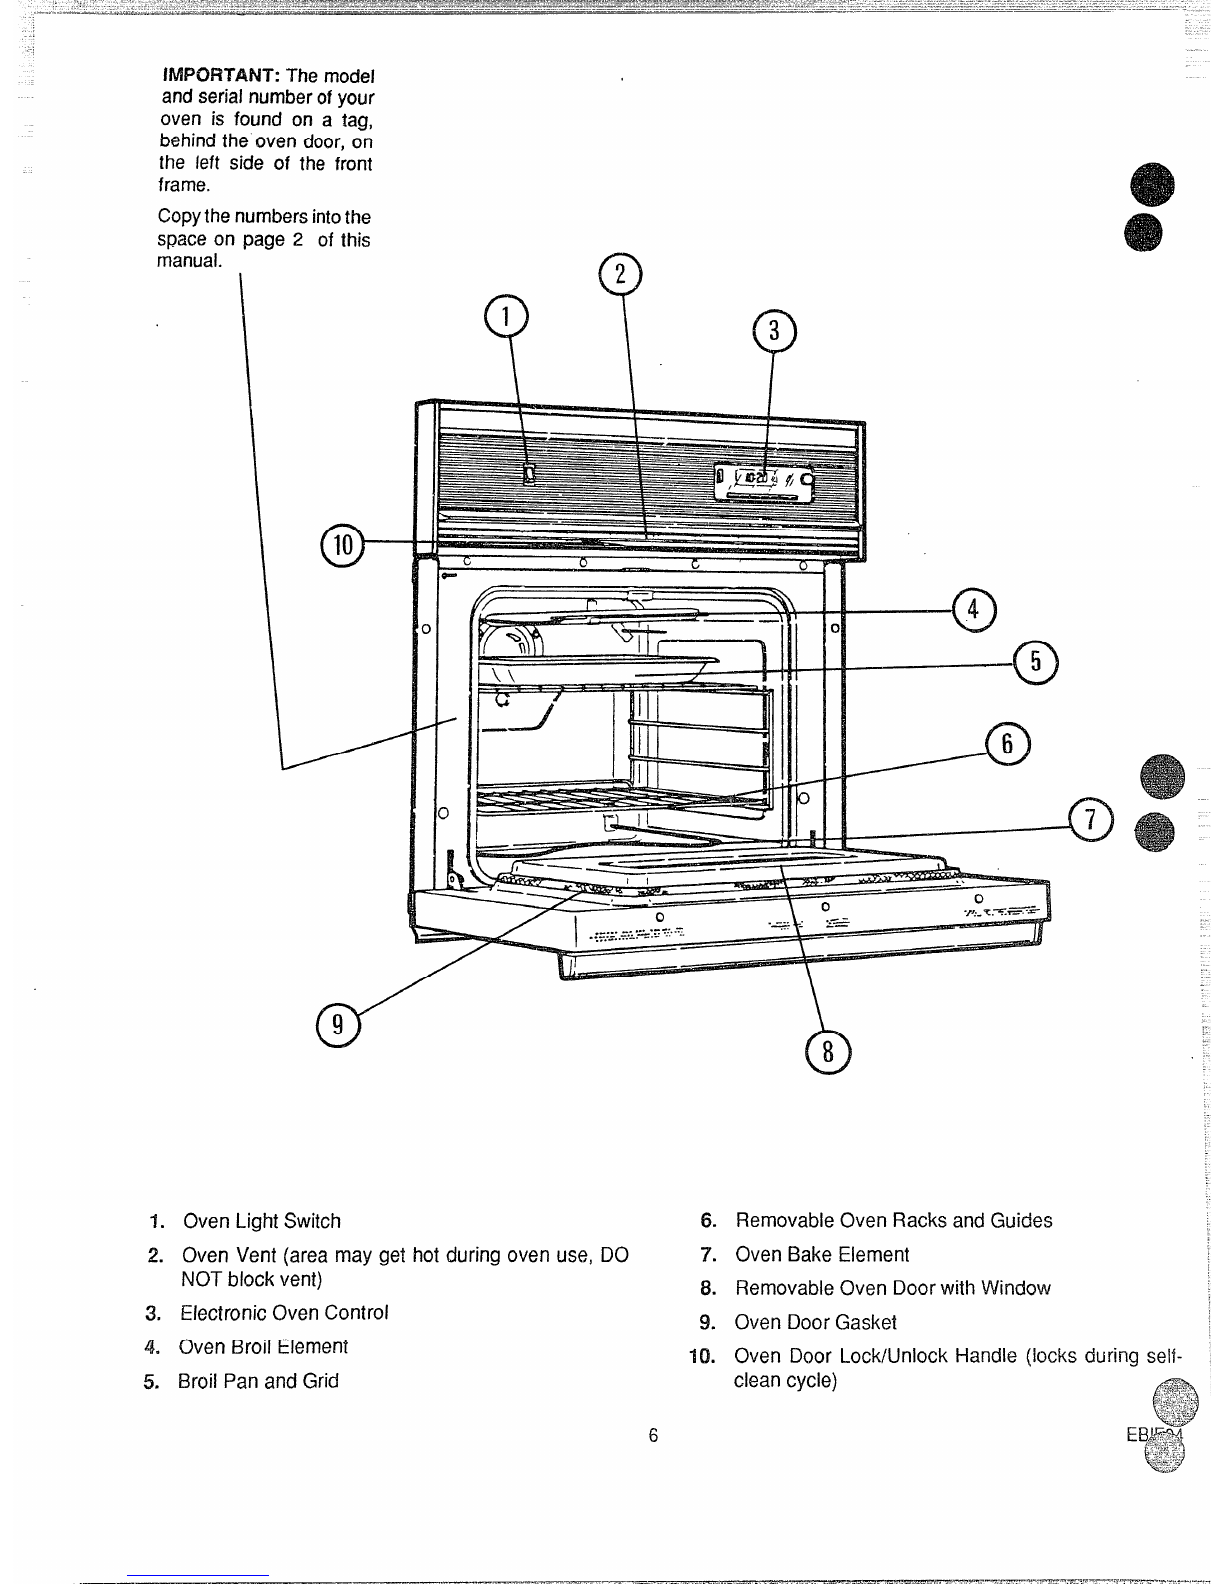
Yourbuilt-inovenispackedwi!hashippingbasepadonthe
bottomoftheunit. Thispadprotectsthelowerfronttrimand
shouldnotberemoveduntilyouarereadyto installtheov
Beforeinstallingtheoven,you mayremovetheovend
tolessentheweightoftheunitifyouwish. Seethe care
cleaningsectionoftheuseandcaremanualforinstruct!
Putthe oven intothe cabinet and use a1/8”drill bitto drill
holesinthecabinetfrontthroughthe holesintheoventrim.
Securethe oveninthe cabinetwiththe screwsprovided.
See the care and cleaning section of the use and care
manualfor instructionson how to instali oven racksand
guides.
,-

Keepthis bookfor lateruse.
esure yourovenisinstalledandgroundedprop-
erlyby aqualifiedtechnician.
!ways use care when touching oven heating
elements or inside the oven. Heating elements
couJdbe hot enoughto burn you evenif they are
darkin color. The ovenvent duct and ovendoor
mayalso becomehotduring oven use.
Always keep the appliance area clear and free
from things that will burn, gasoline and other
flammablevapors and liquids.
Always changeoven rackpositionswhileovenis
cool.
After broiling,alwaystakethebroilerpanoutofthe
oven and clean it. Leftovergrease in the broiler
pancan catchon fire nexttime you usethe pan.
Always usedry pot holderswhen removingpans
from the oven. Moist or damp potholders can
causesteam burns.
Always use care when opening oven door. Let
hotair and steamout before movingfood.
Always follow cleaning instructionsinthis book.
each children not to play with oven controls or
nyother part of the oven.
Always removethe broilerpan and other utensils
fromthe oven before aself-clean cycle.
‘DON’T...
Nevertryto repairor replaceanypartoftheoven
unlessinstructionsaregiveninthisbook. Allother
workshouldbedone by askilledtechnician.
Never heatunopenedfoodcontainers. Pressure
build up may make container burst and cause
injury.
Never leavejars or cans of fat or drippingson or
nearthe oven. Neverletgreasebuildup onyour
oven. You can keep greasefires from startingif
you clean up grease and spills after each oven
use.
Never use aluminum foil to line oven
bottoms. Improperuseof foil could startafi(e.
Never blockfree airflowthroughthe ovenvent.
Never tryto move a pan of hot fat, especiallya
deepfat fryer. Wait untilthe fat hascooled.
Never leavechildren alone or unattendedwhere
anoven is in use.
Never use your oven for warming or heating a
room. Such use can be dangerous and can
damageoven pans.
Never wear loosefitting or hangingclotheswhile
using your oven. Such clothes could-catch fire
andcause serious injury.
Never use atowel or other bulky cloth as apot
holder. Such clothes could catch fire on a hot
element.
Never store things in an oven.
Never rub, move or damage the door gasket on
self-cleaningovens. The gasket is essentialfor a
good seal. Only clean the gasket by soaking it
with hydrogen peroxide, as described inthe self-
clean section of this manual..
Never usewateronagreasefire-it willonly OVEN FIRE
spreadthef~ames. Donottryto move the pan.
1.
2=
5
.-

IMPORTANT:The model
andser~alnumberofyour
oven is foundon atag,
behindthe oven door,on
the left side of the front
frame.
Copythenumbersintothe
spaceon page 2 of this
manual.
*10
Q
2
Y\
1
?
3
~. Oven Light Switch
2. Oven Vent (areamaygethot duringovenuse,DO
NOTblockvent)
3. ElectronicOvenControl
4. Oven Broil Element
5. Broil Pan and Grid
6.
7.
8.
9.
10.
0
8
..
RemovableOven Racks and Guides
Oven Bake Element
RemovableOven Doorwitt~Window
Oven
Oven
clean
Door Gasket
Door Lock/Unlock
cycle) Handle (locks during self-

.
The ElectronicRangeCorItrol(ERC)
o
—
c)-
1
1.
2.
3.
4.
5.
6.
0
2
\??
34P5
H
;ANCEL
iIMER CLOCK ;;[ COOK
CLEAN TIME BROIL BAKE
OVENCANCELBUTTON-Cancelseverything
exceptthe clockandtimer. Pushthis buttonto
turn the ovenoff orto clear everythingif you’ve
madeamistakeinprogramming.
DISPLAYINDICATORS-Lightupto tell you
what is being showninthe TIME DISPLAY
WINDOW.
TIME DISPLAY WINDOW-Showsthe time of
day or the times youset for the timer or auto-
maticoven operation.
OVEN TEMPERATUREAND BROIL DISPLAY
WINDOW-Showsthe oventemperatureor broil
setting you have selected.
FUNCTION INDICATORS-Light upto show
whether oven is baking,broilingor self-cleaning.
SET KNOB-Turn to set times and tempera-
tures after pushing afunction button.
/-13 FUNCTION BUTTONS
7. BAKE-Push beforesetting baketemperature.
8. BROIL -Push before selecting BROIL setting.
7
9.
10.
11.
12.
13.
SET
P6
COOK TIME -Pushbeforesetting length
cooktime for automaticoven operations.
CLEAN -Pushto use self-cleancycle.
of
STOP TIME -Pushbeforeselectingthe time
when youwantthe ovento turn off for automatic
oven operations.
CLOCK -Pushbeforesettingclockor to bring
time of day into the TIME DISPLAYWINDOW.
TIMER-Pushbefore setting amountof time
TO SET THE CLOCK
Q
Turnto set ~
time of day
:ANCEL LJ
‘Top CLEAN ;;;
“MER cLOcK TIME BROIL BAKE
o
1Push
CERC03-3

ToBAKEORROAST
9
3PUSHWHEN
9
TURNTO z
FINISHED SETTEMP
0
PUSH 1
Thereddisplaywill showthe oventemperatureas
it rises(in50steps).
Atonewill soundwhenthe oven is ready.
AUTOMATICOVENOFF
CANCEL LJ
[‘TopCLEAN ;;:
T!”ER jCL*CK TIME BROIL BAKE
/ I
~PusH @ PusI-i
The ERCwill calculatewhen to turnthe oven off.
Whenthe stop time is reached,atone wil! soundand the
ovenwill turn off,
AUTOMATICOVEN ON AND OFF
TURNTO TURNTO TURNTO
SET LENGTH SETTEMP SET OVEN
OF COOK
TIME
CANCEL ~~
‘T*P CLEAN ;;;
“MER CL*CK TIME BROIL BAKE
&II1J
PUSH PUSH PUSH
Whencooktimehasended,atonewillsoundandtheoven
will turn off.
,
ToUSETHETIMERTURNTO
SET AMOUNT
?
2
OFTIME
u
1PUSH u3PUSHAND HOLD
3SECONDSTO CANCEL
Atone will soundwhen time is up.
NOTE:Thetimerisareminderonlyandwill notoperate
the oven.
INCOMPLETEOR INCORRECT
SETTINGS
1. AttentionTonewill sound ifovenhasonlybeenpartially
programmed. Forexample,if youhaveselectedacook
time butnotemperature,youwillheartheAttention Tone
until you select atemperature or push CANCEL.
2. Function ErrorTonewill soundifthere isaproblemwith
oneof the rangefunctions. Cancelthe tone by pushing
the CANCEL button. If the tone starts again, call for
service.
RECALLING FUNCTIONS
Youmayrecallany set function bypushingthe buttonof
function. hat
8
CANCELLING TONES
Ifyou preferthat your rangenot haveatone wheneveryou
push abutton, you can eliminate tones by pushing and
holdingthe CANCELbutton until you hearabeep. Repeat
to activatetones again.
PREHEATING FORAUTOMATICOVEN
OPERATIONS
Cooktimesprogrammedforautomaticovenoperationsstafl
countingdownwhentheovenfirstcomeson, notwhenithas
reachedthe set temperatures. It takes 10 tol 5minutesto
reachthesettemperature, thus additionalcooktime maybe

OvenCooking
Always follow recipe carefully.
Measureingredients properly.
Useproper pan placement.
Placepans on the oven racks with 1fi -2“ of
air space on all sides of each pan. Avoid
overcrowding the oven.
Pans too close to each other, to oven walls
or to the oven bottom block the free move-
ment of air. Improper air movement causes
uneven browning and cooking.
—
2cakelayers --
4cake layers
@Most baking should be done on the second
shelf position from the bottom. When baking
several items, use two shelves placed on the
-—
Let the oven preheat thoroughly before
cooking baked #roducts, Allow IG15 min-
utes preheat time. ~
Avoid opening the door too often to check
the food during baking as heat will be lost,
This may result in poor baking results.
Cakes, cookies, muffins, and quick breads
should be baked in shiny pans —to reflect
the heat —because they should havealight
golden crust. Yeast breads and pie crusts
should be baked in glass or dull (non-shiny
pans) —to absorb the heat —because they
should have abrown, crisp crust.
Oven temperatures should be reduced 25
degrees below recommended temperatures
if you usedark pans or oven proof glass.
There may be some odor when the oven is
first used, This is caused by the heating of
new parts and insulation.
Do not cover the oven bottom or an entire
oven rack with foil, The foil can block nor-
mal heat flow, cause cooking failures, and
damage the oven interior.
second and fourth rack positibns from the
bottom of the oven. Stag~er pans so that no
pan is directly above another. Bake angel
food cakes on the first she!f position from
-the bottom of the oven.
t~;~’
II
t
,.

Broiling POSITIONINGBROILER PAN
Tumto
Y
2HIor LO
Broil
set
?
3Push When
Finished Broilingis cookingby direct heat from the broil element.
Tendercutsofmeatormarinatedmeatshouldbeselecte
forbroiling. Forbestresultssteaksshouldbeat least3/4
~[X- +
CANCEL
‘Tm CLEAN ;;;
“MER cLOcK TIME BROIL BAKE
thick. 0
Afterplacingfoodonthebroilerpan,putthepanonanove
rackinthe properposition. Therecommendedrackposi-
tion andcookingtimecan befound inthe chartbelow
Thecloserthe food is to the broil element,the fasterthe
meat brownson the outside,yet stays red to pink in the
center. Movingthemeatfartherawayfromtheelementlets
the meatcookto the centerwhile browningoutside. Side
oneshouldbecooked1-2 minuteslongerthansidetwo.
MostfoodscanbebroiledattheHIBroilSetting. Selectthe
LO Broil setting to avoidexcessivebrowningor dryingof
foodsthat should be cookedto the well-donestage(such
asthick pork chops or poultry). Rack
Position TotalTime
4=Highest (minutes)
Food
BROILINGTIPS /I1=Lowest II
Steak–1“Thick I
I
eYour oven door should be open to the broil stop
position while broiling. If the door is closed,the
foodwill roast and not broil. Rare I4I9-11 ‘
.Useonly the broilerpan and gridthat camewith your
range for broiling. They are designed for proper
drainage of fat and liquids and help prevent spatter,
smokeor fire.
Medium I3I13-15 I
Well Done 321-23
—
GroundBeef Patties
Medium-1”Thick
Medium-1/2°Thick
eDo notpreheat when broiling. For evenbroilingon
both sides, start the food on a cold pan.
●Whenbroilingfrozenmeat,useonerackpositionlower
than recommended and up to 11/2 times the sug-
gested broiling time. Lamb Chops–1“Thick
PorkChops–1“ Thick 1~
.Trimthe outer layerof fat from steaksandchops. Slit
the fatty edges to keep the meatfrom curling.
9For maximumjuiciness, salt the first sidejust before
turning the meat. Salt the second side just before
serving.
0Brush chicken and fish with butter several times as
they broil Whenbroilingfish, greasethe gridto keepit
from sticking and broil with skin side down. It is not
necessaryto turn fish.
0Never leave asoiled broiler pan in the range.
Greaseinthe pan maysmokeorburnthe nexttimethe
oven is use.
oBesureyou knowthecorrectprocedureforputting
IOutagreasefire. See t!le section on safety.
PorkChops 1/2” Thick 316-18
3lfl-12
311-13
245-55
38-11
39-11
Ham Slice–l/2’’Thick
Fish (Fillets)
Chicken(Pieces)
Frankfurters
Bacon
This chartis ageneralguide. The size,weight, thickness,
and starting temperature of the food as well as yourown
personalpreferencewill affect the cookingtime. Times in
the chad are based on the food being at refrigeratortem-
perature.
1A Donotcovertheentire broiiergrid I
Iwith foil. Poor drainage of hotfat
may cause abroiler fire.
!fa fire starts, closethe ovendoor

FavoriteAmericanRecipes
AcollectionfromAroundthecount~
eUZY=DAY COFFEE CAKE
3/4cup margarine,softened
1cupsugar
2eggs
1cupsour cream
2cupsall-purposeflour
Iteaspoonbakingpowder
7teaspoonsoda
1/2teaspoonsalt
1teaspoonnutmeg
3/4cup light brown sugar
112cupchopped pecans
1teaspooncinnamon
Creammargarineandsugaruntillightandfluffy.Add eggsandsourcream;mixwell.Combineflour, bakingpowder,soda,
saltandnutmeg.Addtobatterandmixweil.Pourbatterinto greasedandfloured 13”x9’ x2“ bakingpan.
Combinebrownsugar,pecansandcinnamon;mixwell.Sprinkleone halfofthismixtureovercakebattenswirlmixture
throughbatter.Sprinkleremainingonehalfmixtureevenlyovercakebatter.
Coverandchiliovernight.Uncoverandbakein preheated350°Fovenfor 35to 45minutesor until caketestsdonewith
toothpick.
BROCCOLICASSEROLE
frozenchoppedbroccoli
2-10 OZ. pkg.
1cup mayonnaise
7cup sharpcheddarcheese,grated
2eggs,beatenslightly
1cancreamof mushroomsoup
2tablespoonschoppedonion
1cup cheesecrackercrumbs
Preheatovento 375°F.Cook broccoli according to packagedirections; drain.
Mix with other ingredients.Pour into greasedtwo (2)quartcasserole.Sprinkle
with cheesecrackercrumbs. Bakeat 375°Ffor 2@25minutes.
w
SOUTHERN BRUNSWICK STEW
Adeliciousquick-to-makeheartystewthatwill feedacrowd or feed the family. Refrigerateot freezethe remainderfor
anotherday.
1-10 oz.can barbecuebeef
1-10 oz. canbarbecuepork
1-24 oz.can Brunswick stew
7-5 oz. canbone/esschicken
1-12 oz.can vacuumpacked corn niblets
1-76 oz.canbaby lima beans,drained
2-16 oz. cansstewed tomatoes
I-141/2oz.cansliced okra,drained
Drain okra and lima beans.Add to all other ingredients in 4quafl
pan.Heaton medium to servingtemperature.
11

TwoCORN CASSEROLE
1/2cupmargarine
3/4 cup choppedgreenpepper ~
1/3cup chopped onion
3eggs,wel!beaten
17oz.can creem stylecorn
17oz.can wholekernelcorn with liquid
%’/2oz. pkg. corn muffin mix
1cup cheddarcheese,shredded
Preheatovento350°F.Saut#greenpeppersandonionin margarine;combine
withremainingingredientsexceptcheese,Pourintogreasedtwo (2)quartcas-
serole;sprinklewithcheeseandbake45-55minutesin350°Foven.Letstand5
minutes“beforeserving.
-my Illinois Cw~rative Exfonsion Homemakers w
2-1 oz.squaressemi-sweetchocolate
1stick margarine
1cup sugar
1/4cup flour
2eggs
1tsp. vanilla ‘
Dashsalt
$/zcupchoppedpecans
Frozen9“ pie shell
Preheatovento 350°F. Meltchocolateandmargarine,Addother
ingredientsto meltedmixture.Pour into unbakedpie shell and
bake35-40 minutesor untilpie appearsset.Servewarmwith ice
creamorwhippedcream.
APPLE DESSERT
1-20 oz.canapplepiefilling
1/2cupsugar
1-9 oz.boxwhitecakemix (1 layersize)
1stickmargarine,melted
1/2cupchoppedpecans
Preheatovento 350°F. Placeinlayersingreased9“ or 10“ squarebaking dish:
apples,sugar, dry cake mix.Pourmeltedmargarineovertopof cakemix.Bake
at 350°Ffor 35 minutes. Sprinkle with pecans. Continue baking 15 minutes.
Servewarm.
CORN BREAD
approximately2tablespoonscoQk-
or8“or9“squarebakingpan.Place
Tilt panto coatbottomevenly.Mix
‘into hot greased pan. Bake 2&25

BEFORE ACLEAN CYCLE
1. Removethebroil panandgrid,ovenracks,rackguides
(somemodels) allutensilsandanyfoilthatmaybeinthe
oven. Donottryto cleanutensilsor anyotherobjectsin
the ovenduringaself-cleancycle. If ovenracksareleft
in the rangeduring aclean cycle,they will cfarken,lose
their lusterand becomehardto slide. If youchooseto
leavethe racksintheoven,youcanpolishthe edgesof
the rackswith steelwool and apply asmall amountof
vegetableoil to the rackedgesafterthe self-cleancycle.
Thiswill makethe rackseasierto slide.
3. Wipeupheavyspilloverson!heovenbottom. Toomuch
soilmaycausesr~~okingduringthe cleancycle.
2. Soil on the oven frontframe, the door lineroutsidethe
doorsealand the frontedgeofthe ovencavity(about1“
intotheoven)will notbecleanedduringacleancycle(see
illustration below). Clean these areas by hand before
startingacleancycle.
Usehotwaterwithasoap-filledsteelwoolpad,thenrinse
well. AFTER ACLEAN CYCLE
4. Cleanthedoorsealbyusingacleanspongetosoakthe
soiledareawith hydrogenperoxide. Repeatedsoaking
maybeneededdependingontheamountofsoil.Frequent
cleaningwillhelppreventexcessivesoilbuildup. Donot
rubthedoorseal. Thefiberglassmaterialofthesealhas
an extremelylow resistanceto abrasion. An intactand
welltitlingovendoor~ealisessentialfor energyefficient
ovenoperationandgoodbakingresults. IfyOIJnoticethe
sealbecomingworn,frayedordamagedin anywayorif
it hasbecomedisplacedonthe door,youshouldreplace
the seal.
After acleancycle, you may noticesomewhite ash in the
oven. Justwipe it upwith adampcloth.
Ifwhite spots remain,removethem with asoap-filledsteel
wool pad. Be sure to rinsethoroughlywith avinegarand
watermixture.Thesedepositsareusuallyasaltresiduethat
cannot be removedby the clean cycle.
Ifthe oven is not clean after one cleancycle,the cycle may
be repeated.
ESCL08

To SET SELF-CLEAN CYCLE
fl. Slide door lock handle to the right. You may CYCLE
‘1-oINTERRUPT ACLEAN
need to slightly press on the door to get it to
lock properly. Q
1PUSH
(!)
2PUSH
The self-clean cycle lasts 3-1/2 hours.
When the oven reaches locking temperature the
word LOCKwill be -shownin the ERC display.
You can push STOP TIME BUTTON to find out
when the cycle will end. Push CLEAN BUTTON
to return to count down.
WHEN ACLEAN CYCLE IS
FINISHED 7
WAIT UNTIL 1
LOCKGOESOUT
(20-30 minutes)
Then follow instructions under WHEN ACLEAN
CYCLE Is FINISHED
2. Slide door lock handle to the left.
After aclean cycle the oven door cannot be
unlocked unlessthe word LOCK is off inthe ERC
display and the oven has cooled.
NEVER force the door !ock/unlock
handle. Forcing the handle may damage the
door lock mechanism.
14

REMOVABLEOVEN DOOR
Theovendoor(s)canberemovedforcleaning.
To remove:
1, Openthedoorto[hebroilsfoppositionandgraspthedoor
ateach side (see illustration).
2. Liftthe-doorup abil,thenpIJllstraighttowardyou.
Toreplace:
1. Makesurethathingearmsareinposilion B(stopposition).
Note: Ifa hingearmsnapsIntopositionA, itmustbe
movedbacktoposition Bbefore ihe door can
be repiaced.
2. Carefuliy insertthe hingearms through the openings in
thefrontframeandpushthedoorintoplacewhilehoiding
the door up.
3. Whenthebottomedgeofthedoorisflush againslthefronf
frame, allowthe door to settle into place.
REMOVABLERACKSAND GUIDES
Becareful not 10scratch the oven finish when installing or
removingoven racks.
To install:
1. Putthe pegsonlhe endofthe rackguide intothe holesin
the oven back. $
2. Lockthe front hook in the slot in the oven side.
3. Settheraisedbackedgeoftheovenrackson apairof rack
guidessothehooksatthesidesoftherackrununderneath
the rack guides.
4. Pushthe rackinuntilyoureachthe bump inthe rack,then
lift the front of the rackabit andpush the rackall the way
in.
To remove:
I. Pullthe oven rack out, then up.
2. Lift the front of the rackguide to unhook it from the oven
wall and pull out.
RACKHOOK RACK
BUMP
REPLACING THE OVEN LIGHT
(self-cleaningoven) GLASS
Besurethat the iight switch is intheoff position. Donot RETAINER
touch hot oven bulb. Do not touch buib with wet GASKET
hands. Never wipe oven light area with wet cloth. SOCKET @o
.
Nevertouch the electrically live metal collar on the bulb
when replacing it.
Electrical power must beshut off if you have to replace
abroken bu:b.
R;~ GLASS
COVER
1. Remove the three screws and lift off Ihe glass retainer, BULB
glasscover and gasket.
2. Replace the bulb with a 40 watt appliance bulb. 1
~. ~eplace Ihe gasket, glass cover and glass ..
refainer. Tighten screws securely.
16
.— __ ————...—— _____ .. . .. —.__..

Before Calling forSertiice
savetimeandmoney<heck this listbeforeyoucallforservice.
To eliminateunnecessaryservicecalls,first,readalltheinstructionsinthis manualcarefully. Then, if youhaveaprob-
—
4Iem,alwayscheckthis listofcommonproblemsandpossiblesolutionsbeforeyoucallfor service,
DON’TCALLFORSERVICE
UNTILYOU CHECK
PROBLEM POSSIBLECAUSE
●Ovendoes not work; totally
inoperative. oCheckhouseholdcircuitbreakerorfuse.●Nopowerto range,
oC!ocksetincorrectly(ifequipped)
oOvencontrolssetincorrectly
oDoorlatch in incorrectposition
(self-clean, manual door lock
modelsonly)
oOvendoes notheat *Checkclockinstructions.
oCheckovencontrolinstructions.
GCheckself-cleaninstructions.
●Foodsdo not bakeproperly Ovennotpreheatedlongenough
Improperrackorpanplacement
Ovenventblockedor covered
Improperuseof foil
Impropertemperaturesettingfor
utensilused
Recipenotfollowed
Rangeand ovenracknot level
Usingimpropercookware
Be sureto pre-heat:
10minutesbelow350degrees
15 minutesabove350 degrees
Maintain uniform air space around pans
andutensils; seecookinghints section.
Be sure that airflow through oven vent is
unobstructed.
Foilusenot recommended
Reducetemperature25degreesfor glass
or dull/darkenedpans.
Is recipetested and reliable?
Checkthe installation sectionfor leveling
instructions(modelswithleglevelersonly).
See ovencookingsection.
●
m
0
s
m
0
0
e
*Thermostatcalibration oSee adjustmentsdescribedon the follow-
ingpage.
oOven temperatureseemsin-
accurate
oImproperrackposition sCheck broil pan placement. See broiling
section.
DDo not preheatwhen broiling.
“Usebroilerpanandgridsuppliedwithrange.
oOpen door to broil stop position; see re-
movableoven door section.
oCheckbroiling chart in broiling seclion.
oFoodsdo not broil properly
●Ovenpreheated
“improperutensil used
oOvendoor closedduringbroil
oImproperbroilinglime
r
oOven smokes oDirtyoven ‘
oBroiler pan containing grease
left in oven
oCheckfor heavyspillover.
oClean pan and grid after each use.
~Check switch setting.
Iooven or work light does not
work (if equipped) sLightswitch inoff position
ELight bulb or fluorescent light
starter burnedout oCheck or replace light buib; see use and
care instruction.
ESER20-2
—- -—..— .. ....-=...———

Before Callina forService
PROBLEM
cOvendoes not clean or
poor cleaning results
(self-cleanmodelsonly)
●Ovendoorwillnotunlock
(self-cleanmodelsonly)
●Tonedoes not sound
~POSSiBLECAUSE
*Controlsnotsetproperly
oClean cycle interrupted too
soon
sOventoo dirty
sCleancyclenotcomplete
●Tone hasbeen eliminatedby
pushingandholdingCANCEL
button
ADJUSTING OVENTEMPERATURE
Thetemperatureinyournewovenhasbeensetcorrectlyat
thefactory,sobe suretofollowthe recipetemperaturesand
timesthe first few timesyou bake in your newoven.
If you think the oven should be hotter or cooler, you can
adjust it yourself. To decidehow muchto changethe tem-
perature,settheoventemperature25°Fhigherorlowerthan
thetemperatureinyourrecipe,thenbake. Theresultsofthis
“test”shouldgive you anideaof howmuchthetemperature
shouldbechanged.
To adjust temperature:
1. Pushthe BAKE button.
2. Select the temperature between 500°F and 550°F with
the SET knob.
18
3.
4.
5,
DON’TCALL FORSERVICE
UNTILYOUCHECK
—..
oCheckselfcleaninstructions.
sHeavily soiled ovens require a 3 1/2 hour
cleancycle.
●Heavyspilioversshouldbe removedbefore
settingcleancycle. Repeatcleancycle.
*Oven must cool below lock temperature
(approximately30minutesaftercleancycleis
complete).
)
~Push and hold CANCEL button to activate
tone.
Quickly(withintwo seconds, beforethe BAKE function
energizes)push and holdthe BAKEbutton.
Thedisplaywill changeto the amountof degreescliff
encebetweentheoriginalfactorytemperaturesettingan
thecurrenttemperaturesetting. ifthe oventemperat
hasthe original factory setting, the displaywill read
The temperature can be adjusted up to 35°F hotter or
35°Fcooler (in 5°F steps), by turning the SET knob. A
minussign(-)beforethe numbermeansthattheOvenWi!l
~.
be coolerby displayedamountof degrees.
Whenyou have madethe desiredadjustment, pushthe
CLOCKbuttonto gobacktothetimeofdaydisplayoruse
--
youroven as youwouldnormally.
Note: Theself-cleantemperaturewillnotbechangedbythe
adjustmentsdescribedabove.
.— —. .—— ———a

IfYou Need Service
To obtain service, see your warranty
onthe back page of this book.
We’reproudof our service and want
youto be pleased. Ifforsome reason
youarenot happywiththeserviceyou
receive,hereare three stepsto follow
for further help.
FIRST, contact the peoplewho serv-
icedyour appliance. Explainwhy you
are not pleased. In most cases, this
willsolvethe problem.
NEXT,ifyouarestill notpleased,write
all the details-including your phone
number-to:
Manager, Consumer Relations
RCA
Appliance Park
Louisville, Kentucky 40225
JNALLY,if your problem is still not
Major Appliance
Consumer Action Panel
20 North Wacker Drive
Chicago, Illinois 60606
19

YOUR RCAOVEN
WARRANTY
Save proof of original purchasedate such as your salesslip or cancelledcheckto establishwarranty period.
We at RCA striveto provide the
~WHATisCOVERED FULL ONE=YEARWARRANTY
Forone year from the date of
original purchase,we will provide,
free of charge, partsand service
labor in your hometo repairor
replaceany pati of the oventhat
fails becauseof amanufacturing
defect.
This warranty is extendedto the
original purchaserand any succeed-
ing ownerfor productspurchasedfor
ordinary home use in the 48 main-
land states, Hawaiiand Washington,
D,C, in Alaska the warranty isthe
same exceptthat it is LIMITED
because youmustpayto ship the
product to the service shop or for the
service technician’s travel costs to
your home.
est quality products and service.
Therefore,we havedesignatedGE
CONSUMER SERVICE, aleaderin
the service industry,to fulfill your
service needs. Should your appliance
need service,during the warranty
period or beyond,look inthe White or
Yellow pagesof yourtelephone
directoryfor GE CONSUMER SERV-
ICE or an Authorized RCAAPPLl-
ANCE SERVICER.
WHATIS NOTCOVERED oServicetrips to your home to teach
you how to use the product.
ReadyourUseandCarematerial.
If you thenhaveanyquestions
aboutoperatingtheproduct,
pleasecontactyourdealerorour
ConsumerAffairsofficeataddress
below.
oImproper installation.
if you have an installation problem,
contact your dealer or installer. You
are responsible for providing ade-
quate electrical, plumbing and other
connecting facilities.
oReplacement of house fuses or
resetting of circuit breakers.
=Failure of the product if it is us
for other than its intended purposeor
used commercially.
‘Damage to product caused by
accident, fire, floods or acts of God.
WARRANTOR IS NOT RESPON-
SIBLE FOR CONSEQUENTIAL
DAMAGES.
Some statesdo notallowthe exclusion or limitation of incidental or consequential damages, so the above
limitation or exclusion may not apply to you. This warranty gives you specific legal rights, and you may also have
other rights which vary from state to state. Toknow what your legal rights are in your state,
consult your local or state consumer affairs office or your state’s Attorney General.
Warrantor: RCAAppliances
Iffurtherhelp is neededconcerting thiswarranty,write:
Manager—ConsumerAffairs,RCA,
AppliancePark,Louisville,KY40225
—
PartNO. MNL069 (342497) L3K335GL (64-68)
~Ub No. 79-4024
Table of contents
Other RCA Oven manuals
Popular Oven manuals by other brands

AEG
AEG BP7004021 user manual

Pizzeria Pronto
Pizzeria Pronto PC6000 owner's manual

Mondial Designs Limited
Mondial Designs Limited FR-14 Technical Manual and Instructions for Use

cecotec
cecotec HORNO BOLERO HEXA MW703800 GLASS BLACK instruction manual

Rommelsbacher
Rommelsbacher BG 1050 instruction manual

Frigidaire
Frigidaire GLEB30S8C Factory parts catalog