RCer dragonus II plus User manual

RCer International
MADE IN TAIWAN
RC e r Dr a g o n u s IIPlus
Please study the manual completely before assembly
process, especially please take notice of Chapter 1 [Read
before assembly] before assembly and operating the unit.
Please keep this Instruction Manual properly.
*In order to make improvement to this product, the specification is
subject to change without prior notice.
Main Feature
Gear Ratio:1:11.5:4.6/1:10.7:4.6/1:10:4.6
Main Gear:150t
Compatible Motor:
400 Class Brushless motor, motor’s KV between 2500-3800.
R
R
RC
C
Ce
e
e
r
r
r

Copyright RCer International co., ltd 1
Index
Read before assembly ………………… 1
How to use this instruction manual ………………… 4
Parts List ………………… 5
Necessary tools & wire connection
schematic
………………… 6
Part types and sizes ………………… 7
Assembly steps ………………… 8
Servo installation ………………… 21
Pitch and throttle setting ………………… 23
Parts replacement ………………… 24
Spare parts List ………………… 26
1. Read Before Assembly
For Safety reasons, observe the following precautions before assembly
Thank you for purchasing RCer Dragonus II Pro(D2 Pro)electric powered helicopter. This Helicopter is well designed for 3D flying by using
400-480 class motor .Because of its Light-weight enhanced frame design, precisely CNC processing, Hi-end carbon material and adjustable
pitch & Bell-Hiller mixed rate system, so you can get outstanding Flying performance from it.
For getting BEST 3D Flying performance, we recommend you to use the Warp4 series brushless motor; You can also try to use Revolution
series brushless motor for light-weight & saving power setting。
In order to flying this helicopter safety and funny, please read this manual, then begin assembling and operating.
Please keep this Instruction Manual properly for further repair or adjustment reference.
The meaning of symbols and signal words
The meaning of symbols and signal words at the head of cautionary notes are as explained below. Even comments marked with
注意 CAUTIONmay result in serious harm depending on the circumstances.
WARNING
Mishandling due to failure to follow these instructions
may result in severe injury or death.
CAUTION
Mishandling due to failure to follow these instructions
may result in serious harm.
FORBIDDEN
Do not attempt under any circumstances.
(Note)Implies important information regarding this product assembly, operation, or maintenance.
*Before assembly, read the instruction manual thoroughly familiarizing yourself with the units structure and assembly procedures.
*Before assembly, check the quantity of parts and their descriptions. After the packing has been opened, parts can’t be exchanged or
returned. In the event of any missing or defective parts, have the store from where you purchased the product stamp you user’s card and
send it with the name and description of the parts to RCer Sales Department.

Copyright RCer International co., ltd 2
WARNING
RC helicopter is not a toy, It may result in serious harm if you don’t assembly or adjust the helicopter very well or not familiarized with the operation. The
manufacture is exempted from the responsibility for such damage. Thus, please ask for instruction of flying, flight assmebling and tuning from expereinced
pilot or shop owner.
Safety Instruction
Before the first time flight, Please plug out the motor wire connecter from ESC and check each servo’s direction and travel setting. Once you have
check all of them, please reconnect the motor wire to ESC .You must execute this procedure before each flight for safety.
Before each flight, please check your transmitter’s battery power to confirm if it has enough Power to avoid your helicopter out of control.
Before each flight, the correct operation sequence is: 1.Turn on your transmitter’s power switch and keep your throttle stick output on low position.
2.Then mount your battery on your helicopter and connect the battery to ESC. After the flight, the correct close sequence is:1.Turn off the power
switch on helicopter and disconnect your battery pack from ESC, then dismount your battery pack from the helicopter and turn off your transmitter’s
power switch. Incorrect operation sequence may result in the helicopter out of control and let yourself or others get hurt.
Please checks if someone else using the same radio frequency which you used to remote control your Helicopter. You have to avoid this situation
because radio signals will be mixed and you will lose control of your model. You can ask each RC member’s to know their frequency or check the radio
frequency board to see if anybody using the same frequency with you.
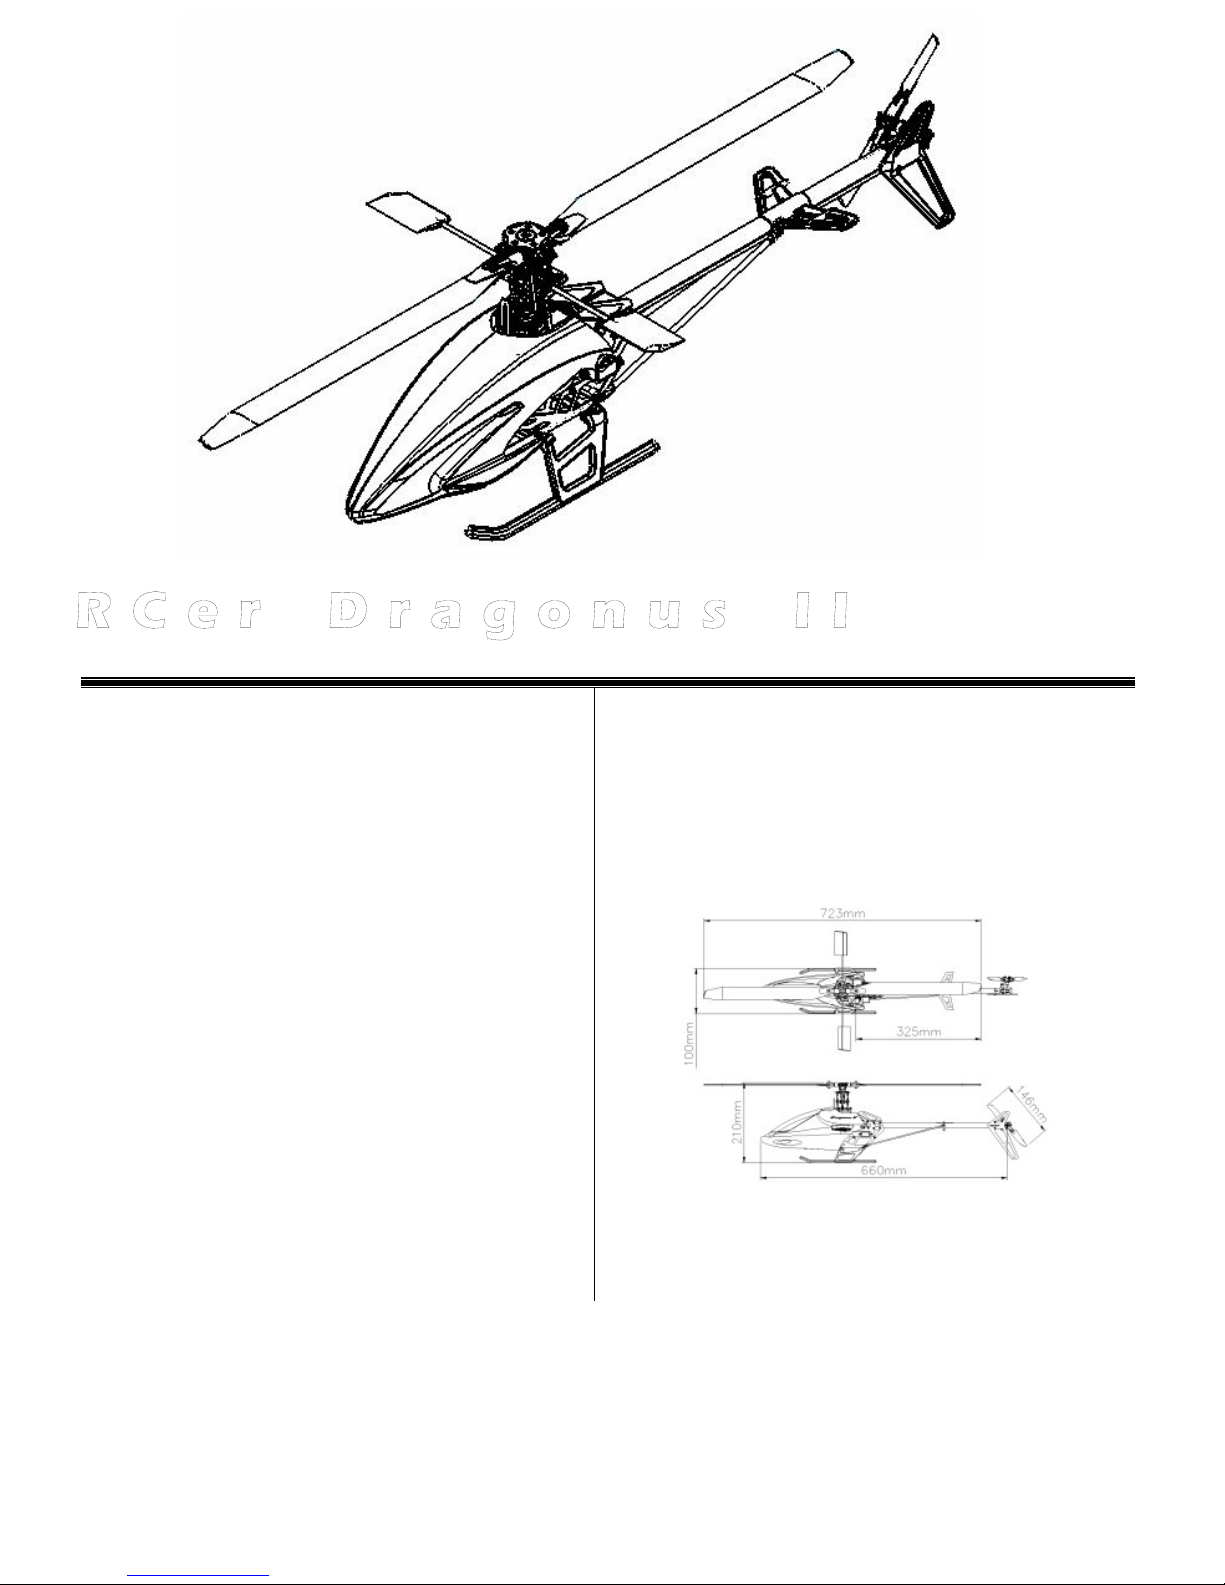
We strongly advise to use the motorsets and R/C components which are recommended by RCer. If you use different components, the flight properties
of the Dragonus II Pro may be diminished. Other effects can be failure and premature wear of the parts.
Before each flight, please check all parts’condition including ball stud, ball link, frame screw and the tail boom fixed condition to avoid mechanical
failure. Throttle channel should be in motor OFF position before connect the motor battery pack to ESC to avoid the operating mistake and causing
accident. Because helicopter’s Main & tail rotors’ RPM are quit high , please check and confirm there are no other things nearby the main or tail blades
when you start your helicopter. When you fly your helicopter, please keep safe distance with your helicopter and keep helicopter far away from other
people or yourself. For Public safety reason, You can’t play RC helicopter nearby real plane’s runway.
Do not fly under the strong wind or heavy rain situation to avoid losing control of your helicopter. To Be competent for a RC helicopter pilot, you have
to pay attention on yourself and surrounding situation when flying the RC helicopter, then you can enjoy your flight.
The Airfield Limits
Please fly your RC helicopter on the permitted airfield and obey the regulations of the field (ex. flight airspace, frequency control and flight time
etc... )。
Please do not fly your model nearby the pylon or railway to avoid the electromagnetic wave disturbing your receiver and causing the model out of
control.
Please do not fly your model at the beach for a long time to avoid the salt in the air corroding your RC equipment or mechanical structure.
Please do not fly your model on the load or at the small park to avoid violating the statute and causing dangerous to other people.
Checking the unit before flight
Real helicopter will execute very strict check steps before taking off. RC helicopter is very sensitive when flying, so it has similar check sequences to real one.
Any mistake operation will cause people get hurt or property loss. Because of above reasons, please purchase qualified RC products and join association’s
insurance.
If the model shows irregular behavior, bring the model to a halt immediately. Turn off all power switches and disconnect the batteries. Investigate the reason
and fix the problem. Do not operate the model again as long as the problem is not solved, as this may lead to further trouble and unforeseen accidents. If
main blade, balance paddle or tail blade ever crash and may cause damage, please replace them to avoid suffering unforeseen accidents.
Please check carefully to confirm if existing any loose or broken parts and should adjust or replace them to maintain your helicopter in well condition.
Please notice that all wires must be fixed properly to avoid the accident.

Copyright RCer International co., ltd 3
WARNING
Please check main blade’s head set to confirm if there is any part loose or damage, especially main blade grip.
Please notice if main blade’s strength and weight is proper.
Please confirm the battery’s power is enough and landing before battery’s power be exhausted.
Please check all wires’ connecters to avoid connecter loosening.
Please obey the operation order, frequency management and transmitter’s power status.
Please check to confirm all servos working smoothly without any noise.
Please check to confirm if Gyro is configured correctly.
Please check to confirm if tail timing belt has proper tension.
Notice In Flying
Please Keep distance with other people or cars surrounding you when you fly your helicopter.
Please Notice if there is any other flyer use the same radio frequency channel with you.If your servo has unusual motion when you turn on your
transmitter’s power, please turn off the power of your helicopter and transmitter.
Throttle channel should be in motor OFF position while powering up and you should hold helicopter’s main rotor head to prevent unexpected rotating.
When you prepare to take off your helicopter, please keep distance over 15 meters long and check to confirm there is no other people or dangerous
objects in the flight area.
When there is abnormal noise or vibration appear on your helicopter, please landing immediately and check to find out the reason of the problem.
Abnormal operation or carelessness may lead to accident. Please obey all flight regulation for safety reason.
Notice After Flight
Please disconnect the Battery pack from helicopter after the flight to avoid short and happen accident
If there is no flight for a long time, please clear up the helicopter and place it at safe place
Safekeeping Place
Please Do not put your Helicopter in the place which is shined by sunlight or high temperature place.(ex. The car under sunshine)
Please Do not put your Helicopter in the place which is wet or dusty.
CAUTION
Throttle channel should be in motor OFF position while powering up.
User must be responsible to any risk of occurring accident or parts damage by doing not permitted modification.
Please obey and execute above affairs certainly and enjoy the fun be brought from RCer D2 Pro.

Copyright RCer International co., ltd 4
How to use this instruction manual
Notice before assembly
Please study through the instruction manual before assembly and let yourself understand each part’s assemble sequence. Incorrect assembly may
cause accident.
Please check parts quantity and object description before taking off the seal. After taking off the seal, you will not be permitted to replace or return the
parts. If you have question about missing or broken parts, please contact with local hobby shop which you bought your helicopter and ask them to
help you to process the problem and enjoy RCer’s customer service.
The parts which need to be tighten and glue will be signed by symbol “242”or “638”. Please obey the manual’s direction and stick the parts by using
the correct glue.
There has the note on each assembly page of the instruction manual to indicate the kinds and quantity of the parts.
WARNING
User must be responsible to any risk of occurring accident by doing not permitted modification or using other
brand’s parts.
零件包編號
Pack No. 零件名稱、編號及使用個數
Part name, number and quantity
注意事項
Caution

Copyright RCer International co., ltd 5
零件清單 Parts List
[A1] R01A001 Main Blade Grip 2 [A36] R01A037 Tail Pitch Lever Arm 1[A71] R01A074 Carbon Main Blade 2
[A2] R01A002 Flybar Basemount 1 [A37] R01A038 Copper collar 1[A72] R01A075 Carbon Tail Boom 1
[A3] R01A003 Main rotor hjosing 1 [A38] R01A039 Cross Member 1[A73] R01A076 Canopy Standoff 2
[A4] R01A004 Feathering Shaft 1 [A39] R01A040 Tail Idle pulley collar 2[A74] R01A077 Carbon Paddle 2
[A5] R01A005 Wash-out Control Arms 2 [A40] R01A041 Canopy Standoff 2[A75] R01A078 Main Gear Shaft Sleeve 2
[A6] R01A006 Center Hub 1 [A41] R01A042 Tail Boom Base 2[A76] R01A079 Spacer 2
[A7] R01A008 Flybar control arm 2 [A42] R01A043 Tail Boom 1[A77] R01A080 Carbon Paddle 2
[A8] R01A009 Flybar control ball 2 [A43] R01A044 Tail Blade Grip 2[A78] R01A081 Carbon Tail Blade 2
[A9] R01A010 Elevator swing arms 2 [A44] R01A045 Tail Pitch Lever Arm 1[A79] R01A082 Landing Skid 1
[A10] R01A011 Ball end 2 [A45] R01A046 Tail Support Rod End 4[B1] RMR52ZZ Bearing 21
[A11] R01A012 Feathering Shaft washer 2 [A46] R01A047 Tail Blade Brass Bushing Sleeve 1[B2] R693ZZ Bearing 6
[A12] R01A013 Washer 5 [A47] R01A048 Tail Blade Slider Hub 1[B3] RMR74 Bearing 2
[[A13] R01A014 Top Main Frame Side 2 [A48] R01A049 Tail Blade Ball Link 2[B4] R685ZZ Bearing 2
[A14] R01A015 Lower Main Frame Side 2 [A49] R01A050 Ball Link 2[B5] RFC6 One Way Bearing 1
[A15] R01A016 Main shaft 1 [A50] R01A051A Linkage Rod A 2[B6] R6704 Bearing 1
[A16] R01A017 Battery basemount 1 [A51] R01A051B Linkage Rod B 2[B7] RPW0204 Washer Screw 26
[A17] R01A018 Landing Skid basemount 1 [A52] R01A051C Linkage Rod C 2[B8] RPW0205 Washer Screw 16
[A18] R01A019 Motor basemount 1 [A53] R01A054 Ball Stud 2[B9] RPW0210 Washer Screw 8
[A19] R01A020 Bearing housing 2 [A54] R01A055 Guide Shaft 1[B10] RPW0214 Washer Screw 2
[A20] R01A021 Main gear 1 [A55] R01A056 Cross Member 2[B11] RPW0231 Washer Screw 2
[A21] R01A022 Main gear housing 1 [A56] R01A057 Cross Member 4[B12] RP0205 Screw 9
[A22] R01A023 pin 2 [A57] R01A058 Spacer 8[B13] RP0208 Screw 13
[A23] R01A024 Lock ring 2 [A58] R01A059 Guide Pulley 2[B14] RP0210 Screw 2
[A24] R01A025 collar 2 [A59] R01A060 Tail Gear Case Set 1[B15] RP0212 Screw 3
[A25] R01A026 Flybar 1 [A60] R01A061 Tail Idle Pulley 1[B16] RO0207 Set Screw 25
[A26] R01A027 Anti-Rotation Upright 1 [A61] R01A062 Tail Support Rod 2[B17] RO02105 Set Screw 1
[A27] R01A028 Shaft Tube 1 [A62] R01A063 Guide Pulley Base 1[B18] RTP10206 TP Screw 4
[A28] R01A029 Plastic screw nut 8 [A63] R01A064 Gyro Base 1[B19] RTP31406 Sleeve Screw 4
[A29] R01A030 Timing Belt Main Gear 1 [A64] R01A065 Horizontal Fin 1[B20] RTR0203 Screw 2
[A30] R01A031 Main Gear Washer 1 [A65] R01A066 Vertical Fin 1[B21] RF0303 Set Screw 8
[A31] R01A032 Tail Rotor Hub 1 [A66] R01A067 Seesaw 1[B22] RYH1200 Rubber Grommet 2
[A32] R01A033 Tail Shaft 1 [A67] R01A068 Swash Ring Casing 1[B23] RP03 O Ring 4
[A33] R01A034 Tail Pully Gear 1 [A68] R01A069 Swash Plate Base 1[B24] RM2 M2 Screw Nut 32
[A34] R01A035 Copper Pinion Gear 3 [A69] R01A070 Pivot Ball Stud 1[B25] RM3 M3 Screw Nut 2
[A35] R01A036 Tail Pitch Lever Arm Mount 1 [A70] R01A071 Swash Plate Base 1[B26] R453MXL Timing Belt 1


Table of contents