RCF C-BR 10 Q15 User manual

FLYING BRACKET C-BR 10° Q 15
Q 15 SPEAKERS 10° FLYING BRACKET
STAFFA SOSPENSIONE 10° PER DIFFUSORI Q 15
OWNER’S MANUAL
MANUALE UTENTE


3
CONTENTS
ENGLISH ������������������������������������������������������������������������������������������������������������������������������������������������������������������������������������������������������� 4
ITALIANO ���������������������������������������������������������������������������������������������������������������������������������������������������������������������������������������������������� 10

4
EN
SAFETY PRECAUTIONS AND GENERAL INFORMATION
The symbols used in this document give notice of important operating instructions and warnings which must be strictly followed�
CAUTION Important operating instructions: explains hazards that could damage a product, including data loss
WARNING Important advice concerning the use of dangerous voltages and the potential risk of electric shock,
personal injury or death�
IMPORTANT NOTES Helpful and relevant information bout the topic
SUPPORTS, TROLLEYS AND CARTS Information about the use of supports, trolleys and carts� Reminds to move with extreme caution and never tilt�
WASTE DISPOSAL This symbol indicates that this product should not be disposed with your household waste, according to the
WEEE directive (2012/19/EU) and your national law�
IMPORTANT NOTES
This manual contains important information about the correct and safe use of the device� Before connecting and using this product, please read this instruction manual carefully and keep
it on hand for future reference� The manual is to be considered an integral part of this product and must accompany it when it changes ownership as a reference for correct installation
and use as well as for the safety precautions� RCF S�p�A� will not assume any responsibility for the incorrect installation and / or use of this product�
IMPORTANT NOTES
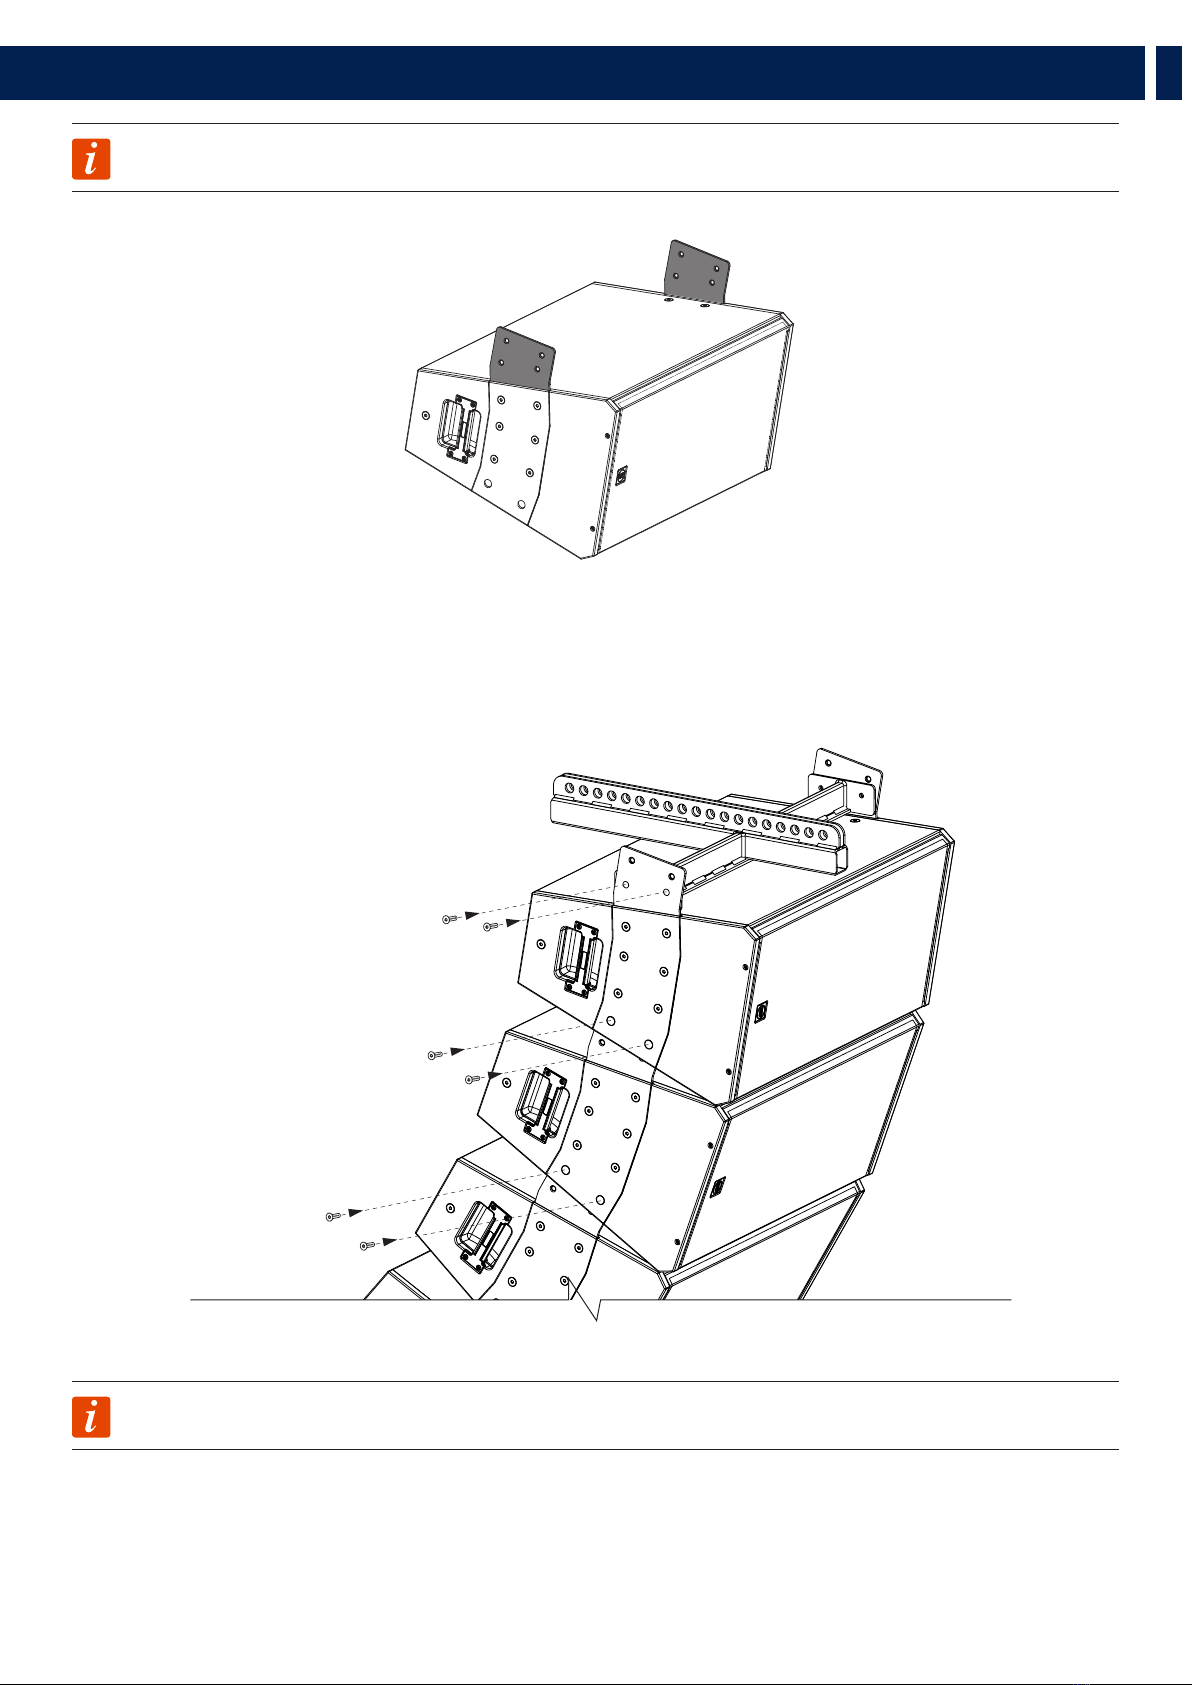
Suspending any object is a potentially dangerous operation and should only be attempted by individuals who have a thorough knowledge of the techniques and regulations of rigging
objects overhead� RCF strongly recommends that all speakers should be suspended taking into account all current national, federal, state and local regulations� It is the responsibility
of the installer to ensure that all speakers are safely installed in accordance with all such regulations� RCF strongly recommends to inspect the system at least once a year� If any sign
of weakness or damage is detected remedial actions should be taken immediately� The user is responsible for making sure that the supporting surfaces and any additional hardware
used is capable of supporting the system� Any hardware used to suspend a loudspeaker array that is not provided by or associated with RCF is not reccomended and is under the
responsibility of others�
SAFETY PRECAUTIONS
1. Read these instructions
2. Keep these instructions
3. Heed all warnings
4. Follow all the instructions
5. Install in accordance with manufacturer’s instructions
6. Only use attachments and accessories specified by the manufacturer
7. All the precautions, in particular the safety ones, must be read with special attention, as they provide important information�
Never attempt to carry out any operations, modifications or repairs that are not expressly described in this manual.
RCF S.p.A. strongly recommends this product is only installed by professional qualified installers (or specialised firms) who can ensure correct installation and
certify it according to the regulations in force.
IMPORTANT NOTES
RCF declines all responsabilities if the user applies this accessory to other configurations not mentioned in this manual.
RCF S.p.A. reserves the right to make changes without prior notice to rectify any errors and / or omissions.
Always refer to the latest version of the manual on www.rcf.it.

5
EN
VERTICAL HANGING WITH A 10° ANGLE
Using the C-BR 10° it is possible to reduce the opening angle from 22�5° to 10°�
PACKAGE CONTENT:
- 2 X C-BR 10° BRACKETS
1. Unscrew the 8 screws from the Top Plate Aand remove it�
2. Remove the two plates located under the top one:
Ba Link Plate (with 6 holes)
Can External Plate (with 2 holes)
A
A
B
C

6
EN
3. Place the C-BR 10° Das shown in the pictures below�
-On the top and following speakers of the cluster, the External Plate Cmust be placed next to the C-BR 10°, as shown in FIGURE 1.
-On the bottom speaker of the cluster the External Plate Cmust be placed as shown in FIGURE 2.
4. For the top and following speakers, place back theTop Plate on its position and screw it back with only six screws, leaving the two bottom holes
empty� For the Bottom speakers screw back the Top Plate with all the 8 screws�
NOTE: The Top Plate Amust be always screwed back on its position.
VERTICAL HANGING WITH A 10° ANGLE
FIGURE 1
(Top and following speakers)
C
D
FIGURE 2
(Bottom speaker)
(Bottom speaker)
C
D
AA

7
EN
5. Now place the Vertical Fly Bar on top of a Q15 speaker and screw it with the 4 screws provided�
The protruding part of the 10° bracket of the lower speaker must be inserted on the respective seat on the upper speaker� Then depending on
which angle is chosen, screw in the last two screws�
NOTE: The exact same operations must be done on both sides of the speaker
VERTICAL HANGING WITH A 10° ANGLE

8
EN
EXAMPLES OF CONFIGURATIONS
Now with the the vertical flybar FLY BAR FL-B V Q 15 you can hang vertically multiple Q 15 speakers (maximum 6)�
10°
10°
10°
10°
10°
EXAMPLE
6 X 10° modules

9
EN
EXAMPLES OF CONFIGURATIONS
10°
10°
22.5°
10°
10°
22.5°
22.5°
10°
22.5°
22.5°
10°
10°
22.5°
10°
10°
22.5°
22.5°
10°
22.5°
22.5°
EXAMPLE
4 X 10° modules + 2 x 22�5° modules

10
EN
EXAMPLES OF CONFIGURATIONS
10°
10°
22.5°
10°
10°
22.5°
22.5°
10°
22.5°
22.5°
10°
10°
22.5°
10°
10°
22.5°
22.5°
10°
22.5°
22.5°
EXAMPLE
3 X 10° modules + 3 x 22�5° modules

11
EN

12
IT
I simboli utilizzati in questo documento notificano importanti istruzioni operative e avvertimenti che devono essere seguiti attentamente�
CAUTELA Importante istruzione operativa: notifica un pericolo che potrebbe danneggiare il prodotto, compresa la perdita di dati
ATTENZIONE Avvertimento importante riguardante l’uso di voltaggi pericolosi e il potenziale rischio di shock elettrico, lesioni personali o
morte�
NOTE IMPORTANTI Informazioni utili e rilevanti sull’argomento
SUPPORTI, TROLLEY E CARRRELLI Informazioni riguardanti l’utilizzo di supporti, trolley e carrelli� Suggerisce di muovere con estrema cautela e di non inclinare
il carico�
SMALTIMENTO Questo simbolo indica che il prodotto non deve essere smaltito con i rifiuti ordinari, così come indicato nella direttiva WEEE
(2012/19/EU) e nelle normative nazionali in vigore�
NOTE IMPORTANTI
Questo manuale contiene informazioni importanti sull’uso corretto e sicuro del dispositivo� Prima di collegare e utilizzare questo prodotto, leggere attentamente questo manuale di
istruzioni e tenerlo a portata di mano per riferimenti futuri� Il manuale deve essere considerato parte integrante di questo prodotto e deve accompagnarlo in caso di cambio proprietà
come riferimento per la corretta installazione e utilizzo nonché per le precauzioni di sicurezza� RCF S�p�A� non si assume alcuna responsabilità per l’installazione e / o l’uso errati di questo
prodotto�
NOTE IMPORTANTI
La sospensione di qualsiasi oggetto è un’operazione potenzialmente pericolosa e deve essere svolta solamente da persone dotate di una conoscenza approfondita delle tecniche e delle
normative relative alla sospensione degli oggetti� RCF raccomanda vivamente che tutti i diffusori e relativi accessori vengano sospesi tenendo conto di tutte le normative nazionali, federali,
statali e locali vigenti� È responsabilità dell’installatore assicurarsi che tutti i diffusori siano installati in modo sicuro in conformità con tutte queste normative� RCF raccomanda vivamente
di ispezionare il sistema almeno una volta all’anno� Se viene rilevato qualsiasi segno di debolezza o danno sarà necessario intraprendere immediatamente azioni correttive� È responsabilità
dell’utente assicurarsi che le superfici di supporto e qualsiasi altra meccanica utilizzata siano in grado di supportare il sistema� Qualsiasi supporto utilizzato per sospendere un array di
altoparlanti che non sia fornito o associato a RCF è sconsigliato ed è sotto la responsabilità di altri�
PRECAUZIONI DI SICUREZZA
1. Leggere queste istruzioni
2. Conservare queste istruzioni
3. Prestare attenzione a tutti gli avertimenti
4. Seguire tutte le istruzioni
5. Installare in conformità con le istruzioni del produttore
6. Utilizzare solo collegamenti e accessori specificati dal produttore
7. Tutte le precauzioni, in particolare quelle di sicurezza, devono essere lette con particolare attenzione in quanto forniscono informazioni importanti�
Non tentare mai di eseguire operazioni, modifiche o riparazioni non espressamente descritte nel presente manuale.
RCF S.p.A. raccomanda vivamente che questo prodotto sia installato solo da installatori professionisti qualificati (o aziende specializzate) che possono garantire
la corretta installazione e certificarlo secondo le normative vigenti.
NOTE IMPORTANTI: RCF declina ogni responsabilità in caso di applicazione di configurazioni non menzionate in questo manuale.
RCF S.p.A. si riserva il diritto di apportare modifiche senza preavviso per rettificare eventuali errori e/o omissioni.
Fare sempre riferimento all’ultima versione del manuale su www.rcf.it.
AVVERTENZE PER LA SICUREZZA E INFORMAZIONI GENERALI

13
IT
SOSPENSIONE VERTICALE CON ANGOLO DI 10°
Mediante l’utilizzo della staffa C-BR 10° è possibile ridurre l’angolo di apertura da 22�5° a 10°�
CONTENUTO DELLA CONFEZIONE:
- 2 X STAFFE C-BR 10°
1. Svitare le 8 viti dalla Piastra Superiore Ae rimuoverla�
2. Rimuovere le due piastre sottostanti la Piastra Superiore:
Bla Piastra di Collegamento (con 6 fori)
Cla Piastra Esterna (con 2 fori)
A
A
B
C

14
IT
3. Posizionare la staffa C-BR 10° Dcome mostrato nelle immagini sotto�
-Sul primo diffusore in alto e sui seguenti del cluster, la Piastra Esterna Cdeve essere posizionata di fianco alla staffa C-BR 10°, come
mostrato nella FIGURA 1.
-Nell’ultimo diffusore in basso del cluster, la Piastra Esterna Cdeve essere posizionata come mostrato nella FIGURA 2.
4. Per il primo diffusore in alto e per i seguenti, posizionare la Piastra Superiore nella sua posizione e avvitarla con solo 6 viti, lasciando vuoti i due
fori in basso� Nell’ultimo diffusore in basso avvitare tutte le 8 viti�
NOTA: La Piastra Superiore Amdeve sempre essere riavvitata nella sua poszizione.
SOSPENSIONE VERTICALE CON ANGOLO DI 10°
FIGURA 1
(Primo diffusore in alto e seguenti)
C
D
FIGURA 2
(Ultimo diffusore in basso)
C
D
AA

15
IT
5. Posizionare il FlyBar verticale sopra al diffusore Q15 e avvitarlo con le 4 viti in dotazione al FlyBar�
Le staffe sporgenti dell’accessorio 10° devono essere inserite nella loro sede ricavata sotto alla Piastra Superiore del diffusore sovrastante�
Quindi a seconda dell’angolo scelto per l’inclinazione, avvitare le ultime due viti�
NOTA: La medesima operazione deve essere fatta su entrambi i lati del diffusore
SOSPENSIONE VERTICALE CON ANGOLO DI 10°

16
EN
ESEMPI DI CONFIGURAZIONI
Mediante l’utilizzo del flybar verticale FLY BAR FL-B V Q 15 è possibile sospendere un cluster di diffusori Q 15 (massimo 6)�
10°
10°
10°
10°
10°
ESEMPIO
6 moduli a 10°

17
EN
ESEMPI DI CONFIGURAZIONI
10°
10°
22.5°
10°
10°
22.5°
22.5°
10°
22.5°
22.5°
10°
10°
22.5°
10°
10°
22.5°
22.5°
10°
22.5°
22.5°
ESEMPIO
4 moduli a 10° + 2 moduli a 22�5°

18
EN
ESEMPI DI CONFIGURAZIONI
10°
10°
22.5°
10°
10°
22.5°
22.5°
10°
22.5°
22.5°
10°
10°
22.5°
10°
10°
22.5°
22.5°
10°
22.5°
22.5°
ESEMPIO
3 moduli a 10° + 3 moduli a 22�5°

19

Tel +39 0522 274 411 - Fax +39 0522 232 428 - e-mail: info@rcf�it - www.rcf.it
RCF S.p.A. Via Raffaello Sanzio, 13 - 42124 Reggio Emilia - Italy 10307726 RevC
Table of contents
Languages:
Other RCF TV Mount manuals
Popular TV Mount manuals by other brands

Bauhn
Bauhn ALPB80-0718 instruction manual

Kanto
Kanto RCF190 user manual

Brasforma
Brasforma SBRP1040 BRA4.0 instruction manual

Perlesmith
Perlesmith PSTVMC04 instruction manual

3M
3M SALA Sealed Block Bracket Assembly & Operation guide

PEERLESS Mounts
PEERLESS Mounts SmartMount RTFPA-220 Installation and assembly