Ready Rig VEGA UPGRADE RR-VU User manual

VEGA UPGRADE RR-VU
INSTALLATION MANUAL
www.ready-rig.com

Safety Instructions and Recommendations
Before use, please read, understand and follow the safety instructions in this manual.
●Safety is your responsibility.
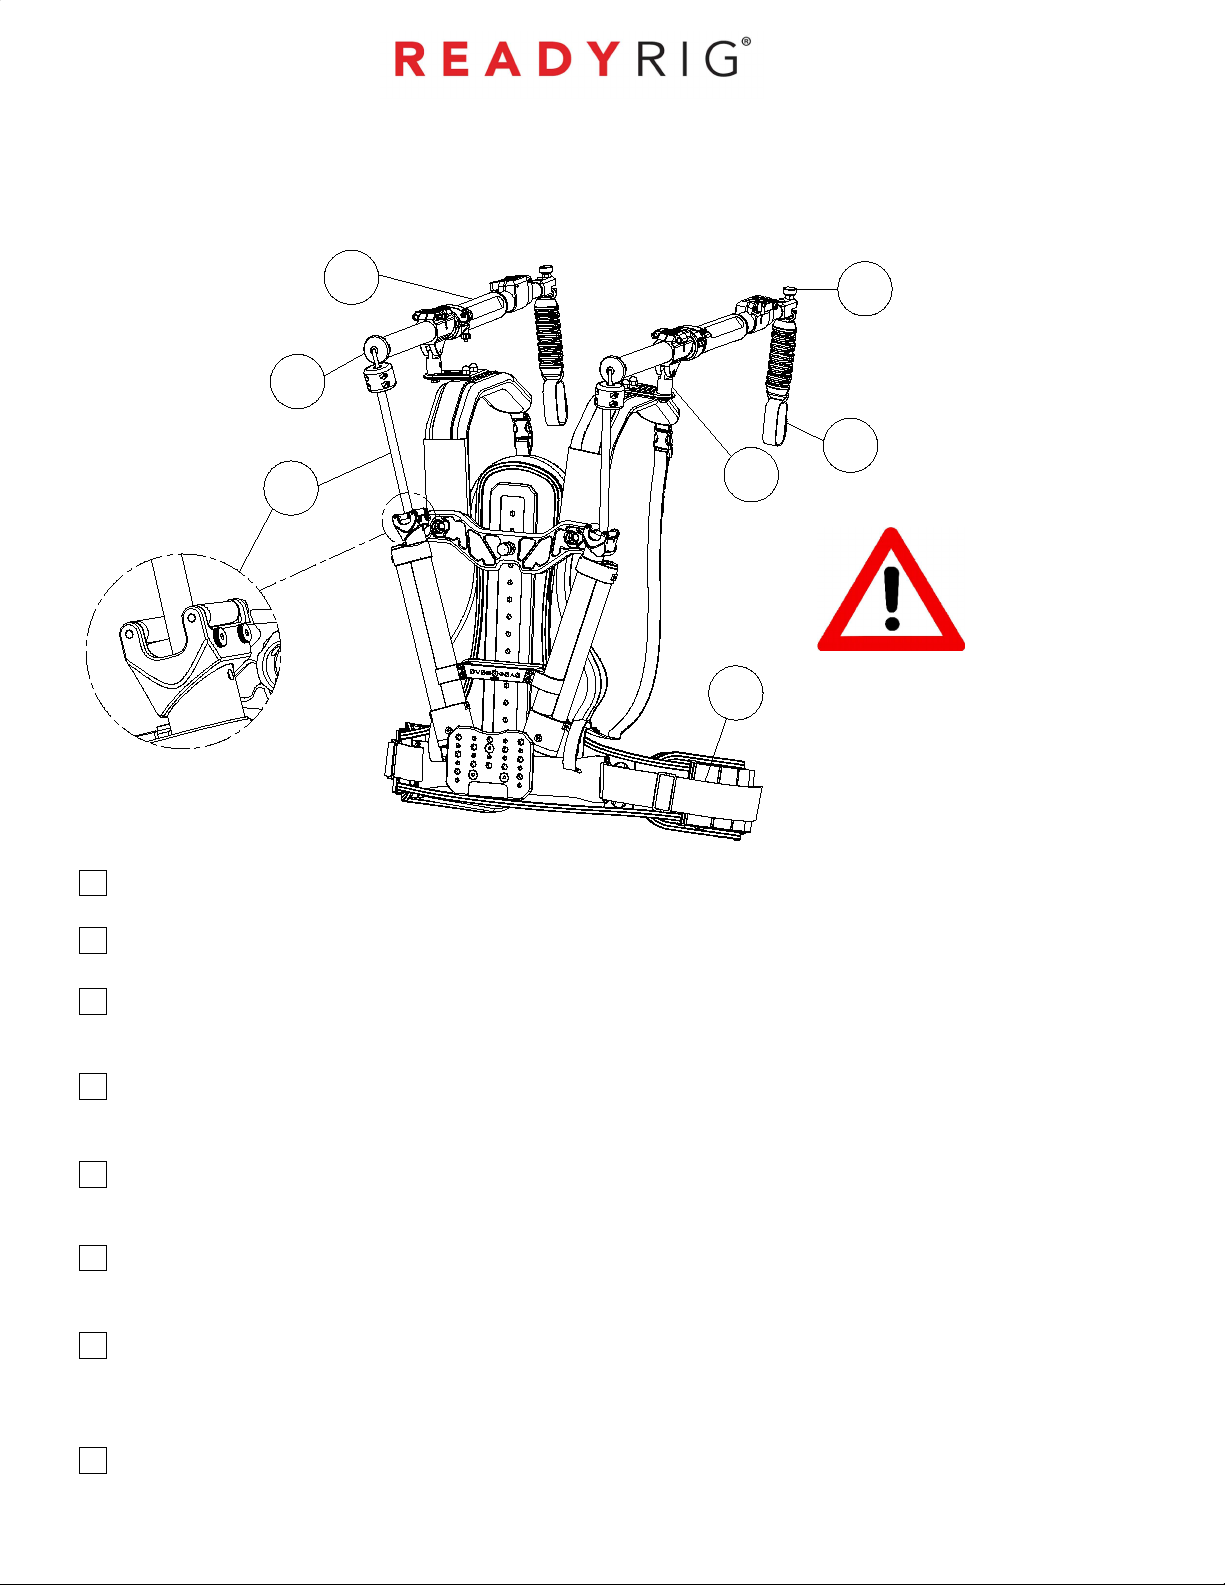
●Perform a complete safety inspection before every use as described in this manual, and
inspect your Ready Rig for damage, loose parts, screws, or signs of damage. Stop
operation immediately and contact your place of purchase if something does not feel
right.
●Ready Rig is a professional tool designed to be used on film sets that follow strict safety
guidelines such as those published by the Industry-Wide Labor-Management Safety
Committee for the Motion Picture and Television Industry and OSHA etc. We
recommend that you attend all safety classes required by your local camera union and
follow all safety guidelines published on www.csatf.org/production-affairs-
safety/safety-bulletins/ prior to using our products.
●NEVER use a Ready Rig in an unsafe environment.
●If you have any safety questions or concerns, we recommend you contact the ICG Safety
Hotline, (877-ICG-HOTLINE) or your regional camera union.
●Do not lend or rent your Ready Rig to anyone unfamiliar with its operation. Ensure any
new users are familiar with these instructions.
●Ready Rig has been designed to allow users to hold camera weight longer than normal,
but the system relies on the operator being well rested and physically fit. Know your own
limits and take breaks. Using the system when tired can result in injury.
●The Ready Rig system uses spring loaded support arms, therefore there are inherent
risks in operating such systems such as arm releasing and causing body injury. You
must ensure that no one is near the arms when in use, or when removing camera
payloads.
●Follow all local laws, regulations, and safety requirements.

Important Safety Warnings
WARNING DO NOT EXCEED MAXIMUM SYSTEM PAYLOAD: Ready Rig
GS Standard: Maximum weight capacity 30 lbs (13.6 kg) total, 15 lbs
(6.8 kg) per arm. Ready Rig GS + ProArm: Maximum weight capacity 40
lbs (18.1 kg) total, 20 lbs (9 kg) per arm. Ready Rig with VEGA Upgrade:
Maximum weight capacity 40 lbs (18.1 kg) total, 20 lbs (9 kg) per arm.
WARNING FALL AND DROWNING RISK: Never operate your Ready Rig
in high risk environments such as any location with a falling risk, trip
hazards, or open bodies of water. The system is attached to the body
and a fall can potentially lead to catastrophic injury or death.
WARNING IMPACT HAZARD: The Ready Rig arms are spring loaded.
Any rapid or uncontrolled release of the support arms, bungees/bands,
or load can potentially cause catastrophic injury or death. You must
maintain a safe distance from others at all times. When adjusting the
system, stay clear of arms or moving components that are under
tension.
WARNING: Discontinue use immediately if you experience any
discomfort, pain, tingling, or numbness anywhere in your body. Consult
a medical professional prior to attempting to use the product again.
Refer to manual sizing chart and contact customer service for further
WARNING: Never use the Ready Rig as a safety harness. Ready Rig
vests are not safety rated and should not be used to replace a safety
harness.
WARNING: Discontinue use if any component shows observable
damage such as abrasions, cuts, gouges, or loose parts.

www.ready-rig.com
SAFETY INSPECTION CHECK LIST
Before using any READY RIG complete the following safety check list.
1. Confirm that the PROARMs have the VEGA ARM CLAMPs installed.
2. Check the SHOULDER WING for any damage such as loose or worn components.
3. Check that the SPRING BOLTS function properly and that the COBRA QUICK RELEASE
is securely fastened to the CARBON FIBER SUPPORT ARMs.
4. Check UNIVERSAL GIMBAL ATTACHMENT to make sure that the Velcro straps have
been attached correctly.
5. Check WAIST BELT to ensure the buckle functions properly and that the belt material is
not damaged in any way.
6. Check the SUPPORT ARM to make sure that the VEGA bands are firmly attached to the
SUPPORT ARMS.
7. Check to be sure each of the VEGA 4-post roller spin freely and check POLYCORE
BANDs for any damage such as cracks, tears, abrasions, nicks, cuts, dents, or scuffing of
the rubber.
8. Inspect the entire product for loose or damaged components.
1
6
2
3
7
4
5

www.ready-rig.com
HEX
SCREW (8)
LOWER
CHEESE
PLATE
BOLT (2)
7
16 in.
NYLON
NUT (2)
VEGA
SPACER
(3)
SCREW
EXTRACTOR (4)
11
64 in.
DRILL
BIT (1)
Congratulations on your purchase of a VEGA UPGRADE! This upgrade adds more stability to
your READY RIG. These instructions assume you are already familiar with assembling your
READY RIG. Instructions are also available in video format on our website at
www.go.ready-rig.com/welcome.
Be sure that the following parts have been included with your VEGA UPGRADE for assembly.
If a part is missing contact our customer support for help. Our email is
PARTS
PHILLIPS HEAD
SCREW DRIVER (1)
7
16 in.
CRESCENT
WRENCH (1)
3
16 in.
HEX KEY
(1)
1
8 in.
HEX KEY
(1)
5
32 in.
HEX KEY
(1)
UPPPER
CHEESE
PLATE
BOLT (1)
L-KEY PHILLIPS HEAD
SCREWDRIVER (1)
HARDWARE PACKET TWO
HARDWARE PACKET ONE
1

BAND
INSTALLATION
SCREWS (2)
www.ready-rig.com
VEGA
UPGRADE (1)
PARTS (cont.)
POLYCORE BANDS (2)
VEGA ARM CLAMPS (2)
3
32 in.
HEX KEY (1)
BAND INSTALLATION ROPE (2)
COUPLING BRACKET
UPGRADE (1)
2
POLYCORE BAND BAG (1)

www.ready-rig.com
DISASSEMBLY
ARMS
In order to install your VEGA UPGRADE, you will first need to remove the POWER BUNGEES.
1. Lay your READY RIG flat on a table with the back facing up.
2. Remove CARBON ROD THUMB SCREWS on ARMS and THUMB
SCREWS on BUNGEE SLIDER.
3. Pull POWER BUNGEES out of READY RIG
4. Adjust BAT WING up to the highest position
CARBON ROD
THUMB SCREWS
THUMB
SCREW
POWER
BUNGEE
BUNGEE
SLIDER
BAT WING
3

www.ready-rig.com
DISASSEMBLY (cont.)
Remove the GS BELT from the BENT WAIST PLATE.
TRI-GLIDE
BENT WAIST
PLATE
GS BELT
BENT WAIST
PLATE
1. Pry GS BELT off the Ready Rig and slide off TRI-GLIDEs off of belts.
2. Pull GS BELT out of BENT WAIST PLATE.
GS BELT
4

www.ready-rig.com
DISASSEMBLY (cont.)
Remove the NYLON NUTS.
1. Pry VEST up from the READY RIG.
2. Use the CRESCENT WRENCH to remove NYLON NUTs (you may need to use the
5
32 HEX WRENCH on the underside of LOWER CHEESE PLATE BOLTs to prevent spinning).
NOTE:
On READY RIGs sold prior
to 2021, use TOP HAT BOLTs
instead of NYLON NUTs. Use
pliers (not included) to remove
TOP HAT BOLTs.
VEST
5
32 HEX
WRENCH
5
5
32 HEX
WRENCH
TOP HAT
BOLTS
3. Flip the VEST over to access the back of the frame.

www.ready-rig.com
DISASSEMBLY (cont.)
Remove the BUNGEE SLIDER, BUNGEE LOOPS and CHEESE PLATE from the READY RIG.
1. Use 1/8 HEX WRENCH (from HARDWARE PACK ONE) or L-KEY PHILLIPS HEAD SCREW
DRIVER to remove SCREWs on BUNGEE LOOP and BUNGEE SLIDER PLATE.
NOTE:
Difficult screws may require the use of
SCREW EXTRACTOR with a drill
(not included) to remove bolts.
BUNGEE
SLIDER
PLATE
BUNGEE
LOOP
BUNGEE
LOOP
FRONT
REAR
CHEESE
PLATE
FRONT
6
2. Use 5
32 HEX WRENCH (from HARDWARE PACK TWO) to remove bolts on CHEESE PLATE.
3. Discard BUNGEE LOOPs, BUNGEE SLIDER PLATE, SPACERs, and 5
32 BOLTs.
Older READY RIGs
may require you to
use L-KEY PHILLIPS
HEAD SCREWDRIVER
PUSH HARD
BOLTS
(3)
SPACER (3)

www.ready-rig.com
ASSEMBLY
Install the VEGA UPGRADE to the back of READY RIG.
1. Use 1
8 HEX WRENCH to CAREFULLY install the eight, HEX SCREWS (from HARDWARE
PACKET ONE) that hold the VEGA UPGRADE onto the BAT WING and SPINE.
FRONT
VEGA
UPGRADE
FRONT
Insert and finger-
tighten ALL bolts
and screws
FIRST before
using any tools
to prevent
cross threading!
COUPLING
BRACKET
UPGRADE
2. Install the CHEESE PLATE using the one UPPER and two LOWER CHEESE PLATE BOLTs
along with VEGA SPACERs (from HARDWARE PACK TWO).
7
REAR
CHEESE
PLATE
UPPER
BOLT
LOWER
BOLTS
VEGA
SPACERS
SPINE

www.ready-rig.com
ASSEMBLY (cont.)
Reinstall VEST back onto BENT WAIST PLATE.
1. Align holes on VEST with BOLT so threads are visible.
2. Reinstall GS BELTs onto BENT WAIST PLATE and slide TRI-GLIDEs onto GS BELTs.
3. Secure GS BELTs to the sides of the READY RIG.
VEST
8
TRI-
GLIDE
BENT
WAIST
PLATE
GS
BELT
Make sure the GS BELT
is installed on BENT WAIST
PLATE before moving to
next step.

www.ready-rig.com
ASSEMBLY (cont.)
Prepare the VEGA UPGRADE for POLYCORE BAND installation.
1. Move BAT WING to position one.
2. Use the 3
32 HEX KEY (from POLYCORE BAND BAG) to remove END CAPs.
9
END
CAPS
POSITION
ONE
POSITION
ONE
BAT
WING

www.ready-rig.com
ASSEMBLY (cont.)
Prepare the VEGA UPGRADE for POLYCORE BAND installation.
1. Unlock the BAND LATCH.
2. Remove POLYCORE BANDs form vacuum bag.
10
BAND
LATCH

www.ready-rig.com
ASSEMBLY (cont.)
Insert the POLYCORE BAND into the VEGA UPGRADE.
1. Tie the LARGE LOOP of BAND INSTALLATION ROPE to head of POLYCORE BAND.
2. Thread the BAND INSTALLATION ROPE into VEGA UPGRADE as shown.
3. Move POLYCORE BAND through and be sure it aligns onto the PULLEYs.
11
POLYCORE
BAND
POLYCORE
BAND
BAND
INSTALLATION
ROPE
BAND
INSTALLATION
ROPE
VEGA
UPGRADE
PULLEY
LARGE
LOOP
SMALL
LOOP
NOTE: Make sure
installation rope
pulls from top of
POLYCORE BAND
head.
NOTE: POLYCORE
BANDS may require strong
pressure to be fed into VEGA
UPGRADE.
Make sure BAND
INSTALLATION ROPE
is properly fed around
PULLEY prior to moving
to the next steps.

www.ready-rig.com
ASSEMBLY (cont.)
Loading the POLYCORE BAND inside the VEGA UPGRADE.
1. Flip open SHOULDER FULCRUM LEVER and secure LARGE LOOP to ARM.
2. Pull up on ARM until 4 inches remain on the bottom and lock SHOULDER FULCRUM LEVER.
3. Pull down on ARMS until head of POLYCORE BAND emerges from VEGA UPGRADE.
12
4. While holding ARMS down, lock the BAND LATCH around head of POLYCORE BAND.
SMALL
LOOP
BAND
INSTALLATION
SCREW
4 in.

www.ready-rig.com
ASSEMBLY (cont.)
Loading the POLYCORE BAND inside the VEGA UPGRADE.
13
Be sure the
BAND LATCHES
are secured
before releasing
the ARMS
SLOWLY!
5. When BAND LATCHES are secured, undo the SMALL LOOP.
BAND
LATCH
BAND
INSTALLATION
ROPE
6. Reinstall END CAPs.
BAND
INSTALLATION
ROPE
Be sure to
LOCK ARMS
before pulling
down!
BAND
LATCH

www.ready-rig.com
ASSEMBLY (cont.)
Installing the VEGA ARM CLAMPs to the PROARMs.
1. Remove the PROARMs and slide VEGA ARM CLAMPs onto the PROARMs.
2. Lock the VEGA ARM CLAMPs to the arms.
3. Return the PROARMs to the READY RIG.
14
PROARM
VEGA ARM
CLAMP
VEGA ARM
CLAMP
VEGA
ARM
CLAMP
TOP
VIEW
TOP
VIEW
VEGA ARM CLAMPS are
required when using VEGA
systems with POLYCORE
BAND V2 installed.
PROARM
PROARM

www.ready-rig.com
ASSEMBLY (cont.)
Final assembly of the VEGA UPGRADE.
1. Tilt PROARMs up to reach Vega Upgrade at the back of the rig and lock PROARMs
position on rig.
2. Secure the DOME CAP to PROARMs.
15
DOME
CAP
Your READY RIG upgrade is now complete.

www.ready-rig.com
USING THE VEGA ARM CLAMP
Use the VEGA ARM CLAMPs to remember pivot points along the PROARMs.
2. Release the VEGA ARM CLAMPs from the PROARMS by flipping up the LEVERs.
3. Slide the VEGA ARM CLAMPs until they contact the PROARM FULCRUM.
4. Lock down the LEVERs on the VEGA ARM CLAMPs.
16
PIVOT
POINT
VEGA
ARM
CLAMP
VEGA
ARM
CLAMP
PIVOT
POINT
LEVER PROARM
FULCRUM
PROARM
1. Adjust the PROARMs along the PROARM FULCRUM into desired position as normal.
PROARM
FULCRUM
Table of contents
Other Ready Rig Camcorder Accessories manuals