P
L
A
Y
O
F
F
1
2
2
8
4
1
6
5
3
7
CB-V240U
Una protección exclusiva y de tamaño conveniente para proteger la videocámara
digital de la lluvia y de la nieve finas.
PREPARATIVOS ANTES DE INSTALAR LA PROTECCIÓN CONTRA NIEVE Y
LLUVIA EN LA VIDEOCÁMARA DE DIGITAL
●Desconexión de la alimentación de la videocámara.
●Coloque una batería.
●Inserte un cassette de video y una tarjeta de memoria*.
(*Sólo para modelos con tarjeta de memoria)
●Retire la tapa del objetivo y la cuerda de la videocámara digital y desprenda la cuerda de la
tapa del objetivo de la correa de la empuñadura.
NOTAS:
●Ajuste el conmutador LIGHT OFF/AUTO/ON en “OFF”.
• No encienda el foco de video.
(Sólo para videocámaras digitales equipadas con un foco de video)
El foco de video puede recalentarse y deformar la funda de protección, o producir un incendio.
●Ajuste la alimentación de la videocámara digital en “OFF”.
●Refiérase al manual de instrucción de su videocámara digital para los procedimientos de
operación.
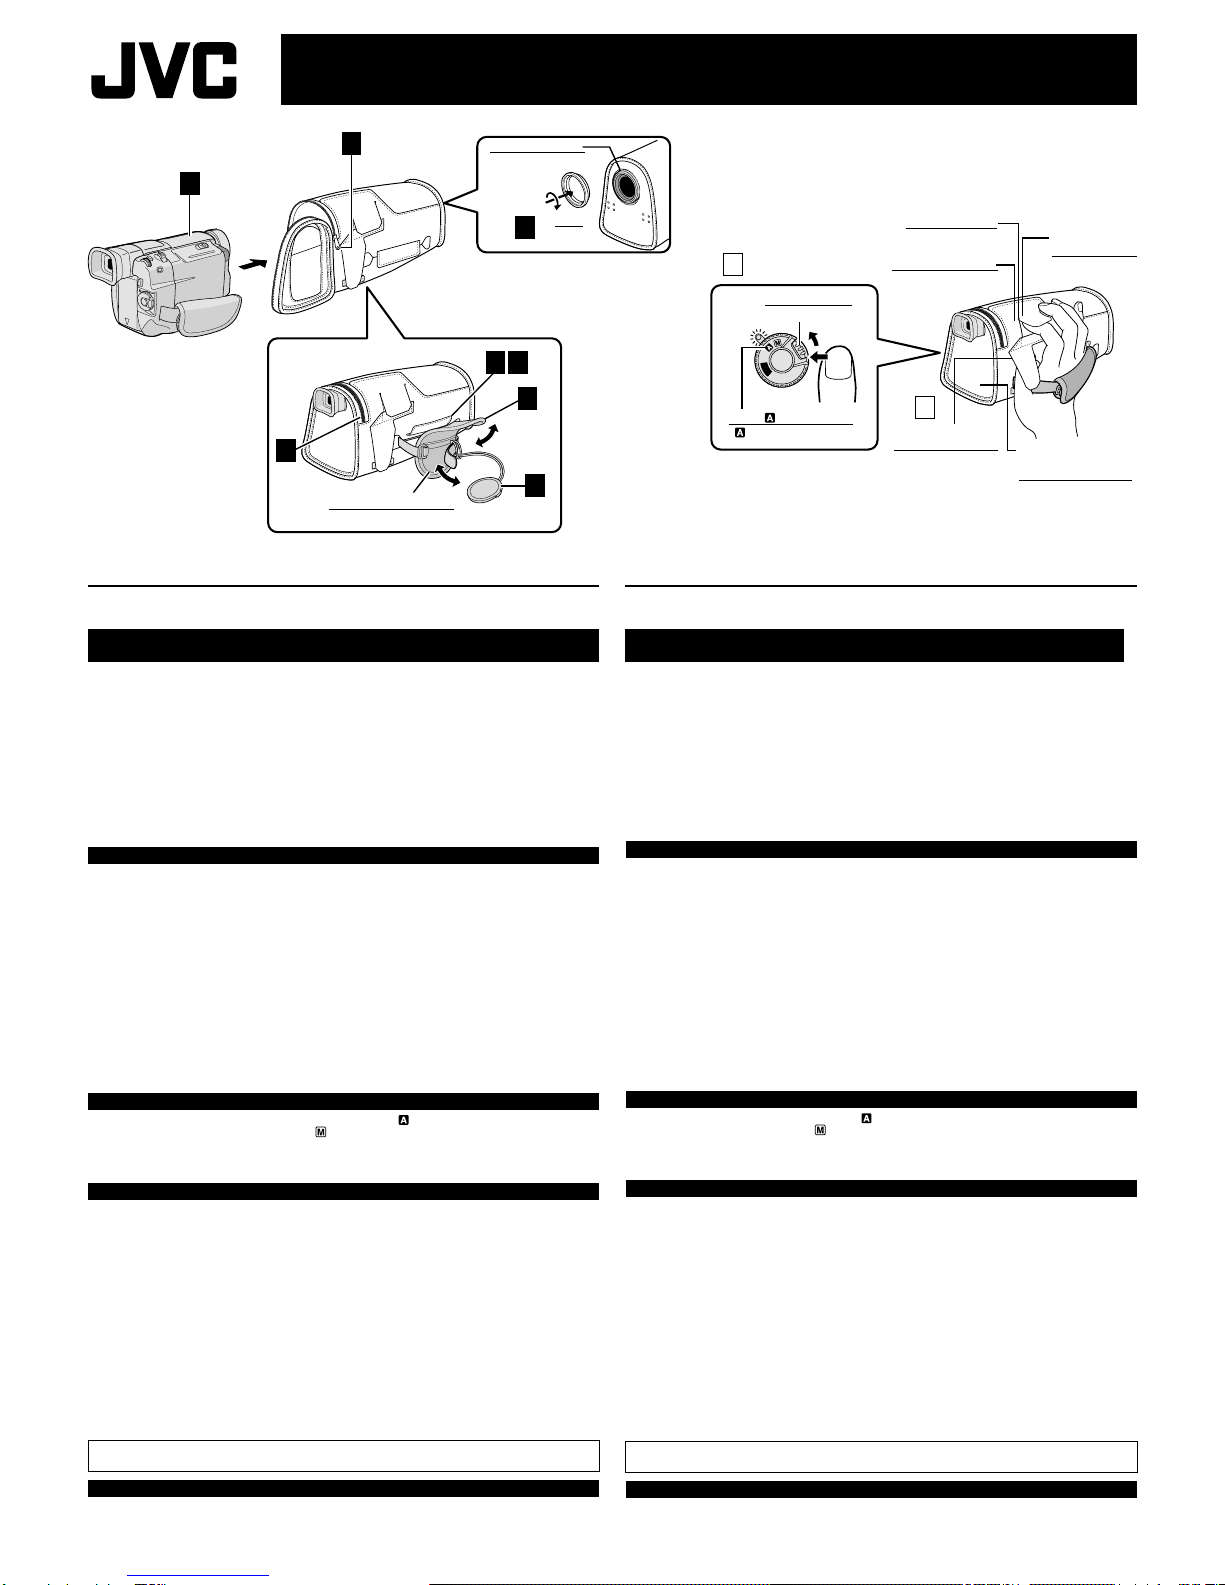
INSTALACIÓN
1Abra la cremallera.
2Deslice la videocámara digital en la funda de protección, colocando el objetivo de la
videocámara digital en el orificio del objetivo de la funda de protección.
• La filmación puede hacerse mientras se observa el monitor LCD colocando la cámara en la
protección con su monitor LCD hacia el exterior.
3Quite la cinta Velcro y pase la correa de la empuñadura a través del orificio de la funda de
protección para retirarla.
4Apriete de nuevo la cinta Velcro.
5Enlace la cuerda del cubreobjetivo en la correa de la empuñadura de manera que usted
no lo pierda.
• El cubreobjetivo no puede ser colocado en la videocámara cuando la protección está puesta.
6Coloque el anillo suministrado en el objetivo.
• En el anillo se puede colocar también un filtro de 43 mm.
7Pase el visor a través del orificio cuando estéinclinado hacia arriba. Luego, cierre la
cremallera.
• Inserte la aleta entre el visor y la batería recargable.
8Abra hacia arriba la almohadilla de la correa de la empuñadura y ajústela para que se
acople a su mano o guante.
GRABACIÓN
1Ponga el dial de alimentación de la videocámara en “ ”.
• También podrá filmar con el ajuste en “ ”.
2Presione el botón de inicio/parada.
• Abra la cubierta de la protección para emplear el conmutador del zoom motorizado, Botón
SNAPSHOT y disco MENU/BRIGHT.
PRECAUCIONES OPERATIVAS
䡲La protección para nieve y lluvia no es impermeable. No la emplee durante muchas horas
bajo la nieve o la lluvia.
䡲No coloque ni extraiga la protección de la videocámara digital cuando haya polvo, nieve o
lluvia.
䡲En caso de que caiga lluvia o copos de nieve sobre la superficie del objetivo de la
videocámara digital, límpiela con un paño suave. De lo contrario las gotas de agua o los
copos de nieve pueden quedar enfocados y el sujeto puede quedar desenfocado.
䡲No emplee ni deje la protección para nieve y lluvia en un lugar dónde la temperatura pueda
elevarse anormalmente, por ejemplo cerca del fuego o calentado o en un automóvil
cerrado.
䡲Para evitar el deterioro de la superficie, no limpie la protección para nieve y lluvia con
productos químicos volátiles tales como bencina, solvente, alcohol o con un paño con
productos químicos.
䡲Asegúrese de extraer la protección para nieve y lluvia de la videocámara digital antes de
almacenarla.
䡲Durante el funcionamiento del zoom puede entrar ruido.
䡲No encienda el foco de video.
(Sólo para videocámaras digitales equipadas con un foco de video)
El foco de video puede recalentarse y deformar la funda de protección, o producir un incendio.
Note que JVC no asume ninguna responsabilidad por cualquier daño o falla en su cámara de video
digital, producido por la lluvia o el polvo.
ESPECIFICACIONES
Dimensiones (An x Al x Pr) : 80 mm x 105 mm x 200 mm
Peso : 65 g
• El diseño y las especificaciones están sujetos a cambios sin aviso.
VORBEREITUNGEN FÜR ANBRINGUNG DES SCHNEE- &
REGENSCHUTZMANTELS AM DIGITAL-CAMCORDER
●Den Camcorder ausschalten.
●Einen Batteriesatz anbringen.
●Eine Videocassette und eine Speicherkarte* einlegen.
(*Nur Modelle mit Speicherkarte.)
●Die Objektivschutzkappe abnehmen und zusammen mit der Halteschnur von der
Griffschlaufe entfernen.
HINWEISE:
●Den LIGHT OFF/AUTO/ON-Schalter auf “OFF” stellen.
• Niemals die Videoleuchte einschalten (Digital-Camcorder mit Videoleuchte).
Andernfalls kann der Schutzmantel durch die Hitzeeinwirkung verformt werden oder Feuer
fangen!
●Den Digital-Camcorder ausschalten (OFF).
●Angaben zur Handhabung des Digital-Camcorders entnehmen Sie bitte dessen
Bedienungsanleitung.
ANBRINGUNG
1Den Reißverschlußöffnen.
2Den Digital-Camcorder in den Schutzmantel schieben. Hierbei das Camcorder-Objektiv in
die Objektivöffnung des Schutzmantels einsetzen.
• Die Aufnahme ist auch bei LCD-Monitor-Bildüberwachung möglich, wenn der Camcorder mit
nach außen weisendem und flach angelegtem LCD-Monitor in den Schutzmantel eingesetzt
wird.
3Den Klettverschlußöffnen und die Griffschlaufe durch die Öffnung am Schutzmantel
ziehen.
4Den Klettverschlußwieder schließen
5Die Halteschnur der Objektivschutzkappe wieder an der Griffschlaufe anbringen, so daß
die Kappe nicht verloren geht.
• Die Objektivschutzkappe kann nicht am im Schutzmantel eingesetzten Camcorder angebracht
werden.
6Den mitgelieferten Ring am Objektiv anbringen.
• Am Ring kann ein 43 mm Filter angebracht werden.
7Den nach oben geklappten Sucher durch die Öffnung führen und dann den Reißverschluß
schließen.
• Die Lasche zwischen Sucher und Batteriesatz einfügen.
8Das Polster der Griffschlaufe öffnen und Ihrer Hand oder Ihrem Handschuh anpassen.
AUFNAHME
1Den Hauptschalter am Camcorder auf “ ” einstellen.
• Die Aufnahme ist auch bei auf “ ” gestelltem Hauptschalter möglich.
2Die Start/Stopp-Taste betätigen.
• Zur Bedienung von Zoomregler, SNAPSHOT-Taste und MENU/BRIGHT-Wählrad die
Umhüllung des Schutzmantels öffnen.
VORSICHTSMASSNAHMEN FÜR BENUTZUNG
䡲Der Schnee- & Regenschutzmantel ist nicht wasserfest. Deshalb sollte er nicht übermäßig
lange bei Schnee oder Regen verwendet werden.
䡲Den Schutzmantel bei Schneeregen, Schnee sowie Regen nicht an am Camcorder
anbringen oder von ihm abnehmen.
䡲Falls Regentropfen oder Schneeflocken an der Objektivoberfläche des Camcorders
anhaften, sollten sie mit einem weichen Tuch abgewischt werden. Sonst könnten
Wassertropfen oder Schneeflocken scharf und der gewünschte Aufnahmegegenstand
unscharf abgebildet werden.
䡲Der Schnee- & Regenschutzmantel sollte nicht an Orten mit hohen Temperaturen
aufbewahrt oder verwendet werden, wie z.B. in Nähe eines Feuers, einer Heizung oder in
einem geschlossenem Fahrzeug.
䡲Um eine Beschädigung der Oberfläche zu verhindern, sollte der Schnee- &
Regenschutzmantel nicht mit angreifenden Chemikalien abgewischt werden, wie z.B.
Benzin, Farbverdünner, Alkohol oder chemischen Reinigungstüchern.
䡲Vor Aufbewahrung des Camcorders nach der Benutzung unbedingt den Schnee- &
Regenschutzmantel abnehmen.
䡲Beim Zoombetrieb kann Bildrauschen auftreten.
䡲Niemals die Videoleuchte einschalten.
(Digital-Camcorder mit Videoleuchte)
Andernfalls kann der Schutzmantel durch die Hitzeeinwirkung verformt werden oder Feuer fangen!
Bitte berücksichtigen Sie, daß JVC keine Verantwortung für jegliche Schäden oder Störungen an Ihrem
Digital-Camcorder übernimmt, die durch Schnee- oder Regeneinwirkung verursacht wurden.
TECHNISCHE DATEN
Abmessungen (B x H x T) : 80 mm x 105 mm x 200 mm
Gewicht : 65 g
• Änderungen des Designs sowie der Spezifikationen sind jeweils ohne Vorankündigung vorbehalten.
PROTECCIÓN CONTRA NIEVE Y LLUVIA
SCHNEE- & REGENSCHUTZMANTEL
INSTRUCCIONES ESPAÑOL
Exklusiver Schutzmantel in handlicher Größe zum Schutz Ihres Digital-Camcorders vor
leichtem Regen und Schnee.
GEBRAUCHSANLEITUNG DEUTSCH
Correa de la empuñadura
Griffschlaufe
Conmutador de
zoom motorizado
Motorzoomregler
Botón SNAPSHOT
SNAPSHOT-Taste
Botón de bloqueo
Sperrknopf
Modo “ ” (Automático)
“” (Automatik) Modus
Orificio del objetivo
Objektivöffnung
Anillo
Ring
Disco MENU/BRIGHT
MENU/BRIGHT-
Wählrad
Botón de inicio/
parada de grabación
Aufnahme
Start/Stopp-Taste
Es posible usar la
batería de larga
duración BN-V428U.
Batteriesatz BN-V428U
(mit Langzeitleistung)
kann angebracht
werden.