manuals.online logo
Brands
  1. Home
  2. •
  3. Brands
  4. •
  5. Ready Set Stand
  6. •
  7. Indoor Furnishing
  8. •
  9. Ready Set Stand DUAL MOTOR DESK WITH DELUXE CONTROL User manual

Ready Set Stand DUAL MOTOR DESK WITH DELUXE CONTROL User manual

DUAL MOTOR DESK WITH
DELUXE CONTROL
ASSEMBLY INSTRUCTIONS
Please read the following safety instructions before commencing set up
∆Once you have found a new home for your new desk, make sure there are no obstacles in its path
∆Make sure the desktop isn’t set up right up against any walls
∆To avoid risk of injury keep children away from electric standing desks, control boxes and controllers
∆Keep all electrical components away from liquids
∆Do not sit or stand on Ready Set Stand frames
∆Do not open electrical components (lifting legs, control box, controller) as there may be a risk of injury
∆Ready Set Stand electric standing desks has electric motors which are designed for dry work areas only
∆The desk is height adjustable in order to suit your desk ergonomics needs while you work.
Any other use is at the risk of the user
STANDING DESK FRAME - PARTS & TOOLS LIST (KIT INCLUSIONS)
67 8 9 10 11
6. ST3.5*19 Screws (x2)
7. ST4.8*19 Screws (x10)
8. M6*16 Bolts (x16)
9. M8*16 Bolts (x8)
10. Rubber Cushion (x8)
11. 5mm Hex Allen (x1)
and Control Box
BEFORE YOU BEGIN
1. We recommend you lay all the peices flat on the floor and your bamboo top laying flat with the pre-drilled holes facing up
2. You will need your own Phillips head screw driver for fixing the frame to the bamboo top (not included in the toolkit)
3. It’s recommended to use an electric drill for faster assembly, or in case you need to pre-drill any holes into your bamboo top
1. Support Beam (x1)
2. Side Bracket (x2)
3. Feet (x2)
4. Foot Pad (x4)
5. Lifting System (1 leg with Motor, 1 leg with Gearbox)
NEED A HAND DURING YOUR SET UP? DROP US AN EMAIL AT
[email protected]
SHARE YOUR PHOTOS WITH US VIA INSTAGRAM #READYSETSTAND OR FIND US ON FACEBOOK @READYSETSTANDAU
THANK YOU FOR CHOOSING READY SET STAND DESKS FOR YOUR ACTIVE WORK SPACE
1
5
2
3
4
READY SET STAND
NEED A HAND DURING YOUR SET UP? FOR ANY QUESTIONS OR ADDITIONAL SUPPORT CONTACT US AT
[email protected]
WE’RE ALWAYS HAPPY TO HELP!
DUAL MOTOR DESK WITH
DELUXE CONTROL
ASSEMBLY INSTRUCTIONS
1
2
3
a. Before you begin, lay down bamboo desktop on the ground
with pre-drilled holes facing up
b. Using the 5mm Hex Allen Key - loosen the 8 centre
support beam bolts and extend support bar out
c. Roughly extend outer bars out to the length of your desktop.
Using the pre-drilled holes as a guide to where your frame will
be positioned
*Note -
- Do not tighten any screws at this stage as
adjustments will be required in following steps
- The inner bars of the centre support beam has 2 holes.
Ensure these are kept in the middle (they will line up with
pre-drilled holes on your desktop)
a. Place lifting legs on each side of the centre support beam
b. Insert M6*16 bolst (4 for each leg) as shown
*Note - do not tighten screws at this stage, as you will need
some tolerance when fixing the lifting legs to the
support beam*
a. Using the 5mm hex allen, attach feet onto the each leg
using M8*16 bolts as shown
b. Attach levelling foot pads as shown
Note the holes of the inner beam should be in the middle before
any tightening occurs
5MM HEX ALLEN
M6*16
BOLTS x8
M8*16
BOLTS x8
FOOT
PAD x4
READY SET STAND
DUAL MOTOR DESK WITH
DELUXE CONTROL
ASSEMBLY INSTRUCTIONS
4
5
How to reset your control:
Hold up & down keys for 20-30 seconds -
the desk will automatically lower to the lowest
height. You will hear a beep sound & digital
display will stop flashing when reset has finished
How to program up to 4 presets:
a. Use the up/down buttons to find a
desired height
b. press & hold “M” - when the
digital display starts flashing, press one
of the numbers 1 – 4 to store desired height setting
Fixing your frame & control panel to your desktop
a. With your bamboo desk top still on the ground and your
assembled frame on the top, realign the frame with
the pre-drilled holes.
b. Fix frame to desktop using wood screws provided, using the
holes along the centre beams and side brackets
(Note, there are some holes on the desk top that you don’t
need to use as the desk top has been designed to be used
across mulitple frame and control types)
c. Fix control panel to desktop using pre-drilled
holes & wood screws provided
d. Check and tighten all screws from steps 1-4
e. Carefully turn assembled desk around once all screws are
tightened
Connecting your control system -
Insert all cables to the control box as shown
6
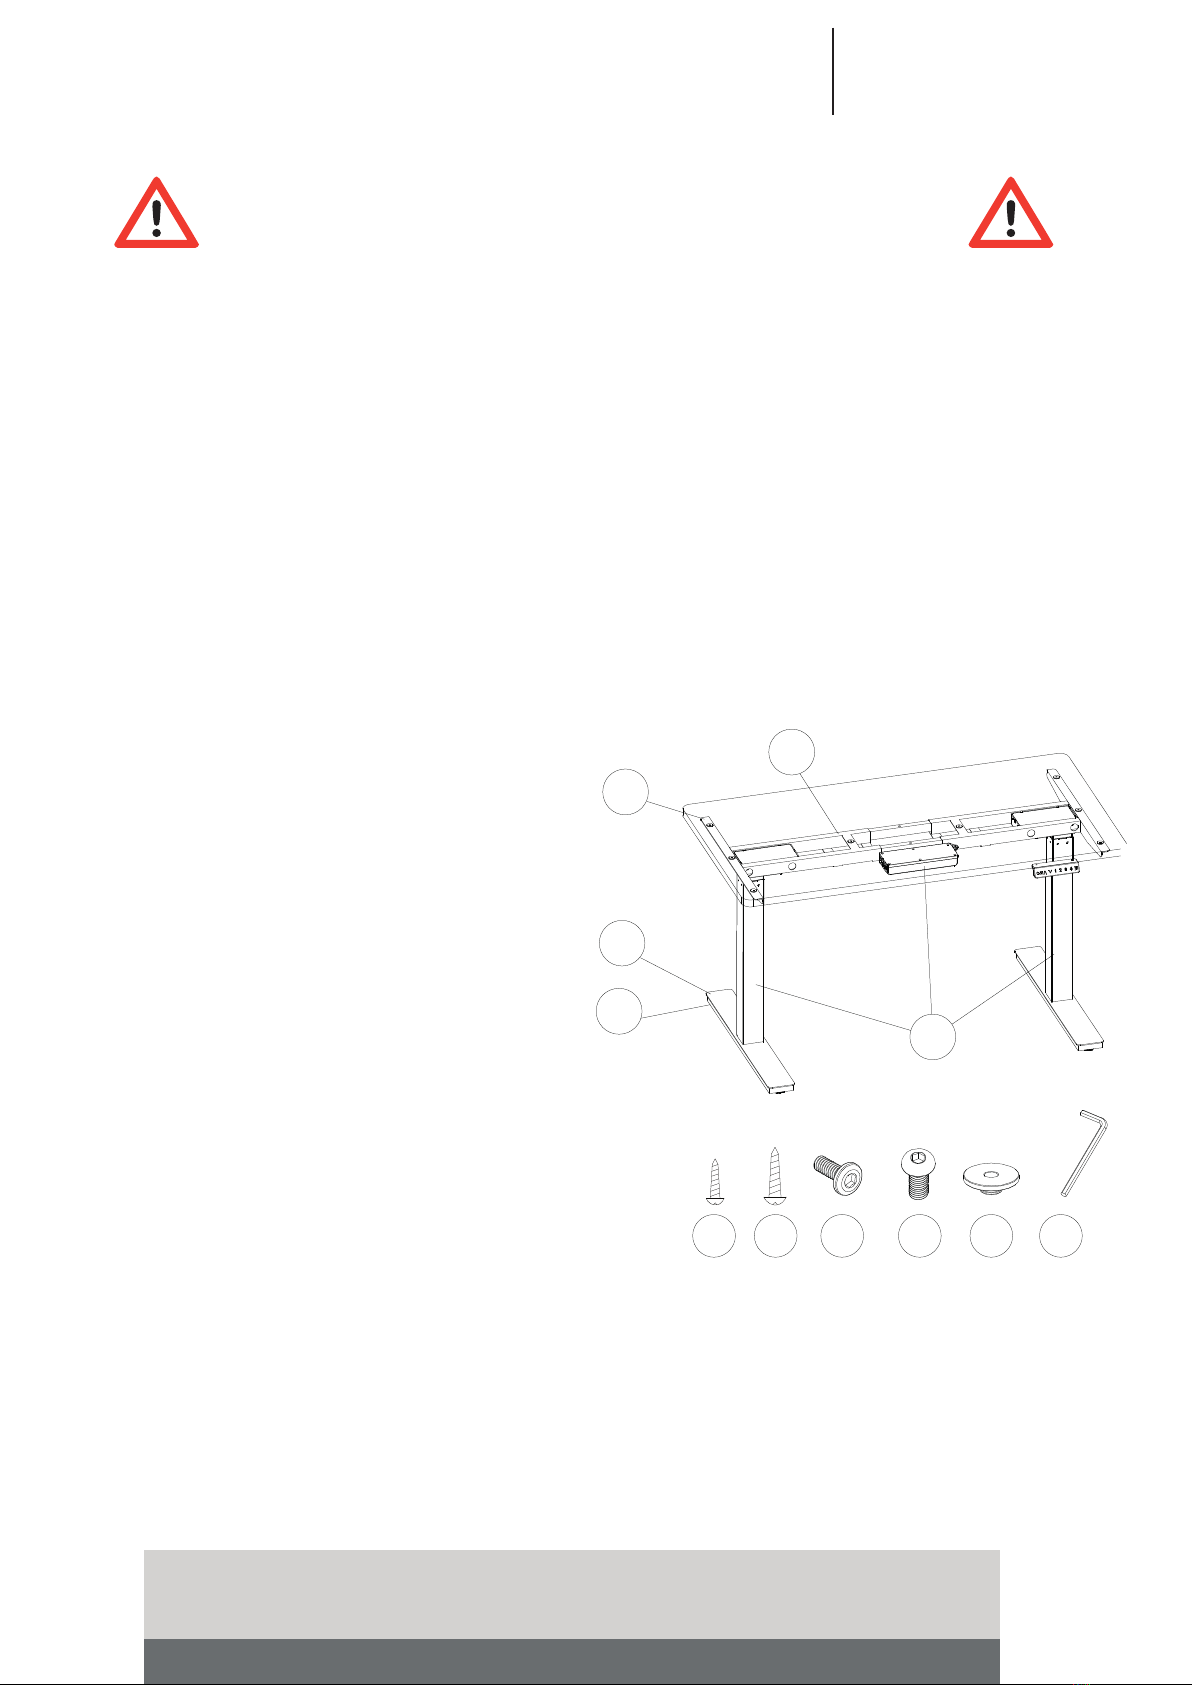
a. Carefully overturn the frame as shown
b. Using the 5mm hex allen and M6*16 bolts, attach
side brackets as shown
c. Fit rubber cushions to the side brackets and centre support
beam
M6*16 BOLTS x8
FIT RUBBER CUSHIONS INTO
HOLES ALONG BEAM AND SIDE BRACKETS
ST4.8*19 & ST3.5*19
WOOD SCREWS
READY SET STAND
NEED A HAND DURING YOUR SET UP? GET IN TOUCH WITH US, WE’RE ALWAYS HAPPY TO HELP!
Send your questions or comments to [email protected]
DUAL MOTOR DESK WITH
DELUXE CONTROL
ASSEMBLY INSTRUCTIONS
How To Program Your Memory Settings
1. Use the up/down buttons to find your desired height
2. Press and hold the “M” key until the digital height display starts flashing
3. Press one of the numbers 1-4 to program that height
How To Use The Memory Keys (buttons 1-4)
1. To choose one of your programmed heights, select and hold one of the numbers 1-4*
2. The desk will automatically stop once it reaches the programmed height
*Please note the control panel requires the user to press and hold down on the keys in order to operate
This is a safety feature to ensure users are at the desk while it’s in motion
How to Reset your controls
Occasionally you may need to perform a reset, and It’s highly recommended to do a system reset before
operating. By performing a system reset, it recharges the power pack that the motors and control panel
are connected to
1. Hold the Up & Down keys together for approx. 30 seconds
2. The desk will automatically lower to the lowest height
3. You will then hear a beep sound and the digital display will stop flashing and display “071”
(which is the lowest height setting). The reset is then complete
Additional Info
1. Your control panel and power box enters sleep mode after 2 mins of inactivity. By pressing the
Up/Down keys or a Memory key, this will automatically turn the system back on again
2. The controls also feature an auto- stop mechanism if there happens to be any physical
interference while the desk is in motion
ABOUT YOUR DELUXE DESK CONTROLS
READY SET STAND
NEED A HAND DURING YOUR SET UP? GET IN TOUCH WITH US, WE’RE ALWAYS HAPPY TO HELP!
Send your questions or comments to [email protected]

Popular Indoor Furnishing manuals by other brands

Factoryfurniture SKOP Series Operation & maintenance manual

Factoryfurniture

Factoryfurniture SKOP Series Operation & maintenance manual

Home Styles 885010941 manual

Home Styles

Home Styles 885010941 manual

Aqua One Styleline 93 Assembly instructions

Aqua One

Aqua One Styleline 93 Assembly instructions

MD SPORTS BL060Y20004 Assembly instructions

MD SPORTS

MD SPORTS BL060Y20004 Assembly instructions

Herman Miller Celle Disassembly for Recycling

Herman Miller

Herman Miller Celle Disassembly for Recycling

Magick Woods Elements W2730 Assembly instructions

Magick Woods Elements

Magick Woods Elements W2730 Assembly instructions

home star Z1411778 Assembly instructions

home star

home star Z1411778 Assembly instructions

PB TEEN iCHAIR quick start guide

PB TEEN

PB TEEN iCHAIR quick start guide

mlmeble LILLE 13 Assembling Instruction

mlmeble

mlmeble LILLE 13 Assembling Instruction

Simpli Home Draper 3AXCDRP-12 manual

Simpli Home

Simpli Home Draper 3AXCDRP-12 manual

Blue Wave NG2571W Assembly instructions

Blue Wave

Blue Wave NG2571W Assembly instructions

Home Styles 88 5650 49 Assembly instructions

Home Styles

Home Styles 88 5650 49 Assembly instructions

mlmeble SZAFKA 02 Assembly instructions

mlmeble

mlmeble SZAFKA 02 Assembly instructions

Simpli Home Jager manual

Simpli Home

Simpli Home Jager manual

Home Styles 20 08001 0095 Aassembly Instructions

Home Styles

Home Styles 20 08001 0095 Aassembly Instructions

PB TEEN Beadboard Study Armoire quick start guide

PB TEEN

PB TEEN Beadboard Study Armoire quick start guide

home star Z1610883 Assembly instructions

home star

home star Z1610883 Assembly instructions

Work Smart OPH62606 operating instructions

Work Smart

Work Smart OPH62606 operating instructions

manuals.online logo
manuals.online logoBrands
  • About & Mission
  • Contact us
  • Privacy Policy
  • Terms and Conditions

Copyright 2025 Manuals.Online. All Rights Reserved.