Reasnow Cross Hair User manual

User Manual of Cross Hair
http//www.reasnow.com PAGE 1 / 24
Cross Hair User Manual
V3.2
Aug, 2015
This manual is the intellectual propert of ReaSnow. It must onl be published in its
original form. Using parts or republishing altered parts of this document is prohibited
without permission from ReaSnow.

User Manual of Cross Hair
http//www.reasnow.com PAGE 2 / 24
Table of Contents
▁▁▁▁▁▁▁▁▁▁▁▁▁▁▁▁▁▁▁▁▁▁▁▁▁
Chapter 1:Intro uction: What is Cross Hair
1.1 A vantages
1.2 Technical Specifications
1.3 To know Cross Hair
1.4 Connections
Chapter 2:Setting up Cross Hair
2.1 Simple set up steps
2.2 Basic Settings
2.3 Global Settings
2.4 Setting up in-game
Chapter 3:Playing Games
3.1 Things to o before playing
3.2 Ways to Use Cross Hair
Chapter 4:Upgra e an Restoration

User Manual of Cross Hair
http//www.reasnow.com PAGE 3 / 24
Chapter 1:Intro uction: What is Cross Hair
Cross Hair aims to provide the best mouse and ke board control solution for all game
consoles (such as PS4, PS3, XBOX ONE,XBOX 360 etc), and the freedom to choose
between the ke board, mouse, jo stick, and other controllers.
For beginners, Cross Hair can give ou a smooth and eas experience while pla ing
games using our own ke board and mouse. On the contrar
,
a controller for aiming in
FPS(First-Person Shooting) games is reall troublesome.
For advanced users, it lets ou enjo the game as ou wish with whatever hardware ou

User Manual of Cross Hair
http//www.reasnow.com PAGE 4 / 24
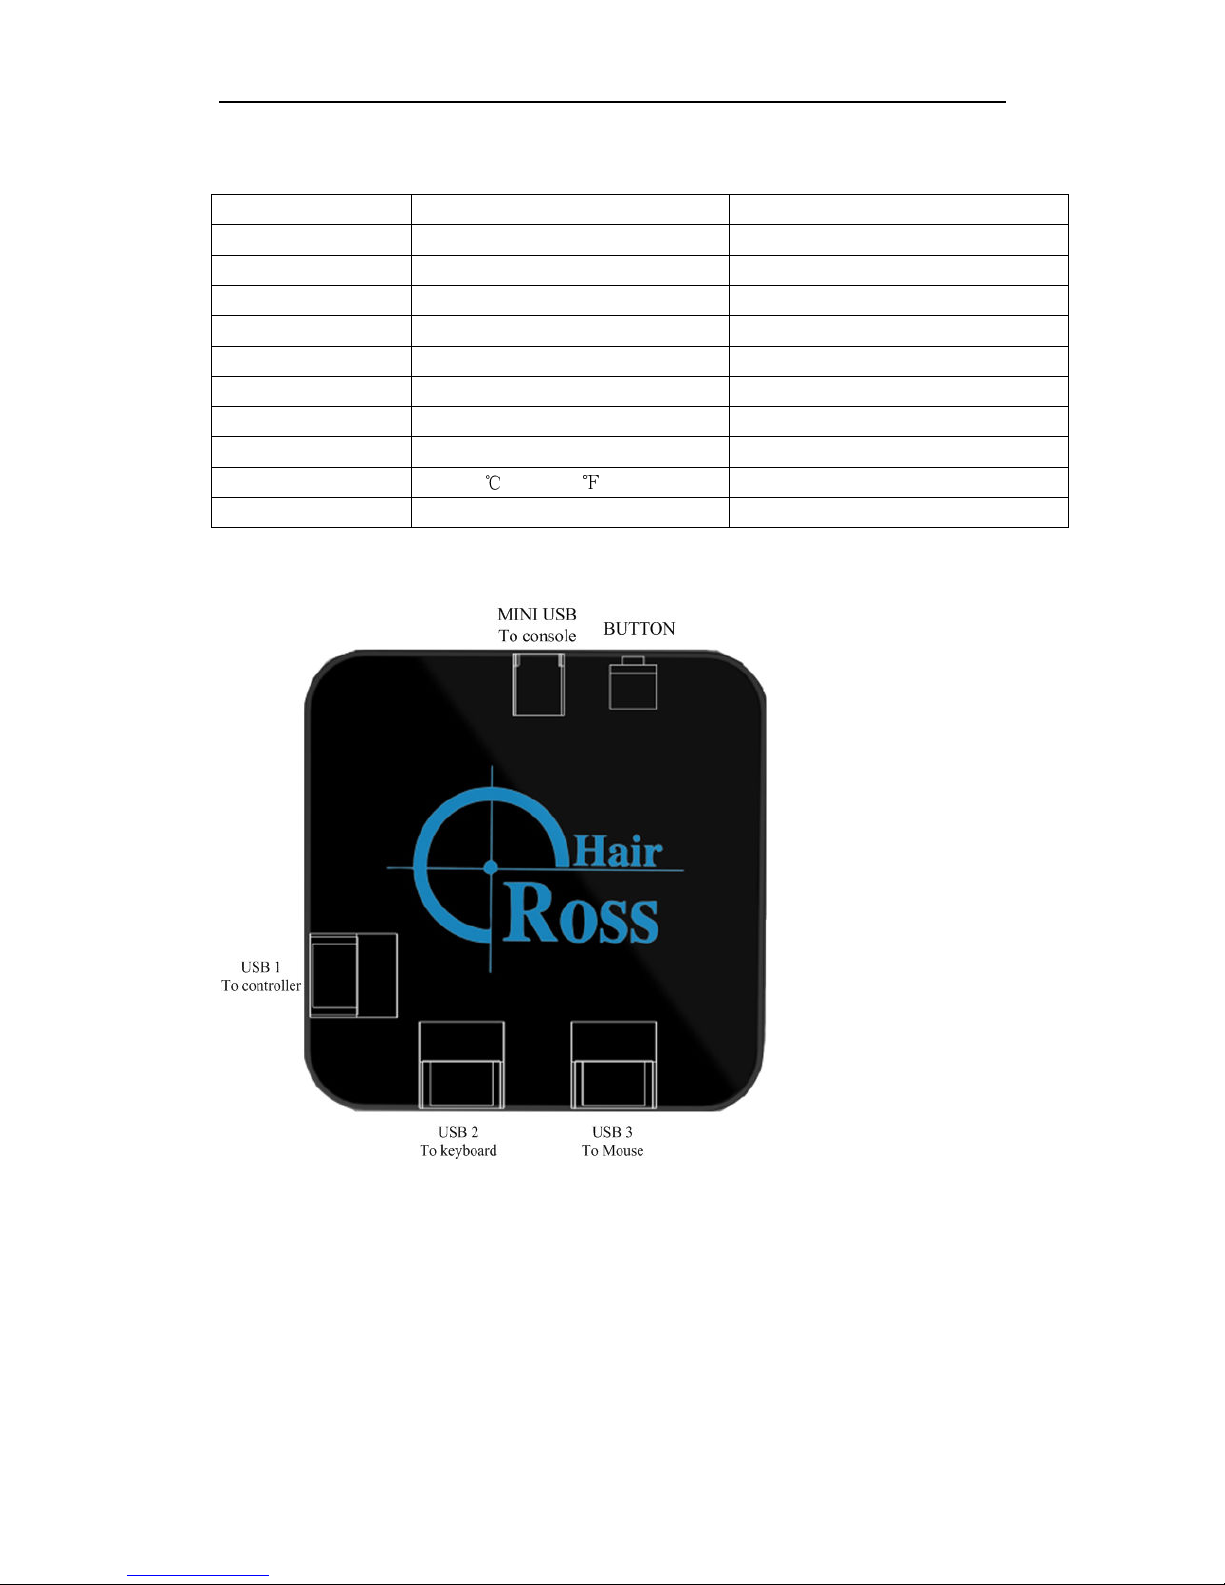
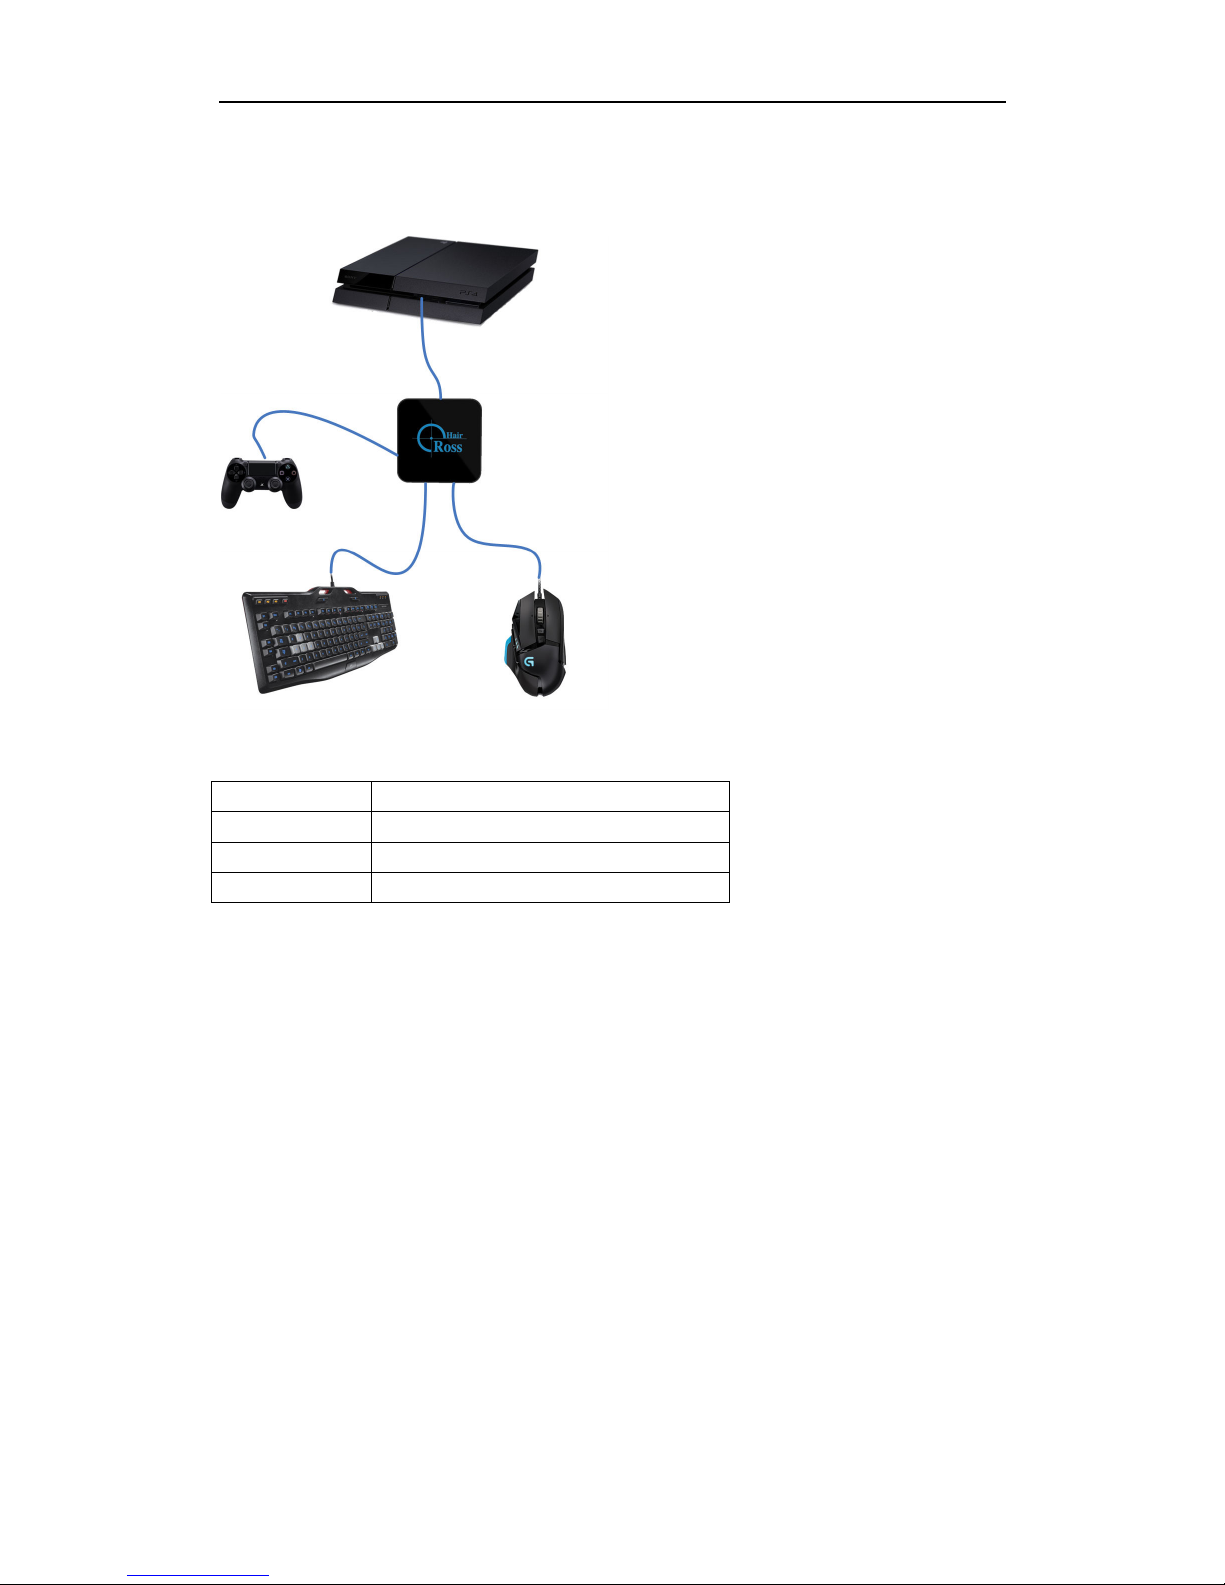
like: the gaming-grade ke board and mouse or jo stick or preferred controller.
Cross Hair has 4 working modes, which ou should know.
●PLAY MODE: When connecting to game console, controller, ke board and mouse are
read , its LOGO will be a breathing color, and then ou can pla our game.
●PC MODE: When connecting to PC and no USB device plugged into it, its LOGO will be
white, then it can be configured on PC b using Cross Hair Manager. Meanwhile ou can
upgrade firmware and restore factor configuration in this mode.
●CONFIG MODE: An time while pla ing a game (in PLAY MODE), just press
SHARE+OPTIONS (PS4 platform) ke s on our controller to enter this mode and the
LOGO’s light will be turned off in this mode. Then ou can change settings and get instant
feed back.
●REPAIR MODE: Hold down the button, then plugging Cross Hair into our PC, when the
LOGO is green, ou can then release the button, and a stable green light means REPAIR
MODE. In this mode, Cross Hair’s firmware and configurations can be repaired.
MODE Soun on start
Color Function Attache Device
PLAY MODE 1 beep Breathing color Pla games Controller, KB, MS
PC MODE 2 beeps White Configure and upgrade NO
CONFIG MODE 3 beeps Black Configure in game Controller, KB, MS
REPAIR MODE 4 beeps Green Repair firmware NO
Please refer to chapter 2.4 and 5.7 for CONFIG MODE and REPAIR MODE details.
Color an Soun
:
Mo e COLOR BEEP Function
PLAY MODE Breathing color
As configured
CONFIG MODE Black
flash red Higher pitch beep HIP ADD
flash red Lower pitch beep HIP SUB
flash green Higher pitch beep ADS ADD
flash green Lower pitch beep ADS SUB
flash blue Normal beep Ke mapping
1.1 A vantages
● Support all platforms: PS4/PS3/ XBOX ONE/XBOX 360
● Mice, Ke boards, Jo sticks compatibilit
● Cross platform controller usage (All controllers on an console)
● Intelligent Engine (best mouse precision, 1:1 movement in game)
● Most of the settings can be adjusted on the fl
● Xbox headsets supported
● Firmware in field upgrade
● Active communit online
● Seamless aluminum enclosure
● Color and sound indication (clear and convenient)

User Manual of Cross Hair
http//www.reasnow.com PAGE 5 / 24
1.2 Technical Specifications
Outline 75*75*22mm
Net Weight 105g
Platforms PS4/PS3/XBOX ONE/XBOX 360
Configuration 16 configurations, user defined
Color Black
PORT 3 USB ports For controller, ke board and mouse
1 MINI USB device port Connecting to game console
BUTTON Firmware repair
BEEPER Internal beeper Sound indication
Temperature -10~50
℃
(14~122
℉
)
Humidit Below 90%
1.3 To know Cross Hair
MINU USB: Connect to game console.
USB1: Connect to the genuine official wired controller shipped with game console. As for
wireless controller, just connect it with suitable USB cable to this USB port. The exception
is that Xbox 360 requires a genuine wired Xbox 360 controller.
USB2: Connect to our ke board, jo stick or other controller.
USB2: Connect to our mouse.
BUTTON: Firmware reparation.
LOGO LED: Status indication.
Internal Beeper: Status indication. You do not need to look at Cross Hair and will be

User Manual of Cross Hair
http//www.reasnow.com PAGE 6 / 24
informed of meaning based on the sound.
1.4 Connections (PLAY MODE)
● Firstly, connect controller(USB PORT1) an keyboar an mouse(USB PORT2-3)
to Cross Hair, then, connect Cross Hair to console.
USB PORT DEVICE TO BE CONNECTED
USB 1 Official wired controller
USB 2 Ke board or jo stick or other controller
USB 3 Mouse
Please refer to Chapter 3.2 for more connection options.
Chapter 2:Setting Up Cross Hair
2.1 Simple set up steps
2.1.1 Step 1: Connect to PC (PC MODE)

User Manual of Cross Hair
http//www.reasnow.com PAGE 7 / 24
● Please connect our Cross Hair according to the figure above, using the USB cable
included in the package. Make sure that there is no controller, keyboar , mouse,
joystick or anything else plugge into it. And when Cross Hair LOGO is white, it enters
into PC MODE, and can then be configured on PC.
2.1.2 Step 2: Run Cross Hair Manager (Win ows OS only)
Run Cross Hair Manager which can be downloaded from http://www.reasnow.com
Please choose the latest version.
2.1.3 Step 3: Choosing console an game

User Manual of Cross Hair
http//www.reasnow.com PAGE 8 / 24
● Choose the game console ou are going to use b clicking on the right-arrow button
● If there is alread a configuration of the game ou want to pla , choose the configuration
and click on the “Edit” button, this is the fastest wa .
● If there is no existing suitable configuration, just click on the “New” button to add a new
configuration. Make an changes as ou see fit.
● If the game ou want to pla do not exist, just choose the “custom game”. This setting
has the highest possibilit of working, as most games are not varied ver much from each
other.
● Remember to mark the configuration most frequently use as “Start Up”. Click
the configuration first then click on the “Start Up” button. Then this configuration will
be activated automaticall ever time when Cross Hair is powered on.
2.1.4 Step 4: E it Configuration
For convenience, ou can use the default settings, but should remember the ke s’
mapping, while advanced users can choose their favorite settings. For details of ever
setting, please refer to chapter 2.2

User Manual of Cross Hair
http//www.reasnow.com PAGE 9 / 24
2.1.5 Step 5: Save an Exit
You should save the configuration first, before exiting Manager, and after that, unplug the
Cross Hair from PC.
Changes you ma e will not be save in you Cross Hair until you have clicke on the
“Save” button. Do not shake the USB cable, unplug it, or turn off your PC uring the
saving. These behaviors will amage your Cross Hair.
This is the final step before you can enjoy gaming. But if you want to know Cross
Hair better, the following chapters are also very important.
2.2 Basic Settings
2.2.1 Choose platform
B clicking on the right-arrow button, ou can choose from PS4/PS3/XBOX ONE/XBOX
360.
2.2.2 Save configuration
An change made to an existing configuration or made b adding a new one has to be
saved in Cross Hair b this button.
2.2.3 E it an existing configuration

User Manual of Cross Hair
http//www.reasnow.com PAGE 10 / 24
If ou want to change existing configurations, ou can use “Edit” button for this purpose.
2.2.4 A a new configuration
If a new configuration is our choice, just click on the “New” button, and ou can then
make detailed changes.
2.2.5 Copy a configuration
If ou would like to add a configuration that is similar to an existing one, ou can cop a
configuration and make necessar changes.
2.2.6 Delete a configuration
If ou want to delete a configuration, click it first and then click on the “Delete” button.
2.2.7
Set a certain configuration as Start Up.
Select one configuration first and click on the “Start Up” button. Then this configuration will
be activated automaticall ever time when Cross Hair is powered on.
2.2.8 Key mapping
Click the mapped ke icon, and ou will enter into a mapping dialog as shown below.

User Manual of Cross Hair
http//www.reasnow.com PAGE 11 / 24
Firstl , choose the hardware from the options of mouse, ke board, jo stick and NONE.
Secondl , use Auto Detect or Drop-down menu , to
select the ke ou want to use, and to substitute a certain ke on controller.
Thirdl , click OK to end this mapping.
2.2.9 Change the name you want to use
in this fiel .
2.2.10 Clicking the color will change the color of LOGO.
This color can indicate which configuration ou are using.
2.2.11 Choose the hotkey for this configuration for
fast activation.
Once the hotke is invoked in PLAY MODE, this configuration will be activated instantl .
Please pa attention to this function, it can not onl be used to swap between different
games but also to swap between different battle modes. Such as, ou set up a
configuration for infantr in BF4 and ou also set up another configuration for tank in BF4
with different ke mapping and HIP/ADS sensitivit . With this function in hand, ou can
swap between different battle modes instantl during our gaming.
2.2.12 Stick mapping

User Manual of Cross Hair
http//www.reasnow.com PAGE 12 / 24
● Choose ke s from ke board or mouse or jo stick to replace left stick and right stick.
● The dead-zone here is used to adjust the original controller, the one plugged into USB
port 1. Leave it as default, if ou have no trouble with the sticks on controller. A smaller
value means more sensitive, but that ma also cause trouble for controlling.
2.2.13 Joystick setting
The dead-zone here is used to adjust the third-part controller(Jo stick), the one plugged
into USB port 2 or 3. Leave it as default, if ou have no trouble with that controller.
Such as: Logitech G13,Son Move Navigation Controller,Logitech Attack3, and other
controllers which are used to replace the original one.
2.2.14 Mouse Sensitivity
T picall in FPS games, ou will have two modes of shooting: HIP and ADS (Aim Down
Sight), so ou have to set them separatel . If ou are not familiar with these values, just
leave them as default.
Please remember to set mouse’s DPI and game’s LOOK sensitivit to maximum first. And
after these two procedures are done, if the mouse is too slow, ou need to set HIP and
ADS sensitivit to a bigger value. If the mouse is too fast, ou need to set HIP and ADS
sensitivit to a smaller value.
As for YX Ratio, it’s the ratio of mouse’s Y and X direction movement speed. Do not

User Manual of Cross Hair
http//www.reasnow.com PAGE 13 / 24
change it, unless ou understand its meaning.
2.2.15 Primary an secon ary mapping
This right-arrow button is used to switch between primar and secondar mapping.
In this wa , ou can have two options for one ke on the original controller.
As default, the secondar mapping is used for a third-part controller. You can change that
to whatever ou like.
2.2.16 More settings

User Manual of Cross Hair
http//www.reasnow.com PAGE 14 / 24
This button will bring ou to options that are not frequentl used.
2.2.17 Notification settings
Maximum Turn Spee in ication:
If selected, when turn speed exceeds maximum, the LOGO will flash red twice.
Aim Down Sight in ication:
If selected, when ADS is activated, the LOGO will flash green twice.
2.2.18 Flip vertical movement
Once enabled, our mouse’s vertical movement will be flipped.
2.2.19 Aim Down Sight toggle
Once enabled, ou can activate ADS firing b clicking the corresponding ke , such as the
right ke of mouse. And clicking again on the same ke will deactivate ADS firing. You do
not need to hold the ke all the while.
2.2.20 Custom Game options
These 2 options are used onl for Custom Game, do not change them in preset games.
Aim Down Sight: ADS function ma be invoked b different ke on controller, due to
different game and console. If ou are using a Custom Game configuration, please select
correct ke of ADS.

User Manual of Cross Hair
http//www.reasnow.com PAGE 15 / 24
Dea zone Type: If ou are using a Custom Game configuration, please select correct
t pe of Deadzone according to the game.
2.2.21 Loa Behavior
This option will change the behavior of our configuration, after it was activated b hotke .
There are three choices: Standard, Temporar Hold, and Temporar Toggle.
Stan ar : The configuration is activated b its hotke and sta s active.
Temporary Hol : The configuration is activated onl when its hotke is pressed and the
previous configuration will be reloaded back when the hotke is released.
Temporary Toggle: The configuration is activated after its hotke is invoked and the
previous configuration will be reloaded back when the hotke is invoked again.
2.2.22 Swap L/R sticks
Once the ke is clicked, it will swap the functions of L/R stick. Clicking it again will restore
the original state.
2.3 Global Settings
2.3.1 Previous an next configuration
These ke s can be alternative wa s to activate a configuration instead of the hotke .
2.4 Setting up in-game (CONFIG MODE)
We provide our users with this function for the most flexible and comfortable setting
experience. Although ever thing of Cross Hair can be configured on PC using its Manager,
ou will like setting it up in-game, for this procedure will give ou instant feed back when
changing the settings.
An time in game, just press SHARE+OPTIONS
(
PS4 platform
)
ke s on our controller to
enter CONFIG MODE and the LOGO’s light will be turned off in this mode.
Different platform has different ke s to use.
Game Console Controller Keys to enter/exit CONFIG MODE
PS4 Dual Shock 4 SHARE+OPTIONS
PS3 Dual Shock 3 SELECT+START

User Manual of Cross Hair
http//www.reasnow.com PAGE 16 / 24
XBOX ONE VIEW+MENU
XBOX 360 BACK+START
In CONFIG MODE, ou can use the controller to change HIP and ADS sensitivit as well
as ke mapping.
Color an Soun in CONFIG MODE:
KEY COLOR BEEP Functions
D-Pad Up flash red Higher pitch beep
HIP ADD
D-Pad Down flash red Lower pitch beep HIP SUB
D-Pad Right flash green Higher pitch beep
ADS ADD
D-Pad Left flash green Lower pitch beep
ADS SUB
flash blue Normal beep Ke mapping
After changing settings to ou liking, just press the combination ke s again, and ou will
exit the CONFIG MODE, and return to PLAY MODE.
2.4.1 A justing HIP sensitivity (CONFIG MODE)
D-Pad Up ke is for increasing HIP sensitivit . You will see a flashing red light and hear a
higher pitch sound once the ke is pressed.
D-Pad Down ke is for decreasing HIP sensitivit . You will see a flashing red light and hear
a lower pitch sound once the ke is pressed.
2.4.2 A justing ADS sensitivity (CONFIG MODE)
D-Pad Right ke is for increasing ADS sensitivit . You will see a flashing green light and
hear a higher pitch sound once the ke is pressed.
D-Pad Left ke is for decreasing ADS sensitivit . You will see a flashing green light and
hear a lower pitch sound once the ke is pressed.
2.4.3 Mapping keys (CONFIG MODE)
In CONFIG MODE, to begin a ke mapping, ou should press the PS ke (PS4/PS3) or
GUIDE ke (XBOX ONE/360). Then the LOGO will show flashing blue. This means ou
can choose one ke on the controller to be mapped.

User Manual of Cross Hair
http//www.reasnow.com PAGE 17 / 24
Once the ke on the controller is pressed, LOGO will show a stable blue light, and then
wait for the corresponding ke on the ke board, mouse, jo stick, etc. After selecting our
ke , Cross Hair will keep flashing blue again. Then a new ke mapping can be continued.
Just like the general ke ’s mapping, if ou are planning to use ke s on ke board or mouse
to replace stick on controller, push the stick to its maximum on one direction (such as Up
direction), LOGO will show a stable blue light, and then wait for the corresponding ke on
the ke board, mouse, etc. After selecting our ke , Cross Hair will keep flashing blue
again. Then ou can continue to map a new direction of this stick.
After mapping all the ke s, ou can press SHARE+OPTIONS
(
PS4 platform
)
ke s on our
controller to exit the CONFIG MODE, and end the mapping procedure.
Mapping ke s in CONFIG MODE is recommended, as ou can get instant response
in-game, and all the ke s can be mapped. On the contrar , in PC MODE, some special
ke s of our mouse, ke board or jo stick ma not be detected due to OS's limitations.
It is especially recommen e to use CONFIG MODE for mapping keys of joystick or
controller.
Chapter 3:Playing Games
There are still 3 steps before playing
Step 1: Set mouse DPI to Maximum
Step 2: Set sensitivity in game to Maximum
Step 3: Change HIP/ADS sensitivity of Cross Hair accor ing to your nee
3.1 Step 1: Set mouse DPI to Maximum
If you have a configurable mouse, please follow 3.1.1 – 3.1.4.
If you have a mouse which can not be configure , just skip 3.1.1 – 3.1.4.
If your mouse is configurable but have no on-boar memory in it that means your
settings will be lost when the mouse is unplugge from PC, remember to set its DPI
to maximum by using the DPI button on it every time you use the mouse with Cross
Hair.
3.1.1 Mouse DPI(CPI)
Make sure the mouse ou are using is configured at its highest DPI, or ou should connect
it to a PC, and use some software from the producer to change the DPI to maximum.
Remember high DPI can give you better experience in game.

User Manual of Cross Hair
http//www.reasnow.com PAGE 18 / 24
3.1.2 Mouse Report Rate
Set our mouse USB polling rate to 500 or 1000.
3.1.3 Mouse Button Function
Buttons of some mouse can be configured. If ou want to use them to replace buttons
from controller, ou should set them as standard ke s of ke board or mouse, do not set
them as combination ke s or special function ke s. For example, Ctrl + C, Volume
Up/Down, DPI up/down are all unacceptable.
3.1.4 Save to On-Boar Memory
Some mice have on-board memor to store DPI and other settings, please remember to
save all these in On-Board Memor .
Other mice have no on-board memor , but their DPI can be adjusted, so ou need to set
their DPI to maximum ever time powered on.
3.2 Step 2: Set sensitivity in game to Maximum
Please set the game’s “SENSITIVITY” or “LOOK SENSITIVITY” to maximum in the game
on game console. It ma be called insane, maximum, 10, 20 or 100%.

User Manual of Cross Hair
http//www.reasnow.com PAGE 19 / 24
3.3 Step 3: Change HIP/ADS sensitivity of Cross Hair accor ing to your nee
There are 2 ways to change Cross Hair sensitivit .
WAY 1 – using PC software (Manager):
Cross Hair has 2 sensitivities : HIP Sensitivit and ADS Sensitivit
The bigger the value, the faster the mouse movement. You can change them to a suitable
value, according to our mouse and game.
HIP: Shooting without aiming optics
ADS: Shooting with aiming optics
ADS sensitivity is normally bigger than HIP.
YX Ratio:
It’s the ratio of mouse's speed in Y and X directions. Do not change it, unless
ou understand its meaning.

User Manual of Cross Hair
http//www.reasnow.com PAGE 20 / 24
WAY 2 – using controller in Config Mo e:
1.
An time in game, just press SHARE+OPTIONS
(
PS4 platform
)
ke s on our controller
to enter CONFIG MODE and the LOGO’s light will be turned off in this mode.
2.
Use the Dpad ke s on controller to change HIP and ADS sensitivit of Cross Hair.
3.
After changing settings to ou liking, just press the combination ke s again, and ou will
exit the CONFIG MODE, and return to PLAY MODE.
Other important things:
●
Battery of controller or mouse
Make sure our controller is full charged and off, and the mouse is also full charged, if
there is batter in it.
●
Controller’s layout in game
Your controller’s la out should be set as default, and change of these will confuse Cross
Hair.
3.4 Ways to Use Cross Hair
Connect all evices (controller/keyboar /mouse) to Cross Hair first, an then
connect Cross Hair to game console.
1. Use a keyboar an mouse instea of controller
Other manuals for Cross Hair
4
Table of contents